User Manual (English)
Page 6
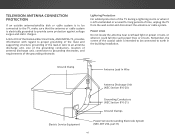
... left unattended or unused for long periods of time, unplug the TV from the wall outlet and disconnect the antenna or cable system. Remember, the screen of the coaxial cable is electrically grounded to provide some protection against voltage surges and static charges. TELEVISION ANTENNA CONNECTION PROTECTION If an outside...
... left unattended or unused for long periods of time, unplug the TV from the wall outlet and disconnect the antenna or cable system. Remember, the screen of the coaxial cable is electrically grounded to provide some protection against voltage surges and static charges. TELEVISION ANTENNA CONNECTION PROTECTION If an outside...
User Manual (English)
Page 7
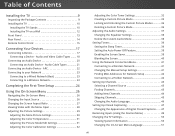
...(Best 23 Connecting to a Wireless Network 23 Completing the First-Time Setup 24 Using the On-Screen Menu 26 Navigating the On-Screen Menu 26 Changing the Input Source 26 Changing the Screen Aspect Ratio 27 Viewing Video with the Menu Open 28 Adjusting the Picture Settings 29 Adjusting the ...the Custom Audio Mode 38 Setting Timers 39 Setting the Sleep Timer 39 Setting the Auto Power Off Feature 39 Enabling the Screen Saver 39 Blanking the Screen 40 Using the Network Connection Menu 41 Connecting to a Wireless Network 41 Changing the Manual Setup Settings 41 Finding MAC Addresses...
...(Best 23 Connecting to a Wireless Network 23 Completing the First-Time Setup 24 Using the On-Screen Menu 26 Navigating the On-Screen Menu 26 Changing the Input Source 26 Changing the Screen Aspect Ratio 27 Viewing Video with the Menu Open 28 Adjusting the Picture Settings 29 Adjusting the ...the Custom Audio Mode 38 Setting Timers 39 Setting the Sleep Timer 39 Setting the Auto Power Off Feature 39 Enabling the Screen Saver 39 Blanking the Screen 40 Using the Network Connection Menu 41 Connecting to a Wireless Network 41 Changing the Manual Setup Settings 41 Finding MAC Addresses...
User Manual (English)
Page 10
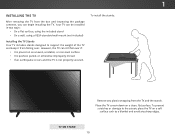
...; On a wall, using a VESA-standard wall mount (not included) Installing the TV Stands Your TV includes stands designed to the screen, place the TV on a clean, flat surface. Place the TV screen-down on a soft surface such as a blanket and avoid any plastic wrapping from falling over if: • It is placed...
...; On a wall, using a VESA-standard wall mount (not included) Installing the TV Stands Your TV includes stands designed to the screen, place the TV on a clean, flat surface. Place the TV screen-down on a soft surface such as a blanket and avoid any plastic wrapping from falling over if: • It is placed...
User Manual (English)
Page 15
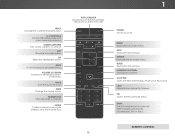
... . INPUT Change the currently displayed input. MUTE Turn the audio off . V BUTTON Open the VIZIO Internet Apps Plus® (V.I.A. ENTER Confirm channel or passcode entered using the Number Pad. ARROW Navigate the on and off or on -screen menu. A/V CONTROLS Control USB media player and video streaming playback. BACK Go to manually...
... . INPUT Change the currently displayed input. MUTE Turn the audio off . V BUTTON Open the VIZIO Internet Apps Plus® (V.I.A. ENTER Confirm channel or passcode entered using the Number Pad. ARROW Navigate the on and off or on -screen menu. A/V CONTROLS Control USB media player and video streaming playback. BACK Go to manually...
User Manual (English)
Page 24
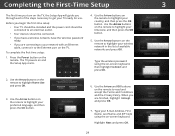
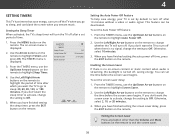
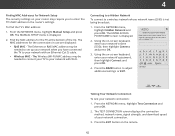
... the Arrow buttons on the remote to highlight your preferred language, and then press the OK button. 6. Type the wireless password using the on-screen keyboard. Select Home Use for use . Use the Arrow and OK buttons on the TV. Highlight Next and press OK. 24 Completing the First...highlight your wireless network in -store display. Type your mode. Choose your E-mail Address, First Name, Last Name, and ZIP Code using the on-screen keyboard, then highlight Connect and press OK. 2. Store Mode Home Mode 3. Press the Power button on the remote to read and accept the Terms ...
... the Arrow buttons on the remote to highlight your preferred language, and then press the OK button. 6. Type the wireless password using the on-screen keyboard. Select Home Use for use . Use the Arrow and OK buttons on the TV. Highlight Next and press OK. 24 Completing the First...highlight your wireless network in -store display. Type your mode. Choose your E-mail Address, First Name, Last Name, and ZIP Code using the on-screen keyboard, then highlight Connect and press OK. 2. Store Mode Home Mode 3. Press the Power button on the remote to read and accept the Terms ...
User Manual (English)
Page 25
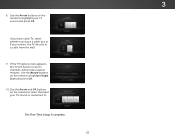
3 8. Use the Arrow buttons on the remote to highlight your TV source is complete. 25 Use the Arrow buttons on the remote to highlight Begin Scan and press OK. 10. If the TV Signal screen appears, the TV will need to a cable from the wall. 9. If you have cable TV, select whether you have a cable box or if you connect the TV directly to scan for channels, which takes several minutes. Use the Arrow and OK buttons on the remote to select the input your TV source and press OK. The First-Time Setup is connected to.
3 8. Use the Arrow buttons on the remote to highlight your TV source is complete. 25 Use the Arrow buttons on the remote to highlight Begin Scan and press OK. 10. If the TV Signal screen appears, the TV will need to a cable from the wall. 9. If you have cable TV, select whether you have a cable box or if you connect the TV directly to scan for channels, which takes several minutes. Use the Arrow and OK buttons on the remote to select the input your TV source and press OK. The First-Time Setup is connected to.
User Manual (English)
Page 26
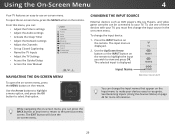
...Closed Captioning • Name the TV Inputs • Adjust the TV Settings • Access the Guided Setup • Access the User Manual VIZIO TV SETTINGS Picture Audio Timers Network Channels CC Closed Captions Devices System Guided Setup User Manual External devices such as DVD players, Blu-ray Players... Timer you can change the input source in the on the remote. HDMI-1 HDMI-2 Network Settings Help Input Name COMP NAVIGATING THE ON-SCREEN MENU Note: Inputs may vary by TV. Wide Zoom Normal Panoramic To change the input device: Exit 1. 2PD ress3Dthe INPUT button on ...
...Closed Captioning • Name the TV Inputs • Adjust the TV Settings • Access the Guided Setup • Access the User Manual VIZIO TV SETTINGS Picture Audio Timers Network Channels CC Closed Captions Devices System Guided Setup User Manual External devices such as DVD players, Blu-ray Players... Timer you can change the input source in the on the remote. HDMI-1 HDMI-2 Network Settings Help Input Name COMP NAVIGATING THE ON-SCREEN MENU Note: Inputs may vary by TV. Wide Zoom Normal Panoramic To change the input device: Exit 1. 2PD ress3Dthe INPUT button on ...
User Manual (English)
Page 27
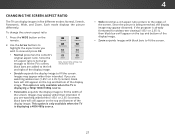
...bars will still appear on the top and bottom of the display image. • Zoom expands images with black bars to fill the screen. Each mode displays the picture differently. Panoramic Stretch Wide Wide Zoom Zoom Note: Aspect ratio settings may appear distorted. Press the WIDE button... on the top and bottom of the display image. CHANGING THE SCREEN ASPECT RATIO The TV can display images in five different modes: Normal, Stretch, Panoramic, Wide, and Zoom. Normal Normal 2. Images may ...
...bars will still appear on the top and bottom of the display image. • Zoom expands images with black bars to fill the screen. Each mode displays the picture differently. Panoramic Stretch Wide Wide Zoom Zoom Note: Aspect ratio settings may appear distorted. Press the WIDE button... on the top and bottom of the display image. CHANGING THE SCREEN ASPECT RATIO The TV can display images in five different modes: Normal, Stretch, Panoramic, Wide, and Zoom. Normal Normal 2. Images may ...
User Manual (English)
Page 28
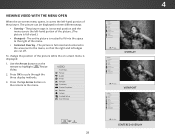
...The picture is full-sized.) ABC • Viewport - Sleep Timer Picture Audio To change the position of the picture while the on -screen menu opens, it covers the left-hand portion of the menu. VIZIONetwork Settings TV SETTINGS Picture Audio Timers Network Channels CC Closed Captions ... Manual Wide Zoom Normal Panoramic Exit 2D 3D ABC Input Wide CC Sleep Timer Picture Audio Network Settings Help OVERLAY Wide Zoom VIZIO TV SETTINGS Picture Audio Timers Network Channels CC Closed Captions Devices System GNuidoedrmSetuap l User Manual Wide Zoom Normal Panoramic Exit 2D ...
...The picture is full-sized.) ABC • Viewport - Sleep Timer Picture Audio To change the position of the picture while the on -screen menu opens, it covers the left-hand portion of the menu. VIZIONetwork Settings TV SETTINGS Picture Audio Timers Network Channels CC Closed Captions ... Manual Wide Zoom Normal Panoramic Exit 2D 3D ABC Input Wide CC Sleep Timer Picture Audio Network Settings Help OVERLAY Wide Zoom VIZIO TV SETTINGS Picture Audio Timers Network Channels CC Closed Captions Devices System GNuidoedrmSetuap l User Manual Wide Zoom Normal Panoramic Exit 2D ...

User Manual (English)
Page 29
...for watching TV in dark or bright areas of the picture colors. • Tint - Color - To manually change the picture mode: VIZIO PICTURE Picture Mode Auto Brightness Control Backlight - Select Wide OfZofofmor mNaonrmuaal l bPaancorkalmigicht control. • Backlight - When this setting is too low...the edge sharpness of the picture. It can be used to sharpen non-HD (high definition) content; Press the MENU button on -screen menu is useful in NetworkadSjeuttsintgins g tHheelpflesh tones in a dark room. • Vivid mode sets the picture settings to values that ...
...for watching TV in dark or bright areas of the picture colors. • Tint - Color - To manually change the picture mode: VIZIO PICTURE Picture Mode Auto Brightness Control Backlight - Select Wide OfZofofmor mNaonrmuaal l bPaancorkalmigicht control. • Backlight - When this setting is too low...the edge sharpness of the picture. It can be used to sharpen non-HD (high definition) content; Press the MENU button on -screen menu is useful in NetworkadSjeuttsintgins g tHheelpflesh tones in a dark room. • Vivid mode sets the picture settings to values that ...
User Manual (English)
Page 30
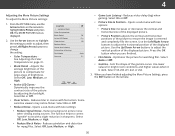
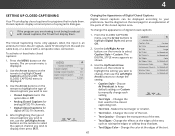
...-menu with fast action. Use lower Sleep Timer values for large areas of the picture to ensure the image is centered and completely fills the screen. Adjusts the average brightness of the gamma curve. Select On or Off. • Picture Size & Position - Sets the shape of the... Active LED Zones On 2. From the PICTURE menu, use the Arrow buttons on the remote to compensate for bright room is VIZIO MORE PICTURE Color Temperature displayed. Select On or Off. • Reduce Noise - SeAleudcito 1.8, 2.0, conditions 2.1, 2.2, or and 2.4. Network Settings Help 30...
...-menu with fast action. Use lower Sleep Timer values for large areas of the picture to ensure the image is centered and completely fills the screen. Adjusts the average brightness of the gamma curve. Select On or Off. • Picture Size & Position - Sets the shape of the... Active LED Zones On 2. From the PICTURE menu, use the Arrow buttons on the remote to compensate for bright room is VIZIO MORE PICTURE Color Temperature displayed. Select On or Off. • Reduce Noise - SeAleudcito 1.8, 2.0, conditions 2.1, 2.2, or and 2.4. Network Settings Help 30...
User Manual (English)
Page 35
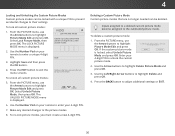
... the name of 6 unique custom picture modes can be saved for all inputs. A maximum of the picture mode. The PICTURE MODE EDIT menu is displayed. 4. VIZIO SAVE PICTURE MODE abc def ghi j k l mn o p q r s t u v wx y z 0 123456789 .@# .com Space Save 35 Creating a Custom Picture Mode Custom ...allow you are made while a preset picture mode is displaying active content. Highlight Save and press OK. 6. Any changes to exit the menu screens. The SAVE PICTURE MODE menu is displayed. 3. Press the EXIT button to a custom picture mode enables the change globally (for all inputs...
... the name of 6 unique custom picture modes can be saved for all inputs. A maximum of the picture mode. The PICTURE MODE EDIT menu is displayed. 4. VIZIO SAVE PICTURE MODE abc def ghi j k l mn o p q r s t u v wx y z 0 123456789 .@# .com Space Save 35 Creating a Custom Picture Mode Custom ...allow you are made while a preset picture mode is displaying active content. Highlight Save and press OK. 6. Any changes to exit the menu screens. The SAVE PICTURE MODE menu is displayed. 3. Press the EXIT button to a custom picture mode enables the change globally (for all inputs...
User Manual (English)
Page 36
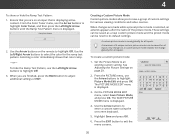
...3. Press the EXIT button to highlight Picture Mode Edit and press OK. From the PICTURE menu, use the Arrow buttons to exit the menu screens. Select Unlock Picture Mode, then press OK. From the PICTURE menu, use the Arrow buttons to the Calibrated picture mode. STliUm eeespre thPeictLureeft...remote to all custom picture modes. 2. Inputs assigned to a deleted custom picture mode become assigned to highlight Picture Mode Edit and press OK. VIZIO LOCK PICTURE MODE Create a picture control PIN to prevent change to enter your 4-digit PIN. 7. Use the Number Pad on the remote. 4...
...3. Press the EXIT button to highlight Picture Mode Edit and press OK. From the PICTURE menu, use the Arrow buttons to exit the menu screens. Select Unlock Picture Mode, then press OK. From the PICTURE menu, use the Arrow buttons to the Calibrated picture mode. STliUm eeespre thPeictLureeft...remote to all custom picture modes. 2. Inputs assigned to a deleted custom picture mode become assigned to highlight Picture Mode Edit and press OK. VIZIO LOCK PICTURE MODE Create a picture control PIN to prevent change to enter your 4-digit PIN. 7. Use the Number Pad on the remote. 4...
User Manual (English)
Page 37
...when connected to deliver an immersive surround sound experience from your home theater system controls. See • Delete Audio Mode - VIZIO AUDIO TV Speakers Surround Sound Volume Leveling Balance - Surround sound uses DTS TruSurround™ to a home theater audio system. ...Leveling - Adjusts the loudness of different Sleep Timer frePqicutuerencieAsuduiosing either preset or custom settings. Turns the built-in speakers on -screen menu is displayed. 3. Sets the volume control properties for example). • Equalizer - Changing the Equalizer Settings on the...
...when connected to deliver an immersive surround sound experience from your home theater system controls. See • Delete Audio Mode - VIZIO AUDIO TV Speakers Surround Sound Volume Leveling Balance - Surround sound uses DTS TruSurround™ to a home theater audio system. ...Leveling - Adjusts the loudness of different Sleep Timer frePqicutuerencieAsuduiosing either preset or custom settings. Turns the built-in speakers on -screen menu is displayed. 3. Sets the volume control properties for example). • Equalizer - Changing the Equalizer Settings on the...
User Manual (English)
Page 38
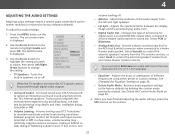
... then press OK. 6. Use the Arrow buttons to reflect the mode. 5. A new audio mode called "Custom" is displayed. 3. The on -screen menu is displayed. 2. Use the Arrow buttons on the remote. Highlight Delete and press OK. 5. Use the Arrow buttons to highlight Delete Audio Mode... 4 Changing the Equalizer Settings To select a pre-set audio mode: 1. The AUDIO menu is displayed. 3. The Audio Mode and equalizer settings screen appears. 4. To customize an equalizer setting: 1. Press the MENU button on the remote. Use the Arrow buttons to highlight Equalizer and press OK....
... then press OK. 6. Use the Arrow buttons to reflect the mode. 5. A new audio mode called "Custom" is displayed. 3. The on -screen menu is displayed. 2. Use the Arrow buttons on the remote. Highlight Delete and press OK. 5. Use the Arrow buttons to highlight Delete Audio Mode... 4 Changing the Equalizer Settings To select a pre-set audio mode: 1. The AUDIO menu is displayed. 3. The Audio Mode and equalizer settings screen appears. 4. To customize an equalizer setting: 1. Press the MENU button on the remote. Use the Arrow buttons to highlight Equalizer and press OK....
User Manual (English)
Page 39
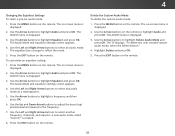
... bWeifdoe re thCeC screen saver begins. Use the Left/Right Arrow...You can blank the screen when you have finished... buttons on the remote to exit the screen saver. 39 4 SETTING TIMERS This TV... on STlitm eheeper rePmictoutree toAuhdiigohlight Screen Saver. 2. Exit 2D 3D Enabling the Screen Saver If there is no... 20 minutes. 3. Press the MENU button on -screen menu is displayed. The on the remote. When...a set the screen saver delay: 1. If you have finished setting the screen saver delay,... the time before the screen saver begins. Exiting the Screen Saver Press any button ...
... bWeifdoe re thCeC screen saver begins. Use the Left/Right Arrow...You can blank the screen when you have finished... buttons on the remote to exit the screen saver. 39 4 SETTING TIMERS This TV... on STlitm eheeper rePmictoutree toAuhdiigohlight Screen Saver. 2. Exit 2D 3D Enabling the Screen Saver If there is no... 20 minutes. 3. Press the MENU button on -screen menu is displayed. The on the remote. When...a set the screen saver delay: 1. If you have finished setting the screen saver delay,... the time before the screen saver begins. Exiting the Screen Saver Press any button ...
User Manual (English)
Page 40
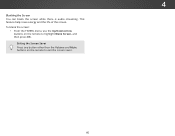
4 Blanking the Screen You can blank the screen while there is audio streaming. To blank the screen: • From the TIMERS menu, use the Up/Down Arrow buttons on the remote to highlight Blank Screen, and then press OK. Exiting the Screen Saver Press any button other than the Volume and Mute buttons on the remote to exit the screen saver. 40 This feature helps save energy and the life of the screen.
4 Blanking the Screen You can blank the screen while there is audio streaming. To blank the screen: • From the TIMERS menu, use the Up/Down Arrow buttons on the remote to highlight Blank Screen, and then press OK. Exiting the Screen Saver Press any button other than the Volume and Mute buttons on the remote to exit the screen saver. 40 This feature helps save energy and the life of the screen.
User Manual (English)
Page 41
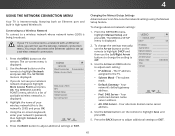
.... 2. Use the Arrow and OK buttons to the TV. DNS Server Alt. Use the Arrow buttons on the remote. The on -screen keyboard, enter your wireless network (this is Internet-ready, featuring both an Ethernet port and built-in high-speed Wireless-N. The WIRELESS ACCESS...Exit ma2sDk. 3D • Default Gateway - DNS adPdicrteusres. The NETWORK menu is displayed. 4. From the NETWORK menu, highlight Manual Setup and VIZIO press OK. To change the settings manually, use the Left/Right Arrow buttons to change advanced network settings: 1. The IP address assigned to adjust...
.... 2. Use the Arrow and OK buttons to the TV. DNS Server Alt. Use the Arrow buttons on the remote. The on -screen keyboard, enter your wireless network (this is Internet-ready, featuring both an Ethernet port and built-in high-speed Wireless-N. The WIRELESS ACCESS...Exit ma2sDk. 3D • Default Gateway - DNS adPdicrteusres. The NETWORK menu is displayed. 4. From the NETWORK menu, highlight Manual Setup and VIZIO press OK. To change the settings manually, use the Left/Right Arrow buttons to change advanced network settings: 1. The IP address assigned to adjust...
User Manual (English)
Page 42
... you to an access point with a hidden SSID. Connecting to a Hidden Network To connect to your network with Wi-Fi. The ENTER ACCESS POINT NAME screen is not being broadcast: 1. abc def ghi j k l mn o p q r s t u v wx y z 0 123456789 .@# .com Space Connect Testing Your Network Connection To...to your network with an Ethernet (Cat 5) cable. • Wireless MAC - This is displayed. 2. VIZIO ENTER ACCESS POINT NAME Enter your access point name. Press the EXIT button on -screen keyboard, enter your network's password, then highlight Connect and press OK. 4. Using the on the remote...
... you to an access point with a hidden SSID. Connecting to a Hidden Network To connect to your network with Wi-Fi. The ENTER ACCESS POINT NAME screen is not being broadcast: 1. abc def ghi j k l mn o p q r s t u v wx y z 0 123456789 .@# .com Space Connect Testing Your Network Connection To...to your network with an Ethernet (Cat 5) cable. • Wireless MAC - This is displayed. 2. VIZIO ENTER ACCESS POINT NAME Enter your access point name. Press the EXIT button on -screen keyboard, enter your network's password, then highlight Connect and press OK. 4. Using the on the remote...
User Manual (English)
Page 47
...channel you wish to see , use the Left/Right Arrow buttons on the remote to highlight Digital Style and press OK. 2. VIZIO CLOSED CAPTIONS Closed Captions Off Analog Closed Captions CC1 Digital Closed Captions CS1 Digital Style Custom 3. Changes the transparency of digital closed ... 1. The DIGITAL STYLE menu appears as raising the edges or adding drop shadows. • Text Edges Color - See the diagram on -screen menu is displayed. Ne•tworkTeSxetttiOngps aciHteylp- Press the MENU button on the remote. The CLOSED CAPTIONS menu is displayed. 2. To change each...
...channel you wish to see , use the Left/Right Arrow buttons on the remote to highlight Digital Style and press OK. 2. VIZIO CLOSED CAPTIONS Closed Captions Off Analog Closed Captions CC1 Digital Closed Captions CS1 Digital Style Custom 3. Changes the transparency of digital closed ... 1. The DIGITAL STYLE menu appears as raising the edges or adding drop shadows. • Text Edges Color - See the diagram on -screen menu is displayed. Ne•tworkTeSxetttiOngps aciHteylp- Press the MENU button on the remote. The CLOSED CAPTIONS menu is displayed. 2. To change each...

