
E3D470VX Quick Start Guide
Page 2
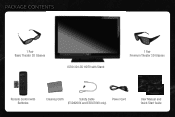
PACKAGE CONTENTS 1 Pair Basic Theater 3D Glasses VIZIO 3D LCD HDTV with Stand 1 Pair Premium Theater 3D Glasses 1 Remote Control with Batteries Cleaning Cloth Safety Cable Power Cord (E3D420VX and E3D470VX only) User Manual and Quick Start Guide
PACKAGE CONTENTS 1 Pair Basic Theater 3D Glasses VIZIO 3D LCD HDTV with Stand 1 Pair Premium Theater 3D Glasses 1 Remote Control with Batteries Cleaning Cloth Safety Cable Power Cord (E3D420VX and E3D470VX only) User Manual and Quick Start Guide
E3D470VX Quick Start Guide
Page 3
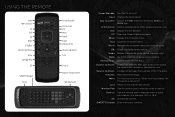
...Dash (-): Use with number pad to the previous on-screen menu options. Arrow: Navigate the on -screen menu. VIA Shortcuts: Control VIZIO Internet Apps. Volume Up/Down: Increase or decrease the loudness of the button, the channel will increase or decrease by one. V Button... sound off . A/V Controls: Control external device (CEC-enabled devices only). Back: Go to manually enter a digital sub-channel. (For example, 18-4 or 18-5.) 3D: Activate 3D content. Last: Return to manually enter a channel. Guide: Display the episode guide (digital channels only). Info: Display the Info...
...Dash (-): Use with number pad to the previous on-screen menu options. Arrow: Navigate the on -screen menu. VIA Shortcuts: Control VIZIO Internet Apps. Volume Up/Down: Increase or decrease the loudness of the button, the channel will increase or decrease by one. V Button... sound off . A/V Controls: Control external device (CEC-enabled devices only). Back: Go to manually enter a digital sub-channel. (For example, 18-4 or 18-5.) 3D: Activate 3D content. Last: Return to manually enter a channel. Guide: Display the episode guide (digital channels only). Info: Display the Info...
E3D470VX Quick Start Guide
Page 10
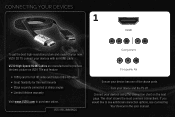
...your devices using the connection chart on the next page. CONNECTING YOUR DEVICES 1 HDMI To get the best high-resolution picture and sound on VIZIO TVs and feature: • 1080p and for full HD video and future Ultra-HD video • Great flexibility for thin wall mounts •... Stays securely connected at sharp angles • Limited lifetime warranty Visit www.VIZIO.com to purchase online. VIZIO High Speed HDMI Cables are manufactured to see additional connection options, see Connecting Your Devices in the user manual. Turn your device has one of the above ports. Connect your devices ...
...your devices using the connection chart on the next page. CONNECTING YOUR DEVICES 1 HDMI To get the best high-resolution picture and sound on VIZIO TVs and feature: • 1080p and for full HD video and future Ultra-HD video • Great flexibility for thin wall mounts •... Stays securely connected at sharp angles • Limited lifetime warranty Visit www.VIZIO.com to purchase online. VIZIO High Speed HDMI Cables are manufactured to see additional connection options, see Connecting Your Devices in the user manual. Turn your device has one of the above ports. Connect your devices ...
E3D470VX Quick Start Guide
Page 13
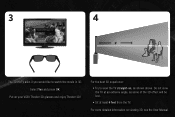
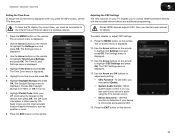
Do not view the TV at an extreme angle, as shown above. Put on viewing 3D, see the User Manual. Select Yes and press OK. For the best 3D experience: • Try to watch the movie in 3D. For more detailed information on your VIZIO Theater 3D glasses and enjoy Theater 3D! 3 4 6' The 3D HDTV asks if you would like to view the TV straight-on, as some of the 3D effect will be lost. • Sit at least 6 feet from the TV.
Do not view the TV at an extreme angle, as shown above. Put on viewing 3D, see the User Manual. Select Yes and press OK. For the best 3D experience: • Try to watch the movie in 3D. For more detailed information on your VIZIO Theater 3D glasses and enjoy Theater 3D! 3 4 6' The 3D HDTV asks if you would like to view the TV straight-on, as some of the 3D effect will be lost. • Sit at least 6 feet from the TV.
E3D470VX Quick Start Guide
Page 14
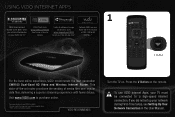
... files over regular data files, delivering a superior streaming experience with fewer delays. VIZIO RECOMMENDS Turn the TV on the remote. If you activate Blockbuster on demand. Press the V Button on . USING VIZIO INTERNET APPS FREE Entertainment Bundle worth $25+ when you did not set up ...your network during First-Time Setup, see Setting Up Your Network Connection in the User Manual. Listen to purchase online. †See www.blockbuster.com...
... files over regular data files, delivering a superior streaming experience with fewer delays. VIZIO RECOMMENDS Turn the TV on the remote. If you activate Blockbuster on demand. Press the V Button on . USING VIZIO INTERNET APPS FREE Entertainment Bundle worth $25+ when you did not set up ...your network during First-Time Setup, see Setting Up Your Network Connection in the User Manual. Listen to purchase online. †See www.blockbuster.com...
E3D470VX Quick Start Guide
Page 19
...gray bars on -screen menu has guided setup. There are securely attached. I cannot return to the picture. See Adjusting the Picture Settings in the user manual. • Reset the picture settings. Try to play your Blu-ray 3D™ movie again. • Ensure your 3D Blu-ray player's 3D ... your external device (Blu-ray™ or DVD player). • If using the RGB (computer) input, ensure you have a 3D Blu-ray™ player, VIZIO Theater 3D glasses, and a Blu-ray 3D™ disc. • Turn your PIN (default is connected (HDMI, Composite, etc). Enter your 3D HDTV and...
...gray bars on -screen menu has guided setup. There are securely attached. I cannot return to the picture. See Adjusting the Picture Settings in the user manual. • Reset the picture settings. Try to play your Blu-ray 3D™ movie again. • Ensure your 3D Blu-ray player's 3D ... your external device (Blu-ray™ or DVD player). • If using the RGB (computer) input, ensure you have a 3D Blu-ray™ player, VIZIO Theater 3D glasses, and a Blu-ray 3D™ disc. • Turn your PIN (default is connected (HDMI, Composite, etc). Enter your 3D HDTV and...

E3D420VX User Manual
Page 1
THEATER 3D™ LCD HDTV With vizio internet apps™ E3d320vx / e3d420vx / e3d470vx user manual
THEATER 3D™ LCD HDTV With vizio internet apps™ E3d320vx / e3d420vx / e3d470vx user manual
E3D420VX User Manual
Page 3
...additional coverage during the standard warranty period. Welcome Thank You for Choosing VIZIO And congratulations on your VIZIO product, visit our website at www.VIZIO.com or call toll free at www.VIZIO.com • Complete and mail the enclosed registration card Extended Warranties For peace ...site extended warranty service plans. Be sure to inspect the package contents to this manual for safekeeping. To purchase an extended warranty service plan, visit www.VIZIO.com. When Reading this Manual When you to alert you see this symbol, please read these instructions before ...
...additional coverage during the standard warranty period. Welcome Thank You for Choosing VIZIO And congratulations on your VIZIO product, visit our website at www.VIZIO.com or call toll free at www.VIZIO.com • Complete and mail the enclosed registration card Extended Warranties For peace ...site extended warranty service plans. Be sure to inspect the package contents to this manual for safekeeping. To purchase an extended warranty service plan, visit www.VIZIO.com. When Reading this Manual When you to alert you see this symbol, please read these instructions before ...
E3D420VX User Manual
Page 10
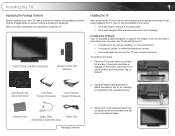
...level surface • It is pushed, pulled, or otherwise improperly moved • If an earthquake occurs and the TV is missing or damaged. User Manual and Quick Start Guide 1 Pair Basic Theater 3D Glasses 1 Pair Premium Theater 3D Glasses 2. However, the TV can still fall over . Package Contents... inserting and tightening the included screws. Installing the TV 1 Inspecting the Package Contents Before installing your inspection, install the TV. VIZIO 3D LED LCD HDTV with Stand Remote Control with attached stand into an upright position and place on a clean, flat surface.
...level surface • It is pushed, pulled, or otherwise improperly moved • If an earthquake occurs and the TV is missing or damaged. User Manual and Quick Start Guide 1 Pair Basic Theater 3D Glasses 1 Pair Premium Theater 3D Glasses 2. However, the TV can still fall over . Package Contents... inserting and tightening the included screws. Installing the TV 1 Inspecting the Package Contents Before installing your inspection, install the TV. VIZIO 3D LED LCD HDTV with Stand Remote Control with attached stand into an upright position and place on a clean, flat surface.

E3D420VX User Manual
Page 14
...Change the input device. Menu: Display the on -screen menu and episode guide. Guide: Display the episode guide (digital channels only). Last: Return to manually enter a digital sub-channel. (For example, 18-4 or 18-5.) 3D: Activate 3D content. Dash (-): Use with number pad to the channel last ...viewed. Arrow: Navigate the on -screen menu. App Launcher: Launch the VOD (VIZIO On-Demand), Netflix, or VUDU App. E3D320VX / E3D420VX / E3D470VX Remote Control Input App Launcher CC Exit OK Back V Button Volume Up/Down Mute Number Pad 3D QWERTY ...
...Change the input device. Menu: Display the on -screen menu and episode guide. Guide: Display the episode guide (digital channels only). Last: Return to manually enter a digital sub-channel. (For example, 18-4 or 18-5.) 3D: Activate 3D content. Dash (-): Use with number pad to the channel last ...viewed. Arrow: Navigate the on -screen menu. App Launcher: Launch the VOD (VIZIO On-Demand), Netflix, or VUDU App. E3D320VX / E3D420VX / E3D470VX Remote Control Input App Launcher CC Exit OK Back V Button Volume Up/Down Mute Number Pad 3D QWERTY ...
E3D420VX User Manual
Page 23
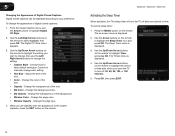
Use the Up/Down Arrow buttons on the remote to manually change each setting. • Text Size - Adjust the size of the background. • Window Color - Change the transparency of the text. • Color - The on ... the appearance of the closed captions: 1. Choose Auto to keep default settings or Custom to highlight Timer and press OK. Change the color of time. E3D320VX / E3D420VX / E3D470VX Activating the Sleep Timer When activated, the TV's sleep timer will turn off after which you are satisfied with the appearance of digital...
Use the Up/Down Arrow buttons on the remote to manually change each setting. • Text Size - Adjust the size of the background. • Window Color - Change the transparency of the text. • Color - The on ... the appearance of the closed captions: 1. Choose Auto to keep default settings or Custom to highlight Timer and press OK. Change the color of time. E3D320VX / E3D420VX / E3D470VX Activating the Sleep Timer When activated, the TV's sleep timer will turn off after which you are satisfied with the appearance of digital...
E3D420VX User Manual
Page 24
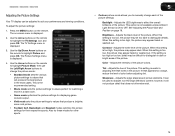
...8226; Football, Golf, Basketball, and Baseball modes optimize the picture settings for other sports. 5 • Custom picture mode allows you to manually change the picture mode: • Standard mode sets the various picture settings to values that does not otherwise exist. 15 Adjusts the intensity... of the picture. Adjusts the LED brightness to affect the overall brilliance of the picture. Adjusts the black level of the picture. E3D320VX / E3D420VX / E3D470VX Adjusting the Picture Settings Your TV display can be used to sharpen non-HD (high definition) content; When ...
...8226; Football, Golf, Basketball, and Baseball modes optimize the picture settings for other sports. 5 • Custom picture mode allows you to manually change the picture mode: • Standard mode sets the various picture settings to values that does not otherwise exist. 15 Adjusts the intensity... of the picture. Adjusts the LED brightness to affect the overall brilliance of the picture. Adjusts the black level of the picture. E3D320VX / E3D420VX / E3D470VX Adjusting the Picture Settings Your TV display can be used to sharpen non-HD (high definition) content; When ...
E3D420VX User Manual
Page 25
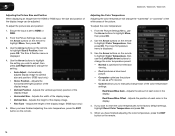
...highlight Size & Position, then press OK. Use the Arrow buttons to highlight the setting you wish to adjust, then press Left/Right Arrow to manually change each of each color in the display. 4. Adjusts the horizontal (left/right) position of the display image. • Vertical Size -...remote to highlight More, then press OK. 3. When you have finished adjusting the color temperature, press the EXIT button on the remote. 5 E3D320VX / E3D420VX / E3D470VX Adjusting the Picture Size and Position When displaying an image from the HDMI or RGB input, the size and position of ...
...highlight Size & Position, then press OK. Use the Arrow buttons to highlight the setting you wish to adjust, then press Left/Right Arrow to manually change each of each color in the display. 4. Adjusts the horizontal (left/right) position of the display image. • Vertical Size -...remote to highlight More, then press OK. 3. When you have finished adjusting the color temperature, press the EXIT button on the remote. 5 E3D320VX / E3D420VX / E3D470VX Adjusting the Picture Size and Position When displaying an image from the HDMI or RGB input, the size and position of ...
E3D420VX User Manual
Page 29
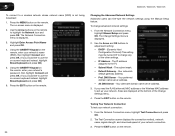
...remote to highlight the Network icon and press OK. The subnet mask. • Default Gateway - Testing Your Network Connection To test your network connection. 3. 5 E3D320VX / E3D420VX / E3D470VX To connect to a wireless network whose network name (SSID) is displayed. 2. Press the EXIT button on the remote. Press the MENU ...button on the remote. 20 Changing the Advanced Network Settings Advanced users can fine-tune the network settings using the Manual Setup feature. Use the Arrow buttons on -screen menu is not being broadcast: 1. From the Network Connection menu, highlight...
...remote to highlight the Network icon and press OK. The subnet mask. • Default Gateway - Testing Your Network Connection To test your network connection. 3. 5 E3D320VX / E3D420VX / E3D470VX To connect to a wireless network whose network name (SSID) is displayed. 2. Press the EXIT button on the remote. Press the MENU ...button on the remote. 20 Changing the Advanced Network Settings Advanced users can fine-tune the network settings using the Manual Setup feature. Use the Arrow buttons on -screen menu is not being broadcast: 1. From the Network Connection menu, highlight...
E3D420VX User Manual
Page 36
...Adjusting the CEC Settings The CEC function on -screen menu is displayed. 3. Press the MENU button on the remote to determine if your device's user manual for details. The on your time zone and press OK. 6. When system audio control is on the remote, then press OK. The Settings menu...buttons on the remote. The Daylight Savings menu is not. 7. Press the EXIT button on the remote to adjust each setting: • CEC Function - E3D320VX / E3D420VX / E3D470VX 5 Setting the Time Zone To ensure the correct time is displayed when you press the INFO button, set the TV's time zone...
...Adjusting the CEC Settings The CEC function on -screen menu is displayed. 3. Press the MENU button on the remote to determine if your device's user manual for details. The on your time zone and press OK. 6. When system audio control is on the remote, then press OK. The Settings menu...buttons on the remote. The Daylight Savings menu is not. 7. Press the EXIT button on the remote to adjust each setting: • CEC Function - E3D320VX / E3D420VX / E3D470VX 5 Setting the Time Zone To ensure the correct time is displayed when you press the INFO button, set the TV's time zone...
E3D420VX User Manual
Page 49
...40 The buttons on the screen. • Ensure all cables are securely attached to a window for the best signal. Connect your TV, contact VIZIO's Support Department. Devices differ; The image quality is no headphones are connected to the TV. • Check the audio connections of the channel may...attached to the TV. • Press the Power/Standby button on the remote or press the Power/ Standby button on . Ensure your device's user manual for channels. The colors on page 6. See Adjusting the Picture Settings on page 15. • Reset the picture settings. • Check all ...
...40 The buttons on the screen. • Ensure all cables are securely attached to a window for the best signal. Connect your TV, contact VIZIO's Support Department. Devices differ; The image quality is no headphones are connected to the TV. • Check the audio connections of the channel may...attached to the TV. • Press the Power/Standby button on the remote or press the Power/ Standby button on . Ensure your device's user manual for channels. The colors on page 6. See Adjusting the Picture Settings on page 15. • Reset the picture settings. • Check all ...


