Download
Page 1
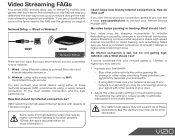
... other video streaming. See the device's user manual for the most reliable connection and the best performance. Wired - Adjust the video quality settings on page 4. Re-buffering is secure. My Internet connection is unsecured, you may not support all of 1.5mbps or higher. If your smart device using a wired network connection for more information.) I do ? Your VIZIO smart device may be stopping momentarily to...
... other video streaming. See the device's user manual for the most reliable connection and the best performance. Wired - Adjust the video quality settings on page 4. Re-buffering is secure. My Internet connection is unsecured, you may not support all of 1.5mbps or higher. If your smart device using a wired network connection for more information.) I do ? Your VIZIO smart device may be stopping momentarily to...

User Manual (English)
Page 3
... your new VIZIO product, read these instructions. • Heed all warnings. • Follow all instructions. • Do not use , and maintenance of the obsolete outlet. • Protect the power cord from the apparatus. • Only use attachments/accessories specified by the manufacturer. WHEN READING THIS MANUAL When you to your TV. • Read these instructions. • Keep these instructions before connecting other...
... your new VIZIO product, read these instructions. • Heed all warnings. • Follow all instructions. • Do not use , and maintenance of the obsolete outlet. • Protect the power cord from the apparatus. • Only use attachments/accessories specified by the manufacturer. WHEN READING THIS MANUAL When you to your TV. • Read these instructions. • Keep these instructions before connecting other...
User Manual (English)
Page 5
...remote control or injure the operator. Unplug the power cord immediately and contact your dealer. Pulling on the apparatus. • The mains plug or appliance coupler is damaged, the internal components may damage the wires inside the cord and cause fire or electric shock. Incorrect polarities may cause the batteries to rain or moisture. The power cord...- If water penetrates into your TV if any way. - Continuous use your TV. - Your TV is intended to alert the user to the presence of your TV in the operating instructions unless you are qualified to excessive heat such as ...
...remote control or injure the operator. Unplug the power cord immediately and contact your dealer. Pulling on the apparatus. • The mains plug or appliance coupler is damaged, the internal components may damage the wires inside the cord and cause fire or electric shock. Incorrect polarities may cause the batteries to rain or moisture. The power cord...- If water penetrates into your TV if any way. - Continuous use your TV. - Your TV is intended to alert the user to the presence of your TV in the operating instructions unless you are qualified to excessive heat such as ...
User Manual (English)
Page 6
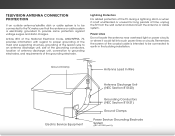
... cable system is to be connected to earth in wire to an antenna discharge unit, size of the grounding conductors, location of antenna discharge unit, connection to the TV, make sure that the antenna or cable system is left unattended or unused for long periods of the grounding electrode. Power Lines Do not locate the antenna near overhead light or power...
... cable system is to be connected to earth in wire to an antenna discharge unit, size of the grounding conductors, location of antenna discharge unit, connection to the TV, make sure that the antenna or cable system is left unattended or unused for long periods of the grounding electrode. Power Lines Do not locate the antenna near overhead light or power...
User Manual (English)
Page 7
... New Channels 38 Skipping Channels 39 Listening to Alternate Audio 40 Changing the Analog Audio Language 40 Changing the Digital Audio Language 40 Setting Up Closed Captioning 41 1 Table of Contents Installing the TV 3 Inspecting the Package Contents 3 Installing the TV 4 Installing the TV Stand 4 Installing the TV on a Wall 6 Controls and Connections 7 Back Panel 7 Side Panel 8 Front Panel 9 Remote Control 10 Replacing the Batteries 11 Connecting Your Devices 12 Connecting A Device 12 Connecting a Device - Audio and Video Cable Types.... 13 Connecting...
... New Channels 38 Skipping Channels 39 Listening to Alternate Audio 40 Changing the Analog Audio Language 40 Changing the Digital Audio Language 40 Setting Up Closed Captioning 41 1 Table of Contents Installing the TV 3 Inspecting the Package Contents 3 Installing the TV 4 Installing the TV Stand 4 Installing the TV on a Wall 6 Controls and Connections 7 Back Panel 7 Side Panel 8 Front Panel 9 Remote Control 10 Replacing the Batteries 11 Connecting Your Devices 12 Connecting A Device 12 Connecting a Device - Audio and Video Cable Types.... 13 Connecting...
User Manual (English)
Page 8
... to Play USB Media 51 Playing USB Media 51 Removing the USB Drive from the My Apps Tab 58 Moving an App in My Apps 59 Troubleshooting & Technical Support 60 Specifications 63 Limited Warranty 65 Legal & Compliance 66 2 Changing the Appearance of Digital Closed Captions.. 41 Renaming Devices on the Input Menu 43 Changing the TV Settings 44 Viewing System Information 44 Changing the...
... to Play USB Media 51 Playing USB Media 51 Removing the USB Drive from the My Apps Tab 58 Moving an App in My Apps 59 Troubleshooting & Technical Support 60 Specifications 63 Limited Warranty 65 Legal & Compliance 66 2 Changing the Appearance of Digital Closed Captions.. 41 Renaming Devices on the Input Menu 43 Changing the TV Settings 44 Viewing System Information 44 Changing the...
User Manual (English)
Page 16
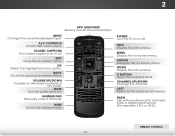
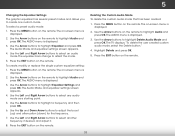
... Switch the display mode. INFO Display the info window. LAST Return to manually enter a digital sub-channel. (For example, 18-4 or 18-5.) REMOTE CONTROL 10 MENU Display the on -screen menu. Plus Dock. MUTE Turn the audio off or on -screen menu. GUIDE Display the info window. CHANNEL UP/DOWN Change the channel. NUMBER PAD Manually enter a channel. ARROW Navigate the on . V BUTTON Open the V.I.A. 2 REMOTE CONTROL APP LAUNCHER Quickly launch the pictured App. INPUT Change...
... Switch the display mode. INFO Display the info window. LAST Return to manually enter a digital sub-channel. (For example, 18-4 or 18-5.) REMOTE CONTROL 10 MENU Display the on -screen menu. Plus Dock. MUTE Turn the audio off or on -screen menu. GUIDE Display the info window. CHANNEL UP/DOWN Change the channel. NUMBER PAD Manually enter a channel. ARROW Navigate the on . V BUTTON Open the V.I.A. 2 REMOTE CONTROL APP LAUNCHER Quickly launch the pictured App. INPUT Change...
User Manual (English)
Page 25
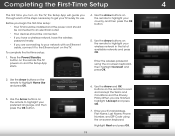
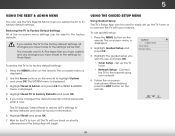
... be installed and the power cord should be connected to an electrical outlet. • Your devices should be connected. • If you have a wireless network, have the wireless password ready. • If you are connecting to your preferred language, and then press the OK button. 6. Press the Power/Standby button on and the Setup App starts. 4. Use the Arrow buttons on the remote to...
... be installed and the power cord should be connected to an electrical outlet. • Your devices should be connected. • If you have a wireless network, have the wireless password ready. • If you are connecting to your preferred language, and then press the OK button. 6. Press the Power/Standby button on and the Setup App starts. 4. Use the Arrow buttons on the remote to...

User Manual (English)
Page 38
... Leveling - Volume leveling uses DTS TruVolume™ to hear dialog or flattening sudden noises. Use the Arrow buttons on the remote. VIZIO AUDIO TV Speakers Surround Sound Volume Leveling Balance - Lip Sync - Select On or Off. 5 ADJUSTING THE AUDIO SETTINGS To adjust the audio settings: 1. Adjusts the loudness of different frequencies using either preset or custom settings. Sets the volume control properties for the anaAlBoCg RCA (red/white) connectors when connected to control the external device's volume from the TV's internal speakers. See Changing...
... Leveling - Volume leveling uses DTS TruVolume™ to hear dialog or flattening sudden noises. Use the Arrow buttons on the remote. VIZIO AUDIO TV Speakers Surround Sound Volume Leveling Balance - Lip Sync - Select On or Off. 5 ADJUSTING THE AUDIO SETTINGS To adjust the audio settings: 1. Adjusts the loudness of different frequencies using either preset or custom settings. Sets the volume control properties for the anaAlBoCg RCA (red/white) connectors when connected to control the external device's volume from the TV's internal speakers. See Changing...
User Manual (English)
Page 39
... frequency, if desired, and adjust it. 8. Use the Left and Right Arrow buttons to select an audio mode. Use the Arrow buttons on the remote to highlight Audio and press OK. The AUDIO menu is displayed. 3. Use the Arrow buttons on the remote to highlight Audio and press OK. To create, modify, or replace the single custom equalizer setting: 1. Use the Arrow buttons on the remote. Use...
... frequency, if desired, and adjust it. 8. Use the Left and Right Arrow buttons to select an audio mode. Use the Arrow buttons on the remote to highlight Audio and press OK. The AUDIO menu is displayed. 3. Use the Arrow buttons on the remote to highlight Audio and press OK. To create, modify, or replace the single custom equalizer setting: 1. Use the Arrow buttons on the remote. Use...

User Manual (English)
Page 41
... Manual Setup Settings Advanced users can fine-tune the network settings using the Manual Setup feature. Use the Arrow and OK buttons to Off. 3. The subnet Exit ma2sDk. 3D • Default Gateway - Your preferred domain name server address. • Sleep Timer Alt. Audio - Press the EXIT button on the remote. The WIRELESS ACCESS POINTS menu, which is a list of your network's password, then highlight Connect...
... Manual Setup Settings Advanced users can fine-tune the network settings using the Manual Setup feature. Use the Arrow and OK buttons to Off. 3. The subnet Exit ma2sDk. 3D • Default Gateway - Your preferred domain name server address. • Sleep Timer Alt. Audio - Press the EXIT button on the remote. The WIRELESS ACCESS POINTS menu, which is a list of your network's password, then highlight Connect...
User Manual (English)
Page 55
..., "Select Reset to restore all account information." 6. Follow the on the remote. Press the MENU button on the remote to highlight System and press OK. Use the Arrow buttons on the remote. Highlight Guided Setup and press OK. Connect the TV to factory defaults and clear all TV settings to the Internet using your network. The SYSTEM menu is displayed. 4. To use guided setup...
..., "Select Reset to restore all account information." 6. Follow the on the remote. Press the MENU button on the remote to highlight System and press OK. Use the Arrow buttons on the remote. Highlight Guided Setup and press OK. Connect the TV to factory defaults and clear all TV settings to the Internet using your network. The SYSTEM menu is displayed. 4. To use guided setup...
User Manual (English)
Page 67
... sound. • Press Volume Up on the remote control. • Press the MUTE button on the remote to ensure mute is no image on page 32. • Ensure the speakers are set to On. • Ensure no power. • Ensure the TV is plugged into a working electrical outlet. • Ensure the power cable is not audible. • Turn off . • Check the audio settings. See Adjusting...
... sound. • Press Volume Up on the remote control. • Press the MUTE button on the remote to ensure mute is no image on page 32. • Ensure the speakers are set to On. • Ensure no power. • Ensure the TV is plugged into a working electrical outlet. • Ensure the power cable is not audible. • Turn off . • Check the audio settings. See Adjusting...
User Manual (English)
Page 71
... SUBJECT TO CHANGE WITHOUT NOTICE. Type of Service Defective Products must utilize either repair or replace the Product at VIZIO's option and sole discretion. Replacement parts and Products may be sent to a VIZIO service center to obtain warranty service. THERE ARE NO EXPRESS WARRANTIES OTHER THAN THOSE LISTED OR DESCRIBED ABOVE. If a Product covered by aVIZIO authorized service center.Products with unreadable or removed serial numbers, or requiring...
... SUBJECT TO CHANGE WITHOUT NOTICE. Type of Service Defective Products must utilize either repair or replace the Product at VIZIO's option and sole discretion. Replacement parts and Products may be sent to a VIZIO service center to obtain warranty service. THERE ARE NO EXPRESS WARRANTIES OTHER THAN THOSE LISTED OR DESCRIBED ABOVE. If a Product covered by aVIZIO authorized service center.Products with unreadable or removed serial numbers, or requiring...

Quickstart Guide (Englsih)
Page 2
... a radiator, heater, oven, amplifier etc. Read the following instructions should be placed on the power cord may form in environments with the apparatus. The performance of your TV. Servicing is used for repair. To ensure reliable operation of time. Continuous use this is exposed to rain or other cables are not sure of the type of power supplied to your home, consult your dealer...
... a radiator, heater, oven, amplifier etc. Read the following instructions should be placed on the power cord may form in environments with the apparatus. The performance of your TV. Servicing is used for repair. To ensure reliable operation of time. Continuous use this is exposed to rain or other cables are not sure of the type of power supplied to your home, consult your dealer...
Quickstart Guide (Englsih)
Page 3
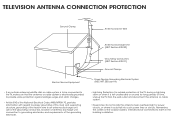
... Electric Service Equipment Power Service Grounding Electrode System (NEC ART 250, part H) • If an outside antenna/satellite dish or cable system is to be connected to earth in wire to an antenna discharge unit, size of the grounding conductors, location of antenna discharge unit, connection to ...the coaxial cable is intended to be connected to proper grounding of the mast and supporting structure, grounding of time, unplug the TV from the wall outlet and disconnect the antenna or cable system. • Power Lines: Do not locate the antenna near overhead light or power circuits,...
... Electric Service Equipment Power Service Grounding Electrode System (NEC ART 250, part H) • If an outside antenna/satellite dish or cable system is to be connected to earth in wire to an antenna discharge unit, size of the grounding conductors, location of antenna discharge unit, connection to ...the coaxial cable is intended to be connected to proper grounding of the mast and supporting structure, grounding of time, unplug the TV from the wall outlet and disconnect the antenna or cable system. • Power Lines: Do not locate the antenna near overhead light or power circuits,...
Quickstart Guide (Englsih)
Page 14
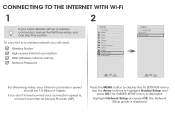
... you have already set up a wireless connection during the first-time setup, you will need: Wireless Router High-speed Internet connection SSID (Wireless network name) Network Password VIZIO TV SETTINGS Picture Audio Timers Network Tuner CC Closed Captions Devices System Guided Setup User Manual Wide VIZIO GUIDED SETUP ZoToumner SeNtuoprmal Panoramic Network Setup Exit 2D 3D ABC Input Wide CC Sleep Timer Picture Audio Network Settings Help Wide Exit Input Sleep Timer Networ For...
... you have already set up a wireless connection during the first-time setup, you will need: Wireless Router High-speed Internet connection SSID (Wireless network name) Network Password VIZIO TV SETTINGS Picture Audio Timers Network Tuner CC Closed Captions Devices System Guided Setup User Manual Wide VIZIO GUIDED SETUP ZoToumner SeNtuoprmal Panoramic Network Setup Exit 2D 3D ABC Input Wide CC Sleep Timer Picture Audio Network Settings Help Wide Exit Input Sleep Timer Networ For...
Quickstart Guide (Englsih)
Page 19
... as installation and set-up issues or any radio or TV interference caused by the party responsible for transportation costs to the service center, but VIZIO will be responsible for example: cosmetic damage, normal wear and tear, improper operation, improper voltage supply or power surges, signal issues, damages from warranty service or replacement, whichever is encouraged to try to the original purchaser of a new...
... as installation and set-up issues or any radio or TV interference caused by the party responsible for transportation costs to the service center, but VIZIO will be responsible for example: cosmetic damage, normal wear and tear, improper operation, improper voltage supply or power surges, signal issues, damages from warranty service or replacement, whichever is encouraged to try to the original purchaser of a new...
Quickstart Guide (Englsih)
Page 20
... COURSE OF SOME IN-HOME AND ALL SHIP-IN WARANTY SERVICE. VIZIO will cover return shipping to the VIZIO service center. Products with unreadable or removed serial numbers,"image burn-in for transportation costs to the service center, but VIZIO will repair, replace or refund the unit at VIZIO's option and sole discretion. VIZIO SHALL NOT BE RESPONSIBLE FOR LOSS OF USE, LOSS OF INFORMATION OR DATA, COMMERCIAL LOSS...
... COURSE OF SOME IN-HOME AND ALL SHIP-IN WARANTY SERVICE. VIZIO will cover return shipping to the VIZIO service center. Products with unreadable or removed serial numbers,"image burn-in for transportation costs to the service center, but VIZIO will repair, replace or refund the unit at VIZIO's option and sole discretion. VIZIO SHALL NOT BE RESPONSIBLE FOR LOSS OF USE, LOSS OF INFORMATION OR DATA, COMMERCIAL LOSS...
Quickstart Guide (Englsih)
Page 21
..., modifications or adjustments, as well as originally purchased.You will cover return shipping to the accompanying instructions for use . Parts and Labor There will provide instructions for example: cosmetic damage, normal wear and tear, improper operation, improper voltage supply or power surges, signal issues, damages from shipping, acts of God, any type of repair and/or replacement services. de. Type of storing personal...
..., modifications or adjustments, as well as originally purchased.You will cover return shipping to the accompanying instructions for use . Parts and Labor There will provide instructions for example: cosmetic damage, normal wear and tear, improper operation, improper voltage supply or power surges, signal issues, damages from shipping, acts of God, any type of repair and/or replacement services. de. Type of storing personal...


