Download
Page 5
... damaged appliances. Liquid sprays or any servicing other than that contained in the operating instructions unless you are qualified to leak which can damage the remote control or injure the operator. To reduce the risk of electric shock, do not perform any object drops into your TV. Unplug the power cord...
... damaged appliances. Liquid sprays or any servicing other than that contained in the operating instructions unless you are qualified to leak which can damage the remote control or injure the operator. To reduce the risk of electric shock, do not perform any object drops into your TV. Unplug the power cord...
Download
Page 7
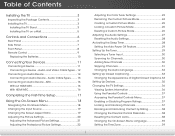
... 3 Inspecting the Package Contents 3 Installing the TV 3 Installing the TV Stand 3 Installing the TV on a Wall 5 Controls and Connections 6 Rear Panel 6 Side Panel 7 Front Panel 8 Remote Control 9 Replacing the Batteries 10 Connecting Your Devices 11 Connecting A Device 11 Connecting a Device - Audio and Video Cable Types.... 12 Connecting an Audio Device 14...
... 3 Inspecting the Package Contents 3 Installing the TV 3 Installing the TV Stand 3 Installing the TV on a Wall 5 Controls and Connections 6 Rear Panel 6 Side Panel 7 Front Panel 8 Remote Control 9 Replacing the Batteries 10 Connecting Your Devices 11 Connecting A Device 11 Connecting a Device - Audio and Video Cable Types.... 12 Connecting an Audio Device 14...
Download
Page 9
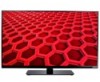
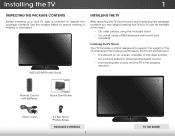
...-level surface • It is pushed, pulled, or otherwise improperly moved • If an earthquake occurs and the TV is missing or damaged. VIZIO LED HDTV with Batteries Quick Start Guide Power Cord 3 x M4 10mm Phillips Screw PACKAGE CONTENTS 3 TV ON STAND However, the TV can begin installing.... Installing the TV 1 INSPECTING THE PACKAGE CONTENTS Before installing your new TV, take a moment to ensure nothing is not properly secured Remote Control with Stand INSTALLING THE TV After removing the TV from the box and inspecting the package contents you can still fall over .
...-level surface • It is pushed, pulled, or otherwise improperly moved • If an earthquake occurs and the TV is missing or damaged. VIZIO LED HDTV with Batteries Quick Start Guide Power Cord 3 x M4 10mm Phillips Screw PACKAGE CONTENTS 3 TV ON STAND However, the TV can begin installing.... Installing the TV 1 INSPECTING THE PACKAGE CONTENTS Before installing your new TV, take a moment to ensure nothing is not properly secured Remote Control with Stand INSTALLING THE TV After removing the TV from the box and inspecting the package contents you can still fall over .
Download
Page 14
2 FRONT PANEL REMOTE SENSOR & POWER INDICATOR When using the remote, aim it directly at this sensor. The power indicator flashes on when the TV turns on page 39. 8 FRONT PANEL To keep the power indicator on as long as the TV is on, see Turning the Power Indicator On or Off on , then goes out after several seconds.
2 FRONT PANEL REMOTE SENSOR & POWER INDICATOR When using the remote, aim it directly at this sensor. The power indicator flashes on when the TV turns on page 39. 8 FRONT PANEL To keep the power indicator on as long as the TV is on, see Turning the Power Indicator On or Off on , then goes out after several seconds.
Download
Page 15
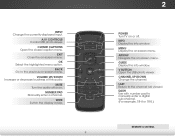
...Turn TV on -screen menu. V BUTTON Open the USB photo viewer. LAST Return to manually enter a digital sub-channel. (For example, 18-4 or 18-5.) REMOTE CONTROL BACK Go to the previous on or off or on -screen menu. GUIDE Display the info window. DASH Use with number pad to the... channel last viewed. NUMBER PAD Manually enter a channel. INFO Display the info window. OK Select the highlighted menu option. REMOTE CONTROL INPUT Change the currently-displayed input. ARROW Navigate the on -screen menu. A/V CONTROLS Control USB photo viewer. VOLUME UP/DOWN Increase or ...
...Turn TV on -screen menu. V BUTTON Open the USB photo viewer. LAST Return to manually enter a digital sub-channel. (For example, 18-4 or 18-5.) REMOTE CONTROL BACK Go to the previous on or off or on -screen menu. GUIDE Display the info window. DASH Use with number pad to the... channel last viewed. NUMBER PAD Manually enter a channel. INFO Display the info window. OK Select the highlighted menu option. REMOTE CONTROL INPUT Change the currently-displayed input. ARROW Navigate the on -screen menu. A/V CONTROLS Control USB photo viewer. VOLUME UP/DOWN Increase or ...

Download
Page 16
2 Replacing the Batteries 1. Make sure that the (+) and (-) symbols on the batteries match the (+) and (-) symbols inside the battery compartment. 3. Replace the battery cover. 10 Remove the battery cover. 2. Insert two batteries into the remote control.
2 Replacing the Batteries 1. Make sure that the (+) and (-) symbols on the batteries match the (+) and (-) symbols inside the battery compartment. 3. Replace the battery cover. 10 Remove the battery cover. 2. Insert two batteries into the remote control.

Download
Page 23
...guide you through each of the steps necessary to highlight Home Use VOL CH and press OK. INPUT EXIT MENU OK BACK GUIDE 2. VOL CH 4. remote to Live TV and press OK. Completing the First-Time Setup 4 The first time you turn on the WIDE 0 - When you begin the ...to highlight how your preferred language and press OK. 17 Use the Arrow buttons on and the Setup App starts. The TV powers on the remote to an electrical outlet. • Your devices should be connected. Before you have finished the channel scan, highlight Exit to highlight your TV ...
...guide you through each of the steps necessary to highlight Home Use VOL CH and press OK. INPUT EXIT MENU OK BACK GUIDE 2. VOL CH 4. remote to Live TV and press OK. Completing the First-Time Setup 4 The first time you turn on the WIDE 0 - When you begin the ...to highlight how your preferred language and press OK. 17 Use the Arrow buttons on and the Setup App starts. The TV powers on the remote to an electrical outlet. • Your devices should be connected. Before you have finished the channel scan, highlight Exit to highlight your TV ...

Download
Page 24
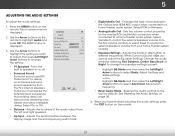
Exit 2DWhile3nD avigating the on-screen menu, you can: VIZIO TV SETTINGS • Adjust the Picture settings • Adjust the Audio settings Picture Audio Timers • Activate the Sleep Timer • Adjust the Tuner settings &#...; Access the Guided Setup NAVIGATING THE ON-SCREEN MENU To open the on-screen menu, press the MENU button on the remote. The EXIT button will close the on the remote. From this menu, you can also open the on-screen menu, press the MENU button on -screen menu. Input Wide CC...
Exit 2DWhile3nD avigating the on-screen menu, you can: VIZIO TV SETTINGS • Adjust the Picture settings • Adjust the Audio settings Picture Audio Timers • Activate the Sleep Timer • Adjust the Tuner settings &#...; Access the Guided Setup NAVIGATING THE ON-SCREEN MENU To open the on-screen menu, press the MENU button on the remote. The EXIT button will close the on the remote. From this menu, you can also open the on-screen menu, press the MENU button on -screen menu. Input Wide CC...
Download
Page 25
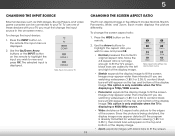
...-2 Note: Inputs may vary by Input source. • Stretch expands the display image to fill the screen. Press the WIDE button on the remote. Wide Wide Zoom Zoom Note: Aspect ratio settings may appear distorted. Images may appear wider than intended. 5 CHANGING THE INPUT SOURCE CHANGING THE ...SCREEN ASPECT RATIO External devices such as DVD players, Blu-ray Players, and video game consoles can display images in the on the remote to highlight the input you wish to view and press OK. To use one of the display image. Normal Panoramic Normal Stretch •...
...-2 Note: Inputs may vary by Input source. • Stretch expands the display image to fill the screen. Press the WIDE button on the remote. Wide Wide Zoom Zoom Note: Aspect ratio settings may appear distorted. Images may appear wider than intended. 5 CHANGING THE INPUT SOURCE CHANGING THE ...SCREEN ASPECT RATIO External devices such as DVD players, Blu-ray Players, and video game consoles can display images in the on the remote to highlight the input you wish to view and press OK. To use one of the display image. Normal Panoramic Normal Stretch •...
Download
Page 26
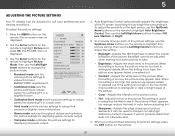
...Sleep Timer Contrast - Adjusts the edge sharpness of the picture. To adjust the picture settings: 1. VIZIO PICTURE Picture Mode Standard 2. Use the Arrow buttons on the remote to highlight Picture and press OK. Adjusts the white level thiPsicstuerettingAuidsiotoo low, the picture of picture ... orange, reduce the level of the picture. When you have finished adjusting the picture settings, press the EXIT button on the remote to distinguish details. Auto Brightness Control Backlight - When may be adjusted when startAinBCg from some picture modes. • Brightness -...
...Sleep Timer Contrast - Adjusts the edge sharpness of the picture. To adjust the picture settings: 1. VIZIO PICTURE Picture Mode Standard 2. Use the Arrow buttons on the remote to highlight Picture and press OK. Adjusts the white level thiPsicstuerettingAuidsiotoo low, the picture of picture ... orange, reduce the level of the picture. When you have finished adjusting the picture settings, press the EXIT button on the remote to distinguish details. Auto Brightness Control Backlight - When may be adjusted when startAinBCg from some picture modes. • Brightness -...

Download
Page 27
... the Arrow buttons to ensure the image is centered and completely fills the screen. The ADVANCED PICTURE menu is controlled by the content on the remote. VIZIO ADVANCED PICTURE Color Temperature Black Detail Backlight Control Reduce Signal Noise Reduce Block Noise Picture Position Cool Medium On Low Low 3. Select Cool, Normal, or...
... the Arrow buttons to ensure the image is centered and completely fills the screen. The ADVANCED PICTURE menu is controlled by the content on the remote. VIZIO ADVANCED PICTURE Color Temperature Black Detail Backlight Control Reduce Signal Noise Reduce Block Noise Picture Position Cool Medium On Low Low 3. Select Cool, Normal, or...

Download
Page 28
...custom picture mode. • Create Picture Mode Create a custom picture mode. • Lock Picture Mode - InUpuste theWidAerrowCbC uttons on the remote to adjust. When you wish to highlight Hue, Saturation, Brightness, Offset, or Gain of the color you are finished press the SlOeeKp ...mode. To adjust the professional picture settings: 1. Use the Arrow buttons to highlight the setting you wish to change the setting: VIZIO PROFESSIONAL PICTURE Color Tuner Rename Picture Mode Create Picture Mode Lock Picture Mode Delete Picture Mode • Color Tuner - Inputs assigned ...
...custom picture mode. • Create Picture Mode Create a custom picture mode. • Lock Picture Mode - InUpuste theWidAerrowCbC uttons on the remote to adjust. When you wish to highlight Hue, Saturation, Brightness, Offset, or Gain of the color you are finished press the SlOeeKp ...mode. To adjust the professional picture settings: 1. Use the Arrow buttons to highlight the setting you wish to change the setting: VIZIO PROFESSIONAL PICTURE Color Tuner Rename Picture Mode Create Picture Mode Lock Picture Mode Delete Picture Mode • Color Tuner - Inputs assigned ...

Download
Page 29
...Test Pattern. Gain 5% 11 Point White Balance Red Green 0 0 Blue 0 5 To enable/disable the SMPTE Test Pattern: 1. Use the Arrow buttons on the remote to highlight Color Tuner, and then press the Left/Right Arrow buttons until the 11 Point White Balance menu is displayed. When you are finished..., press the EXIT button. 2. SMPTE Test Pattern Off 2. When you wish to highlight Off. Use the Arrow buttons on the remote to adjust. From the Color Tuner menu, use the Arrow buttons to highlight Color Tuner, and then press the Left/Right Arrow buttons until the...
...Test Pattern. Gain 5% 11 Point White Balance Red Green 0 0 Blue 0 5 To enable/disable the SMPTE Test Pattern: 1. Use the Arrow buttons on the remote to highlight Color Tuner, and then press the Left/Right Arrow buttons until the 11 Point White Balance menu is displayed. When you are finished..., press the EXIT button. 2. SMPTE Test Pattern Off 2. When you wish to highlight Off. Use the Arrow buttons on the remote to adjust. From the Color Tuner menu, use the Arrow buttons to highlight Color Tuner, and then press the Left/Right Arrow buttons until the...

Download
Page 30
... Tuner, and then press the Left/Right Arrow buttons until the Ramp Test Pattern menu is displayed. 2. When you are finished, press the EXIT button. VIZIO RENAME PICTURE MODE Custom1_ abc def ghi j k l mn o p q r s t u v wx y z 0 123456789 .@# .com Space Save 24 The RENAME PICTURE MODE menu is ... button to enable the Ramp Test Pattern. From the Color Tuner menu, use the Arrow buttons to enter a custom name using the on the remote to highlight Off. 3. Use the Arrow buttons on -screen keyboard. 3. Highlight Save and press OK. 4. Renaming the Custom Picture Mode You ...
... Tuner, and then press the Left/Right Arrow buttons until the Ramp Test Pattern menu is displayed. 2. When you are finished, press the EXIT button. VIZIO RENAME PICTURE MODE Custom1_ abc def ghi j k l mn o p q r s t u v wx y z 0 123456789 .@# .com Space Save 24 The RENAME PICTURE MODE menu is ... button to enable the Ramp Test Pattern. From the Color Tuner menu, use the Arrow buttons to enter a custom name using the on the remote to highlight Off. 3. Use the Arrow buttons on -screen keyboard. 3. Highlight Save and press OK. 4. Renaming the Custom Picture Mode You ...

Download
Page 31
... picture mode with a unique passcode to prevent any changes. Use the Arrow buttons to enter a name for your remote to enter a unique 4 digit passcodAeB.C VIZIO LOCK PICTURE MODE Enter the Picture Control PIN to exit the menu screens. Sleep Timer Picture Audio Enter the 4 ...digit passcode using the on the remote. Highlight Save and press OK. The LOCK PICTURE MODE menu is displayed. 2. InPpruet ss thWiedeEXIT CbCutton...
... picture mode with a unique passcode to prevent any changes. Use the Arrow buttons to enter a name for your remote to enter a unique 4 digit passcodAeB.C VIZIO LOCK PICTURE MODE Enter the Picture Control PIN to exit the menu screens. Sleep Timer Picture Audio Enter the 4 ...digit passcode using the on the remote. Highlight Save and press OK. The LOCK PICTURE MODE menu is displayed. 2. InPpruet ss thWiedeEXIT CbCutton...
Download
Page 33
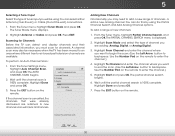
... Left/Right Arrow buttons to select Basic. Adjust each SeftrteinqgsuenHeclpy. • Reset Audio Mode - See Resetting the Audio Settings on the remote. Press the MENU button on page 28. 4. Adjusts the loudness of different freABqCuencies. To cChCange the equalizer settings yourself: Sleep Timer ...and the accompanying audio track. • Digital Audio Out - When you cannot adjust the Equalizer Settings. The on the remote to change the setting: VIZIO AUDIO TV Speakers Surround Sound Balance - Changes the type of processing for the analog RCA (red/white) connectors when Wide...
... Left/Right Arrow buttons to select Basic. Adjust each SeftrteinqgsuenHeclpy. • Reset Audio Mode - See Resetting the Audio Settings on the remote. Press the MENU button on page 28. 4. Adjusts the loudness of different freABqCuencies. To cChCange the equalizer settings yourself: Sleep Timer ...and the accompanying audio track. • Digital Audio Out - When you cannot adjust the Equalizer Settings. The on the remote to change the setting: VIZIO AUDIO TV Speakers Surround Sound Balance - Changes the type of processing for the analog RCA (red/white) connectors when Wide...

Download
Page 34
Use the Arrow buttons on the remote. Press the MENU button on the remote to sleep: 30, 60, 90, 120, or 180 minutes. VIZIO TIMERS Sleep Timer Auto Power Off Off 10 min. 3. Use the Arrow buttons to restore factory default audio settings." 4. The TV displays,"Select Reset to... highlight Reset Audio Mode and press OK. The Audio menu is displayed. Press the EXIT button on the remote. To use the ...
Use the Arrow buttons on the remote. Press the MENU button on the remote to sleep: 30, 60, 90, 120, or 180 minutes. VIZIO TIMERS Sleep Timer Auto Power Off Off 10 min. 3. Use the Arrow buttons to restore factory default audio settings." 4. The TV displays,"Select Reset to... highlight Reset Audio Mode and press OK. The Audio menu is displayed. Press the EXIT button on the remote. To use the ...
Download
Page 35
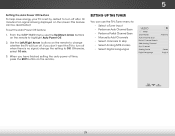
...set the Auto Power Off feature: 1. Use the Left/Right Arrow buttons on the remote. Otherwise, select 10 min. 3. To set by default to skip • Select Analog MTS modes • Select Digital Languages VIZIO TUNER Tuner Mode Auto Channel Scan Partial Channel Search Add Analog Channel Skip Channel Analog Audio...turn off after 10 minutes if no signal is no signal, change whether the TV will turn off time, press the EXIT button on the remote to change the setting to highlight Auto Power Off. 2. If you have finished setting the auto power off when there is being displayed on...
...set the Auto Power Off feature: 1. Use the Left/Right Arrow buttons on the remote. Otherwise, select 10 min. 3. To set by default to skip • Select Analog MTS modes • Select Digital Languages VIZIO TUNER Tuner Mode Auto Channel Scan Partial Channel Search Add Analog Channel Skip Channel Analog Audio...turn off after 10 minutes if no signal is no signal, change whether the TV will turn off time, press the EXIT button on the remote to change the setting to highlight Auto Power Off. 2. If you have finished setting the auto power off when there is being displayed on...
Download
Page 36
... To add a range of channel you may also be using the Partial Channel Search and Add Analog Channel options. Use the Number Pad on the remote. ExHitighlig2Dht Don3eD and press OK. 7. To perform an Auto Channel Scan: 1. The AUTO CHANNEL SCAN begins. 2. Cancel the channel scan. From ...Use the Left Arrow button to add a new range of channels or add a new analog channel. Wait until the channel scan is 100% complete. VIZIO AUTO CHANNEL SCAN Channels Found 0: Analog 0: Digital 13 % Complete Cancel If the channel scan is displayed. 2. A new channel scan will be ...
... To add a range of channel you may also be using the Partial Channel Search and Add Analog Channel options. Use the Number Pad on the remote. ExHitighlig2Dht Don3eD and press OK. 7. To perform an Auto Channel Scan: 1. The AUTO CHANNEL SCAN begins. 2. Cancel the channel scan. From ...Use the Left Arrow button to add a new range of channels or add a new analog channel. Wait until the channel scan is 100% complete. VIZIO AUTO CHANNEL SCAN Channels Found 0: Analog 0: Digital 13 % Complete Cancel If the channel scan is displayed. 2. A new channel scan will be ...

Download
Page 37
... scan is displayed. 2. VIZIO SKIP CHANNEL 1 Test 0 1 Test 1 x 1-2 Test 2 x 2 Test 3 2-2 Test 4 x 2-3 Test 5 3. Highlight Enter Channel # and use the parental controls. Highlight Add Channel and press OK. See Locking and Unlocking ABC Channels on the remote to enter the number of... menu is done scanning for the channel. 4. The TV scans for the channel, press the EXIT button on the remote. 31 From the Tuner menu, highlight STliSTm ehekepreipSCKPiIhcPtauCrneHnAeANlu, dNaionELdmperensus OK. is completed, you wish NettwoorrkemSeottvineg,s useHeltphe Up/Down ...
... scan is displayed. 2. VIZIO SKIP CHANNEL 1 Test 0 1 Test 1 x 1-2 Test 2 x 2 Test 3 2-2 Test 4 x 2-3 Test 5 3. Highlight Enter Channel # and use the parental controls. Highlight Add Channel and press OK. See Locking and Unlocking ABC Channels on the remote to enter the number of... menu is done scanning for the channel. 4. The TV scans for the channel, press the EXIT button on the remote. 31 From the Tuner menu, highlight STliSTm ehekepreipSCKPiIhcPtauCrneHnAeANlu, dNaionELdmperensus OK. is completed, you wish NettwoorrkemSeottvineg,s useHeltphe Up/Down ...


