

E370VT User Manual
Page 4
...your TV. A polarized plug has two blades and a third grounding prong. When a cart is damaged, liquid has been spilled or E320VT / E370VT / E420VT objects have an electrician install the correct outlet, or use this apparatus during lightning storms or when unused for future reference. •... shock or component damage, switch off the power before connecting other components to your TV from being damaged, the following safety instructions before turning on your TV to avoid causing fire, electric shock, or component damage. • A distance of at plugs, convenience receptacles, and...
...your TV. A polarized plug has two blades and a third grounding prong. When a cart is damaged, liquid has been spilled or E320VT / E370VT / E420VT objects have an electrician install the correct outlet, or use this apparatus during lightning storms or when unused for future reference. •... shock or component damage, switch off the power before connecting other components to your TV from being damaged, the following safety instructions before turning on your TV to avoid causing fire, electric shock, or component damage. • A distance of at plugs, convenience receptacles, and...
E370VT User Manual
Page 6
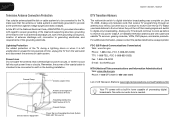
... switch to digital-only broadcasting. Remember, the screen of processing digital broadcasts. Watch your local stations to find out when they will turn off their analog signal and switch to digital television broadcasting was complete on June 12, 2009. For additional information, please contact the ...that receive TV programming through an antenna now need a converter box to continue to receive over-the-air TV. E320VT / E370VT / E420VT Television Antenna Connection Protection If an outside antenna/satellite dish or cable system is to be connected to earth in the building installation....
... switch to digital-only broadcasting. Remember, the screen of processing digital broadcasts. Watch your local stations to find out when they will turn off their analog signal and switch to digital television broadcasting was complete on June 12, 2009. For additional information, please contact the ...that receive TV programming through an antenna now need a converter box to continue to receive over-the-air TV. E320VT / E370VT / E420VT Television Antenna Connection Protection If an outside antenna/satellite dish or cable system is to be connected to earth in the building installation....
E370VT User Manual
Page 12
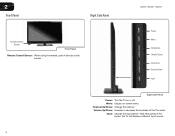
Input: Change the input device. With each press of the TVs audio. E320VT / E370VT / E420VT Power Menu Channel Up Channel Down Volume Up Volume Down Input Right Side Panel Power: Turn the TV on -screen menu. Volume Up/Down: Increase or decrease the loudness of the button, the TV will display a different input source. 4 Menu: Display on or off. 2 Front Panel Right Side Panel Remote Control Sensor Front Panel Remote Control Sensor: When using the remote, point it directly at this sensor. Channel Up/Down: Change the channel.
Input: Change the input device. With each press of the TVs audio. E320VT / E370VT / E420VT Power Menu Channel Up Channel Down Volume Up Volume Down Input Right Side Panel Power: Turn the TV on -screen menu. Volume Up/Down: Increase or decrease the loudness of the button, the TV will display a different input source. 4 Menu: Display on or off. 2 Front Panel Right Side Panel Remote Control Sensor Front Panel Remote Control Sensor: When using the remote, point it directly at this sensor. Channel Up/Down: Change the channel.

E370VT User Manual
Page 13
...channel. Input: Change the input device. Volume Up/Down: Increase or decrease the loudness of the but- When mute is activated, the TV's audio is turned off or on -screen menu options. Exit: Close the on -screen menu and episode guide. Back: Go to manually enter a channel. ton, the... modes. CC: Open the Closed Captioning menu. Info: Display the Info Window. Dash (-): Use with number pad to the channel last viewed. E320VT / E370VT / E420VT Input CC Exit OK Back Volume Up/Down Mute Number Pad Wide Power/Standby A/V Controls Info Menu Arrow Channel Up/Down Last Dash (-) 2 ...
...channel. Input: Change the input device. Volume Up/Down: Increase or decrease the loudness of the but- When mute is activated, the TV's audio is turned off or on -screen menu options. Exit: Close the on -screen menu and episode guide. Back: Go to manually enter a channel. ton, the... modes. CC: Open the Closed Captioning menu. Info: Display the Info Window. Dash (-): Use with number pad to the channel last viewed. E320VT / E370VT / E420VT Input CC Exit OK Back Volume Up/Down Mute Number Pad Wide Power/Standby A/V Controls Info Menu Arrow Channel Up/Down Last Dash (-) 2 ...
E370VT User Manual
Page 15
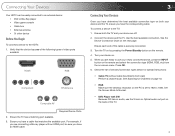
... menu. Ensure both your device and the TV, ensure you have the corresponding cable. Use the best available connection. Ensure each end of the TV. 7 Turn your device on the next page. Check the list of video ports available: HDMI RGB Component RF/Antenna Composite AV Required Device Ports 2. Set the... you have determined the best available connection type on both the TV and your device are off. 2. Connect the device and the TV. Press OK. 6. Turn the TV on by pressing the Power/Standby button on the remote. 4.
... menu. Ensure both your device and the TV, ensure you have the corresponding cable. Use the best available connection. Ensure each end of the TV. 7 Turn your device on the next page. Check the list of video ports available: HDMI RGB Component RF/Antenna Composite AV Required Device Ports 2. Set the... you have determined the best available connection type on both the TV and your device are off. 2. Connect the device and the TV. Press OK. 6. Turn the TV on by pressing the Power/Standby button on the remote. 4.
E370VT User Manual
Page 17
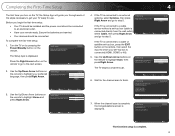
.... Initial Setup Please select your cable or antenna to the DTV/TV input Channel Scan Scan Skip Scan The TV begins a channel scan. 6. Turn the TV on by pressing the Power/Standby button on the remote, then select the input to which your preferred language, then press Right Arrow...connected (HDMI, COMP, or AV). 5. Status: Scanning.. Initial Setup completed EXIT Exit Complete Back The first-time setup is displayed. Initial Setup Allow the VIZIO setup Wizard to help you begin the first-time setup: • Your TV should be installed and the power cord should be connected to an...
.... Initial Setup Please select your cable or antenna to the DTV/TV input Channel Scan Scan Skip Scan The TV begins a channel scan. 6. Turn the TV on by pressing the Power/Standby button on the remote, then select the input to which your preferred language, then press Right Arrow...connected (HDMI, COMP, or AV). 5. Status: Scanning.. Initial Setup completed EXIT Exit Complete Back The first-time setup is displayed. Initial Setup Allow the VIZIO setup Wizard to help you begin the first-time setup: • Your TV should be installed and the power cord should be connected to an...
E370VT User Manual
Page 26
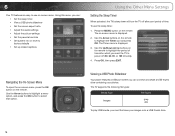
... TV to factory defaults • Set up closed captions Using the Other Menu Settings Setting the Sleep Timer When activated, the TV's sleep timer will turn the TV off (30, 60, 90, or 120 minutes). 4. 6 Your TV features an easy-to highlight the Timer icon and press OK. To use on...
... TV to factory defaults • Set up closed captions Using the Other Menu Settings Setting the Sleep Timer When activated, the TV's sleep timer will turn the TV off (30, 60, 90, or 120 minutes). 4. 6 Your TV features an easy-to highlight the Timer icon and press OK. To use on...

E370VT User Manual
Page 31
... Left/Right Arrow buttons to highlight Bass & Treble Audio and press OK. Enabling or Disabling the Built-In Speakers Using this menu option, you can turn the built-in speakers: 1. This is often used when the TV is displayed. 2. The on -screen menu is displayed. 2. Bass 0 Treble 0 3. Use the Arrow buttons... to highlight Audio and press OK. 3. To enable or disable the built-in speakers on the remote. Press the OK button on or off. E320VT / E370VT / E420VT 6 Adjusting Bass and Treble Levels The bass and treble levels for your liking.
... Left/Right Arrow buttons to highlight Bass & Treble Audio and press OK. Enabling or Disabling the Built-In Speakers Using this menu option, you can turn the built-in speakers: 1. This is often used when the TV is displayed. 2. The on -screen menu is displayed. 2. Bass 0 Treble 0 3. Use the Arrow buttons... to highlight Audio and press OK. 3. To enable or disable the built-in speakers on the remote. Press the OK button on or off. E320VT / E370VT / E420VT 6 Adjusting Bass and Treble Levels The bass and treble levels for your liking.
E370VT User Manual
Page 39
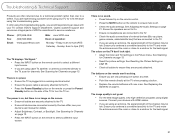
...: Email: (877) 698-4946 (949) 585-9563 techsupport@vizio.com Web: www.VIZIO.com Hours of the TV to turn the TV on the remote aren't working electrical outlet. •...(PST) Saturday - Ensure your TV, try to fix the issue using an antenna, the signal strength of VIZIO's commitment to the TV. • Check the audio connections of the channel may be low. The colors on...• Ensure all cables to the TV. • If you are securely attached. see your TV, contact VIZIO's Support Department. A There is not good. • For the best image quality, view high-definition programs ...
...: Email: (877) 698-4946 (949) 585-9563 techsupport@vizio.com Web: www.VIZIO.com Hours of the TV to turn the TV on the remote aren't working electrical outlet. •...(PST) Saturday - Ensure your TV, try to fix the issue using an antenna, the signal strength of VIZIO's commitment to the TV. • Check the audio connections of the channel may be low. The colors on...• Ensure all cables to the TV. • If you are securely attached. see your TV, contact VIZIO's Support Department. A There is not good. • For the best image quality, view high-definition programs ...

E370VT User Manual
Page 44
... AC/DC power adapter that are designed to correct the interference by turning the equipment off and on a circuit different from the date of the distribution of the FCC Rules. VIZIO offers to provide source code to you on your VIZIO VIA device. This device complies with the emission limits. 3. Notice 1. Use the...
... AC/DC power adapter that are designed to correct the interference by turning the equipment off and on a circuit different from the date of the distribution of the FCC Rules. VIZIO offers to provide source code to you on your VIZIO VIA device. This device complies with the emission limits. 3. Notice 1. Use the...
E370VT Quick Start Guide
Page 3
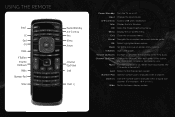
...on . Last: Return to manually enter a channel. Number Pad: Use the number pad to the channel last viewed. Input: Change the input device. Mute: Turn the sound off . Arrow: Navigate the on or off. V Button: Open USB player. OK: Select highlighted menu option. CC: Open the Closed Captioning menu....: Increase or decrease the loudness of the button, the channel will increase or decrease by one. When mute is activated, the TV's audio is turned off or on -screen menu options. A/V Controls: Control USB photo slideshow. USING THE REMOTE Input CC Exit OK Back V Button Volume Up/Down...
...on . Last: Return to manually enter a channel. Number Pad: Use the number pad to the channel last viewed. Input: Change the input device. Mute: Turn the sound off . Arrow: Navigate the on or off. V Button: Open USB player. OK: Select highlighted menu option. CC: Open the Closed Captioning menu....: Increase or decrease the loudness of the button, the channel will increase or decrease by one. When mute is activated, the TV's audio is turned off or on -screen menu options. A/V Controls: Control USB photo slideshow. USING THE REMOTE Input CC Exit OK Back V Button Volume Up/Down...

E370VT Quick Start Guide
Page 7
Turn the TV on by pressing the Power/Standby button on the remote or on the side of the TV. The Setup App is displayed. Welcome Next EXIT Exit If you tune your channels. 3 4 Initial Setup Allow the VIZIO setup Wizard to help you have an external antenna or a cable connection that extends from a wall outlet, connect it to the TV with an RF/Coaxial cable and the included RF Adapter.
Turn the TV on by pressing the Power/Standby button on the remote or on the side of the TV. The Setup App is displayed. Welcome Next EXIT Exit If you tune your channels. 3 4 Initial Setup Allow the VIZIO setup Wizard to help you have an external antenna or a cable connection that extends from a wall outlet, connect it to the TV with an RF/Coaxial cable and the included RF Adapter.
E370VT Quick Start Guide
Page 10
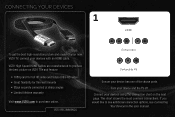
...would like to purchase online. Connect your devices using the connection chart on your new VIZIO TV, connect your devices with an HDMI cable. VIZIO RECOMMENDS Component Composite AV Ensure your device and the TV off. Turn your device has one of the above ports. This chart shows the most common ...connections. VIZIO High Speed HDMI Cables are manufactured to produce the best picture on VIZIO TVs and feature: • 1080p and for full HD video and...
...would like to purchase online. Connect your devices using the connection chart on your new VIZIO TV, connect your devices with an HDMI cable. VIZIO RECOMMENDS Component Composite AV Ensure your device and the TV off. Turn your device has one of the above ports. This chart shows the most common ...connections. VIZIO High Speed HDMI Cables are manufactured to produce the best picture on VIZIO TVs and feature: • 1080p and for full HD video and...

E370VT Quick Start Guide
Page 12
VIZIO RECOMMENDS Add home theater surround sound without the excess clutter of wires! The VIZIO 5.1 Surround Sound Home Theater with Wireless Subwoofer delivers big home theater sound in a sleek design that's perfect for your TV: • Universal 5.1 soundbar with rear satellite speakers and wireless subwoofer turns any TV into a home theater • Wireless subwoofer uses Wireless HD Audio™ 2.4 GHz, so you can place it anywhere in the room • Premium sound with Dolby Digital®, DTS, SRS CircleCinema HD™ and SRS TruVolume™.
VIZIO RECOMMENDS Add home theater surround sound without the excess clutter of wires! The VIZIO 5.1 Surround Sound Home Theater with Wireless Subwoofer delivers big home theater sound in a sleek design that's perfect for your TV: • Universal 5.1 soundbar with rear satellite speakers and wireless subwoofer turns any TV into a home theater • Wireless subwoofer uses Wireless HD Audio™ 2.4 GHz, so you can place it anywhere in the room • Premium sound with Dolby Digital®, DTS, SRS CircleCinema HD™ and SRS TruVolume™.
E370VT Quick Start Guide
Page 15
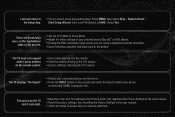
The TV displays "No Signal" • Ensure your connected devices are turned on. • Press the INPUT button on the remote and select the input to which your PIN (default is 0000). The colors on the remote ...
The TV displays "No Signal" • Ensure your connected devices are turned on. • Press the INPUT button on the remote and select the input to which your PIN (default is 0000). The colors on the remote ...


