

E370VT User Manual
Page 4
... component damage. • A distance of at your TV. • Your TV should be replaced when using different voltage than the other. The manufacturer's warranty does not cover user abuse or improper installations. • The power cord must be operated only from overheating, be observed for the installation, use attachments/accessories specified by the manufacturer. • Use only with the cart, stand, tripod, bracket, or table...
... component damage. • A distance of at your TV. • Your TV should be replaced when using different voltage than the other. The manufacturer's warranty does not cover user abuse or improper installations. • The power cord must be operated only from overheating, be observed for the installation, use attachments/accessories specified by the manufacturer. • Use only with the cart, stand, tripod, bracket, or table...
E370VT User Manual
Page 5
... with instructions. To avoid electric shock, avoid handling the power cord during electrical storms. • Unplug your TV and easily accessible. • Only power of the marked voltage can damage the remote control or injure the operator. Opening or removing the back cover may function abnormally. If your TV. - Continued use your TV. Pulling on the apparatus. • The mains plug...
... with instructions. To avoid electric shock, avoid handling the power cord during electrical storms. • Unplug your TV and easily accessible. • Only power of the marked voltage can damage the remote control or injure the operator. Opening or removing the back cover may function abnormally. If your TV. - Continued use your TV. Pulling on the apparatus. • The mains plug...
E370VT User Manual
Page 6
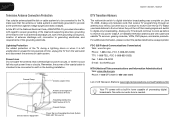
... TV. Analog-only television sets that the antenna or cable system is electrically grounded to receive low power, Class A or translator television stations and with a built-in the building installation. Watch your local stations to find out when they will turn off their analog signal and switch to earth in tuner capable of time, unplug the TV from the wall outlet and disconnect the antenna or cable system.
... TV. Analog-only television sets that the antenna or cable system is electrically grounded to receive low power, Class A or translator television stations and with a built-in the building installation. Watch your local stations to find out when they will turn off their analog signal and switch to earth in tuner capable of time, unplug the TV from the wall outlet and disconnect the antenna or cable system.

E370VT User Manual
Page 7
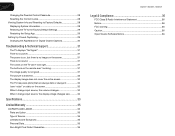
... Installing the TV Stand 1 Installing the TV on a Wall 2 Controls and Connections 3 Rear Panel 3 Front Panel 4 Right Side Panel 4 Remote Control 5 Replacing the Batteries 6 Connecting Your Devices 7 Before You Begin 7 Connecting Your Devices 7 Completing the First-Time Setup 9 Adjusting the TV Settings 10 Setting Up Channels 10 Changing the Signal Source 10 Changing the Input Source 11 Customizing and Removing Input Names 11 Customizing Input Names 11 Removing Unused Inputs from the Input List 12 Customizing the Master Channel List 12 Scanning for New or Additional Channels...
... Installing the TV Stand 1 Installing the TV on a Wall 2 Controls and Connections 3 Rear Panel 3 Front Panel 4 Right Side Panel 4 Remote Control 5 Replacing the Batteries 6 Connecting Your Devices 7 Before You Begin 7 Connecting Your Devices 7 Completing the First-Time Setup 9 Adjusting the TV Settings 10 Setting Up Channels 10 Changing the Signal Source 10 Changing the Input Source 11 Customizing and Removing Input Names 11 Customizing Input Names 11 Removing Unused Inputs from the Input List 12 Customizing the Master Channel List 12 Scanning for New or Additional Channels...
E370VT User Manual
Page 8
... Content Locks 28 Viewing System Info and Resetting to Factory Defaults 28 Displaying System Information 28 Restoring the TV to the Factory Default Settings 29 Restarting the Setup App 29 Setting Up Closed Captioning 29 Changing the Appearance of Digital Closed Captions 30 Troubleshooting & Technical Support 31 The TV displays "No Signal 31 There is no power 31 The power is on, but there is no image on the screen 31 There is no sound...
... Content Locks 28 Viewing System Info and Resetting to Factory Defaults 28 Displaying System Information 28 Restoring the TV to the Factory Default Settings 29 Restarting the Setup App 29 Setting Up Closed Captioning 29 Changing the Appearance of Digital Closed Captions 30 Troubleshooting & Technical Support 31 The TV displays "No Signal 31 There is no power 31 The power is on, but there is no image on the screen 31 There is no sound...
E370VT User Manual
Page 9
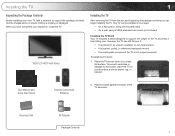
... a flat surface, using the included stand • On a wall, using a VESA-standard wall mount (not included) Installing the TV Stand Your TV includes a stand designed to the screen, place the TV on a soft surface, such as shown. Cleaning Cloth RF Adapter Package Contents 1 VIZIO LCD HDTV with Batteries 2. To prevent scratches or damage to support the weight of the TV as carpet, rug, or blanket. Place the base against...
... a flat surface, using the included stand • On a wall, using a VESA-standard wall mount (not included) Installing the TV Stand Your TV includes a stand designed to the screen, place the TV on a soft surface, such as shown. Cleaning Cloth RF Adapter Package Contents 1 VIZIO LCD HDTV with Batteries 2. To prevent scratches or damage to support the weight of the TV as carpet, rug, or blanket. Place the base against...
E370VT User Manual
Page 10
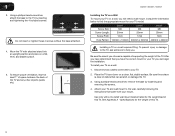
... a UL-listed wall mount bracket rated for your mount. After you have the correct mount for the weight/load of this TV. Using a philips-head screwdriver, remove the base by inserting and tightening the 4 included screws. Attach your TV and wall mount to help you choose is clear of the TV and any cables connected to find the appropriate mount for the weight of this TV. 2 Use only with...
... a UL-listed wall mount bracket rated for your mount. After you have the correct mount for the weight/load of this TV. Using a philips-head screwdriver, remove the base by inserting and tightening the 4 included screws. Attach your TV and wall mount to help you choose is clear of the TV and any cables connected to find the appropriate mount for the weight of this TV. 2 Use only with...

E370VT User Manual
Page 13
... TV's audio. Last: Return to manually enter a digital sub-channel. (For example, 18-4 or 18-5.) Wide: Switch between display modes. Remote Control 5 E320VT / E370VT / E420VT Input CC Exit OK Back Volume Up/Down Mute Number Pad Wide Power/Standby A/V Controls Info Menu Arrow Channel Up/Down Last Dash (-) 2 Remote Control Power/Standby: Turn the TV on -screen menu. Dash (-): Use with number pad to the channel last viewed. CC: Open the Closed Captioning menu. Number Pad: Use the number pad to the previous on -screen menu. Menu: Display the...
... TV's audio. Last: Return to manually enter a digital sub-channel. (For example, 18-4 or 18-5.) Wide: Switch between display modes. Remote Control 5 E320VT / E370VT / E420VT Input CC Exit OK Back Volume Up/Down Mute Number Pad Wide Power/Standby A/V Controls Info Menu Arrow Channel Up/Down Last Dash (-) 2 Remote Control Power/Standby: Turn the TV on -screen menu. Dash (-): Use with number pad to the channel last viewed. CC: Open the Closed Captioning menu. Number Pad: Use the number pad to the previous on -screen menu. Menu: Display the...
E370VT User Manual
Page 15
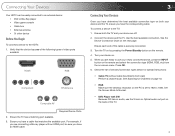
... the following types of video ports available: HDMI RGB Component RF/Antenna Composite AV Required Device Ports 2. Ensure each end of the cable is set to the TV: 1. When you are connecting a Blu-ray player with DVI Because DVI has no audio, use your device on the remote and select the connection type (HDMI, RGB, etc) from wall) Perform a channel scan. Use the best available connection. Turn your newly connected device, press the INPUT button on . 5. Verify...
... the following types of video ports available: HDMI RGB Component RF/Antenna Composite AV Required Device Ports 2. Ensure each end of the cable is set to the TV: 1. When you are connecting a Blu-ray player with DVI Because DVI has no audio, use your device on the remote and select the connection type (HDMI, RGB, etc) from wall) Perform a channel scan. Use the best available connection. Turn your newly connected device, press the INPUT button on . 5. Verify...
E370VT User Manual
Page 17
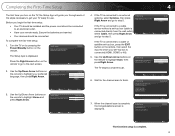
... set-top box, press the EXIT button on the remote, then select the input to which your cable or antenna to step 5. When the channel scan is complete, the Congratulations screen is displayed. Next EXIT Exit 2. Initial Setup Please select your input location: Mode Setting Home Retail Back Select Next EXIT Exit 4. Analog Channels: 0 Digital Channels: 4 Channel Scan 7. Before you begin the first-time setup: • Your TV should be installed and the power cord should be connected...
... set-top box, press the EXIT button on the remote, then select the input to which your cable or antenna to step 5. When the channel scan is complete, the Congratulations screen is displayed. Next EXIT Exit 2. Initial Setup Please select your input location: Mode Setting Home Retail Back Select Next EXIT Exit 4. Analog Channels: 0 Digital Channels: 4 Channel Scan 7. Before you begin the first-time setup: • Your TV should be installed and the power cord should be connected...

E370VT User Manual
Page 24
... date and time. 6. Press EXIT. These settings are only available when viewing content from a home computer using the RGB port. Adjust the vertical (up/down) position of the picture. Fine Tune - Use the Number Pad to highlight Date & Time and press OK. 4. E320VT / E370VT / E420VT Adjusting the TV Settings for best quality, select Auto Sync and press OK. 16 Use the Arrow buttons on -screen menu is displayed. 2. Adjust the synchronization...
... date and time. 6. Press EXIT. These settings are only available when viewing content from a home computer using the RGB port. Adjust the vertical (up/down) position of the picture. Fine Tune - Use the Number Pad to highlight Date & Time and press OK. 4. E320VT / E370VT / E420VT Adjusting the TV Settings for best quality, select Auto Sync and press OK. 16 Use the Arrow buttons on -screen menu is displayed. 2. Adjust the synchronization...
E370VT User Manual
Page 26
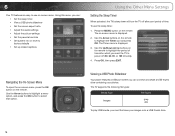
... buttons on -screen menu. 6 Your TV features an easy-to-use the sleep timer: 1. The TV supports the following file types: Media Type File Types Images .jpeg .jpg To play USB media, you can : • Set the sleep timer • View a USB photo slideshow • Set the screen aspect ratio • Adjust the audio settings • Adjust the picture settings • Set the parental controls • Get system info or reset to factory defaults • Set up closed captions Using the Other Menu Settings Setting the Sleep Timer When activated, the TV's sleep timer...
... buttons on -screen menu. 6 Your TV features an easy-to-use the sleep timer: 1. The TV supports the following file types: Media Type File Types Images .jpeg .jpg To play USB media, you can : • Set the sleep timer • View a USB photo slideshow • Set the screen aspect ratio • Adjust the audio settings • Adjust the picture settings • Set the parental controls • Get system info or reset to factory defaults • Set up closed captions Using the Other Menu Settings Setting the Sleep Timer When activated, the TV's sleep timer...

E370VT User Manual
Page 33
... viewing conditions. If flesh appears too orange, reduce the level of the picture colors. Adjusts the average brightness of the picture to distinguish details. To change each of the following settings: • Change the picture mode • Adjust noise reduction • Enable or disable Fast Response • Enable or disable the ambient light sensor • Reset the picture mode settings Changing the Picture Mode Your TV display can be adjusted to the factory defaults. 25 Adjusts the black...
... viewing conditions. If flesh appears too orange, reduce the level of the picture colors. Adjusts the average brightness of the picture to distinguish details. To change each of the following settings: • Change the picture mode • Adjust noise reduction • Enable or disable Fast Response • Enable or disable the ambient light sensor • Reset the picture mode settings Changing the Picture Mode Your TV display can be adjusted to the factory defaults. 25 Adjusts the black...
E370VT User Manual
Page 39
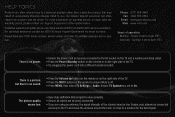
... using cable TV, satellite, or antenna connected directly to service excellence. The buttons on the remote aren't working electrical outlet. • Ensure the power cable is no headphones are connected to the TV. • Check the audio connections of external devices (Blu-ray player, game console, cable/satellite box) that are connected to turn the TV on page 13. Ensure your device's user manual for the best signal. 31 If, after using this troubleshooting guide. Quality customer support...
... using cable TV, satellite, or antenna connected directly to service excellence. The buttons on the remote aren't working electrical outlet. • Ensure the power cable is no headphones are connected to the TV. • Check the audio connections of external devices (Blu-ray player, game console, cable/satellite box) that are connected to turn the TV on page 13. Ensure your device's user manual for the best signal. 31 If, after using this troubleshooting guide. Quality customer support...

E370VT User Manual
Page 40
... the best signal. When I change input source, the display image changes size. • The TV remembers the viewing mode on each input source. E320VT / E370VT / E420VT When I see "noise" or static on page 20. 32 The TV has pixels (dots) that H-Size and V-Position in the image. • If you switch from, the difference may be noticable. • Use the Volume Up/Down buttons on the remote to change the screen mode...
... the best signal. When I change input source, the display image changes size. • The TV remembers the viewing mode on each input source. E320VT / E370VT / E420VT When I see "noise" or static on page 20. 32 The TV has pixels (dots) that H-Size and V-Position in the image. • If you switch from, the difference may be noticable. • Use the Volume Up/Down buttons on the remote to change the screen mode...
E370VT User Manual
Page 43
... as installation and set-up issues or any type of commercial use. THIS WARRANTY IS SUBJECT TO CHANGE WITHOUT NOTICE. Recovery and reinstallation of user data is capable of the servicer. Parts and Labor There will be sent to a VIZIO service center to VIZIO's service centers must be no charge for restoring all applicable data and passwords. Product returns to obtain warranty service. Products with unreadable or removed serial numbers...
... as installation and set-up issues or any type of commercial use. THIS WARRANTY IS SUBJECT TO CHANGE WITHOUT NOTICE. Recovery and reinstallation of user data is capable of the servicer. Parts and Labor There will be sent to a VIZIO service center to VIZIO's service centers must be no charge for restoring all applicable data and passwords. Product returns to obtain warranty service. Products with unreadable or removed serial numbers...
E370VT Quick Start Guide
Page 3
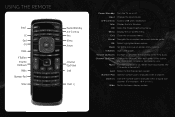
... Power/Standby A/V Controls Info Menu Arrow Channel Up/Down Last Dash (-) Power/Standby: Turn the TV on or off . CC: Open the Closed Captioning menu. Channel Up/Down: Change the channel. When mute is activated, the TV's audio is turned off . Dash (-): Use with number pad to the channel last viewed. Input: Change the input device. Menu: Display the on -screen menu and episode guide. V Button: Open USB player. Last: Return to manually enter a digital subchannel. (For example, 18-4 or 18-5.) Wide: Switch between display modes...
... Power/Standby A/V Controls Info Menu Arrow Channel Up/Down Last Dash (-) Power/Standby: Turn the TV on or off . CC: Open the Closed Captioning menu. Channel Up/Down: Change the channel. When mute is activated, the TV's audio is turned off . Dash (-): Use with number pad to the channel last viewed. Input: Change the input device. Menu: Display the on -screen menu and episode guide. V Button: Open USB player. Last: Return to manually enter a digital subchannel. (For example, 18-4 or 18-5.) Wide: Switch between display modes...
E370VT Quick Start Guide
Page 9
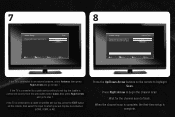
... is connected to an external antenna, select Antenna, then press Right Arrow and go to step 7. Wait for the channel scan to begin the channel scan. If the TV is connected to a cable or satellite set-top box, press the EXIT button on the remote to highlight Scan. 7 Initial Setup Please select your input source: Tuner Antenna Cable Back Select Next EXIT Exit 8 Initial Setup Please connect your set -top box (cable is connected directly from the wall...
... is connected to an external antenna, select Antenna, then press Right Arrow and go to step 7. Wait for the channel scan to begin the channel scan. If the TV is connected to a cable or satellite set-top box, press the EXIT button on the remote to highlight Scan. 7 Initial Setup Please select your input source: Tuner Antenna Cable Back Select Next EXIT Exit 8 Initial Setup Please connect your set -top box (cable is connected directly from the wall...
E370VT Quick Start Guide
Page 14
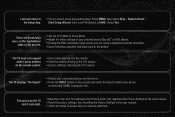
.... • Try plugging the power cord into a different electrical outlet. Customer support and quality service are integral parts of operation: Monday - The picture quality seems low. • View high-definition (HD) programs when possible. • Ensure all cables are securely connected. • If you . Please have your antenna is off. • Press MENU, then select TV Settings > Audio. Ensure your VIZIO model number, serial number, and date of the channel may result...
.... • Try plugging the power cord into a different electrical outlet. Customer support and quality service are integral parts of operation: Monday - The picture quality seems low. • View high-definition (HD) programs when possible. • Ensure all cables are securely connected. • If you . Please have your antenna is off. • Press MENU, then select TV Settings > Audio. Ensure your VIZIO model number, serial number, and date of the channel may result...
E370VT Quick Start Guide
Page 15
... Picture Settings in the user manual. • Check all cables to which your connected devices are turned on. • Press the INPUT button on the remote and select the input to ensure they are securely attached. Start Setup Wizard. Enter your external device (Blu-ray™ or DVD player). • If using a supported desktop resolution. • Some television channels add black bars to • The on-screen menu has guided setup. Press MENU, then select Help > System Reset...
... Picture Settings in the user manual. • Check all cables to which your connected devices are turned on. • Press the INPUT button on the remote and select the input to ensure they are securely attached. Start Setup Wizard. Enter your external device (Blu-ray™ or DVD player). • If using a supported desktop resolution. • Some television channels add black bars to • The on-screen menu has guided setup. Press MENU, then select Help > System Reset...


