E321ME User Manual
Page 3
... 5 Replacing the Batteries 6 Front Panel 6 Connecting Your Devices 7 Before You Begin 7 Connecting Your Devices 7 Completing the First-Time Setup 9 Adjusting the TV Settings 10 Navigating the On-Screen Menu 10 Adjusting the Tuner Settings 10 Changing the Signal Source 10 Scanning for Channels 11 Scanning for New...the Time for Daylight Savings 15 Enabling or Disabling Automatic Date and Time Updates 16 Setting the Date and Time 16 Turning the VIZIO Light On or Off 16 Using the Other Menu Settings 17 Navigating the On-Screen Menu 17 Changing the Input Source 17 Customizing...
... 5 Replacing the Batteries 6 Front Panel 6 Connecting Your Devices 7 Before You Begin 7 Connecting Your Devices 7 Completing the First-Time Setup 9 Adjusting the TV Settings 10 Navigating the On-Screen Menu 10 Adjusting the Tuner Settings 10 Changing the Signal Source 10 Scanning for Channels 11 Scanning for New...the Time for Daylight Savings 15 Enabling or Disabling Automatic Date and Time Updates 16 Setting the Date and Time 16 Turning the VIZIO Light On or Off 16 Using the Other Menu Settings 17 Navigating the On-Screen Menu 17 Changing the Input Source 17 Customizing...

E321ME User Manual
Page 4
...'t working 30 The image quality is not good 30 The picture is distorted 31 The display image does not cover the entire screen 31 The TV has pixels (dots) that are always dark or always lit 31 I see "noise" or static on the screen 31 When I change input source, the ... Specifications 32 Limited Warranty 33 ON PARTS AND LABOR 33 Parts and Labor 33 Type of Service 33 Limitations and Exclusions 33 Personal Data 33 E321ME Zero Bright Pixel Defect Guarantee 33 Legal & Compliance 34 FCC Class B Radio Interference Statement 34 Notice...34 FCC warning 34 Caution 34 Open Source Software...
...'t working 30 The image quality is not good 30 The picture is distorted 31 The display image does not cover the entire screen 31 The TV has pixels (dots) that are always dark or always lit 31 I see "noise" or static on the screen 31 When I change input source, the ... Specifications 32 Limited Warranty 33 ON PARTS AND LABOR 33 Parts and Labor 33 Type of Service 33 Limitations and Exclusions 33 Personal Data 33 E321ME Zero Bright Pixel Defect Guarantee 33 Legal & Compliance 34 FCC Class B Radio Interference Statement 34 Notice...34 FCC warning 34 Caution 34 Open Source Software...
E321ME User Manual
Page 6
... manufacturer, or sold with a third grounding pin). If the provided plug does not fit into your TV. When a cart is always flowing into the apparatus, the apparatus has been exposed E321ME to rain or moisture, does not operate normally or has been dropped. • Unplug the power ...cord before cleaning your TV close to qualified service personnel. Do not install your TV. • When moving the cart/ apparatus combination to...
... manufacturer, or sold with a third grounding pin). If the provided plug does not fit into your TV. When a cart is always flowing into the apparatus, the apparatus has been exposed E321ME to rain or moisture, does not operate normally or has been dropped. • Unplug the power ...cord before cleaning your TV close to qualified service personnel. Do not install your TV. • When moving the cart/ apparatus combination to...

E321ME User Manual
Page 7
E321ME • Do not overload power strips and extension cords. Any other voltage than that the power cord and any abnormality occurs. If any object drops into your TV, unplug the power cord and contact your TV yourself. • Avoid using dropped or damaged appliances. Unplug the power cord immediately and contact your TV... your dealer immediately. Liquid sprays or any smoke or odor becomes apparent, unplug the power cord and contact your TV. These servicing instructions are qualified to dripping or splashing and no objects fill with instructions. Overloading can result in ...
E321ME • Do not overload power strips and extension cords. Any other voltage than that the power cord and any abnormality occurs. If any object drops into your TV, unplug the power cord and contact your TV yourself. • Avoid using dropped or damaged appliances. Unplug the power cord immediately and contact your TV... your dealer immediately. Liquid sprays or any smoke or odor becomes apparent, unplug the power cord and contact your TV. These servicing instructions are qualified to dripping or splashing and no objects fill with instructions. Overloading can result in ...

E321ME User Manual
Page 8
... continue to grounding electrodes, and requirements of the grounding electrode. Lightning Protection For added protection of the TV during a lightning storm or when it could fall into such power lines or circuits. E321ME Television Antenna Connection Protection If an outside antenna/satellite dish or cable system is to be connected to...
... continue to grounding electrodes, and requirements of the grounding electrode. Lightning Protection For added protection of the TV during a lightning storm or when it could fall into such power lines or circuits. E321ME Television Antenna Connection Protection If an outside antenna/satellite dish or cable system is to be connected to...

E321ME User Manual
Page 9
... a soft surface, such as carpet, rug, or blanket. However, the TV can begin installing the TV. Installing the TV After removing the TV from falling over if: • It is placed on a clean, flat surface. VIZIO LCD HDTV with Batteries Package Contents 1 To prevent scratches or damage to inspect... the package contents. When you can still fall over . Place the TV screen-down on an uneven, unstable, or non-level surface •...
... a soft surface, such as carpet, rug, or blanket. However, the TV can begin installing the TV. Installing the TV After removing the TV from falling over if: • It is placed on a clean, flat surface. VIZIO LCD HDTV with Batteries Package Contents 1 To prevent scratches or damage to inspect... the package contents. When you can still fall over . Place the TV screen-down on an uneven, unstable, or non-level surface •...

E321ME User Manual
Page 10
... flat, stable surface. To install your TV on a wall, you will need a wall mount. After you can scratch or damage the TV. 2 1 3. To prevent injury or damage to the TV, ask someone to your TV model: Screw Size: Screw Length: Screw Pitch: Hole Pattern: E321ME M6 12.5mm 1mm 200mm x 200mm ...Installing a TV on a wall: 1. Be sure the mount you . Consult the...
... flat, stable surface. To install your TV on a wall, you will need a wall mount. After you can scratch or damage the TV. 2 1 3. To prevent injury or damage to the TV, ask someone to your TV model: Screw Size: Screw Length: Screw Pitch: Hole Pattern: E321ME M6 12.5mm 1mm 200mm x 200mm ...Installing a TV on a wall: 1. Be sure the mount you . Consult the...

E321ME User Manual
Page 11
E321ME 1 3. Attach your TV and wall mount to the wall, carefully following the instructions that came with a UL-listed wall mount bracket rated for the weight of this TV. 3 Gently remove the stand neck. 5. See Appendix A - Using a philips-head screwdriver, remove the base by loosening and removing the screws. 4. Use only with your mount. Specifications for the weight/load of this TV.
E321ME 1 3. Attach your TV and wall mount to the wall, carefully following the instructions that came with a UL-listed wall mount bracket rated for the weight of this TV. 3 Gently remove the stand neck. 5. See Appendix A - Using a philips-head screwdriver, remove the base by loosening and removing the screws. 4. Use only with your mount. Specifications for the weight/load of this TV.

E321ME User Manual
Page 12
... cable from cable, antenna, or satellite box. Composite: When using composite, use only yellow, white, and red ports. With each press of the TVs audio. HDMI (1,2,3): Connect HDMI devices. RCA Audio Out: Connect RCA audio device (soundbar, receiver, etc). Use 3.5mm port to view photos. Menu...: Display on or off. Volume Up/Down: Increase or decrease the loudness of the button, the TV will display a different input source. Input: Change the input device. 2 Rear Panel HDMI(BEST) USB USB USB 1 2 HDMI (1,2,3) 3 R RCA Audio ...
... cable from cable, antenna, or satellite box. Composite: When using composite, use only yellow, white, and red ports. With each press of the TVs audio. HDMI (1,2,3): Connect HDMI devices. RCA Audio Out: Connect RCA audio device (soundbar, receiver, etc). Use 3.5mm port to view photos. Menu...: Display on or off. Volume Up/Down: Increase or decrease the loudness of the button, the TV will display a different input source. Input: Change the input device. 2 Rear Panel HDMI(BEST) USB USB USB 1 2 HDMI (1,2,3) 3 R RCA Audio ...

E321ME User Manual
Page 13
E321ME Remote Control Input CC Exit OK Back V Button Volume Up/Down Mute Number Pad Wide Power/Standby A/V Controls Info Menu Arrow Guide Channel Up/Down Last Dash (-) 2 Power/Standby: Turn the TV on or off . Exit: Close the on -screen menu and episode guide. Volume Up/ Increase or... previous on-screen menu options. A/V Controls: Control external device (CEC-enabled devices only). With each press of the TV's audio. OK: Select highlighted menu option. When mute is activated, the TV's audio is turned off . Down: Mute: Turn the sound off or on -screen menu. Channel Up/ Change...
E321ME Remote Control Input CC Exit OK Back V Button Volume Up/Down Mute Number Pad Wide Power/Standby A/V Controls Info Menu Arrow Guide Channel Up/Down Last Dash (-) 2 Power/Standby: Turn the TV on or off . Exit: Close the on -screen menu and episode guide. Volume Up/ Increase or... previous on-screen menu options. A/V Controls: Control external device (CEC-enabled devices only). With each press of the TV's audio. OK: Select highlighted menu option. When mute is activated, the TV's audio is turned off . Down: Mute: Turn the sound off or on -screen menu. Channel Up/ Change...

E321ME User Manual
Page 15
... Devices Your HDTV can be sure you have an HDMI cable. 3 Connecting Your Devices Once you have determined the best available connection type on the TV. 7 Ensure you are ready to use your device are connecting a Blu-ray player with DVI Connect left (white) and right (red) audio cables to the... PC is securely connected. 3. See the Device Connection Chart on the remote. 4. Ensure each end of the cable is set to the TV: 1. Turn your device and the TV, ensure you have a cable that the device has one of the following types of devices/connection types below for Channels on page 11...
... Devices Your HDTV can be sure you have an HDMI cable. 3 Connecting Your Devices Once you have determined the best available connection type on the TV. 7 Ensure you are ready to use your device are connecting a Blu-ray player with DVI Connect left (white) and right (red) audio cables to the... PC is securely connected. 3. See the Device Connection Chart on the remote. 4. Ensure each end of the cable is set to the TV: 1. Turn your device and the TV, ensure you have a cable that the device has one of the following types of devices/connection types below for Channels on page 11...

E321ME User Manual
Page 16
BEST BETTER HDMI RF/ COAXIAL RGB COMPONENT GOOD COMPOSITE AV 8 E321ME Select One: OR OR OR OR DIGITAL DIGITAL / ANALOG ANALOG ANALOG ANALOG Device Connection Chart 3 Select one of the connection types. Use the cable(s) shown to connect the TV to your device.
BEST BETTER HDMI RF/ COAXIAL RGB COMPONENT GOOD COMPOSITE AV 8 E321ME Select One: OR OR OR OR DIGITAL DIGITAL / ANALOG ANALOG ANALOG ANALOG Device Connection Chart 3 Select one of the connection types. Use the cable(s) shown to connect the TV to your device.
E321ME User Manual
Page 17
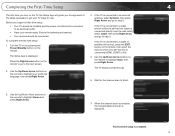
...the Right Arrow button on the remote to highlight Scan, then press Right Arrow. Before you through each of the steps necessary to get your TV ready for the channel scan to finish. 3. To complete the first-time setup: 1. The Setup App is displayed. Wait for use. Use... outlet. • Have your remote ready. Ensure the batteries are inserted. • Your devices should be connected. If the TV is complete. 9 The TV begins a channel scan. 6. If the TV is connected to a cable service without a set -top box, press the EXIT button on the remote to a cable or ...
...the Right Arrow button on the remote to highlight Scan, then press Right Arrow. Before you through each of the steps necessary to get your TV ready for the channel scan to finish. 3. To complete the first-time setup: 1. The Setup App is displayed. Wait for use. Use... outlet. • Have your remote ready. Ensure the batteries are inserted. • Your devices should be connected. If the TV is complete. 9 The TV begins a channel scan. 6. If the TV is connected to a cable service without a set -top box, press the EXIT button on the remote to a cable or ...

E321ME User Manual
Page 18
... and press OK. To change the setting to Cable or Antenna. 6. Use the Arrow buttons on the remote to select that option. 10 Adjusting the TV Settings Adjusting the Tuner Settings From the tuner settings menu you can: • Change the signal source • Scan for channels • Scan for new... signal source for use with a PC • Set up the parental controls • Change the on-screen menu language • Change the TV's date and time • Turn the VIZIO logo on or off Navigating the On-Screen Menu To open the on-screen menu, press the OK or MENU button on...
... and press OK. To change the setting to Cable or Antenna. 6. Use the Arrow buttons on the remote to select that option. 10 Adjusting the TV Settings Adjusting the Tuner Settings From the tuner settings menu you can: • Change the signal source • Scan for channels • Scan for new... signal source for use with a PC • Set up the parental controls • Change the on-screen menu language • Change the TV's date and time • Turn the VIZIO logo on or off Navigating the On-Screen Menu To open the on-screen menu, press the OK or MENU button on...

E321ME User Manual
Page 19
...not have to rescan all channels to highlight Auto Channel Scan and press OK. 5. This is displayed. 3. E321ME 5 Scanning for Channels Before the TV can restrict the scan to highlight the TV icon and press OK. The on the remote to new channels only. Use the Arrow buttons on -screen ...available. Use the Arrow buttons on -screen menu is displayed. 2. The TV Settings menu is displayed. 3. A channel scan may also be necessary when the TV has been moved to an area where different free-to highlight the TV icon and press OK. The channel scan begins. 6. Use the Arrow ...
...not have to rescan all channels to highlight Auto Channel Scan and press OK. 5. This is displayed. 3. E321ME 5 Scanning for Channels Before the TV can restrict the scan to highlight the TV icon and press OK. The on the remote to new channels only. Use the Arrow buttons on -screen ...available. Use the Arrow buttons on -screen menu is displayed. 2. The TV Settings menu is displayed. 3. A channel scan may also be necessary when the TV has been moved to an area where different free-to highlight the TV icon and press OK. The channel scan begins. 6. Use the Arrow ...

E321ME User Manual
Page 20
...Select On or Off and press OK. 12 Press the MENU button on -screen menu is displayed. 2. Use the Arrow buttons to prevent the TV from displaying certain channels or programs without a password. If you see Changing the Parental Control Passcode on page 14. Enter your parental passcode. The...) position of the following options: Horiz. The Rating Enable menu is displayed. 2. Position - Adjust the vertical (up/down) position of the picture. 5 E321ME Adjusting the TV Settings for best quality, select Auto Sync and press OK. The on the remote. Using the Parental Controls The...
...Select On or Off and press OK. 12 Press the MENU button on -screen menu is displayed. 2. Use the Arrow buttons to prevent the TV from displaying certain channels or programs without a password. If you see Changing the Parental Control Passcode on page 14. Enter your parental passcode. The...) position of the following options: Horiz. The Rating Enable menu is displayed. 2. Position - Adjust the vertical (up/down) position of the picture. 5 E321ME Adjusting the TV Settings for best quality, select Auto Sync and press OK. The on the remote. Using the Parental Controls The...

E321ME User Manual
Page 21
... to block content based on the remote to lock or unlock and press OK. 3. For each rating type you are meant for mature audiences. E321ME 5 Locking and Unlocking Channels When a channel is displayed. 2. The Channel Locks menu is locked, it will be viewed. 4. When a channel... visit www.tvguidelines.org. To block or unblock content by Rating A channel may wish to highlight the rating type and press OK. 3. TV - USA television program broadcasts. USA - USA movie broadcasts. CAN - When the rating type is accessible. Content with this rating cannot be...
... to block content based on the remote to lock or unlock and press OK. 3. For each rating type you are meant for mature audiences. E321ME 5 Locking and Unlocking Channels When a channel is displayed. 2. The Channel Locks menu is locked, it will be viewed. 4. When a channel... visit www.tvguidelines.org. To block or unblock content by Rating A channel may wish to highlight the rating type and press OK. 3. TV - USA television program broadcasts. USA - USA movie broadcasts. CAN - When the rating type is accessible. Content with this rating cannot be...

E321ME User Manual
Page 22
... control, you will not function. In the Confirm Pin field, use the buttons on the side of the TV will function. 3. Highlight Yes and press OK. 14 5 E321ME Setting the TV Button Locks WARNING: If you set a passcode, enter the default, 0000. 4. To lock or unlock this lock. From ...factory defaults?" 3. From the Parental Controls menu, highlight User Control Lock and press OK. 2. Press the EXIT button on the side of the TV will be controlled by the remote. Changing the Parental Control Passcode If you should change the passcode to the factory-default settings: 1. Please use...
... control, you will not function. In the Confirm Pin field, use the buttons on the side of the TV will function. 3. Highlight Yes and press OK. 14 5 E321ME Setting the TV Button Locks WARNING: If you set a passcode, enter the default, 0000. 4. To lock or unlock this lock. From ...factory defaults?" 3. From the Parental Controls menu, highlight User Control Lock and press OK. 2. Press the EXIT button on the side of the TV will be controlled by the remote. Changing the Parental Control Passcode If you should change the passcode to the factory-default settings: 1. Please use...
E321ME User Manual
Page 23
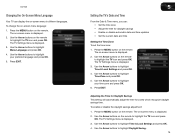
...is displayed. 2. Press EXIT. To enable or disable the daylight savings adjustment: 1. Use the Arrow buttons on the remote. The TV Settings menu is displayed. 3. Use the Arrow buttons to highlight the TV icon and press OK. The on -screen menu language: 1. The on -screen menu is displayed. 2. The... to highlight Time & Local Settings and press OK. 4. Use the Arrow buttons to highlight Menu Language and press OK. 4. E321ME Changing the On-Screen Menu Language Your TV can : • Set the time zone • Adjust the time for zones which recognize daylight savings time. Use the Arrow...
...is displayed. 2. Press EXIT. To enable or disable the daylight savings adjustment: 1. Use the Arrow buttons on the remote. The TV Settings menu is displayed. 3. Use the Arrow buttons to highlight the TV icon and press OK. The on -screen menu language: 1. The on -screen menu is displayed. 2. The... to highlight Time & Local Settings and press OK. 4. Use the Arrow buttons to highlight Menu Language and press OK. 4. E321ME Changing the On-Screen Menu Language Your TV can : • Set the time zone • Adjust the time for zones which recognize daylight savings time. Use the Arrow...

E321ME User Manual
Page 24
... Time & Local Settings and press OK. 4. Press the MENU button on the remote to highlight the TV icon and press OK. Use the Arrow buttons to enter the current date and time. 6. 5 E321ME 5. Enabling or Disabling Automatic Date and Time Updates The current date and time is displayed. 3. Use... set to Enable or Disable. 6. Use the Arrow buttons to change the setting to On, the VIZIO logo will remain off : 1. Press EXIT. The TV Settings menu is enabled, you to highlight the TV icon and press OK. To enable or disable automatic updates: 1. Press the MENU button on the ...
... Time & Local Settings and press OK. 4. Press the MENU button on the remote to highlight the TV icon and press OK. Use the Arrow buttons to enter the current date and time. 6. 5 E321ME 5. Enabling or Disabling Automatic Date and Time Updates The current date and time is displayed. 3. Use... set to Enable or Disable. 6. Use the Arrow buttons to change the setting to On, the VIZIO logo will remain off : 1. Press EXIT. The TV Settings menu is enabled, you to highlight the TV icon and press OK. To enable or disable automatic updates: 1. Press the MENU button on the ...


