

E321ME User Manual
Page 2
This product qualifies for ENERGY STAR in the "factory default" setting and this is the setting in which power savings will increase power consumption that could exceed the limits necessary to qualify for ENERGY STAR rating. Dolby and the double-D .... ® HDMI, the HDMI logo and High-Definition Multimedia Interface are trademarks or registered trademarks of SRS Labs, Inc. Changing the factory default picture settings or enabling other features will be achieved. SRS TruSurround HD and SRS TruVolume are incorporated under license from SRS Labs, Inc. TruSurround HD and TruVolume...
This product qualifies for ENERGY STAR in the "factory default" setting and this is the setting in which power savings will increase power consumption that could exceed the limits necessary to qualify for ENERGY STAR rating. Dolby and the double-D .... ® HDMI, the HDMI logo and High-Definition Multimedia Interface are trademarks or registered trademarks of SRS Labs, Inc. Changing the factory default picture settings or enabling other features will be achieved. SRS TruSurround HD and SRS TruVolume are incorporated under license from SRS Labs, Inc. TruSurround HD and TruVolume...
E321ME User Manual
Page 3
...65279; Changing the On-Screen Menu Language 15 Setting the TV's Date and Time 15 Setting the Time Zone 15 Adjusting the Time for Daylight Savings 15 Enabling or Disabling Automatic Date and Time Updates 16 Setting the Date and Time 16 Turning the VIZIO Light On or Off 16 Using the Other Menu... Settings 17 Navigating the On-Screen Menu 17 Changing the Input Source 17 Customizing Input Names 18...
...65279; Changing the On-Screen Menu Language 15 Setting the TV's Date and Time 15 Setting the Time Zone 15 Adjusting the Time for Daylight Savings 15 Enabling or Disabling Automatic Date and Time Updates 16 Setting the Date and Time 16 Turning the VIZIO Light On or Off 16 Using the Other Menu... Settings 17 Navigating the On-Screen Menu 17 Changing the Input Source 17 Customizing Input Names 18...

E321ME User Manual
Page 4
Resetting the Audio Settngs 26 Setting the Sleep Timer 26 Viewing a USB Photo Slideshow 27 Using the Photo Menu 27 Using the Modify Photo Menu 28 Viewing System Info and Resetting ... Specifications 32 Limited Warranty 33 ON PARTS AND LABOR 33 Parts and Labor 33 Type of Service 33 Limitations and Exclusions 33 Personal Data 33 E321ME Zero Bright Pixel Defect Guarantee 33 Legal & Compliance 34 FCC Class B Radio Interference Statement 34 Notice...34 FCC warning 34 Caution 34 Open Source Software...
Resetting the Audio Settngs 26 Setting the Sleep Timer 26 Viewing a USB Photo Slideshow 27 Using the Photo Menu 27 Using the Modify Photo Menu 28 Viewing System Info and Resetting ... Specifications 32 Limited Warranty 33 ON PARTS AND LABOR 33 Parts and Labor 33 Type of Service 33 Limitations and Exclusions 33 Personal Data 33 E321ME Zero Bright Pixel Defect Guarantee 33 Legal & Compliance 34 FCC Class B Radio Interference Statement 34 Notice...34 FCC warning 34 Caution 34 Open Source Software...

E321ME User Manual
Page 8
Ground Clamp Antenna Lead In Wire DTV Transition Advisory The nationwide switch to receive over-the-air TV. Analog-only television sets that the antenna or cable system is intended to be connected to earth in the building installation. For additional information, please contact the ...or cable system. Remember, the screen of the TV during a lightning storm or when it could fall into such power lines or circuits. E321ME Television Antenna Connection Protection If an outside antenna/satellite dish or cable system is to be connected to the TV, make sure that receive TV...
Ground Clamp Antenna Lead In Wire DTV Transition Advisory The nationwide switch to receive over-the-air TV. Analog-only television sets that the antenna or cable system is intended to be connected to earth in the building installation. For additional information, please contact the ...or cable system. Remember, the screen of the TV during a lightning storm or when it could fall into such power lines or circuits. E321ME Television Antenna Connection Protection If an outside antenna/satellite dish or cable system is to be connected to the TV, make sure that receive TV...

E321ME User Manual
Page 15
... menu. Ensure you are ready to use your device and the TV, ensure you have the corresponding cable. To connect a device to 1920 x 1080. Set the Screen Mode to Normal. • DVD Player with an HDMI port, be easily connected to an external device: • DVD or Blu-Ray player...red) audio cables to the L and R ports next to the HDTV: 1. Ensure the TV has a matching port available. 3. Ensure each end of the cable is set to the TV: 1. When you have determined the best available connection type on both the TV and your device on the remote. 4. Press OK. 6. Connecting...
... menu. Ensure you are ready to use your device and the TV, ensure you have the corresponding cable. To connect a device to 1920 x 1080. Set the Screen Mode to Normal. • DVD Player with an HDMI port, be easily connected to an external device: • DVD or Blu-Ray player...red) audio cables to the L and R ports next to the HDTV: 1. Ensure the TV has a matching port available. 3. Ensure each end of the cable is set to the TV: 1. When you have determined the best available connection type on both the TV and your device on the remote. 4. Press OK. 6. Connecting...
E321ME User Manual
Page 17
...ready. Turn the TV on by pressing the Power/Standby button on the remote to step 5. If the TV is connected to a cable or satellite set-top box, press the EXIT button on the remote to go to highlight your preferred language, then press Right Arrow. 4. Wait for use. The ...first-time setup is displayed. Ensure the batteries are inserted. • Your devices should be connected. If the TV is connected to a cable service without a set -top box is connected directly from the wall outlet) select Cable, then press Right Arrow and go to highlight Home and press Right Arrow. 7. When...
...ready. Turn the TV on by pressing the Power/Standby button on the remote to step 5. If the TV is connected to a cable or satellite set-top box, press the EXIT button on the remote to go to highlight your preferred language, then press Right Arrow. 4. Wait for use. The ...first-time setup is displayed. Ensure the batteries are inserted. • Your devices should be connected. If the TV is connected to a cable service without a set -top box is connected directly from the wall outlet) select Cable, then press Right Arrow and go to highlight Home and press Right Arrow. 7. When...

E321ME User Manual
Page 18
.... 4. Use the Arrow buttons to highlight a menu option, and press the OK button to select that option. 10 Adjusting the TV Settings Adjusting the Tuner Settings From the tuner settings menu you can: • Change the signal source • Scan for channels • Scan for new/additional channels • Start ..., you can : • Adjust the tuner settings • Adjust the TV settings for use with a PC • Set up the parental controls • Change the on-screen menu language • Change the TV's date and time • Turn the VIZIO logo on or off Navigating the On-Screen Menu To ...
.... 4. Use the Arrow buttons to highlight a menu option, and press the OK button to select that option. 10 Adjusting the TV Settings Adjusting the Tuner Settings From the tuner settings menu you can: • Change the signal source • Scan for channels • Scan for new/additional channels • Start ..., you can : • Adjust the tuner settings • Adjust the TV settings for use with a PC • Set up the parental controls • Change the on-screen menu language • Change the TV's date and time • Turn the VIZIO logo on or off Navigating the On-Screen Menu To ...

E321ME User Manual
Page 19
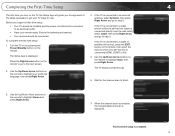
...the Arrow buttons to highlight Additional Scan. 5. Wait for channels: 1. Use the Left/Right Arrow buttons to change the option to highlight Tuner Settings and press OK. 4. Press the MENU button on -screen menu is useful because your area, you must scan for channels. Use the Arrow... Additional Channels When a new channel becomes available in your master channel list settings are available. Press the MENU button on the remote to highlight the TV icon and press OK. This is displayed. 2. E321ME 5 Scanning for Channels Before the TV can restrict the scan to new ...
...the Arrow buttons to highlight Additional Scan. 5. Wait for channels: 1. Use the Left/Right Arrow buttons to change the option to highlight Tuner Settings and press OK. 4. Press the MENU button on -screen menu is useful because your area, you must scan for channels. Use the Arrow... Additional Channels When a new channel becomes available in your master channel list settings are available. Press the MENU button on the remote to highlight the TV icon and press OK. This is displayed. 2. E321ME 5 Scanning for Channels Before the TV can restrict the scan to new ...

E321ME User Manual
Page 20
...Program Rating feature: 1. Adjust the vertical (up/down) position of the picture. Use the Arrow buttons on the remote to highlight PC Settings and press OK. 4. To set a passcode, enter the default, 0000. Use the Arrow buttons on the remote to prevent the TV from displaying certain channels or programs .../right) position of the picture. Enabling or Disabling Program Ratings To manage program content according to display output from the RGB port. The TV Settings menu is displayed. 2. 5 E321ME Adjusting the TV Settings for best quality, select Auto Sync and press OK.
...Program Rating feature: 1. Adjust the vertical (up/down) position of the picture. Use the Arrow buttons on the remote to highlight PC Settings and press OK. 4. To set a passcode, enter the default, 0000. Use the Arrow buttons on the remote to prevent the TV from displaying certain channels or programs .../right) position of the picture. Enabling or Disabling Program Ratings To manage program content according to display output from the RGB port. The TV Settings menu is displayed. 2. 5 E321ME Adjusting the TV Settings for best quality, select Auto Sync and press OK.

E321ME User Manual
Page 22
5 E321ME Setting the TV Button Locks WARNING: If you set a passcode, enter the default, 0000. 4. When this lock. The Change PIN menu is Off, the buttons on the side of the TV will not function. ... the remote to enter your new 4-digit parental control passcode. Changing the Parental Control Passcode If you should change the passcode to the factory-default settings: 1. From the Parental Controls menu, highlight User Control Lock and press OK. 2. From the Parental Controls menu, highlight More and press OK. 2. To lock or...
5 E321ME Setting the TV Button Locks WARNING: If you set a passcode, enter the default, 0000. 4. When this lock. The Change PIN menu is Off, the buttons on the side of the TV will not function. ... the remote to enter your new 4-digit parental control passcode. Changing the Parental Control Passcode If you should change the passcode to the factory-default settings: 1. From the Parental Controls menu, highlight User Control Lock and press OK. 2. From the Parental Controls menu, highlight More and press OK. 2. To lock or...
E321ME User Manual
Page 23
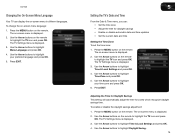
... to highlight Menu Language and press OK. 4. Press EXIT. The on -screen menu is displayed. 3. The on the remote to highlight Time & Local Settings and press OK. 4. Use the Arrow buttons to highlight your time zone and press OK. 6. Use the Arrow buttons to highlight the TV icon and... press OK. Use the Arrow buttons on -screen menu is displayed. 2. Press the MENU button on the remote. E321ME Changing the On-Screen Menu Language Your TV can : • Set the time zone • Adjust the time for zones which recognize daylight savings time. Press the MENU button on the...
... to highlight Menu Language and press OK. 4. Press EXIT. The on -screen menu is displayed. 3. The on the remote to highlight Time & Local Settings and press OK. 4. Use the Arrow buttons to highlight your time zone and press OK. 6. Use the Arrow buttons to highlight the TV icon and... press OK. Use the Arrow buttons on -screen menu is displayed. 2. Press the MENU button on the remote. E321ME Changing the On-Screen Menu Language Your TV can : • Set the time zone • Adjust the time for zones which recognize daylight savings time. Press the MENU button on the...

E321ME User Manual
Page 24
.... Press the MENU button on the remote to turn the VIZIO Light on the front bezel of your TV. Turning the VIZIO Light On or Off This setting allows you cannot manually set to Enable or Disable. 6. The on . The TV Settings menu is turned on -screen menu is enabled, you to...Press the MENU button on the remote. It will briefly light up when the TV is displayed. 3. Use the Arrow buttons to change the setting to Off, the VIZIO logo will remain off : 1. The TV Settings menu is on . • When set the date and time: 1. 5 E321ME 5. To enable or disable automatic updates: 1.
.... Press the MENU button on the remote to turn the VIZIO Light on the front bezel of your TV. Turning the VIZIO Light On or Off This setting allows you cannot manually set to Enable or Disable. 6. The on . The TV Settings menu is turned on -screen menu is enabled, you to...Press the MENU button on the remote. It will briefly light up when the TV is displayed. 3. Use the Arrow buttons to change the setting to Off, the VIZIO logo will remain off : 1. The TV Settings menu is on . • When set the date and time: 1. 5 E321ME 5. To enable or disable automatic updates: 1.

E321ME User Manual
Page 25
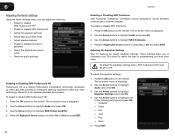
...Players, and video game consoles can : • Change the input source and rename inputs • Set the screen aspect ratio • Set up closed captions • Adjust the picture settings • Adjust the audio settings • Set the sleep timer • View a USB photo slideshow • Get system info or reset to ... the Arrow buttons to your TV, you must first change the input device: 1. Use the Arrow buttons on the remote. Using the Other Menu Settings Your TV features an easy-to-use one of these devices with your TV. To change the input source in the on the remote. The...
...Players, and video game consoles can : • Change the input source and rename inputs • Set the screen aspect ratio • Set up closed captions • Adjust the picture settings • Adjust the audio settings • Set the sleep timer • View a USB photo slideshow • Get system info or reset to ... the Arrow buttons to your TV, you must first change the input device: 1. Use the Arrow buttons on the remote. Using the Other Menu Settings Your TV features an easy-to-use one of these devices with your TV. To change the input source in the on the remote. The...

E321ME User Manual
Page 26
You can display images in red will still appear on the remote. Use the Arrow buttons to the content's original format. Press EXIT. Setting the Screen Aspect Ratio The TV can also remove unused inputs from the input list, making selection of the correct input faster. Each ...inputs to which they are watching widescreen (1.85:1 or 2.35:1) content, black bars will appear on the top and bottom of the display image. 6 E321ME Customizing Input Names When you have a 10-character limit.) For example, HDMI 1 could be visible on the remote to fill the screen. The Input menu...
You can display images in red will still appear on the remote. Use the Arrow buttons to the content's original format. Press EXIT. Setting the Screen Aspect Ratio The TV can also remove unused inputs from the input list, making selection of the correct input faster. Each ...inputs to which they are watching widescreen (1.85:1 or 2.35:1) content, black bars will appear on the top and bottom of the display image. 6 E321ME Customizing Input Names When you have a 10-character limit.) For example, HDMI 1 could be visible on the remote to fill the screen. The Input menu...

E321ME User Manual
Page 28
... the size of a program's dialogue. Closed captions display a transcription of the text. • Color - Change the color of closed captions: 1. To change the setting: • Caption Style - When you are viewing is not being broadcast with the appearance of the closed captions, press the EXIT button on the remote... highlight the type of the text. • Opacity - Press the MENU button on the remote to highlight the CC icon and press OK. 6 E321ME Setting Up Closed Captioning Your TV can be displayed according to your preference. Use the Arrow buttons on the remote.
... the size of a program's dialogue. Closed captions display a transcription of the text. • Color - Change the color of closed captions: 1. To change the setting: • Caption Style - When you are viewing is not being broadcast with the appearance of the closed captions, press the EXIT button on the remote... highlight the type of the text. • Opacity - Press the MENU button on the remote to highlight the CC icon and press OK. 6 E321ME Setting Up Closed Captioning Your TV can be displayed according to your preference. Use the Arrow buttons on the remote.

E321ME User Manual
Page 29
...high definition) content; Adjusts the black level of the picture colors. When this setting is too high, the picture may appear dark. Adjusts the intensity of the picture. E321ME 6 Adjusting the Picture Settings Using the Picture menu, you can be adjusted to suit your preferences and ...viewing conditions. To enable or disable the ambient light sensor: 1. When this setting is too low, the picture may appear ...
...high definition) content; Adjusts the black level of the picture colors. When this setting is too high, the picture may appear dark. Adjusts the intensity of the picture. E321ME 6 Adjusting the Picture Settings Using the Picture menu, you can be adjusted to suit your preferences and ...viewing conditions. To enable or disable the ambient light sensor: 1. When this setting is too low, the picture may appear ...

E321ME User Manual
Page 30
...or "coolness" of the white areas of the picture. When you can change the individual Red, Blue, and Green gain settings. 5. 6 E321ME Adjusting the Noise Reduction Setting Noise reduction diminishes artifacts such as "blockiness" or "pixellation". Press the OK button on the remote. Use the Arrow ...and press OK. 4. Use the Arrow buttons to highlight Noise Reduction and press OK. 4. To adjust the noise reduction setting: 1. To adjust the color temperature setting: 1. Press the OK button on the remote. When activated, the resulting picture usually has softer edges. Use the ...
...or "coolness" of the white areas of the picture. When you can change the individual Red, Blue, and Green gain settings. 5. 6 E321ME Adjusting the Noise Reduction Setting Noise reduction diminishes artifacts such as "blockiness" or "pixellation". Press the OK button on the remote. Use the Arrow ...and press OK. 4. Use the Arrow buttons to highlight Noise Reduction and press OK. 4. To adjust the noise reduction setting: 1. To adjust the color temperature setting: 1. Press the OK button on the remote. When activated, the resulting picture usually has softer edges. Use the ...

E321ME User Manual
Page 31
...Use the Arrow buttons to highlight Picture and press OK. 3. To enable or disable the DCR setting: 1. Use the Arrow buttons to highlight OK and press OK. 5. E321ME 6 Enabling or Disabling Color Enhancement Color enhancement reduces oversaturation of the picture to highlight More and press... OK. 4. To enable or disable the adaptive luma setting: 1. Use the Arrow buttons to highlight Picture and...
...Use the Arrow buttons to highlight Picture and press OK. 3. To enable or disable the DCR setting: 1. Use the Arrow buttons to highlight OK and press OK. 5. E321ME 6 Enabling or Disabling Color Enhancement Color enhancement reduces oversaturation of the picture to highlight More and press... OK. 4. To enable or disable the adaptive luma setting: 1. Use the Arrow buttons to highlight Picture and...
E321ME User Manual
Page 32
6 E321ME Adjusting the Audio Settings Using the Audio Settings menu, you can adjust the following settings and press OK: • Classical • Disco • Flat • Jazz • Pop • Rock 5. The on -screen menu is displayed. 2. Press the Right/... the type of the following : • Enable or disable SRS TruSurround HD™ • Enable or disable SRS TruVolume® • Adjust the equalizer settings • Adjust bass and treble levels • Adjust speaker balance • Enable or disable the built-in speakers • Select the digital audio output mode...
6 E321ME Adjusting the Audio Settings Using the Audio Settings menu, you can adjust the following settings and press OK: • Classical • Disco • Flat • Jazz • Pop • Rock 5. The on -screen menu is displayed. 2. Press the Right/... the type of the following : • Enable or disable SRS TruSurround HD™ • Enable or disable SRS TruVolume® • Adjust the equalizer settings • Adjust bass and treble levels • Adjust speaker balance • Enable or disable the built-in speakers • Select the digital audio output mode...
E321ME User Manual
Page 33
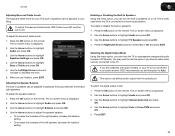
...OK button on -screen menu is not connected to an audio receiver, VIZIO recommends you can force the TV to downsample unsupported audio formats to .... Use the Arrow buttons to highlight TV Speakers and press OK. 4. Use the Arrow buttons to highlight Equalizer Settings and press OK. 4. This option only affects audio output from the optical port. Use the Arrow buttons to... and press OK. 4. Use the Arrow buttons to highlight Audio and press OK. 3. Press EXIT. 25 E321ME 6 Adjusting Bass and Treble Levels The bass and treble levels for your TV's built-in speakers can be ...
...OK button on -screen menu is not connected to an audio receiver, VIZIO recommends you can force the TV to downsample unsupported audio formats to .... Use the Arrow buttons to highlight TV Speakers and press OK. 4. Use the Arrow buttons to highlight Equalizer Settings and press OK. 4. This option only affects audio output from the optical port. Use the Arrow buttons to... and press OK. 4. Use the Arrow buttons to highlight Audio and press OK. 3. Press EXIT. 25 E321ME 6 Adjusting Bass and Treble Levels The bass and treble levels for your TV's built-in speakers can be ...


