
E321ME User Manual
Page 1
32" CLASS LCD HDTV E321ME - user manual
32" CLASS LCD HDTV E321ME - user manual

E321ME User Manual
Page 5
...is intended to alert you to the presence of mind, and to protect your investment beyond the standard warranty, VIZIO offers on your new VIZIO HDTV. When Reading this Manual When you attach your sales receipt to ensure there are no missing or damaged parts. My Product Information Enter ... before using your product and retain them for safekeeping. When you either: • Register your VIZIO product at 1-888-849-4623. Be sure to inspect the package contents to this manual for future reference. We recommend that you see this symbol, please read the accompanying helpful tip....
...is intended to alert you to the presence of mind, and to protect your investment beyond the standard warranty, VIZIO offers on your new VIZIO HDTV. When Reading this Manual When you attach your sales receipt to ensure there are no missing or damaged parts. My Product Information Enter ... before using your product and retain them for safekeeping. When you either: • Register your VIZIO product at 1-888-849-4623. Be sure to inspect the package contents to this manual for future reference. We recommend that you see this symbol, please read the accompanying helpful tip....

E321ME User Manual
Page 9
...; It is pushed, pulled, or otherwise improperly moved • If an earthquake occurs and the TV is missing or damaged. User Manual and Quick Start Guide Remote Control with Stand 2. VIZIO LCD HDTV with Batteries Package Contents 1 When you can be installed in two ways: • On a flat surface, using the included...
...; It is pushed, pulled, or otherwise improperly moved • If an earthquake occurs and the TV is missing or damaged. User Manual and Quick Start Guide Remote Control with Stand 2. VIZIO LCD HDTV with Batteries Package Contents 1 When you can be installed in two ways: • On a flat surface, using the included...

E321ME User Manual
Page 13
... the channel last viewed. When mute is activated, the TV's audio is turned off or on -screen menu. Dash (-): Use with number pad to manually enter a channel. OK: Select highlighted menu option. Channel Up/ Change the channel. Volume Up/ Increase or decrease the loudness of the button, the Down... Info Window. Arrow: Navigate the on or off. With each press of the TV's audio. Last: Return to the previous on -screen menu. E321ME Remote Control Input CC Exit OK Back V Button Volume Up/Down Mute Number Pad Wide Power/Standby A/V Controls Info Menu Arrow Guide Channel Up/Down...
... the channel last viewed. When mute is activated, the TV's audio is turned off or on -screen menu. Dash (-): Use with number pad to manually enter a channel. OK: Select highlighted menu option. Channel Up/ Change the channel. Volume Up/ Increase or decrease the loudness of the button, the Down... Info Window. Arrow: Navigate the on or off. With each press of the TV's audio. Last: Return to the previous on -screen menu. E321ME Remote Control Input CC Exit OK Back V Button Volume Up/Down Mute Number Pad Wide Power/Standby A/V Controls Info Menu Arrow Guide Channel Up/Down...

E321ME User Manual
Page 24
...and time. 6. Use the Number Pad to highlight Date & Time. 5. Press EXIT. To turn off the back-lit VIZIO logo on -screen menu is displayed. 2. The on the front bezel of your TV. 5 E321ME 5. Press EXIT. Use the Arrow buttons on or off while the TV is enabled, you can automatically set... date and time is turned on . 16 The TV Settings menu is displayed. 3. Setting the Date and Time Using this menu option, you cannot manually set to highlight the TV icon and press OK. Use the Arrow buttons to highlight Auto Update. 5. When this information. Use the Arrow buttons to...
...and time. 6. Use the Number Pad to highlight Date & Time. 5. Press EXIT. To turn off the back-lit VIZIO logo on -screen menu is displayed. 2. The on the front bezel of your TV. 5 E321ME 5. Press EXIT. Use the Arrow buttons on or off while the TV is enabled, you can automatically set... date and time is turned on . 16 The TV Settings menu is displayed. 3. Setting the Date and Time Using this menu option, you cannot manually set to highlight the TV icon and press OK. Use the Arrow buttons to highlight Auto Update. 5. When this information. Use the Arrow buttons to...

E321ME User Manual
Page 29
...; Custom - Sets the picture settings to values that does not otherwise exist. 21 If the setting is enabled, you will be unable to manually change the picture mode: 1. Adjusts the intensity of the picture. Adjusts the hue of the picture colors. Adjusts the edge sharpness of the ... brightness of the TV's backlight. Sharpness - It can be used to sharpen non-HD (high definition) content; E321ME 6 Adjusting the Picture Settings Using the Picture menu, you to manually change each of the picture settings: Backlight - Use the Arrow buttons to highlight Picture Mode and press OK. 4....
...; Custom - Sets the picture settings to values that does not otherwise exist. 21 If the setting is enabled, you will be unable to manually change the picture mode: 1. Adjusts the intensity of the picture. Adjusts the hue of the picture colors. Adjusts the edge sharpness of the ... brightness of the TV's backlight. Sharpness - It can be used to sharpen non-HD (high definition) content; E321ME 6 Adjusting the Picture Settings Using the Picture menu, you to manually change each of the picture settings: Backlight - Use the Arrow buttons to highlight Picture Mode and press OK. 4....

E321ME User Manual
Page 38
...time. • Point the remote directly at the TV when pressing a button. • Replace the remote batteries with your device's user manual for Channels on the remote control to select a different input source. • If you are using cable TV, satellite, or antenna ...8226; Reset the picture settings. • Check all devices are connected correctly. If, after using this troubleshooting guide. see your TV, contact VIZIO's Support Department. See Scanning for details. • Adjust Brightness, Contrast, or Backlight. Ensure your TV, try to service excellence. If ...
...time. • Point the remote directly at the TV when pressing a button. • Replace the remote batteries with your device's user manual for Channels on the remote control to select a different input source. • If you are using cable TV, satellite, or antenna ...8226; Reset the picture settings. • Check all devices are connected correctly. If, after using this troubleshooting guide. see your TV, contact VIZIO's Support Department. See Scanning for details. • Adjust Brightness, Contrast, or Backlight. Ensure your TV, try to service excellence. If ...

E321ME Quick Start Guide
Page 2
PACKAGE CONTENTS Remote Control with Batteries VIZIO LCD HDTV with Base User Manual and Quick Start Guide
PACKAGE CONTENTS Remote Control with Batteries VIZIO LCD HDTV with Base User Manual and Quick Start Guide

E321ME Quick Start Guide
Page 3
... (digital channels only). CC: Open the Closed Captioning menu. OK: Select highlighted menu option. Mute: Turn the sound off . Last: Return to manually enter a channel. Menu: Display the on -screen menu and episode guide. Number Pad: Use the number pad to the channel last viewed. USING ...: Turn the TV on -screen menu. Dash (-): Use with number pad to the previous on . Exit: Close the on or off. Back: Go to manually enter a digital sub-channel. (For example, 18-4 or 18-5.) Wide: Switch between display modes. V Button: Launch the USB photo viewer. A/V Controls: Control...
... (digital channels only). CC: Open the Closed Captioning menu. OK: Select highlighted menu option. Mute: Turn the sound off . Last: Return to manually enter a channel. Menu: Display the on -screen menu and episode guide. Number Pad: Use the number pad to the channel last viewed. USING ...: Turn the TV on -screen menu. Dash (-): Use with number pad to the previous on . Exit: Close the on or off. Back: Go to manually enter a digital sub-channel. (For example, 18-4 or 18-5.) Wide: Switch between display modes. V Button: Launch the USB photo viewer. A/V Controls: Control...
E321ME Quick Start Guide
Page 10
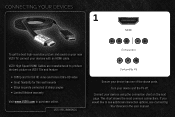
...your device has one of the above ports. Connect your devices with an HDMI cable. VIZIO High Speed HDMI Cables are manufactured to see additional connection options, see Connecting Your Devices in the user manual. If you would like to produce the best picture on the next page. CONNECTING YOUR ...DEVICES 1 HDMI To get the best high-resolution picture and sound on your new VIZIO TV, connect your devices using the connection chart on...
...your device has one of the above ports. Connect your devices with an HDMI cable. VIZIO High Speed HDMI Cables are manufactured to see additional connection options, see Connecting Your Devices in the user manual. If you would like to produce the best picture on the next page. CONNECTING YOUR ...DEVICES 1 HDMI To get the best high-resolution picture and sound on your new VIZIO TV, connect your devices using the connection chart on...

E321ME Quick Start Guide
Page 15
... when I cannot return to ensure they are securely attached. There are black/gray bars on the top/bottom/ sides of the TV, in the user manual. • Check all cables to • The on-screen menu has guided setup. See Adjusting the Picture Settings in the Picture menu. See Resetting the... you are turned on. • Press the INPUT button on the TV don't look right. • Adust the Color and Tint settings in the user manual. • Reset the picture settings. Highlight Wide or Zoom and press OK. • Adjust the video settings of your external device (Blu-ray™ or...
... when I cannot return to ensure they are securely attached. There are black/gray bars on the top/bottom/ sides of the TV, in the user manual. • Check all cables to • The on-screen menu has guided setup. See Adjusting the Picture Settings in the Picture menu. See Resetting the... you are turned on. • Press the INPUT button on the TV don't look right. • Adust the Color and Tint settings in the user manual. • Reset the picture settings. Highlight Wide or Zoom and press OK. • Adjust the video settings of your external device (Blu-ray™ or...

