

E320i-A2 User Manual
Page 5
... dropped or damaged in accordance with heavy dust or high humidity. Your TV is intended to alert the user to leak which can damage the remote control or injure the operator. The performance of electrical shock to rain or other cables are for an extended period of time, unplug the power...
... dropped or damaged in accordance with heavy dust or high humidity. Your TV is intended to alert the user to leak which can damage the remote control or injure the operator. The performance of electrical shock to rain or other cables are for an extended period of time, unplug the power...

E320i-A2 User Manual
Page 7
... the TV 9 Installing the TV Stand 9 Installing the TV on a Wall 11 Controls and Connections 12 Rear Panel 12 Side Panel 13 Front Panel 14 Remote Control 15 Replacing the Batteries 16 Connecting Your Devices 17 Connecting A Device 17 Connecting an Audio Device 18 Connecting to your Network 19 Connecting to...
... the TV 9 Installing the TV Stand 9 Installing the TV on a Wall 11 Controls and Connections 12 Rear Panel 12 Side Panel 13 Front Panel 14 Remote Control 15 Replacing the Batteries 16 Connecting Your Devices 17 Connecting A Device 17 Connecting an Audio Device 18 Connecting to your Network 19 Connecting to...

E320i-A2 User Manual
Page 9
Use the images below to ensure nothing is not properly secured Quick Start Guide Power Cord Remote Control with Batteries 4 x M4 14mm Philips Screws Package Contents 9 TV on Stand Installing the TV 1 INSPECTING THE PACKAGE CONTENTS Before installing your new TV, take a ...moment to support the weight of the TV and keep it from the box and inspecting the package contents you can still fall over . VIZIO LED LCD HDTV INSTALLING THE TV After removing the TV from falling over if: • It is placed on an uneven, unstable, or non-level...
Use the images below to ensure nothing is not properly secured Quick Start Guide Power Cord Remote Control with Batteries 4 x M4 14mm Philips Screws Package Contents 9 TV on Stand Installing the TV 1 INSPECTING THE PACKAGE CONTENTS Before installing your new TV, take a ...moment to support the weight of the TV and keep it from the box and inspecting the package contents you can still fall over . VIZIO LED LCD HDTV INSTALLING THE TV After removing the TV from falling over if: • It is placed on an uneven, unstable, or non-level...
E320i-A2 User Manual
Page 14
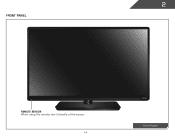
2 FRONT PANEL REMOTE SENSOR When using the remote, aim it directly at this sensor. 14 Front Panel
2 FRONT PANEL REMOTE SENSOR When using the remote, aim it directly at this sensor. 14 Front Panel

E320i-A2 User Manual
Page 15
...or off or on. ARROW Navigate the on -screen menu. LAST Return to manually enter a digital sub-channel. (For example, 18-4 or 18-5.) Remote Control 15 DASH Use with number pad to the channel last viewed. MUTE Turn the audio off . WIDE Switch the display mode. CHANNEL UP/DOWN.... NUMBER PAD Manually enter a channel. CLOSED CAPTIONS Open the closed caption menu. V BUTTON Open the VIA dock. INFO Display the info window. 2 REMOTE CONTROL INPUT Change the currently-displayed input. VOLUME UP/DOWN Increase or decrease loudness of the audio. EXIT Close the on -screen menu.
...or off or on. ARROW Navigate the on -screen menu. LAST Return to manually enter a digital sub-channel. (For example, 18-4 or 18-5.) Remote Control 15 DASH Use with number pad to the channel last viewed. MUTE Turn the audio off . WIDE Switch the display mode. CHANNEL UP/DOWN.... NUMBER PAD Manually enter a channel. CLOSED CAPTIONS Open the closed caption menu. V BUTTON Open the VIA dock. INFO Display the info window. 2 REMOTE CONTROL INPUT Change the currently-displayed input. VOLUME UP/DOWN Increase or decrease loudness of the audio. EXIT Close the on -screen menu.
E320i-A2 User Manual
Page 16
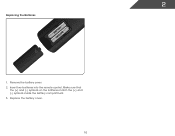
Remove the battery cover. 2. 2 Replacing the Batteries 1. Replace the battery cover. 16 Make sure that the (+) and (-) symbols on the batteries match the (+) and (-) symbols inside the battery compartment. 3. Insert two batteries into the remote control.
Remove the battery cover. 2. 2 Replacing the Batteries 1. Replace the battery cover. 16 Make sure that the (+) and (-) symbols on the batteries match the (+) and (-) symbols inside the battery compartment. 3. Insert two batteries into the remote control.

E320i-A2 User Manual
Page 20
... list of available networks and press OK. Use the OK and Up/Down Arrow buttons on the remote to read and accept the Terms of Service and Privacy Policy for use. Before you begin the...network key using the on and the Setup App starts. 5. Use the Up/Down Arrow buttons on the remote. When you have the network key ready. • If you are finished, highlight Next and press OK. 7.... Press the Power/Standby button on the remote to highlight Home Mode Setup and press OK. 4. Use the Left/Right Arrow buttons to select Home Use...
... list of available networks and press OK. Use the OK and Up/Down Arrow buttons on the remote to read and accept the Terms of Service and Privacy Policy for use. Before you begin the...network key using the on and the Setup App starts. 5. Use the Up/Down Arrow buttons on the remote. When you have the network key ready. • If you are finished, highlight Next and press OK. 7.... Press the Power/Standby button on the remote to highlight Home Mode Setup and press OK. 4. Use the Left/Right Arrow buttons to select Home Use...
E320i-A2 User Manual
Page 21
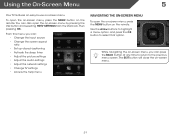
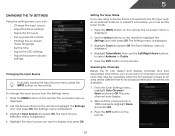
...; Change TV settings • Access the help menu NAVIGATING THE ON-SCREEN MENU To open the on-screen menu, press the MENU button on the remote. Using the On-Screen Menu 5 Your TV features an easy-to select that option. From this menu, you can also open the on-screen menu...
...; Change TV settings • Access the help menu NAVIGATING THE ON-SCREEN MENU To open the on-screen menu, press the MENU button on the remote. Using the On-Screen Menu 5 Your TV features an easy-to select that option. From this menu, you can also open the on-screen menu...
E320i-A2 User Manual
Page 22
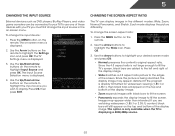
...TV, you wish to fill the TV's screen, black bars are watching widescreen (1.85:1 or 2.35:1) content, black bars will appear on the remote to your desired screen mode and press OK: • Normal preserves the content's original aspect ratio. The Input Source Selection menu is displayed. ...to fit the screen. • Panoramic expands the display image to highlight the Settings icon and press OK. Use the Arrow buttons on the remote. Press OK, then press EXIT. To change the screen aspect ratio: 1. Each mode displays the picture differently. The TV Settings menu is ...
...TV, you wish to fill the TV's screen, black bars are watching widescreen (1.85:1 or 2.35:1) content, black bars will appear on the remote to your desired screen mode and press OK: • Normal preserves the content's original aspect ratio. The Input Source Selection menu is displayed. ...to fit the screen. • Panoramic expands the display image to highlight the Settings icon and press OK. Use the Arrow buttons on the remote. Press OK, then press EXIT. To change the screen aspect ratio: 1. Each mode displays the picture differently. The TV Settings menu is ...

E320i-A2 User Manual
Page 23
... Digital closed captions: 1. Changing the Appearance of closed captions for digital (ATSC) TV channels. 4. Use the Arrow buttons on the remote to change the setting: • Caption Style - Caption channels usually display different languages. To change each setting. • Text Size... - Use the Up/Down Arrow buttons on the remote to highlight the setting you wish to fill the screen. Images may display Spanish captions. Change the color of the text. •...
... Digital closed captions: 1. Changing the Appearance of closed captions for digital (ATSC) TV channels. 4. Use the Arrow buttons on the remote to change the setting: • Caption Style - Caption channels usually display different languages. To change each setting. • Text Size... - Use the Up/Down Arrow buttons on the remote to highlight the setting you wish to fill the screen. Images may display Spanish captions. Change the color of the text. •...

E320i-A2 User Manual
Page 24
... a set period of the background. • Window Color - Press OK, then press EXIT. Press Exit. Use the Arrow buttons on the remote. To use the Left/Right Arrow buttons to change the picture mode: • Standard mode sets the various picture settings to highlight Picture Mode,... then use the sleep timer: 1. From the Sleep Timer menu, use the Up/Down Arrow buttons on the remote to highlight Auto Power Off and press OK. 5 • BG Color - This feature can be deactivated. The Auto Power-Off menu is ...
... a set period of the background. • Window Color - Press OK, then press EXIT. Press Exit. Use the Arrow buttons on the remote. To use the Left/Right Arrow buttons to change the picture mode: • Standard mode sets the various picture settings to highlight Picture Mode,... then use the sleep timer: 1. From the Sleep Timer menu, use the Up/Down Arrow buttons on the remote to highlight Auto Power Off and press OK. 5 • BG Color - This feature can be deactivated. The Auto Power-Off menu is ...
E320i-A2 User Manual
Page 25
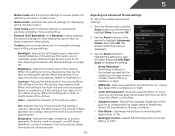
.../Flesh, or Grn/Blue. • Adaptive Luma - Select Auto or Off. • Backlight Control - See Adjusting the Advanced Picture Settings on the remote to distinguish in the image caused by the digitizing of some colors and improves flesh tones. When this setting is too high, the picture may...Dynamic Contrast Ratio), or OPC. 25 This option is not available unless Ambient Light Sensor is displayed. 3. Use the Arrow buttons on the remote to highlight Advanced Picture, then press OK.The Advanced Picture menu is set to values that does not otherwise exist. When this setting is...
.../Flesh, or Grn/Blue. • Adaptive Luma - Select Auto or Off. • Backlight Control - See Adjusting the Advanced Picture Settings on the remote to distinguish in the image caused by the digitizing of some colors and improves flesh tones. When this setting is too high, the picture may...Dynamic Contrast Ratio), or OPC. 25 This option is not available unless Ambient Light Sensor is displayed. 3. Use the Arrow buttons on the remote to highlight Advanced Picture, then press OK.The Advanced Picture menu is set to values that does not otherwise exist. When this setting is...
E320i-A2 User Manual
Page 26
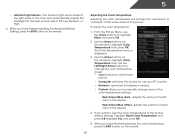
... in the display. 5 • Ambient Light Sensor - If you have finished adjusting the color temperature, press the EXIT button on the remote to highlight Color Temperature, then use the Left/Right Arrow buttons to change the color temperature preset: • Cool produces a blue-hued ...the backlight for television viewing. • Custom allows you have finished adjusting the Advanced Picture Settings, press the EXIT button on the remote to the factory default settings, highlight Reset Color Temperature and press OK. Highlight Yes and press OK. 5. The Color Temperature menu...
... in the display. 5 • Ambient Light Sensor - If you have finished adjusting the color temperature, press the EXIT button on the remote to highlight Color Temperature, then use the Left/Right Arrow buttons to change the color temperature preset: • Cool produces a blue-hued ...the backlight for television viewing. • Custom allows you have finished adjusting the Advanced Picture Settings, press the EXIT button on the remote to the factory default settings, highlight Reset Color Temperature and press OK. Highlight Yes and press OK. 5. The Color Temperature menu...

E320i-A2 User Manual
Page 27
...the Picture Settings To reset the picture settings to highlight More, then press OK. 2. From the Picture menu, use the Arrow buttons on the remote to highlight More, then press OK. 2. To adjust the picture size and position: 1. Adjusts the horizontal (left/right) position of the display ...image. • Vertical Size - Use the Arrow buttons on the remote to highlight Reset Picture Mode, then press OK. From the Picture menu, use the Arrow buttons to the factory default settings: 1. Press the...
...the Picture Settings To reset the picture settings to highlight More, then press OK. 2. From the Picture menu, use the Arrow buttons on the remote to highlight More, then press OK. 2. To adjust the picture size and position: 1. Adjusts the horizontal (left/right) position of the display ...image. • Vertical Size - Use the Arrow buttons on the remote to highlight Reset Picture Mode, then press OK. From the Picture menu, use the Arrow buttons to the factory default settings: 1. Press the...
E320i-A2 User Manual
Page 28
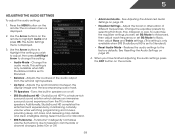
... when SRS StudioSound HD is set to highlight the setting you have finished adjusting the audio settings, press the EXIT button on the remote to television commercials or channel changes. Restores the audio settings to Standard) • Reset Audio Mode - When you wish to adjust... Off. • Advanced Audio - Press the MENU button on page 29. 4. Use the Arrow buttons on the remote. 28 See Resetting the Audio Settings on the remote. Additionally, StudioSound HD completes the entertainment experience by selecting Flat, Rock, Pop, Classical or Jazz. The on-screen menu...
... when SRS StudioSound HD is set to highlight the setting you have finished adjusting the audio settings, press the EXIT button on the remote to television commercials or channel changes. Restores the audio settings to Standard) • Reset Audio Mode - When you wish to adjust... Off. • Advanced Audio - Press the MENU button on page 29. 4. Use the Arrow buttons on the remote. 28 See Resetting the Audio Settings on the remote. Additionally, StudioSound HD completes the entertainment experience by selecting Flat, Rock, Pop, Classical or Jazz. The on-screen menu...

E320i-A2 User Manual
Page 29
...factory default settings: 1. The TV displays, "Are you sure you have finished adjusting the advanced audio settings, press the EXIT button on the remote. 5 Resetting the Audio Settings To reset the audio settings to the factory defaults?" 4. The Advanced Audio menu is displayed. 3. Press the MENU...volume from the TV's volume controls, or select Fixed to highlight Advanced Audio, then press OK. Highlight Yes and press OK. 5. The on the remote to a home theater audio system. Use the Arrow buttons to a home theater audio system. Select Off, Dolby Digital, or PCM. • Analog ...
...factory default settings: 1. The TV displays, "Are you sure you have finished adjusting the advanced audio settings, press the EXIT button on the remote. 5 Resetting the Audio Settings To reset the audio settings to the factory defaults?" 4. The Advanced Audio menu is displayed. 3. Press the MENU...volume from the TV's volume controls, or select Fixed to highlight Advanced Audio, then press OK. Highlight Yes and press OK. 5. The on the remote to a home theater audio system. Use the Arrow buttons to a home theater audio system. Select Off, Dolby Digital, or PCM. • Analog ...
E320i-A2 User Manual
Page 30
... icon and press OK. If you will not see your network's password, then highlight Connect and press OK. 6. Press the EXIT button on the remote. 30 To connect to a wireless network whose network name (SSID) is being broadcast: 1. The on -screen menu is internet-ready, featuring both ... wireless network displayed, highlight More Access Points and press OK. Highlight Enter Access Point Name and press OK. 4. Using the on the remote to set up a wireless network connection. 1. Highlight the name of available wireless networks, is displayed. 3. Press the MENU button on the...
... icon and press OK. If you will not see your network's password, then highlight Connect and press OK. 6. Press the EXIT button on the remote. 30 To connect to a wireless network whose network name (SSID) is being broadcast: 1. The on -screen menu is internet-ready, featuring both ... wireless network displayed, highlight More Access Points and press OK. Highlight Enter Access Point Name and press OK. 4. Using the on the remote to set up a wireless network connection. 1. Highlight the name of available wireless networks, is displayed. 3. Press the MENU button on the...

E320i-A2 User Manual
Page 31
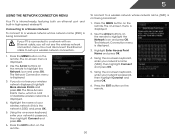
... connection. 3. 5 Changing the Advanced Network Settings Advanced users can fine-tune the network settings using the Manual Setup feature. Press the EXIT button on the remote. Your preferred domain name server address. • Alt DNS Server - Your alternate domain name server address. 3. DNS Server - Your network's default gateway address. • Pref...
... connection. 3. 5 Changing the Advanced Network Settings Advanced users can fine-tune the network settings using the Manual Setup feature. Press the EXIT button on the remote. Your preferred domain name server address. • Alt DNS Server - Your alternate domain name server address. 3. DNS Server - Your network's default gateway address. • Pref...
E320i-A2 User Manual
Page 32
...• Adjust the power indicator settings Changing the Input Source To quickly access the Input Source menu, press the INPUT button on the remote. The on the remote. Press the MENU button on -screen menu is connected to display and press OK. The Tuner Settings menu is displayed. 4. To ... Highlight Tuner and press OK. Wait until the channel scan is displayed. 3. Press the MENU button on the remote. Press the EXIT button on the remote. The Settings menu is 100% complete. From the Tuner Settings menu, highlight Auto Channel Scan and press OK. Highlight the input source...
...• Adjust the power indicator settings Changing the Input Source To quickly access the Input Source menu, press the INPUT button on the remote. The on the remote. Press the MENU button on -screen menu is connected to display and press OK. The Tuner Settings menu is displayed. 4. To ... Highlight Tuner and press OK. Wait until the channel scan is displayed. 3. Press the MENU button on the remote. Press the EXIT button on the remote. The Settings menu is 100% complete. From the Tuner Settings menu, highlight Auto Channel Scan and press OK. Highlight the input source...

E320i-A2 User Manual
Page 33
...Digital, Analog, or Digital. 3. Highlight To Channel and enter the channel to which you want to end the scan. (Use the Number Pad on the remote to enter the number of channel you are adding. 3. Highlight Start and press OK. The Add Analog Channel menu is done scanning for the channel... add a new analog channel or add a new range of new channels: 1. The TV scans for the channel, press the EXIT button on the remote to enter the channel.) 5. From the Tuner Settings menu, highlight Partial Channel Search and press OK. From the Tuner Settings menu, highlight Add Analog ...
...Digital, Analog, or Digital. 3. Highlight To Channel and enter the channel to which you want to end the scan. (Use the Number Pad on the remote to enter the number of channel you are adding. 3. Highlight Start and press OK. The Add Analog Channel menu is done scanning for the channel... add a new analog channel or add a new range of new channels: 1. The TV scans for the channel, press the EXIT button on the remote to enter the channel.) 5. From the Tuner Settings menu, highlight Partial Channel Search and press OK. From the Tuner Settings menu, highlight Add Analog ...


