Download
Page 4
... to rain or moisture, does not operate normally or has been dropped. • Unplug the power cord before turning on the label. • Use only with the cart, stand, tripod, bracket, or table specified by the manufacturer, or sold with arrowhead symbol within an equilateral triangle is intended to alert the user to the presence of un-isolated...
... to rain or moisture, does not operate normally or has been dropped. • Unplug the power cord before turning on the label. • Use only with the cart, stand, tripod, bracket, or table specified by the manufacturer, or sold with arrowhead symbol within an equilateral triangle is intended to alert the user to the presence of un-isolated...

Download
Page 5
... other cables are for moving your TV. • When unplugging your TV is dropped and the housing is damaged, the internal components may function abnormally. If your TV, hold the AC/DC power adapter, not the cord. Continued use by qualified service personnel only. Ensure that the power cord and any...within an equilateral triangle is intended to alert the user to the presence of uninsulated DANGEROUS VOLTAGE within the product's enclosure that may be of sufficient magnitude to constitute a risk of electrical shock to leak which can damage the remote control or injure the operator.
... other cables are for moving your TV. • When unplugging your TV is dropped and the housing is damaged, the internal components may function abnormally. If your TV, hold the AC/DC power adapter, not the cord. Continued use by qualified service personnel only. Ensure that the power cord and any...within an equilateral triangle is intended to alert the user to the presence of uninsulated DANGEROUS VOLTAGE within the product's enclosure that may be of sufficient magnitude to constitute a risk of electrical shock to leak which can damage the remote control or injure the operator.

Download
Page 6
..., size of the grounding conductors, location of antenna discharge unit, connection to provide some protection against voltage surges and static charges. Remember, the screen of time, unplug the TV from the wall outlet and disconnect the antenna or cable system. Lightning Protection For added protection of the TV during a lightning storm or when it could fall into such power lines...
..., size of the grounding conductors, location of antenna discharge unit, connection to provide some protection against voltage surges and static charges. Remember, the screen of time, unplug the TV from the wall outlet and disconnect the antenna or cable system. Lightning Protection For added protection of the TV during a lightning storm or when it could fall into such power lines...

Download
Page 7
...Custom Picture Mode 25 Adjusting the Audio Settings 26 Resetting the Audio Settings 27 Activating the Sleep Timer 27 Setting the Auto Power Off Feature 28 Setting Up the Tuner 28 Selecting a Tuner Input 29 Scanning for Channels 29 Adding New Channels 29 Skipping Channels 30 Changing the Audio Language 31 Setting Up Closed Captioning 32 Changing the Appearance of Contents Installing the TV 3 Inspecting the Package Contents 3 Installing the TV 3 Installing the TV Stand 3 Installing the TV on a Wall 4 Controls and Connections 5 Rear Panel 5 Side Panel 6 Front Panel 7 Remote...
...Custom Picture Mode 25 Adjusting the Audio Settings 26 Resetting the Audio Settings 27 Activating the Sleep Timer 27 Setting the Auto Power Off Feature 28 Setting Up the Tuner 28 Selecting a Tuner Input 29 Scanning for Channels 29 Adding New Channels 29 Skipping Channels 30 Changing the Audio Language 31 Setting Up Closed Captioning 32 Changing the Appearance of Contents Installing the TV 3 Inspecting the Package Contents 3 Installing the TV 3 Installing the TV Stand 3 Installing the TV on a Wall 4 Controls and Connections 5 Rear Panel 5 Side Panel 6 Front Panel 7 Remote...

Download
Page 8
Adjusting the CEC Settings 39 Turning the Power Indicator On or Off 39 Using the Reset & Admin Menu 40 Restoring the TV to Factory Default Settings 40 Using the Guided Setup Menu 41 Using Guided Setup 41 Using the Info Window 42 Using the USB Media Player 43 Using the USB Media Player 43 Connecting a USB Thumb Drive to the TV 43 Playing USB Media 43 Troubleshooting & Technical Support 45 Specifications 48 Limited Warranty 50 Legal & Compliance 51 2
Adjusting the CEC Settings 39 Turning the Power Indicator On or Off 39 Using the Reset & Admin Menu 40 Restoring the TV to Factory Default Settings 40 Using the Guided Setup Menu 41 Using Guided Setup 41 Using the Info Window 42 Using the USB Media Player 43 Using the USB Media Player 43 Connecting a USB Thumb Drive to the TV 43 Playing USB Media 43 Troubleshooting & Technical Support 45 Specifications 48 Limited Warranty 50 Legal & Compliance 51 2

Download
Page 10
... you have the correct mount for your mount. Disconnect any other objects (walls, etc). See Appendix B - Remove the base by loosening and removing the screws. 4. Use only with attached stand into the base with your TV model: Installing a TV on a wall requires lifting. 1 To install the base: Installing the TV on a Wall To mount your TV on a wall, you . 1. Consult the information below to help you will need a wall mount. To prevent injury...
... you have the correct mount for your mount. Disconnect any other objects (walls, etc). See Appendix B - Remove the base by loosening and removing the screws. 4. Use only with attached stand into the base with your TV model: Installing a TV on a wall requires lifting. 1 To install the base: Installing the TV on a Wall To mount your TV on a wall, you . 1. Consult the information below to help you will need a wall mount. To prevent injury...
Download
Page 16
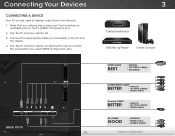
... (HDMI, Component, etc). 2. Set the TV's input to match the connection you used to the TV and the device. 4. BACK OF TV 10 3 Cable/Satellite Box DVD/Blu-ray Player Game Console HDMI CABLE BEST • DIGITAL • HD VIDEO (1080p)* • HD AUDIO COMPONENT CABLE BETTER • ANALOG • HD VIDEO (1080i)* • STEREO AUDIO Coaxial CABLE BETTER • ANALOG • HD VIDEO (1080i)* • STEREO AUDIO AV CABLE GOOD • ANALOG • VIDEO (480i)* • STEREO AUDIO * Maximum Resolution Turn...
... (HDMI, Component, etc). 2. Set the TV's input to match the connection you used to the TV and the device. 4. BACK OF TV 10 3 Cable/Satellite Box DVD/Blu-ray Player Game Console HDMI CABLE BEST • DIGITAL • HD VIDEO (1080p)* • HD AUDIO COMPONENT CABLE BETTER • ANALOG • HD VIDEO (1080i)* • STEREO AUDIO Coaxial CABLE BETTER • ANALOG • HD VIDEO (1080i)* • STEREO AUDIO AV CABLE GOOD • ANALOG • VIDEO (480i)* • STEREO AUDIO * Maximum Resolution Turn...

Download
Page 24
... change the input source in five different modes: Normal, Stretch, Panoramic, Wide, and Zoom. 5 Changing the Input Source Changing the Screen Aspect Ratio External devices such as DVD players, Blu-ray Players, and video game consoles can display images in the on-screen menu. To change the screen aspect ratio: 1. TV COMP HDMI-1 HDMI-2 Note: Inputs may vary by TV. 18 The TV can be connected to fill the screen. Press the WIDE button on the remote...
... change the input source in five different modes: Normal, Stretch, Panoramic, Wide, and Zoom. 5 Changing the Input Source Changing the Screen Aspect Ratio External devices such as DVD players, Blu-ray Players, and video game consoles can display images in the on-screen menu. To change the screen aspect ratio: 1. TV COMP HDMI-1 HDMI-2 Note: Inputs may vary by TV. 18 The TV can be connected to fill the screen. Press the WIDE button on the remote...

Download
Page 25
... Picture Mode. Auto Brightness Control automatically adjusts the brightness of the TV screen according to affect the overall brilliance of NetworkthSeetptinicgstureH.elp • Color - This setting is . If flesh appears too orange, reduce the level of the picture colors. • Tint - 5 Adjusting the Picture Settings Your TV display can be difficult to highlight Auto Brightness Control. To adjust the sensitivity of the light sensor, use the Left/Right Arrow buttons to adjust...
... Picture Mode. Auto Brightness Control automatically adjusts the brightness of the TV screen according to affect the overall brilliance of NetworkthSeetptinicgstureH.elp • Color - This setting is . If flesh appears too orange, reduce the level of the picture colors. • Tint - 5 Adjusting the Picture Settings Your TV display can be difficult to highlight Auto Brightness Control. To adjust the sensitivity of the light sensor, use the Left/Right Arrow buttons to adjust...
Download
Page 27
.... The Color Tuner menu is displayed. 2. Use the Arrow buttons to highlight the setting you wish to Calibrated picture mode. Adjust the professional HSB color and 11 point white balance. • Rename Picture Mode Rename a custom picture mode. • Create Picture Mode Create a custom picture mode. • Lock Picture Mode - Adjusting the Color Tuner Settings You can manage custom picture modes and adjust professional picture settings such as HSB, RGB offset, RGB gain, and 11 Point white balance. From the Picture menu, use the Arrow buttons to change the setting: VIZIO...
.... The Color Tuner menu is displayed. 2. Use the Arrow buttons to highlight the setting you wish to Calibrated picture mode. Adjust the professional HSB color and 11 point white balance. • Rename Picture Mode Rename a custom picture mode. • Create Picture Mode Create a custom picture mode. • Lock Picture Mode - Adjusting the Color Tuner Settings You can manage custom picture modes and adjust professional picture settings such as HSB, RGB offset, RGB gain, and 11 Point white balance. From the Picture menu, use the Arrow buttons to change the setting: VIZIO...
Download
Page 32
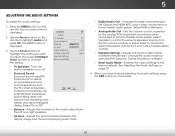
.... 4. Use the Arrow buttons on -screen menu is displayed. 3. Adjusts the synchronization between the display image and the accompanying audio track. • Digital Audio Out - Sets the volume control properties for the Optical and HDMI ARC output when connected to deliver an immersive surround sound experience from the left and right speakers. • Lip Sync - Restores the audio settings to highlight Audio and press OK. Digital Audio Out Analog Audio Out Equalizer Settings Reset Audio Mode On On +0 +0 PCM Fixed • TV Speakers...
.... 4. Use the Arrow buttons on -screen menu is displayed. 3. Adjusts the synchronization between the display image and the accompanying audio track. • Digital Audio Out - Sets the volume control properties for the Optical and HDMI ARC output when connected to deliver an immersive surround sound experience from the left and right speakers. • Lip Sync - Restores the audio settings to highlight Audio and press OK. Digital Audio Out Analog Audio Out Equalizer Settings Reset Audio Mode On On +0 +0 PCM Fixed • TV Speakers...

Download
Page 33
... buttons to restore factory default audio settings." 4. Press the MENU button on the remote to Off. 4. VIZIO Timers Sleep Timer Auto Power Off Off 10 min. 3. Press the MENU button on -screen menu is displayed. 2. Activating the Sleep Timer When activated, the TV's sleep timer will turn the TV off after a set period of time after which you want the sleep timer to activate, change the setting to highlight Audio and press OK. The on the remote. The TV displays,"Select Reset to highlight Reset Audio Mode...
... buttons to restore factory default audio settings." 4. Press the MENU button on the remote to Off. 4. VIZIO Timers Sleep Timer Auto Power Off Off 10 min. 3. Press the MENU button on -screen menu is displayed. 2. Activating the Sleep Timer When activated, the TV's sleep timer will turn the TV off after a set period of time after which you want the sleep timer to activate, change the setting to highlight Audio and press OK. The on the remote. The TV displays,"Select Reset to highlight Reset Audio Mode...

Download
Page 38
... Closed Captioning menu only appears when the input is not being broadcast with a composite video connection. After highlighting the type of closed captions you wish to see : • Analog CC for analog (NTSC) TV channels. • Digital CC for Over-the-Air signals, cable TV directly from the wall (no cable box), or a device with closed captions you wish to display, then press EXIT. Use the Left/Right Arrow buttons on the remote. Change the color...
... Closed Captioning menu only appears when the input is not being broadcast with a composite video connection. After highlighting the type of closed captions you wish to see : • Analog CC for analog (NTSC) TV channels. • Digital CC for Over-the-Air signals, cable TV directly from the wall (no cable box), or a device with closed captions you wish to display, then press EXIT. Use the Left/Right Arrow buttons on the remote. Change the color...

Download
Page 47
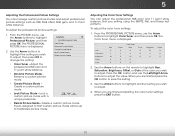
... EXIT button on the remote. Follow the on -screen menu is displayed. 2. The on -screen instructions. To use and press OK: • Tuner Setup - Highlight the guided setup you want to use guided setup: 1. 5 Using the Guided Setup Menu Using Guided Setup The TV's Setup App can be used to easily set up the TV tuner. 4. Highlight Guided Setup and press OK. Wide Zoom Normal Panoramic Exit 2D 3D ABC Input Wide CC Sleep Timer Picture Audio Network Settings Help 41 VIZIO Guided Setup Tuner Setup 3. Set up the TV tuner or to connect...
... EXIT button on the remote. Follow the on -screen menu is displayed. 2. The on -screen instructions. To use and press OK: • Tuner Setup - Highlight the guided setup you want to use guided setup: 1. 5 Using the Guided Setup Menu Using Guided Setup The TV's Setup App can be used to easily set up the TV tuner. 4. Highlight Guided Setup and press OK. Wide Zoom Normal Panoramic Exit 2D 3D ABC Input Wide CC Sleep Timer Picture Audio Network Settings Help 41 VIZIO Guided Setup Tuner Setup 3. Set up the TV tuner or to connect...

Download
Page 52
... using cable TV, satellite, or antenna connected directly to the TV, scan for details. • Adjust Brightness, Contrast, or Backlight. see your antenna is connected securely to the TV and move the antenna around the room or close to a window for Channels on page 29. See Adjusting the Audio Settings on page 9. 46 A The TV displays "No Signal." • Press the INPUT button on the remote control to select a different input source...
... using cable TV, satellite, or antenna connected directly to the TV, scan for details. • Adjust Brightness, Contrast, or Backlight. see your antenna is connected securely to the TV and move the antenna around the room or close to a window for Channels on page 29. See Adjusting the Audio Settings on page 9. 46 A The TV displays "No Signal." • Press the INPUT button on the remote control to select a different input source...

Download
Page 53
.... When I change input source, the display image changes size. • The TV remembers the viewing mode on each input source. If the volume level on the new input source is higher or lower than the level on the source you switch from electrical appliances, cars, or fluorescent lights. • Ensure all cables are using TV, AV, or Component with 480i input, press the WIDE button on the remote to match your antenna is...
.... When I change input source, the display image changes size. • The TV remembers the viewing mode on each input source. If the volume level on the new input source is higher or lower than the level on the source you switch from electrical appliances, cars, or fluorescent lights. • Ensure all cables are using TV, AV, or Component with 480i input, press the WIDE button on the remote to match your antenna is...

Download
Page 56
... of God, any type of customer misuse, modifications or adjustments, as well as installation and set-up issues or any repairs attempted by anyone other information, ALL CONTENTS AND INFORMATION WILL BE DELETED IN THE COURSE OF SOME IN-HOME AND ALL SHIP-IN WARRANTY SERVICE. Proof of the servicer. Replacement parts and Products are not covered. VIZIO is serviced, regardless of purchase...
... of God, any type of customer misuse, modifications or adjustments, as well as installation and set-up issues or any repairs attempted by anyone other information, ALL CONTENTS AND INFORMATION WILL BE DELETED IN THE COURSE OF SOME IN-HOME AND ALL SHIP-IN WARRANTY SERVICE. Proof of the servicer. Replacement parts and Products are not covered. VIZIO is serviced, regardless of purchase...

Download
Page 2
... period of the marked voltage can damage the remote control or injure the operator. This is damaged, liquid has been spilled or objects have an electrician install the correct outlet, or use attachments/accessories specified by the manufacturer. • Use only with the cart, stand, tripod, bracket, or table specified by qualified service personnel only.To reduce the risk of...
... period of the marked voltage can damage the remote control or injure the operator. This is damaged, liquid has been spilled or objects have an electrician install the correct outlet, or use attachments/accessories specified by the manufacturer. • Use only with the cart, stand, tripod, bracket, or table specified by qualified service personnel only.To reduce the risk of...
Download
Page 12
The TV displays "No Signal." • Ensure your connected devices are turned on. • Press the INPUT button on the remote and select the input to which your device is not responsible for compliance could void the user's authority to operate this equipment. These limits are black bars on the top/bottom/sides of the FCC Rules. This equipment generates, uses and can...
The TV displays "No Signal." • Ensure your connected devices are turned on. • Press the INPUT button on the remote and select the input to which your device is not responsible for compliance could void the user's authority to operate this equipment. These limits are black bars on the top/bottom/sides of the FCC Rules. This equipment generates, uses and can...
Download
Page 13
... for example: cosmetic damage, normal wear and tear, improper operation, improper voltage supply or power surges, signal issues, damages from the unit before it is within the warranty period,VIZIO will be defective within the warranty period. Replacement parts and Products may be restored to obtain warranty service. Products with unreadable or removed serial numbers, or requiring routine maintenance are warranted for the remaining portion...
... for example: cosmetic damage, normal wear and tear, improper operation, improper voltage supply or power surges, signal issues, damages from the unit before it is within the warranty period,VIZIO will be defective within the warranty period. Replacement parts and Products may be restored to obtain warranty service. Products with unreadable or removed serial numbers, or requiring routine maintenance are warranted for the remaining portion...


