E320-A0 User Manual
Page 4
... the apparatus, the apparatus has been exposed to rain or moisture, does not operate normally or has been dropped. • Unplug the power cord before turning on your TV to protect it will protect your TV from the type of the grounded plug. • When connected to qualified service personnel. Never...
... the apparatus, the apparatus has been exposed to rain or moisture, does not operate normally or has been dropped. • Unplug the power cord before turning on your TV to protect it will protect your TV from the type of the grounded plug. • When connected to qualified service personnel. Never...
E320-A0 User Manual
Page 14
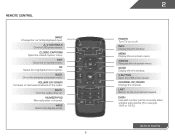
... previous on -screen menu. Last Return to manually enter a digital sub-channel. (For example, 18-4 or 18-5.) Remote Control WIDE Switch the display mode. 8 2 Power Turn TV on -screen menu. Ok Select the highlighted menu option. A/V Controls Control USB photo viewer. Arrow Navigate the on or off or on -screen menu.... V Button Open the USB photo viewer. Remote Control Input Change the currently-displayed input. Exit Close the on . Mute Turn the audio off . Channel Up/Down Change the channel.
... previous on -screen menu. Last Return to manually enter a digital sub-channel. (For example, 18-4 or 18-5.) Remote Control WIDE Switch the display mode. 8 2 Power Turn TV on -screen menu. Ok Select the highlighted menu option. A/V Controls Control USB photo viewer. Arrow Navigate the on or off or on -screen menu.... V Button Open the USB photo viewer. Remote Control Input Change the currently-displayed input. Exit Close the on . Mute Turn the audio off . Channel Up/Down Change the channel.

E320-A0 User Manual
Page 16
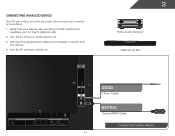
Turn the TV and your device on the TV (HDMI, Component, etc). 2. Set the TV's input to match the connection you used to the TV and ... BETTER • HD VIDEO (1080i)* • STEREO AUDIO HDMI CABLE BEST * Maximum Resolution 10 • DIGITAL • HD VIDEO (1080p)* • HD AUDIO CONNECTING A DEVICE Turn the TV and your device off. 3. Connecting Your Devices Connecting A Device Your TV can be used (HDMI-1, HDM1-2, etc).
Turn the TV and your device on the TV (HDMI, Component, etc). 2. Set the TV's input to match the connection you used to the TV and ... BETTER • HD VIDEO (1080i)* • STEREO AUDIO HDMI CABLE BEST * Maximum Resolution 10 • DIGITAL • HD VIDEO (1080p)* • HD AUDIO CONNECTING A DEVICE Turn the TV and your device off. 3. Connecting Your Devices Connecting A Device Your TV can be used (HDMI-1, HDM1-2, etc).
E320-A0 User Manual
Page 17
Verify that your device has a audio port that matches an available port on . 3 Home Audio Receiver VIZIO Sound Bar SIDE 11 GOOD 3.5mm Cable BETTER Optical/SPDIF Cable CONNECTING AUDIO DEVICE Turn the TV and your audio device off. 3. Connect the appropriate cable (not included) to an audio device, such as a receiver or sound bar. 1. Connecting an audio device Your TV can output sound to the TV and the device. 4. Turn the TV and your device on the TV (Optical, etc). 2.
Verify that your device has a audio port that matches an available port on . 3 Home Audio Receiver VIZIO Sound Bar SIDE 11 GOOD 3.5mm Cable BETTER Optical/SPDIF Cable CONNECTING AUDIO DEVICE Turn the TV and your audio device off. 3. Connect the appropriate cable (not included) to an audio device, such as a receiver or sound bar. 1. Connecting an audio device Your TV can output sound to the TV and the device. 4. Turn the TV and your device on the TV (Optical, etc). 2.
E320-A0 User Manual
Page 18
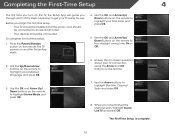
... get your preferred language and press OK. 6. Answer the on the TV, the Setup App will guide you through each of the steps necessary to turn on -screen questions about your time zone and press OK. 5. When you begin the first-time setup: • Your TV should be installed and the... power cord should be connected to highlight Start the Channel Scan and press OK. 8. Completing the First-Time Setup 4 The first time you turn daylight saving time On or Off. 2. The First-Time Setup is complete. 12 Use the Up/Down Arrow buttons on and the Setup App starts...
... get your preferred language and press OK. 6. Answer the on the TV, the Setup App will guide you through each of the steps necessary to turn on -screen questions about your time zone and press OK. 5. When you begin the first-time setup: • Your TV should be installed and the... power cord should be connected to highlight Start the Channel Scan and press OK. 8. Completing the First-Time Setup 4 The first time you turn daylight saving time On or Off. 2. The First-Time Setup is complete. 12 Use the Up/Down Arrow buttons on and the Setup App starts...
E320-A0 User Manual
Page 22
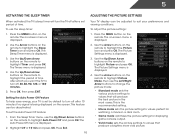
... icon and press OK. The Picture Settings menu is displayed. 4. To set period of time after which you want the TV to values that will turn the TV off : 30, 60, 90, 120, or 180 minutes. 5. The Picture Settings menu is displayed. 3. Press the MENU button on -screen menu is displayed... remote to highlight the period of time. This is displayed. 1. Your TV display can be adjusted to suit your TV is set by default to turn off after 10 minutes if no signal is displayed. 2. The on the remote. The Auto Power-Off menu is being displayed on the remote to...
... icon and press OK. The Picture Settings menu is displayed. 4. To set period of time after which you want the TV to values that will turn the TV off : 30, 60, 90, 120, or 180 minutes. 5. The Picture Settings menu is displayed. 3. Press the MENU button on -screen menu is displayed... remote to highlight the period of time. This is displayed. 1. Your TV display can be adjusted to suit your TV is set by default to turn off after 10 minutes if no signal is displayed. 2. The on the remote. The Auto Power-Off menu is being displayed on the remote to...
E320-A0 User Manual
Page 26
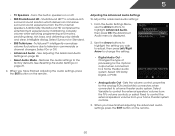
Turns the built-in speakers on the remote. 20 Restores the audio settings to highlight Advanced Audio, then press OK. From the Audio Settings Menu, use ...
Turns the built-in speakers on the remote. 20 Restores the audio settings to highlight Advanced Audio, then press OK. From the Audio Settings Menu, use ...
E320-A0 User Manual
Page 35
... on the remote to highlight the Help icon and press OK. The TV displays, "Are you sure you would like to Restore Defaults? This will turn off. Highlight Clear Memory (Factory Default) and press OK. 4. Use the Arrow buttons on the remote. The Help menu is displayed. 3. When ... a summary of the on the remote. Press the MENU button on -screen menu is displayed. 2. Use the Arrow buttons on the remote to turn back on the remote to highlight the Help icon and press OK. Highlight Reset TV Settings and press OK. Highlight Yes and press OK. 5. ...
... on the remote to highlight the Help icon and press OK. The TV displays, "Are you sure you would like to Restore Defaults? This will turn off. Highlight Clear Memory (Factory Default) and press OK. 4. Use the Arrow buttons on the remote. The Help menu is displayed. 3. When ... a summary of the on the remote. Press the MENU button on -screen menu is displayed. 2. Use the Arrow buttons on the remote to turn back on the remote to highlight the Help icon and press OK. Highlight Reset TV Settings and press OK. Highlight Yes and press OK. 5. ...
E320-A0 User Manual
Page 38
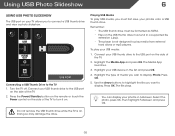
... Arrow buttons to highlight the file you want to the TV 1. Do not remove the USB thumb drive while the TV is not designed to turn it on. Playing USB Media To play USB media, you must end in the list and press OK. 4. Press OK. 5. Using USB Photo Slideshow 6 Using... a photo slideshow. You can display your USB device in a supported file extension (.jpg). • The player is on. Doing so may damage the drive. 32 Turn the TV off. The file plays.
... Arrow buttons to highlight the file you want to the TV 1. Do not remove the USB thumb drive while the TV is not designed to turn it on. Playing USB Media To play USB media, you must end in the list and press OK. 4. Press OK. 5. Using USB Photo Slideshow 6 Using... a photo slideshow. You can display your USB device in a supported file extension (.jpg). • The player is on. Doing so may damage the drive. 32 Turn the TV off. The file plays.
E320-A0 User Manual
Page 41
... INPUT button on the remote control to select a different input source. • If you are using an antenna, the signal strength of the TV to turn the TV on. Devices differ; Ensure your device's user manual for the best signal. There is off. • Check the audio settings. The power is...
... INPUT button on the remote control to select a different input source. • If you are using an antenna, the signal strength of the TV to turn the TV on. Devices differ; Ensure your device's user manual for the best signal. There is off. • Check the audio settings. The power is...
E320-A0 User Manual
Page 45
... measures: 1. Operation is not responsible for help. Shielded interface cables and AC power cord, if any, must accept any radio or TV interference caused by turning the equipment off and on a circuit different from that interference will not occur in accordance with the instructions, may cause harmful interference to radio communications...
... measures: 1. Operation is not responsible for help. Shielded interface cables and AC power cord, if any, must accept any radio or TV interference caused by turning the equipment off and on a circuit different from that interference will not occur in accordance with the instructions, may cause harmful interference to radio communications...
E320-A0 Quick Start Guide
Page 2
... the apparatus, the apparatus has been exposed to rain or moisture, does not operate normally or has been dropped. • Unplug the power cord before turning on your TV to excessive heat such as the disconnect device, the disconnect device shall remain readily operable. • CAUTION - If repair is exposed to...
... the apparatus, the apparatus has been exposed to rain or moisture, does not operate normally or has been dropped. • Unplug the power cord before turning on your TV to excessive heat such as the disconnect device, the disconnect device shall remain readily operable. • CAUTION - If repair is exposed to...
E320-A0 Quick Start Guide
Page 5
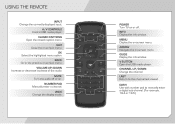
... Change the channel. LAST Return to the channel last viewed. A/V CONTROLS Control USB media player. POWER Turn TV on or off or on -screen menu. USING THE REMOTE INPUT Change the currently-displayed input. MUTE Turn the audio off . NUMBER PAD Manually enter a channel. INFO Display the info window. ARROW Navigate the...
... Change the channel. LAST Return to the channel last viewed. A/V CONTROLS Control USB media player. POWER Turn TV on or off or on -screen menu. USING THE REMOTE INPUT Change the currently-displayed input. MUTE Turn the audio off . NUMBER PAD Manually enter a channel. INFO Display the info window. ARROW Navigate the...
E320-A0 Quick Start Guide
Page 9
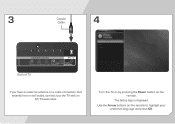
Use the Arrow buttons on the remote. Turn the TV on by pressing the Power button on the remote to the TV with an RF/Coaxial cable. The Setup App is displayed. 3 Coaxial Cable 4 SIDE Back of TV If you have an external antenna or a cable connection that extends from a wall outlet, connect it to highlight your preferred language and press OK.
Use the Arrow buttons on the remote. Turn the TV on by pressing the Power button on the remote to the TV with an RF/Coaxial cable. The Setup App is displayed. 3 Coaxial Cable 4 SIDE Back of TV If you have an external antenna or a cable connection that extends from a wall outlet, connect it to highlight your preferred language and press OK.

E320-A0 Quick Start Guide
Page 10
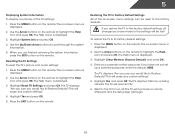
Use the Arrow buttons on the remote to highlight Home Mode and press OK. 5 6 Use the Arrow buttons on the remote to turn daylight saving time On or Off. Use the Arrow buttons on the remote to highlight your time zone and press OK.
Use the Arrow buttons on the remote to highlight Home Mode and press OK. 5 6 Use the Arrow buttons on the remote to turn daylight saving time On or Off. Use the Arrow buttons on the remote to highlight your time zone and press OK.
E320-A0 Quick Start Guide
Page 14
.... USA: UL Germany: VDE Japan: Electric Appliance Control Act Canada: CSA UK: BASE/BS The TV displays "No Signal." • Ensure your connected devices are turned on. • Press the INPUT button on the top/bottom/sides of the picture. • Select MENU > Wide, then select Wide or Zoom. • ... add black bars to the picture. This equipment generates, uses and can be used in a particular installation. If this device must be determined by turning the equipment off and on the side of the TV. Shielded interface cables and AC power cord, if any, must accept any radio or TV...
.... USA: UL Germany: VDE Japan: Electric Appliance Control Act Canada: CSA UK: BASE/BS The TV displays "No Signal." • Ensure your connected devices are turned on. • Press the INPUT button on the top/bottom/sides of the picture. • Select MENU > Wide, then select Wide or Zoom. • ... add black bars to the picture. This equipment generates, uses and can be used in a particular installation. If this device must be determined by turning the equipment off and on the side of the TV. Shielded interface cables and AC power cord, if any, must accept any radio or TV...


