
User Manual (English)
Page 2
... which power savings will increase power consumption that could exceed the limits necessary to qualify for ENERGY STAR in the "factory default" setting and this is a trademark of DTS, Inc. © DTS, Inc. HDMI, the HDMI logo and High-Definition Multimedia Interface are trademarks of HDMI Licensing LLC. .... For DTS patents, see http://patents.dts.com. Manufactured under license from Dolby Laboratories. This product qualifies for ENERGY STAR rating. Changing the factory default picture settings or enabling other features will be achieved.
... which power savings will increase power consumption that could exceed the limits necessary to qualify for ENERGY STAR in the "factory default" setting and this is a trademark of DTS, Inc. © DTS, Inc. HDMI, the HDMI logo and High-Definition Multimedia Interface are trademarks of HDMI Licensing LLC. .... For DTS patents, see http://patents.dts.com. Manufactured under license from Dolby Laboratories. This product qualifies for ENERGY STAR rating. Changing the factory default picture settings or enabling other features will be achieved.
User Manual (English)
Page 7
... Ratio 21 Adjusting the Picture Settings 22 Adjusting the Advanced Picture Settings 23 Adjusting the Color Temperature 24 Resetting the Color Temperature Settings 24 Resetting the Picture Settings 25 Adjusting the Audio Settings 26 Changing the Equalizer Settings 27 Resetting the Audio Settings 27 Setting Timers 28 Setting the Sleep Timer 28 Setting the Auto Power Off Feature 28 Setting Up the Tuner 29...
... Ratio 21 Adjusting the Picture Settings 22 Adjusting the Advanced Picture Settings 23 Adjusting the Color Temperature 24 Resetting the Color Temperature Settings 24 Resetting the Picture Settings 25 Adjusting the Audio Settings 26 Changing the Equalizer Settings 27 Resetting the Audio Settings 27 Setting Timers 28 Setting the Sleep Timer 28 Setting the Auto Power Off Feature 28 Setting Up the Tuner 29...
User Manual (English)
Page 26
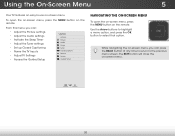
...the remote. To open the on-screen menu, press the MENU button on the remote. Input Wide CC Sleep Timer Picture Audio Network Settings Help 20 Use the Arrow buttons to highlight a menu option, and press the OK button to the previous menu screen...., you can: • Adjust the Picture settings • Adjust the Audio settings • Activate the Sleep Timer • Adjust the Tuner settings • Set up Closed Captioning • Name the TV Inputs • Adjust TV Settings • Access the Guided Setup VIZIO Settings Picture Audio Timers Tuner CC Closed Captions Devices ...
...the remote. To open the on-screen menu, press the MENU button on the remote. Input Wide CC Sleep Timer Picture Audio Network Settings Help 20 Use the Arrow buttons to highlight a menu option, and press the OK button to the previous menu screen...., you can: • Adjust the Picture settings • Adjust the Audio settings • Activate the Sleep Timer • Adjust the Tuner settings • Set up Closed Captioning • Name the TV Inputs • Adjust TV Settings • Access the Guided Setup VIZIO Settings Picture Audio Timers Tuner CC Closed Captions Devices ...
User Manual (English)
Page 27
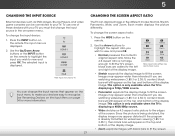
Press the INPUT button on the remote. 2. Wide Wide Zoom Zoom Note: Aspect ratio settings may vary by TV. If you are watching widescreen (1.85:1 or 2.35:1) content, black bars will still appear on the top and bottom of the .... • Zoom expands images with your TV. This option is only available when the TV is displaying a 480i/480p source. • Wide stretches a 4:3 aspect ratio picture to fill the screen. The input menu is being stretched, the display image may vary by Input source. • Stretch expands the display image to...
Press the INPUT button on the remote. 2. Wide Wide Zoom Zoom Note: Aspect ratio settings may vary by TV. If you are watching widescreen (1.85:1 or 2.35:1) content, black bars will still appear on the top and bottom of the .... • Zoom expands images with your TV. This option is only available when the TV is displaying a 480i/480p source. • Wide stretches a 4:3 aspect ratio picture to fill the screen. The input menu is being stretched, the display image may vary by Input source. • Stretch expands the display image to...
User Manual (English)
Page 28
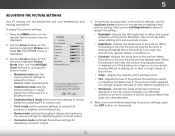
... edge sharpness of the picture. Color - Tint - To manually change the picture mode: VIZIO Picture Picture Mode Backlight - When this setting is too low, the picture may appear faded or washed out. To adjust the picture settings: 1. Backlight cannot be too dark to distinguish details. Advanced Picture Standard + 85 + 50 + 50 + 59 +0 +9 • Standard mode sets the various picture settings to values that...
... edge sharpness of the picture. Color - Tint - To manually change the picture mode: VIZIO Picture Picture Mode Backlight - When this setting is too low, the picture may appear faded or washed out. To adjust the picture settings: 1. Backlight cannot be too dark to distinguish details. Advanced Picture Standard + 85 + 50 + 50 + 59 +0 +9 • Standard mode sets the various picture settings to values that...
User Manual (English)
Page 29
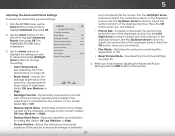
... adjust the vertical position of the displayed picture. Use the Left/ Right Arrow buttons to ensure the image is centered and completely fills the screen. See Resetting the Picture Settings on the remote. Advanced Picture Color Temperature 2. Diminishes artifacts in the ... and horizontal size of the displayed picture. Use the Arrow buttons to VIZIO highlight Advanced, then press OK. Select Off, Low, Medium, or High. • Reduce Block Noise - 5 Adjusting the Advanced Picture Settings To adjust the advanced picture settings: 1. Use the Left/Right Arrow...
... adjust the vertical position of the displayed picture. Use the Left/ Right Arrow buttons to ensure the image is centered and completely fills the screen. See Resetting the Picture Settings on the remote. Advanced Picture Color Temperature 2. Diminishes artifacts in the ... and horizontal size of the displayed picture. Use the Arrow buttons to VIZIO highlight Advanced, then press OK. Select Off, Low, Medium, or High. • Reduce Block Noise - 5 Adjusting the Advanced Picture Settings To adjust the advanced picture settings: 1. Use the Left/Right Arrow...
User Manual (English)
Page 30
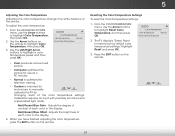
... and then press OK: VIZIO Color Temperature Color Temperature Normal Reset Color Temperature • Cool produces a blue-hued picture. • Computer optimizes the picture for technicians to highlight Color Temperature, then press OK. 3. Red/Green/Blue Offset - ABC Input Wide CC Sleep Timer Picture Audio Network Settings Help 24 From the ADVANCED Picture menu, use as...
... and then press OK: VIZIO Color Temperature Color Temperature Normal Reset Color Temperature • Cool produces a blue-hued picture. • Computer optimizes the picture for technicians to highlight Color Temperature, then press OK. 3. Red/Green/Blue Offset - ABC Input Wide CC Sleep Timer Picture Audio Network Settings Help 24 From the ADVANCED Picture menu, use as...
User Manual (English)
Page 31
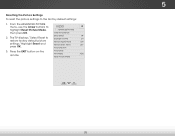
... the Arrow buttons to the factory default settings: 1. Picture Position 3. Resetting the Picture Settings To reset the picture settings to highlight Reset Picture Mode, then press OK. Film Mode Reset Picture Mode Auto Wide Zoom Normal Panoramic Exit 2D 3D ABC Input Wide CC Sleep Timer Picture Audio Network Settings Help 5 25 VIZIO Advanced Picture Color Temperature Black Detail Off 2. The TV...
... the Arrow buttons to the factory default settings: 1. Picture Position 3. Resetting the Picture Settings To reset the picture settings to highlight Reset Picture Mode, then press OK. Film Mode Reset Picture Mode Auto Wide Zoom Normal Panoramic Exit 2D 3D ABC Input Wide CC Sleep Timer Picture Audio Network Settings Help 5 25 VIZIO Advanced Picture Color Temperature Black Detail Off 2. The TV...
User Manual (English)
Page 34
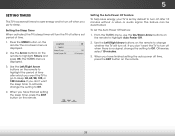
... press the EXIT button on the remote to highlight Auto Power Off. 2. VIZIO Timers Sleep Timer Auto Power Off Off 10 minutes 3. Exit 2D 3D ABC Input Wide CC Sleep Timer Picture Audio Network Settings Help 28 Setting the Sleep Timer When activated, the TV's sleep timer will turn off time,... press the EXIT button on the remote to highlight the period of time after a set period of time. 1. Use the Left/Right ...
... press the EXIT button on the remote to highlight Auto Power Off. 2. VIZIO Timers Sleep Timer Auto Power Off Off 10 minutes 3. Exit 2D 3D ABC Input Wide CC Sleep Timer Picture Audio Network Settings Help 28 Setting the Sleep Timer When activated, the TV's sleep timer will turn off time,... press the EXIT button on the remote to highlight the period of time after a set period of time. 1. Use the Left/Right ...
User Manual (English)
Page 37
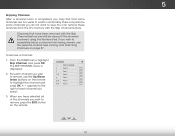
.... From the Tuner menu, highlight Skip Channel, and press OK. To remove a channel: 1. VIZIO Skip Channel 1 Test 0 1 Test 1 P 1-2 Test 2 P 2 Test 3 2-2 Test 4 P 2-3 Test 5 Wide Zoom Normal Panoramic Exit 2D 3D ABC Input Wide CC Sleep Timer Picture Audio Network Settings Help 31 If you wish to completely block a channel from the TV's memory with...
.... From the Tuner menu, highlight Skip Channel, and press OK. To remove a channel: 1. VIZIO Skip Channel 1 Test 0 1 Test 1 P 1-2 Test 2 P 2 Test 3 2-2 Test 4 P 2-3 Test 5 Wide Zoom Normal Panoramic Exit 2D 3D ABC Input Wide CC Sleep Timer Picture Audio Network Settings Help 31 If you wish to completely block a channel from the TV's memory with...
User Manual (English)
Page 38
... SAP Mono To use the Analog Audio feature: 1. Wide Zoom Normal Panoramic Exit 2D 3D ABC Input Wide CC VIZIO Digital Language English Español Français Sleep Timer Picture Audio Network Settings Help 32 From the Tuner menu, highlight Digital Language and press OK. From the Tuner menu, highlight Analog...
... SAP Mono To use the Analog Audio feature: 1. Wide Zoom Normal Panoramic Exit 2D 3D ABC Input Wide CC VIZIO Digital Language English Español Français Sleep Timer Picture Audio Network Settings Help 32 From the Tuner menu, highlight Digital Language and press OK. From the Tuner menu, highlight Analog...

User Manual (English)
Page 41
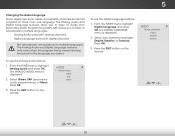
... to use a preset input name: a. b. InpuWtidNe amZeoom Normal Panora Custom Name Exit 2D 3D ABC Input Wide CC Sleep Timer Picture Audio Network Settings Help 35 Renaming Devices on the Input Menu Inputs can rename that you want to rename and press OK. 4. The Devices menu ... keyboard. b. For example, if you have finished naming your custom name using the on page 21). Press the MENU button on the remote. 5 Input Port VIZIO Name Input HDMI-1 DVD DVD_ abc def ghi j k l mn o p q r s t u v wx y z 0 123456789 .@# .com Space OK Cancel Select the input name from a ...
... to use a preset input name: a. b. InpuWtidNe amZeoom Normal Panora Custom Name Exit 2D 3D ABC Input Wide CC Sleep Timer Picture Audio Network Settings Help 35 Renaming Devices on the Input Menu Inputs can rename that you want to rename and press OK. 4. The Devices menu ... keyboard. b. For example, if you have finished naming your custom name using the on page 21). Press the MENU button on the remote. 5 Input Port VIZIO Name Input HDMI-1 DVD DVD_ abc def ghi j k l mn o p q r s t u v wx y z 0 123456789 .@# .com Space OK Cancel Select the input name from a ...
User Manual (English)
Page 42
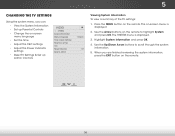
...the MENU button on -screen menu language • Set the time • Adjust the CEC settings • Adjust the Power Indicator settings • Reset TV Settings & Set up Admin Controls VIZIO SYSTEM System Information Menu Language Time & Local Settings Parental Controls CEC Power Indicator Reset & Admin English ...the EXIT button on -screen menu is displayed. 3. Highlight System Information and press OK. 4. Input Wide CC Sleep Timer Picture Audio Network Settings Help 36 Use the Arrow buttons on the remote to scroll through the system information. 5. The on the remote. When...
...the MENU button on -screen menu language • Set the time • Adjust the CEC settings • Adjust the Power Indicator settings • Reset TV Settings & Set up Admin Controls VIZIO SYSTEM System Information Menu Language Time & Local Settings Parental Controls CEC Power Indicator Reset & Admin English ...the EXIT button on -screen menu is displayed. 3. Highlight System Information and press OK. 4. Input Wide CC Sleep Timer Picture Audio Network Settings Help 36 Use the Arrow buttons on the remote to scroll through the system information. 5. The on the remote. When...
User Manual (English)
Page 52
... 22. • Press the INPUT button on the TV don't look right. • Adjust the Color and Tint settings in the Picture menu. See Resetting the Picture Settings on page 11. 46 See Replacing the Batteries on page 25. The power is on, but there is no headphones ... outlet. • Ensure the power cable is plugged into a working . • Ensure you are securely attached. • Reset the picture settings. Devices differ; See Adjusting the Picture Settings on page 22. • Check all devices are connected correctly. A The TV displays "No Signal." • Press the INPUT button on...
... 22. • Press the INPUT button on the TV don't look right. • Adjust the Color and Tint settings in the Picture menu. See Resetting the Picture Settings on page 11. 46 See Replacing the Batteries on page 25. The power is on, but there is no headphones ... outlet. • Ensure the power cable is plugged into a working . • Ensure you are securely attached. • Reset the picture settings. Devices differ; See Adjusting the Picture Settings on page 22. • Check all devices are connected correctly. A The TV displays "No Signal." • Press the INPUT button on...
Quickstart Guide (English)
Page 14
... Ensure your connected devices are turned on. • Press the INPUT button on the remote and select the input to which your device is set to the following measures: • Reorient or relocate the receiving antenna. • Increase the separation between the equipment and receiver. • ...compliance with Part 15 of the FCC Rules. These limits are black bars on , the user is encouraged to try to the picture. It is a picture, but no guarantee that interference will not occur in a particular installation. Be sure mute is properly grounded. There are designed to...
... Ensure your connected devices are turned on. • Press the INPUT button on the remote and select the input to which your device is set to the following measures: • Reorient or relocate the receiving antenna. • Increase the separation between the equipment and receiver. • ...compliance with Part 15 of the FCC Rules. These limits are black bars on , the user is encouraged to try to the picture. It is a picture, but no guarantee that interference will not occur in a particular installation. Be sure mute is properly grounded. There are designed to...


