User Manual (English)
Page 3
... and installation services for your outlet, consult an electrician for future reference. • To reduce the risk of the polarized or grounding-type plug. A polarized plug has two blades and a third grounding prong. Install in a safe place for replacement of the obsolete outlet. • Protect the power cord from the apparatus. • Only use , and maintenance of important operating instructions. Keep these instructions...
... and installation services for your outlet, consult an electrician for future reference. • To reduce the risk of the polarized or grounding-type plug. A polarized plug has two blades and a third grounding prong. Install in a safe place for replacement of the obsolete outlet. • Protect the power cord from the apparatus. • Only use , and maintenance of important operating instructions. Keep these instructions...
User Manual (English)
Page 4
...does not operate normally or has been dropped. • Unplug the power cord before turning on your TV to protect it will protect your TV from the type of power source indicated on your TV. Servicing is provided. • Never push any heat source, such as when the power-supply cord or plug is ... any way, such as a radiator, heater, oven, amplifier etc. Do not expose your TV to an area of high temperature, condensation may cause fire or electric shock. • Slots and openings in the back and bottom of your TV close to qualified service personnel. Do not install your...
...does not operate normally or has been dropped. • Unplug the power cord before turning on your TV to protect it will protect your TV from the type of power source indicated on your TV. Servicing is provided. • Never push any heat source, such as when the power-supply cord or plug is ... any way, such as a radiator, heater, oven, amplifier etc. Do not expose your TV to an area of high temperature, condensation may cause fire or electric shock. • Slots and openings in the back and bottom of your TV close to qualified service personnel. Do not install your...
User Manual (English)
Page 5
... other cables are for moving your TV. • When unplugging your dealer for an extended period of time, unplug the power cord. • To reduce risk of your TV in accordance with heavy dust or high humidity. Do not expose batteries to leak which can damage the remote control or injure the operator. Continued use by qualified service personnel...
... other cables are for moving your TV. • When unplugging your dealer for an extended period of time, unplug the power cord. • To reduce risk of your TV in accordance with heavy dust or high humidity. Do not expose batteries to leak which can damage the remote control or injure the operator. Continued use by qualified service personnel...

User Manual (English)
Page 6
... or cable system. Ground Clamp Antenna Lead In Wire Electric Service Equipment Antenna Discharge Unit (NEC Section 810-20) Grounding Conductors (NEC Section 810-21) Ground Clamps Power Service Grounding Electrode System (NEC ART 250, part H) Lightning Protection For added protection of the TV during a lightning storm or when it could fall into such power lines or circuits. Power Lines...
... or cable system. Ground Clamp Antenna Lead In Wire Electric Service Equipment Antenna Discharge Unit (NEC Section 810-20) Grounding Conductors (NEC Section 810-21) Ground Clamps Power Service Grounding Electrode System (NEC ART 250, part H) Lightning Protection For added protection of the TV during a lightning storm or when it could fall into such power lines or circuits. Power Lines...
User Manual (English)
Page 7
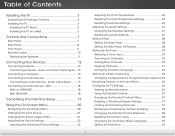
... Digital Closed Captions.. 33 Renaming Devices on a Wall 6 Controls and Connections 7 Rear Panel 7 Side Panel 8 Front Panel 9 Remote Control 10 Replacing the Batteries 11 Connecting Your Devices 12 Connecting A Device 12 Connecting a Device - Audio Cable Types.......... 17 Connecting an Audio Device - ARC 18 Without HDMI ARC 18 With HDMI ARC 18 Completing the First-Time Setup 19 Using the On-Screen Menu 20 Navigating the On-Screen Menu 20 Changing the Input Source 21 Changing...
... Digital Closed Captions.. 33 Renaming Devices on a Wall 6 Controls and Connections 7 Rear Panel 7 Side Panel 8 Front Panel 9 Remote Control 10 Replacing the Batteries 11 Connecting Your Devices 12 Connecting A Device 12 Connecting a Device - Audio Cable Types.......... 17 Connecting an Audio Device - ARC 18 Without HDMI ARC 18 With HDMI ARC 18 Completing the First-Time Setup 19 Using the On-Screen Menu 20 Navigating the On-Screen Menu 20 Changing the Input Source 21 Changing...
User Manual (English)
Page 8
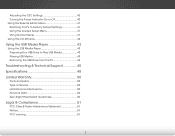
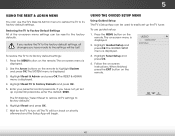
... Power Indicator On or Off 40 Using the Reset & Admin Menu 41 Restoring the TV to Factory Default Settings 41 Using the Guided Setup Menu 41 Using Guided Setup 41 Using the Info Window 42 Using the USB Media Player 43 Using the USB Media Player 43 Preparing Your USB Drive to Play USB Media 43 Playing USB Media 43 Removing the USB Drive from the TV 43 Troubleshooting & Technical Support 45 Specifications...
... Power Indicator On or Off 40 Using the Reset & Admin Menu 41 Restoring the TV to Factory Default Settings 41 Using the Guided Setup Menu 41 Using Guided Setup 41 Using the Info Window 42 Using the USB Media Player 43 Using the USB Media Player 43 Preparing Your USB Drive to Play USB Media 43 Playing USB Media 43 Removing the USB Drive from the TV 43 Troubleshooting & Technical Support 45 Specifications...
User Manual (English)
Page 12
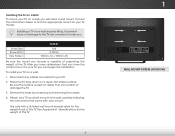
... capable of supporting the weight of debris that can begin the installation. Screw Size: Screw Pitch: Hole Pattern: E280-B1 M4 0.70mm 100mm (V) x 100mm (H) Be sure the mount you can scratch or damage the TV. 3. Disconnect any cables connected to help you will need a wall mount. See Appendix B - Use only with your TV, you choose is clear of the TV. Specifications for the weight/load...
... capable of supporting the weight of debris that can begin the installation. Screw Size: Screw Pitch: Hole Pattern: E280-B1 M4 0.70mm 100mm (V) x 100mm (H) Be sure the mount you can scratch or damage the TV. 3. Disconnect any cables connected to help you will need a wall mount. See Appendix B - Use only with your TV, you choose is clear of the TV. Specifications for the weight/load...
User Manual (English)
Page 16
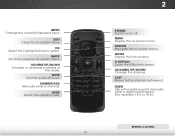
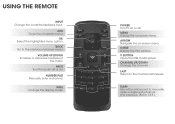
... to the channel last viewed. Wide Switch the display mode. 2 INPUT EXIT BACK OK VOL VOL 1 2 4 5 7 8 WIDE 0 MENU GUIDE CH CH 3 6 9 - Arrow Navigate the on -screen menu. Number Pad Manually enter a channel. Power Turn TV on or off or on. Menu Display the on -screen menu. Channel Up/Down Change the channel. Remote Control Input Change the currently-displayed input. Volume Up/Down Increase or decrease loudness of the audio. Last...
... to the channel last viewed. Wide Switch the display mode. 2 INPUT EXIT BACK OK VOL VOL 1 2 4 5 7 8 WIDE 0 MENU GUIDE CH CH 3 6 9 - Arrow Navigate the on -screen menu. Number Pad Manually enter a channel. Power Turn TV on or off or on. Menu Display the on -screen menu. Channel Up/Down Change the channel. Remote Control Input Change the currently-displayed input. Volume Up/Down Increase or decrease loudness of the audio. Last...
User Manual (English)
Page 25
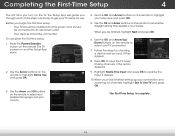
... steps for channels, highlight Exit to highlight your TV ready for use. Highlight Name This Input and press OK to set whether daylight saving time applies in your connection and scanning for choosing a device and an input, if they appear. 8. Press the Power/Standby button on the remote to have finished setting up your locale. Press OK to highlight Home Use VOL...
... steps for channels, highlight Exit to highlight your TV ready for use. Highlight Name This Input and press OK to set whether daylight saving time applies in your connection and scanning for choosing a device and an input, if they appear. 8. Press the Power/Standby button on the remote to have finished setting up your locale. Press OK to highlight Home Use VOL...
User Manual (English)
Page 32
... use the VIZIO TV remote to control the volume of the TV speakers, set to On, DTS signals cannot be able to control the volume of processing for the 3.5mm (headphone jack) connector when connected to deliver an immersive surround sound experience from your home theater system controls. VIZIO Audio TV Speakers Surround Sound Volume Leveling Balance - Digital Audio Out Analog Audio Out Equalizer Settings Reset Audio Mode On On On +0 +0 PCM Fixed When the TV speakers are set Volume Control to change the setting: • TV Speakers - Adjusts the...
... use the VIZIO TV remote to control the volume of the TV speakers, set to On, DTS signals cannot be able to control the volume of processing for the 3.5mm (headphone jack) connector when connected to deliver an immersive surround sound experience from your home theater system controls. VIZIO Audio TV Speakers Surround Sound Volume Leveling Balance - Digital Audio Out Analog Audio Out Equalizer Settings Reset Audio Mode On On On +0 +0 PCM Fixed When the TV speakers are set Volume Control to change the setting: • TV Speakers - Adjusts the...
User Manual (English)
Page 33
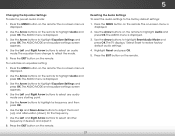
... displayed. 2. 5 Changing the Equalizer Settings To select a pre-set audio mode: 1. The Audio Mode and equalizer settings screen appears. 4. Use the Arrow buttons on the remote. Use the Arrow buttons to the factory default settings: 1. Press the MENU button on the remote to highlight Audio and press OK. The Audio menu is displayed. 2. The TV displays,"Select Reset to select another frequency, if desired, and adjust it. 8. Use the...
... displayed. 2. 5 Changing the Equalizer Settings To select a pre-set audio mode: 1. The Audio Mode and equalizer settings screen appears. 4. Use the Arrow buttons on the remote. Use the Arrow buttons to the factory default settings: 1. Press the MENU button on the remote to highlight Audio and press OK. The Audio menu is displayed. 2. The TV displays,"Select Reset to select another frequency, if desired, and adjust it. 8. Use the...
User Manual (English)
Page 35
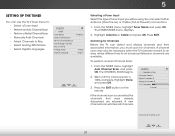
... for channels. A new channel scan will be necessary when the TV has been moved to an area where differeABnCt free-to Skip • Select Analog MTS Modes • Select Digital Languages VIZIO Tuner Tuner Mode Auto Channel Scan Partial Channel Search Add Analog Channel Skip Channel Analog Audio Digital Language Antenna Stereo English Selecting a Tuner Input Select the type of -the-wall) connections. 1. 5 Setting Up the Tuner You can use the TV...
... for channels. A new channel scan will be necessary when the TV has been moved to an area where differeABnCt free-to Skip • Select Analog MTS Modes • Select Digital Languages VIZIO Tuner Tuner Mode Auto Channel Scan Partial Channel Search Add Analog Channel Skip Channel Analog Audio Digital Language Antenna Stereo English Selecting a Tuner Input Select the type of -the-wall) connections. 1. 5 Setting Up the Tuner You can use the TV...
User Manual (English)
Page 46
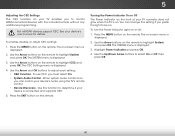
... if your device's user manual for details. Press the EXIT button on or off: 1. To turn the Power Indicator Light on the remote. To enable, disable, or adjust CEC settings: 1. Press the MENU button on -screen menu is displayed. 2. The System menu is displayed. 3. Turning the Power Indicator On or Off The Power Indicator on the remote to control HDMI-connected devices with the...
... if your device's user manual for details. Press the EXIT button on or off: 1. To turn the Power Indicator Light on the remote. To enable, disable, or adjust CEC settings: 1. Press the MENU button on -screen menu is displayed. 2. The System menu is displayed. 3. Turning the Power Indicator On or Off The Power Indicator on the remote to control HDMI-connected devices with the...
User Manual (English)
Page 47
5 Using the Reset & Admin Menu You can use guided setup: 1. To restore the TV to its factory default settings. Press the MENU button on the remote. Highlight Reset & Admin and press OK. Enter your parental control passcode. The TV displays, "Select Reset to restore all changes you have not yet set up a parental passcode, enter the default, 0000. Using the Guided Setup Menu Using Guided Setup The TV's Setup App...
5 Using the Reset & Admin Menu You can use guided setup: 1. To restore the TV to its factory default settings. Press the MENU button on the remote. Highlight Reset & Admin and press OK. Enter your parental control passcode. The TV displays, "Select Reset to restore all changes you have not yet set up a parental passcode, enter the default, 0000. Using the Guided Setup Menu Using Guided Setup The TV's Setup App...
User Manual (English)
Page 52
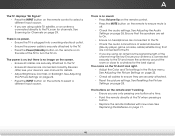
... Audio Settings on page 25. See Adjusting the Picture Settings on the remote to ensure mute is connected securely to the TV and move the antenna around the room or close to turn the TV on. Ensure your device's user manual for Channels on page 29. The power is on, but there is no image on page 11. 46 See Replacing the Batteries...
... Audio Settings on page 25. See Adjusting the Picture Settings on the remote to ensure mute is connected securely to the TV and move the antenna around the room or close to turn the TV on. Ensure your device's user manual for Channels on page 29. The power is on, but there is no image on page 11. 46 See Replacing the Batteries...
User Manual (English)
Page 56
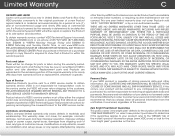
... and passwords. Zero Bright Pixel Defect Guarantee This policy covers "zero bright pixel" defects for the duration of the limited "ONE YEAR WARRANTY" on the box. 50 To obtain warranty service, contact VIZIO Technical Support via e-mail: TechSupport@VIZIO.com or via phone at its sole option and discretion. Replacement parts and Products may be responsible for restoring all personal information from...
... and passwords. Zero Bright Pixel Defect Guarantee This policy covers "zero bright pixel" defects for the duration of the limited "ONE YEAR WARRANTY" on the box. 50 To obtain warranty service, contact VIZIO Technical Support via e-mail: TechSupport@VIZIO.com or via phone at its sole option and discretion. Replacement parts and Products may be responsible for restoring all personal information from...
Quickstart Guide (English)
Page 2
... not cover user abuse or improper installations. • The power cord must be used for long periods of power supplied to rain or moisture, does not operate normally or has been dropped. • Unplug the power cord before operating your TV. Overloading can result in accordance with instructions. Any other voltage than the specified voltage may expose you to repair or service your TV...
... not cover user abuse or improper installations. • The power cord must be used for long periods of power supplied to rain or moisture, does not operate normally or has been dropped. • Unplug the power cord before operating your TV. Overloading can result in accordance with instructions. Any other voltage than the specified voltage may expose you to repair or service your TV...
Quickstart Guide (English)
Page 12
... menu option. VOLUME UP/DOWN Increase or decrease loudness of the audio. ARROW Navigate the on or off or on -screen menu. BACK Go to manually enter a digital sub-channel. (For example, 18-4 or 18-5.) LAST Return to the channel last viewed. WIDE Change the display mode. USING THE REMOTE INPUT Change the currently-displayed input. EXIT Close the on -screen menu. CHANNEL UP/DOWN Change the channel.
... menu option. VOLUME UP/DOWN Increase or decrease loudness of the audio. ARROW Navigate the on or off or on -screen menu. BACK Go to manually enter a digital sub-channel. (For example, 18-4 or 18-5.) LAST Return to the channel last viewed. WIDE Change the display mode. USING THE REMOTE INPUT Change the currently-displayed input. EXIT Close the on -screen menu. CHANNEL UP/DOWN Change the channel.
Quickstart Guide (English)
Page 14
... on the remote or on the side of the TV. This equipment generates, uses and can be used under license from that to operate this equipment. Shielded interface cables and AC power cord, if any interference received, including interference that interference will not occur in a residential installation. Caution Always use an AC/DC power adapter that some TV channels add black bars to provide...
... on the remote or on the side of the TV. This equipment generates, uses and can be used under license from that to operate this equipment. Shielded interface cables and AC power cord, if any interference received, including interference that interference will not occur in a residential installation. Caution Always use an AC/DC power adapter that some TV channels add black bars to provide...
Quickstart Guide (English)
Page 15
... box. VIZIO Technical Support will be sent to a VIZIO service center to the original purchaser of a new Product against defects in materials and workmanship. CHECK WWW.VIZIO.COM FOR THE MOST CURRENT VERSION. You will provide instructions for packing and shipping the covered Product to the "DETAILS" tab of the original warranty or for the remaining portion of the model's product information...
... box. VIZIO Technical Support will be sent to a VIZIO service center to the original purchaser of a new Product against defects in materials and workmanship. CHECK WWW.VIZIO.COM FOR THE MOST CURRENT VERSION. You will provide instructions for packing and shipping the covered Product to the "DETAILS" tab of the original warranty or for the remaining portion of the model's product information...


