Quickstart Guide / Guide de Demarrage Rapide
Page 1
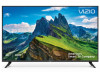
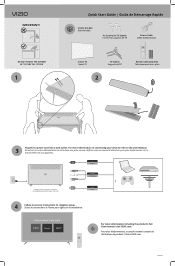
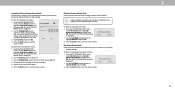
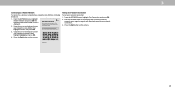
... d'utilisation pour plus d'informations, y compris manuel complet de l'utilisateur du produitr, Visitez VIZIO.com. 05082018 Choose a Language for TV Stands 4 x Vis Pour supports de TV Power Cable Câble d'alimentation Smart TV Smart TV TV Stands Supports de TV 2 Remote with Batteries Télécommande avec piles $ Watch Now HDRMCRIACTAoT3o 3 RSCtAaSntTadona3drdard OStpOatnipcdtaiacl...
... d'utilisation pour plus d'informations, y compris manuel complet de l'utilisateur du produitr, Visitez VIZIO.com. 05082018 Choose a Language for TV Stands 4 x Vis Pour supports de TV Power Cable Câble d'alimentation Smart TV Smart TV TV Stands Supports de TV 2 Remote with Batteries Télécommande avec piles $ Watch Now HDRMCRIACTAoT3o 3 RSCtAaSntTadona3drdard OStpOatnipcdtaiacl...
Manuel de l Utilisateur
Page 16
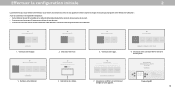
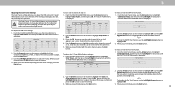
... experience. TouNtextest Skip prêt! Effectuer la configuration initiale Back Rescan Networks Hotten Netwok Help Skip 2 Choose a language for your phone into the ultimate remote. TWerhmicsh&roCoomndisitiyoonusr. VIZIO TV Located? FVaImZIiOlyTReormoms & Conditions LViIvZinIOg PRroivoamcy Policy GooMgalestPerrivacy Policy GoBogelderoToemrms & Conditons English Español Français Home Network Public Wi-Fi Back...
... experience. TouNtextest Skip prêt! Effectuer la configuration initiale Back Rescan Networks Hotten Netwok Help Skip 2 Choose a language for your phone into the ultimate remote. TWerhmicsh&roCoomndisitiyoonusr. VIZIO TV Located? FVaImZIiOlyTReormoms & Conditions LViIvZinIOg PRroivoamcy Policy GooMgalestPerrivacy Policy GoBogelderoToemrms & Conditons English Español Français Home Network Public Wi-Fi Back...

User Manual
Page 3
...set . or injure the operator. Do not expose your dealer. Do not try to hang onto the product. • Store the accessories (remote, batteries, etc.) in the ears). Operating your TV. The performance of the following occurs, contact the dealer: - iii When your TV ...power cord fails or frays. - Incorrect polarities • Using cabinets or stands recommended by qualified service personnel only. Ensure that can damage the remote control television set in an area with wet hands. • Many injuries, particularly to children, can be pulled, pushed or knocked over....
...set . or injure the operator. Do not expose your dealer. Do not try to hang onto the product. • Store the accessories (remote, batteries, etc.) in the ears). Operating your TV. The performance of the following occurs, contact the dealer: - iii When your TV ...power cord fails or frays. - Incorrect polarities • Using cabinets or stands recommended by qualified service personnel only. Ensure that can damage the remote control television set in an area with wet hands. • Many injuries, particularly to children, can be pulled, pushed or knocked over....

User Manual
Page 6
Table Of Contents Getting to Know Your TV 7 Front Panel 7 Rear Panel 8 Connecting Your Devices 11 Wall-mounting the TV 14 Using the Remote 15 Completing The First-Time Setup 16 Using the On-Screen Menu 17 Navigating the On-Screen Menu 17 Changing the Input Source 17 Changing ...
Table Of Contents Getting to Know Your TV 7 Front Panel 7 Rear Panel 8 Connecting Your Devices 11 Wall-mounting the TV 14 Using the Remote 15 Completing The First-Time Setup 16 Using the On-Screen Menu 17 Navigating the On-Screen Menu 17 Changing the Input Source 17 Changing ...

User Manual
Page 7
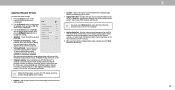
The power indicator flashes on when the TV turns on , see Turning the Power Indicator On or Off. 7 Getting to Know Your TV 1 FRONT PANEL Remote Sensor and Power Indicator When using the remote, aim it directly at this sensor. To keep the power indicator on as long as the TV is on , then goes out after several seconds.
The power indicator flashes on when the TV turns on , see Turning the Power Indicator On or Off. 7 Getting to Know Your TV 1 FRONT PANEL Remote Sensor and Power Indicator When using the remote, aim it directly at this sensor. To keep the power indicator on as long as the TV is on , then goes out after several seconds.
User Manual
Page 15
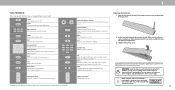
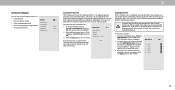
... the back cover. 2. Channel Up/Down Change the channel When needed, VIZIO recommends replacing the batteries that came with the laws and/or regulations where you properly dispose of batteries infire. 1 USING THE REMOTE Note that specific buttons may cause choking and/or lead to a fire... or chemical burn if mishandled. Please ensure you live. For more information please visit: www.vizio.com/environment WARNING: keep the remote control batteries away from children. Do ...
... the back cover. 2. Channel Up/Down Change the channel When needed, VIZIO recommends replacing the batteries that came with the laws and/or regulations where you properly dispose of batteries infire. 1 USING THE REMOTE Note that specific buttons may cause choking and/or lead to a fire... or chemical burn if mishandled. Please ensure you live. For more information please visit: www.vizio.com/environment WARNING: keep the remote control batteries away from children. Do ...
User Manual
Page 16
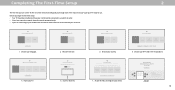
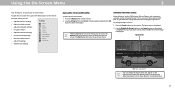
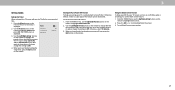
...All 7. You can turn on the TV, the on the TV. The VIZIO SmartCastTM App brings together TV Shows, movies, and more from the App Store or Google Play. Download now from multiple apps into the ultimate remote. Completing The First-Time Setup 2 The first time you turn your phone into... one simple experience. Where is your VIZIO TV. To search for local broadcast channels, make sure the cable from the antenna, ...
...All 7. You can turn on the TV, the on the TV. The VIZIO SmartCastTM App brings together TV Shows, movies, and more from the App Store or Google Play. Download now from multiple apps into the ultimate remote. Completing The First-Time Setup 2 The first time you turn your phone into... one simple experience. Where is your VIZIO TV. To search for local broadcast channels, make sure the cable from the antenna, ...
User Manual
Page 17
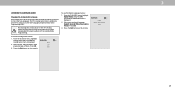
...Name Change Input SMARTCAST WatchFree HDMI-1 HDMI-2 HDMI-3 HDMI-4 COMP TV Note: Inputs may vary by TV. The Exit button will close the on the remote. To change the input source using the Input menu. Using the On-Screen Menu 3 Your TV features an easy-to-use one of these devices...Use the Arrow buttons to highlight a menu option, and press the OK button to select that appear on -screen menu. While navigating the on the remote to recognize. Use the Right/Left Arrow buttons or the Input button on -screen menu, you must first change the input sources: 1. See Renaming Devices...
...Name Change Input SMARTCAST WatchFree HDMI-1 HDMI-2 HDMI-3 HDMI-4 COMP TV Note: Inputs may vary by TV. The Exit button will close the on the remote. To change the input source using the Input menu. Using the On-Screen Menu 3 Your TV features an easy-to-use one of these devices...Use the Arrow buttons to highlight a menu option, and press the OK button to select that appear on -screen menu. While navigating the on the remote to recognize. Use the Right/Left Arrow buttons or the Input button on -screen menu, you must first change the input sources: 1. See Renaming Devices...
User Manual
Page 19
... the picture. however, it will not produce detail that picture setting, then use the Up/ Down Arrow buttons on the remote. * Not applicable to D24h-G9 **Applicable models: D50x-G9, V505-G9, V405-G9 and V655-G9 19 Color Space** Auto • Black Detail* - Reduce Signal Noise - Reduces pixelation and distortion for watching film. Available for the...
... the picture. however, it will not produce detail that picture setting, then use the Up/ Down Arrow buttons on the remote. * Not applicable to D24h-G9 **Applicable models: D50x-G9, V505-G9, V405-G9 and V655-G9 19 Color Space** Auto • Black Detail* - Reduce Signal Noise - Reduces pixelation and distortion for watching film. Available for the...
User Manual
Page 20
...press OK. Prevent changes to factory default values. Choose between On or Off. • Reset Picture Mode† - Use either on the remote. Highlight Save and press OK. 4. Save a custom picture mode. • Lock Picture Mode - To adjust the Picture Mode Edit settings:...Save Picture Mode Back abc def ghi j k l mn o p q r s t u v wx y z 0 1 2 3 4 5 6 7 8 9 .@# äêí Space Save † Only available on the remote to highlight Save Picture Mode, and then press OK. To adjust the color temperature: 1. From the MORE PICTURE menu, use as a PC monitor. 3. Use the...
...press OK. Prevent changes to factory default values. Choose between On or Off. • Reset Picture Mode† - Use either on the remote. Highlight Save and press OK. 4. Save a custom picture mode. • Lock Picture Mode - To adjust the Picture Mode Edit settings:...Save Picture Mode Back abc def ghi j k l mn o p q r s t u v wx y z 0 1 2 3 4 5 6 7 8 9 .@# äêí Space Save † Only available on the remote to highlight Save Picture Mode, and then press OK. To adjust the color temperature: 1. From the MORE PICTURE menu, use as a PC monitor. 3. Use the...
User Manual
Page 21
... buttons to factory defaults. Select Reset to restor the Standard picture mode to highlight Reset and press OK. 3. Use the Number Pad on your remote to enter your remote to highlight Lock Picture Mode, and then press OK. From the PICTURE MODE EDIT menu, use the Arrow buttons to enter a unique 4-digit...
... buttons to factory defaults. Select Reset to restor the Standard picture mode to highlight Reset and press OK. 3. Use the Number Pad on your remote to enter your remote to highlight Lock Picture Mode, and then press OK. From the PICTURE MODE EDIT menu, use the Arrow buttons to enter a unique 4-digit...
User Manual
Page 22
... -24 Offset 0 Gain 0 Green 0 5 0 0 0 Color Tuner Blue 0 -4 -22 0 0 Cyan 0 0 0 Magenta 25 -2 0 Yellow -14 0 0 2. Use the Arrow buttons on the remote to manually calibrate the TV. SMPT Test Pattern Off 2. To hide the SMPTE Test Pattern, use the Left/Right Arrow buttons to highlight Off. 3. When...the SMPTE Test Pattern: 1. Selecting a percentage immediately shows the flat pattern at the same time. 5. Use the Arrow buttons on the remote to highlight Color Tuner, and then press OK. From the COLOR CALIBRATION menu, use the Arrow buttons to turn color channels off . ...
... -24 Offset 0 Gain 0 Green 0 5 0 0 0 Color Tuner Blue 0 -4 -22 0 0 Cyan 0 0 0 Magenta 25 -2 0 Yellow -14 0 0 2. Use the Arrow buttons on the remote to manually calibrate the TV. SMPT Test Pattern Off 2. To hide the SMPTE Test Pattern, use the Left/Right Arrow buttons to highlight Off. 3. When...the SMPTE Test Pattern: 1. Selecting a percentage immediately shows the flat pattern at the same time. 5. Use the Arrow buttons on the remote to highlight Color Tuner, and then press OK. From the COLOR CALIBRATION menu, use the Arrow buttons to turn color channels off . ...
User Manual
Page 23
...Analyzer Test Pattern: 1. To hide the Ramp Test Pattern, use the Left/Right Arrow buttons to highlight Off. 3. Use the Arrow buttons on the remote to highlight Off. Use the Left/ Right Arrow buttons to show the Uniformity Analyzer Test Pattern. -or- When you are finished, press the Exit...to select the color for the ramp test pattern. When you are finished, press the Exit button. 3 23 Use the Arrow buttons on the remote to highlight Off. Uniformity Analyzer Test Pattern Off 2. From the Color Tuner menu, use the Arrow buttons to highlight Calibration Tests, and then ...
...Analyzer Test Pattern: 1. To hide the Ramp Test Pattern, use the Left/Right Arrow buttons to highlight Off. 3. Use the Arrow buttons on the remote to highlight Off. Use the Left/ Right Arrow buttons to show the Uniformity Analyzer Test Pattern. -or- When you are finished, press the Exit...to select the color for the ramp test pattern. When you are finished, press the Exit button. 3 23 Use the Arrow buttons on the remote to highlight Off. Uniformity Analyzer Test Pattern Off 2. From the Color Tuner menu, use the Arrow buttons to highlight Calibration Tests, and then ...
User Manual
Page 24
... display the on-screen volume slider that appears when volume is adjusted. • Surround Sound - Use the Arrow buttons on the remote. Volume leveling uses DTS TruVolume™ to maintain consistent volume levels during transitions between On or Off to highlight Audio and press OK... bar or AV receiver) will control the volume. 4. Sets the volume control properties for example). • Analog Audio Out - The on the remote. • Balance - Audio Back 2. Surround Sound On 3. Turns the built-in speakers Digital Audio Out Auto On or Off. Toggle between program...
... display the on-screen volume slider that appears when volume is adjusted. • Surround Sound - Use the Arrow buttons on the remote. Volume leveling uses DTS TruVolume™ to maintain consistent volume levels during transitions between On or Off to highlight Audio and press OK... bar or AV receiver) will control the volume. 4. Sets the volume control properties for example). • Analog Audio Out - The on the remote. • Balance - Audio Back 2. Surround Sound On 3. Turns the built-in speakers Digital Audio Out Auto On or Off. Toggle between program...

User Manual
Page 25
...Wireless MAC - From the NETWORK menu, highlight Manual Setup and press OK. Use the Arrow buttons on the remote. To find the TV's MAC address: 1. D24h-G9 , D32h-G9 and D40f-G9 support Wireless-N. Use the Arrow and OK buttons to the TV. DNS Server - From the NETWORK menu, ... wireless network connection Connecting to a Wireless Network To connect to a wireless network whose network name (SSID) is displayed. 3. D50x-G9, V405-G9, V505-G9 and V655-G9 support Wireless-AC. If you have connected the TV to your router may be needed to connect your TV to your network's...
...Wireless MAC - From the NETWORK menu, highlight Manual Setup and press OK. Use the Arrow buttons on the remote. To find the TV's MAC address: 1. D24h-G9 , D32h-G9 and D40f-G9 support Wireless-N. Use the Arrow and OK buttons to the TV. DNS Server - From the NETWORK menu, ... wireless network connection Connecting to a Wireless Network To connect to a wireless network whose network name (SSID) is displayed. 3. D50x-G9, V405-G9, V505-G9 and V655-G9 support Wireless-AC. If you have connected the TV to your router may be needed to connect your TV to your network's...
User Manual
Page 26
... and download speed of your network connection: 1. From the NETWORK menu, highlight Hidden Network and press OK. Press the Exit button on the remote. From the NETWORK menu, highlight Test Connection and press OK. 2. Back Enter Acces Point Name Enter your network's name (SSID), then highlight ...Connect and press OK. Press the Exit button on the remote. Connect 3 26 Using the on -screen keyboard, enter your network's password, then highlight Connect and press OK. 4. The ENTER ACCESS POINT NAME...
... and download speed of your network connection: 1. From the NETWORK menu, highlight Hidden Network and press OK. Press the Exit button on the remote. From the NETWORK menu, highlight Test Connection and press OK. 2. Back Enter Acces Point Name Enter your network's name (SSID), then highlight ...Connect and press OK. Press the Exit button on the remote. Connect 3 26 Using the on -screen keyboard, enter your network's password, then highlight Connect and press OK. 4. The ENTER ACCESS POINT NAME...
User Manual
Page 27
... Timers and press OK. Sleep Timer Auto Power Off Blank Screen Off 10 Minutes 3. Use the Left/Right Arrow buttons on the remote. Otherwise, select 10 minutes. 3. The on the remote to highlight Blank Screen. 2. To set by default to turn off after which you want the TV to go to activate... audio signal. To use the Up/Down Arrow buttons on -screen menu is streaming. Press the Menu button on the remote to immediatly blank the screen. 3. Use the Arrow buttons on the remote. If you don't want the sleep timer to sleep: 30, 60, 90, 120, or 180 minutes. Setting the Auto...
... Timers and press OK. Sleep Timer Auto Power Off Blank Screen Off 10 Minutes 3. Use the Left/Right Arrow buttons on the remote. Otherwise, select 10 minutes. 3. The on the remote to highlight Blank Screen. 2. To set by default to turn off after which you want the TV to go to activate... audio signal. To use the Up/Down Arrow buttons on -screen menu is streaming. Press the Menu button on the remote to immediatly blank the screen. 3. Use the Arrow buttons on the remote. If you don't want the sleep timer to sleep: 30, 60, 90, 120, or 180 minutes. Setting the Auto...
User Manual
Page 28
... The TV may need to scan for channels before it can remove these channels from being viewed, use the Up/Down Arrow buttons on the remote. The auto channel scan begins. Channels Found 2. Wait until the channel scan is displayed. If you select. 0 Test 0 1 Test 1 2 Test 2 3. From the .... Skip Channels Back 2. A P appears to the right of the channels you wish to watch comfortably. Press the Exit button on the remote to remove, press the Exit button on the remote. 3 Test 3 4 Test 4 28 Digitial : 8 Analog: 12 45% Complete If the channel scan is entered using an antenna) and...
... The TV may need to scan for channels before it can remove these channels from being viewed, use the Up/Down Arrow buttons on the remote. The auto channel scan begins. Channels Found 2. Wait until the channel scan is displayed. If you select. 0 Test 0 1 Test 1 2 Test 2 3. From the .... Skip Channels Back 2. A P appears to the right of the channels you wish to watch comfortably. Press the Exit button on the remote to remove, press the Exit button on the remote. 3 Test 3 4 Test 4 28 Digitial : 8 Analog: 12 45% Complete If the channel scan is entered using an antenna) and...
User Manual
Page 29
... the Analog Audio Language Some analog over-the-air (free) and cable channels broadcast programs in SAP. Press the Exit button on the remote. 3 29 Stereo 2. From the CHANNELS menu, highlight Digital Audio and press OK. The Analog Audio Back Analog Audio menu is displayed... language using Secondary Audio Programming (SAP). Select Stereo, SAP (secondary audio SAP programming), or Mono. Press the Exit button on the remote. Select your preferred language: English, Spanish/Video Description, French. From the Channels menu, highlight Analog Audio and press OK. The Analog...
... the Analog Audio Language Some analog over-the-air (free) and cable channels broadcast programs in SAP. Press the Exit button on the remote. 3 29 Stereo 2. From the CHANNELS menu, highlight Digital Audio and press OK. The Analog Audio Back Analog Audio menu is displayed... language using Secondary Audio Programming (SAP). Select Stereo, SAP (secondary audio SAP programming), or Mono. Press the Exit button on the remote. Select your preferred language: English, Spanish/Video Description, French. From the Channels menu, highlight Analog Audio and press OK. The Analog...
User Manual
Page 30
...the Program Rating feature: 1. The channel is the case, you are finished adjusting the rating level blocks, press the Exit button on the remote to cable TV directly from being viewed. Press the Menu button on -screen menu is displayed. 2. The LOCKS menu is locked, the Lock.... 3. Other devices have a device connected using the tuner to receive your set a custom PIN passcode, see Setting a System Pin. The on the remote. The CHANNEL LOCKS menu is displayed. 2. To block or unblock content by Rating A channel may sometimes broadcast programs that are meant for children, and...
...the Program Rating feature: 1. The channel is the case, you are finished adjusting the rating level blocks, press the Exit button on the remote to cable TV directly from being viewed. Press the Menu button on -screen menu is displayed. 2. The LOCKS menu is locked, the Lock.... 3. Other devices have a device connected using the tuner to receive your set a custom PIN passcode, see Setting a System Pin. The on the remote. The CHANNEL LOCKS menu is displayed. 2. To block or unblock content by Rating A channel may sometimes broadcast programs that are meant for children, and...


