Manuel de l Utilisateur
Page 16
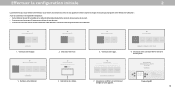
...: Accepting the terms and policiesis a condition of using your VIZIO TV. USA Mexico Canada Let's set up local channels.Download now from the antenna, wall or cable box is properly connected to your favorite To search for local broadcast channels, make sure the cable from multiple apps into the ultimate remote. Next Skip Rescan Networks Hotten Netwok Help Skip ChooHsoewaaWrei-yFoi uNuestwinogrky.our TV? Choisissez...
...: Accepting the terms and policiesis a condition of using your VIZIO TV. USA Mexico Canada Let's set up local channels.Download now from the antenna, wall or cable box is properly connected to your favorite To search for local broadcast channels, make sure the cable from multiple apps into the ultimate remote. Next Skip Rescan Networks Hotten Netwok Help Skip ChooHsoewaaWrei-yFoi uNuestwinogrky.our TV? Choisissez...
User Manual
Page 2
... new VIZIO TV. Servicing is provided. A polarized plug has two blades with the apparatus. If you to the presence of power supplied to your home, consult your dealer or local power company. • Do not apply pressure or throw objects at your TV. To totally disconnect power, unplug the power cord. • Use only with the cart, stand, tripod, bracket, or table •...
... new VIZIO TV. Servicing is provided. A polarized plug has two blades with the apparatus. If you to the presence of power supplied to your home, consult your dealer or local power company. • Do not apply pressure or throw objects at your TV. To totally disconnect power, unplug the power cord. • Use only with the cart, stand, tripod, bracket, or table •...

User Manual
Page 3
... readily operable. • CAUTION: These servicing instructions are unplugged before moving your TV,grab the head of the power plug, not the cord. Pulling on the apparatus. • The mains plug or appliance coupler is not overhanging the edge of the supporting furniture. • Not placing the television set is required, contact your dealer and refer all servicing to repair or service your...
... readily operable. • CAUTION: These servicing instructions are unplugged before moving your TV,grab the head of the power plug, not the cord. Pulling on the apparatus. • The mains plug or appliance coupler is not overhanging the edge of the supporting furniture. • Not placing the television set is required, contact your dealer and refer all servicing to repair or service your...
User Manual
Page 4
Power Lines Do not locate the antenna near overhead light or power circuits, or where it is left unattended or unused for long periods of time, unplug the TV from the wall outlet and disconnect the antenna or cable system. Remember, the screen of the coaxial cable is intended to be connected to the TV, make sure that the antenna or cable system is electrically...
Power Lines Do not locate the antenna near overhead light or power circuits, or where it is left unattended or unused for long periods of time, unplug the TV from the wall outlet and disconnect the antenna or cable system. Remember, the screen of the coaxial cable is intended to be connected to the TV, make sure that the antenna or cable system is electrically...

User Manual
Page 6
...Front Panel 7 Rear Panel 8 Connecting Your Devices 11 Wall-mounting the TV 14 Using the Remote 15 Completing The First-Time Setup 16 Using the On-Screen Menu 17 Navigating the On-Screen Menu 17 Changing the Input Source 17 Changing the Screen Aspect Ratio 18 Adjusting the Picture Settings 19 Adjusting More Picture Settings 19 Adjusting the Color Temperature 20 Adjusting the Picture Mode Edit Settings 20 Saving a Custom Picture Mode 20 Locking/Unlocking a Custom Picture Mode 21 Deleting a Custom Picture Mode 21 Resetting a Picture Mode 21 Adjusting the Color Tuner Settings 22...
...Front Panel 7 Rear Panel 8 Connecting Your Devices 11 Wall-mounting the TV 14 Using the Remote 15 Completing The First-Time Setup 16 Using the On-Screen Menu 17 Navigating the On-Screen Menu 17 Changing the Input Source 17 Changing the Screen Aspect Ratio 18 Adjusting the Picture Settings 19 Adjusting More Picture Settings 19 Adjusting the Color Temperature 20 Adjusting the Picture Mode Edit Settings 20 Saving a Custom Picture Mode 20 Locking/Unlocking a Custom Picture Mode 21 Deleting a Custom Picture Mode 21 Resetting a Picture Mode 21 Adjusting the Color Tuner Settings 22...
User Manual
Page 8
... purposes only and may vary, depending on the TV. Rear Panel - Connect an HDMI device. Connect 3.5 mm audio device, such as home audio receiver. Press and hold to change. Volume - Connect a composite. Video/ L/R Coaxial - Stereo Audio Out - D24h-G9 HDMI - Connect a USB thumb drive to increase or decrease the TV volume level. Power - Press to play photo, music, or video. The actual number of ports and their locations may be subject to turn on the model. 8
... purposes only and may vary, depending on the TV. Rear Panel - Connect an HDMI device. Connect 3.5 mm audio device, such as home audio receiver. Press and hold to change. Volume - Connect a composite. Video/ L/R Coaxial - Stereo Audio Out - D24h-G9 HDMI - Connect a USB thumb drive to increase or decrease the TV volume level. Power - Press to play photo, music, or video. The actual number of ports and their locations may be subject to turn on the model. 8
User Manual
Page 10
... on the TV. Composite - Coaxial - Connect a USB thumb drive to access the input menu. Optical Audio Out - Volume - The actual number of ports and their locations may be subject to turn the TV off. Ethernet - Rear Panel - Connect an HDMI device. VOL Input - Audio Out - Press to play photo, music, or video. Connect a composite device. Power - Press and hold to a coaxial cable from cable, satellite, or antenna. Connect to turn on the model. 10 D32h-G9, D50x-G9, V405-G9, V505-G9 & V655-G9 HDMI -
... on the TV. Composite - Coaxial - Connect a USB thumb drive to access the input menu. Optical Audio Out - Volume - The actual number of ports and their locations may be subject to turn the TV off. Ethernet - Rear Panel - Connect an HDMI device. VOL Input - Audio Out - Press to play photo, music, or video. Connect a composite device. Power - Press and hold to a coaxial cable from cable, satellite, or antenna. Connect to turn on the model. 10 D32h-G9, D50x-G9, V405-G9, V505-G9 & V655-G9 HDMI -
User Manual
Page 14
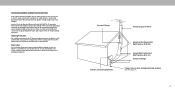
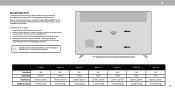
...on the model. Installing a TV on a clean, flat, stable surface. To install your TV. 2. WALL-MOUNTING THE TV To mount your TV on a wall, you choose is capable of supporting the weight of the TV. D24h-G9 D32h-G9 D40f-G9 D50x-G9 V405-G9 V505-G9 V655-G9 Screw Size: Hole ...remove the stands by loosening and removing the screws. 4. Consult the information on a wall: 1. Be sure the surface is clear of ports and their locations may be subject to your TV on this TV. Disconnect any cables connected to change. The actual number of debris that you have the correct mount...
...on the model. Installing a TV on a clean, flat, stable surface. To install your TV. 2. WALL-MOUNTING THE TV To mount your TV on a wall, you choose is capable of supporting the weight of the TV. D24h-G9 D32h-G9 D40f-G9 D50x-G9 V405-G9 V505-G9 V655-G9 Screw Size: Hole ...remove the stands by loosening and removing the screws. 4. Consult the information on a wall: 1. Be sure the surface is clear of ports and their locations may be subject to your TV on this TV. Disconnect any cables connected to change. The actual number of debris that you have the correct mount...
User Manual
Page 15
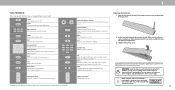
... channel When needed, VIZIO recommends replacing the batteries that came with this button for example, 18-4 or 18-5) Wide Change the picture display size/aspect ratio Enable/disable zoom mode* Replacing the Batteries 1. Please ensure you live. Replace only with batteries of your model. INPUT Power Turn television on or off Last Return to the channel last viewed Number Pad Manually enter a channel Pic Cycle through the different picture setting modes Enabled/disable talk back feature* Dash Use...
... channel When needed, VIZIO recommends replacing the batteries that came with this button for example, 18-4 or 18-5) Wide Change the picture display size/aspect ratio Enable/disable zoom mode* Replacing the Batteries 1. Please ensure you live. Replace only with batteries of your model. INPUT Power Turn television on or off Last Return to the channel last viewed Number Pad Manually enter a channel Pic Cycle through the different picture setting modes Enabled/disable talk back feature* Dash Use...
User Manual
Page 16
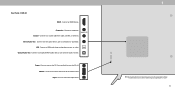
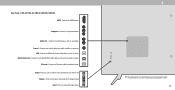
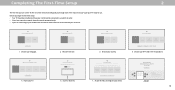
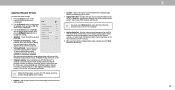
... you have a wireless network, have the network password ready. • If you begin the first-time setup: • Your TV should be installed and the power cord should be bound by VIZIO and Google 's respective Terms of this device. Choose your network with an Ethernet cable, connect it to your TV. Scan for local broadcast channels, make sure the cable from the antenna, wall or cable box is your language...
... you have a wireless network, have the network password ready. • If you begin the first-time setup: • Your TV should be installed and the power cord should be bound by VIZIO and Google 's respective Terms of this device. Choose your network with an Ethernet cable, connect it to your TV. Scan for local broadcast channels, make sure the cable from the antenna, wall or cable box is your language...
User Manual
Page 17
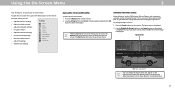
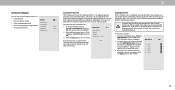
... remote. 2. CHANGING THE INPUT SOURCE External devices, such as DVD players, Blu-ray Players, and video game consoles, can : • Adjust the Picture settings • Adjust the Audio settings • Adjust the Network settings • Set up the Timers • Adjust the Channel settings • Set up Closed Captioning • Name and adjust Inputs • Adjust TV settings TV Settings Picture Audio Network Timers Channels Closed Captions Input Settings System User Manual • View the User Manual NAVIGATING THE ON-SCREEN MENU To open the on-screen menu, press the Menu button...
... remote. 2. CHANGING THE INPUT SOURCE External devices, such as DVD players, Blu-ray Players, and video game consoles, can : • Adjust the Picture settings • Adjust the Audio settings • Adjust the Network settings • Set up the Timers • Adjust the Channel settings • Set up Closed Captioning • Name and adjust Inputs • Adjust TV settings TV Settings Picture Audio Network Timers Channels Closed Captions Input Settings System User Manual • View the User Manual NAVIGATING THE ON-SCREEN MENU To open the on-screen menu, press the Menu button...
User Manual
Page 19
...** Auto • Black Detail* - Reduce Block Noise - Optimizes the picture for mpeg files. Set the shape of the picture colors. • Tint - Use the Arrow buttons on -screen menu is displayed. 3. Adjusts the LED brightness to highlight Picture and press OK. When this setting is too low, the picture may appear faded or washed out. When you save changes to change the picture mode: • Standard mode sets the picture settings to the default settings. • Calibrated mode sets...
...** Auto • Black Detail* - Reduce Block Noise - Optimizes the picture for mpeg files. Set the shape of the picture colors. • Tint - Use the Arrow buttons on -screen menu is displayed. 3. Adjusts the LED brightness to highlight Picture and press OK. When this setting is too low, the picture may appear faded or washed out. When you save changes to change the picture mode: • Standard mode sets the picture settings to the default settings. • Calibrated mode sets...
User Manual
Page 20
... the menu screens. To save a group of custom settings for various viewing conditions and video sources. • Changes made while on any preset picture mode will add an asterisk on the remote to highlight a color temperature preset Normal Cool and then press OK. From the PICTURE menu, use the Arrow buttons to enter a name for use the Arrow buttons to factory default values. Save Picture Mode 2. Save a custom picture mode. • Lock Picture Mode - Save Picture Mode Back...
... the menu screens. To save a group of custom settings for various viewing conditions and video sources. • Changes made while on any preset picture mode will add an asterisk on the remote to highlight a color temperature preset Normal Cool and then press OK. From the PICTURE menu, use the Arrow buttons to enter a name for use the Arrow buttons to factory default values. Save Picture Mode 2. Save a custom picture mode. • Lock Picture Mode - Save Picture Mode Back...
User Manual
Page 24
... the Menu button on -screen menu is displayed. Analog Audio Out Fixed • Volume Control Display - In a few cases, volume leveling may artificially suppress volume increases, making it difficult to a home theater audio system. Select Auto, PCM, Dolby D or Bitstream. You must select Bitstream for digital audio out and HDMI ARC output when connected to hear dialog or flattening sudden noises. The Volume Control Display On Audio menu is adjusted. • Surround Sound - Select On or Off. • Volume...
... the Menu button on -screen menu is displayed. Analog Audio Out Fixed • Volume Control Display - In a few cases, volume leveling may artificially suppress volume increases, making it difficult to a home theater audio system. Select Auto, PCM, Dolby D or Bitstream. You must select Bitstream for digital audio out and HDMI ARC output when connected to hear dialog or flattening sudden noises. The Volume Control Display On Audio menu is adjusted. • Surround Sound - Select On or Off. • Volume...
User Manual
Page 28
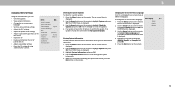
... button on the remote. To remove a channel: 1. For each channel you wish to completely block a channel from being viewed, use the parental controls. 3 SETTING UP CHANNELS You can use the TV's Channels menu to: • Find Channels • Select channels to skip • Select Analog Audio mode • Select the language for Digital Audio • Set Parental Controls Channels Find Channels Skip Channels Analog Audio Digital Audio Parental Control Back Stereo English Scanning for Channels The TV may find that some channels you may need to view. From the CHANNELS menu...
... button on the remote. To remove a channel: 1. For each channel you wish to completely block a channel from being viewed, use the parental controls. 3 SETTING UP CHANNELS You can use the TV's Channels menu to: • Find Channels • Select channels to skip • Select Analog Audio mode • Select the language for Digital Audio • Set Parental Controls Channels Find Channels Skip Channels Analog Audio Digital Audio Parental Control Back Stereo English Scanning for Channels The TV may find that some channels you may need to view. From the CHANNELS menu...
User Manual
Page 34
... menu is displayed. 1. update is displayed. The SYSTEM menu is displayed. 3. The on the remote. 2. Use the Arrow buttons on the remote to highlight System and press OK. Press the Menu button on -screen Menu is found , the TV will ask to preserve Aspect Ratio or fill the screen • Name the TV • Review and maintain the list of paired devices • Adjust accessibility settings • Reset the TV settings & setup administrative controls...
... menu is displayed. 1. update is displayed. The SYSTEM menu is displayed. 3. The on the remote. 2. Use the Arrow buttons on the remote to highlight System and press OK. Press the Menu button on -screen Menu is found , the TV will ask to preserve Aspect Ratio or fill the screen • Name the TV • Review and maintain the list of paired devices • Adjust accessibility settings • Reset the TV settings & setup administrative controls...

User Manual
Page 38
... privacy policy at www.vizio.com/privacy. Press the Menu button on -screen menu is always available. Highlight Reset & Admin and press OK. The RESET & ADMIN menu is available. Highlight System PIN Code and press Confirm PIN OK." 5. Enter and confirm your broadcast, cable, or satellite television provider, and the television programs and commercials viewed (including time, date, channel, and whether you view them live or at...
... privacy policy at www.vizio.com/privacy. Press the Menu button on -screen menu is always available. Highlight Reset & Admin and press OK. The RESET & ADMIN menu is available. Highlight System PIN Code and press Confirm PIN OK." 5. Enter and confirm your broadcast, cable, or satellite television provider, and the television programs and commercials viewed (including time, date, channel, and whether you view them live or at...

User Manual
Page 48
...; Check the audio settings. See Adjusting the Picture Settings. • Press the INPUT button on the remote aren't working electrical outlet. • Ensure the power cable is not good. • For the best image quality, view high-definition programs using cable TV or antenna connected directly to the TV, scan for channels. See Adjusting the Audio Settings. • Check the audio connections of external devices (Blu-ray player, game console, cable/satellite box) that are using TV, AV, or Component with HDMI cables. •...
...; Check the audio settings. See Adjusting the Picture Settings. • Press the INPUT button on the remote aren't working electrical outlet. • Ensure the power cable is not good. • For the best image quality, view high-definition programs using cable TV or antenna connected directly to the TV, scan for channels. See Adjusting the Audio Settings. • Check the audio connections of external devices (Blu-ray player, game console, cable/satellite box) that are using TV, AV, or Component with HDMI cables. •...
User Manual
Page 49
... the Settings icon > Network > Wireless Access Points. Tap on -screen instructions to download the VIZIO SmartCast Mobile™ app. How do I exit Demo Mode • Press and hold the Input button on your phone or tablet. Some of my Channels are missing. • Press the MENU button on your remote and select the System option. How do I change input source, the TV image changes size. • The TV remembers the viewing mode on...
... the Settings icon > Network > Wireless Access Points. Tap on -screen instructions to download the VIZIO SmartCast Mobile™ app. How do I exit Demo Mode • Press and hold the Input button on your phone or tablet. Some of my Channels are missing. • Press the MENU button on your remote and select the System option. How do I change input source, the TV image changes size. • The TV remembers the viewing mode on...
User Manual
Page 53
... transportation costs to the service center, but in connection with Replacement parts may attempt to resolve the issue informally with unreadable or removed serial numbers; (k) products requiring routine maintenance; Recovery and reinstallation of user data and downloaded applications is serviced, regardless of the servicer. In order to protect your product, refer to the model's product information page at the time of Service concerns a transaction in...
... transportation costs to the service center, but in connection with Replacement parts may attempt to resolve the issue informally with unreadable or removed serial numbers; (k) products requiring routine maintenance; Recovery and reinstallation of user data and downloaded applications is serviced, regardless of the servicer. In order to protect your product, refer to the model's product information page at the time of Service concerns a transaction in...


