User Manual (English)
Page 5
...Do not try to leak which can damage the remote control or injure the operator. When your TV will not be placed on the power cord may cause the batteries to repair your TV. Your TV is intended to alert the user to persons. Continuous use in this case may result in fire or electric... shock. • Do not use your TV if any way. - Operating your TV in environments with arrowhead symbol within the product's enclosure that may cause fire or electric shock. • Do not install your TV, hold the AC/DC power adapter, not the cord. To reduce the risk of the ...
...Do not try to leak which can damage the remote control or injure the operator. When your TV will not be placed on the power cord may cause the batteries to repair your TV. Your TV is intended to alert the user to persons. Continuous use in this case may result in fire or electric... shock. • Do not use your TV if any way. - Operating your TV in environments with arrowhead symbol within the product's enclosure that may cause fire or electric shock. • Do not install your TV, hold the AC/DC power adapter, not the cord. To reduce the risk of the ...
User Manual (English)
Page 6
... an antenna discharge unit, size of the grounding conductors, location of antenna discharge unit, connection to grounding electrodes, and requirements of the grounding electrode. Power Lines Do not locate the antenna near overhead light or power circuits, or where it is left unattended or unused for long periods of time, unplug the TV from the wall outlet and disconnect the antenna or cable system...
... an antenna discharge unit, size of the grounding conductors, location of antenna discharge unit, connection to grounding electrodes, and requirements of the grounding electrode. Power Lines Do not locate the antenna near overhead light or power circuits, or where it is left unattended or unused for long periods of time, unplug the TV from the wall outlet and disconnect the antenna or cable system...
User Manual (English)
Page 7
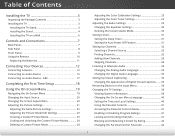
... the On-Screen Menu 19 Changing the Input Source 20 Changing the Screen Aspect Ratio 20 Adjusting the Picture Settings 21 Adjusting the More Picture Settings 22 Adjusting the Picture Mode Edit Settings 23 Creating a Custom Picture Mode 23 Locking and Unlocking the Custom Picture Modes 24 Deleting a Custom Picture Mode 24 Adjusting the Color Calibration Settings 25 Adjusting the Color Tuner Settings 26 Adjusting the Audio Settings 29 Changing the Equalizer Settings 30 Deleting the Custom Audio Mode 30 Setting Timers 31 Setting the Sleep Timer 31 Setting the Auto Power Off...
... the On-Screen Menu 19 Changing the Input Source 20 Changing the Screen Aspect Ratio 20 Adjusting the Picture Settings 21 Adjusting the More Picture Settings 22 Adjusting the Picture Mode Edit Settings 23 Creating a Custom Picture Mode 23 Locking and Unlocking the Custom Picture Modes 24 Deleting a Custom Picture Mode 24 Adjusting the Color Calibration Settings 25 Adjusting the Color Tuner Settings 26 Adjusting the Audio Settings 29 Changing the Equalizer Settings 30 Deleting the Custom Audio Mode 30 Setting Timers 31 Setting the Sleep Timer 31 Setting the Auto Power Off...
User Manual (English)
Page 8
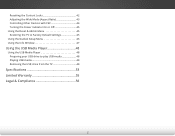
Resetting the Content Locks 42 Adjusting the Wide Mode (Aspect Ratio 43 Controlling Other Devices with CEC 44 Turning the Power Indicator On or Off 45 Using the Reset & Admin Menu 45 Restoring the TV to Factory Default Settings 45 Using the Guided Setup Menu 46 Using the Info Window 47 Using the USB Media Player 48 Using the USB Media Player 48 Preparing your USB drive to play USB media 48 Playing USB media 48 Removing the USB drive from the TV 48 Specifications 53 Limited Warranty 55 Legal & Compliance 56 2
Resetting the Content Locks 42 Adjusting the Wide Mode (Aspect Ratio 43 Controlling Other Devices with CEC 44 Turning the Power Indicator On or Off 45 Using the Reset & Admin Menu 45 Restoring the TV to Factory Default Settings 45 Using the Guided Setup Menu 46 Using the Info Window 47 Using the USB Media Player 48 Using the USB Media Player 48 Preparing your USB drive to play USB media 48 Playing USB media 48 Removing the USB drive from the TV 48 Specifications 53 Limited Warranty 55 Legal & Compliance 56 2
User Manual (English)
Page 12
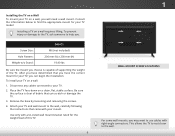
Remove the base by loosening and removing the screws. 4. Use only with a UL-listed wall mount bracket rated for the weight/load of this TV. 6 1 WALL MOUNT SCREW LOCATIONS For some wall mounts, you may want to find the appropriate mount for your TV, you . Consult the information below to use cables with your mount. To install your TV model: Installing a TV on a wall requires lifting. Attach your TV and wall mount to help you can scratch or...
Remove the base by loosening and removing the screws. 4. Use only with a UL-listed wall mount bracket rated for the weight/load of this TV. 6 1 WALL MOUNT SCREW LOCATIONS For some wall mounts, you may want to find the appropriate mount for your TV, you . Consult the information below to use cables with your mount. To install your TV model: Installing a TV on a wall requires lifting. Attach your TV and wall mount to help you can scratch or...
User Manual (English)
Page 26
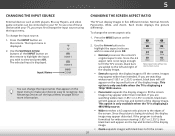
... TV, you are added to fill the screen. The selected input is displayed. 5 CHANGING THE INPUT SOURCE CHANGING THE SCREEN ASPECT RATIO External devices such as DVD players, Blu-ray Players, and video game consoles can be connected to fill the screen. To use one of the display image. To change the input source using the Input menu. Normal Panoramic Normal Stretch Wide Wide Zoom Zoom Note: Aspect ratio settings may appear wider than intended.
... TV, you are added to fill the screen. The selected input is displayed. 5 CHANGING THE INPUT SOURCE CHANGING THE SCREEN ASPECT RATIO External devices such as DVD players, Blu-ray Players, and video game consoles can be connected to fill the screen. To use one of the display image. To change the input source using the Input menu. Normal Panoramic Normal Stretch Wide Wide Zoom Zoom Note: Aspect ratio settings may appear wider than intended.
User Manual (English)
Page 27
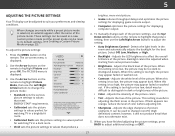
... setting is useful in the picture. Adjusts the intensity of the picture colors. • Sleep Timer TinPitctu-reAdjuAusdtsio the hue of picture NetworkelSeemttinegnsts. These settings can be saved as a new custom picture mode and the preset mode can be reset to distinguish in a brightly-lit room. The on the remote. Use the Arrow buttons on the remote to sharpen non-HD (high definition) content; VIZIO PICTURE Picture Mode Auto Brightness Control Backlight - More Picture Picture Mode Edit Color Calibration...
... setting is useful in the picture. Adjusts the intensity of the picture colors. • Sleep Timer TinPitctu-reAdjuAusdtsio the hue of picture NetworkelSeemttinegnsts. These settings can be saved as a new custom picture mode and the preset mode can be reset to distinguish in a brightly-lit room. The on the remote. Use the Arrow buttons on the remote to sharpen non-HD (high definition) content; VIZIO PICTURE Picture Mode Auto Brightness Control Backlight - More Picture Picture Mode Edit Color Calibration...
User Manual (English)
Page 29
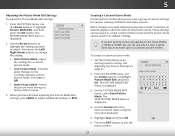
... picture mode: Input Wide CC 1. The SAVE PICTURE MODE menu is displayed. 3. When you have up to the currently selected custom picture mode. Saves the settings for various viewing conditions and video sources. Select On or Off. • Reset Picture Mode - Exit 12D, HDMI3-D2, COMP, AV, etc.) in use the Arrow buttons to change the setting: • Save Picture Mode - On the PICTURE MODE EDIT menu, select Save Picture Mode. Press the EXIT button to factory default values. 3. Resets the picture mode settings...
... picture mode: Input Wide CC 1. The SAVE PICTURE MODE menu is displayed. 3. When you have up to the currently selected custom picture mode. Saves the settings for various viewing conditions and video sources. Select On or Off. • Reset Picture Mode - Exit 12D, HDMI3-D2, COMP, AV, etc.) in use the Arrow buttons to change the setting: • Save Picture Mode - On the PICTURE MODE EDIT menu, select Save Picture Mode. Press the EXIT button to factory default values. 3. Resets the picture mode settings...
User Manual (English)
Page 35
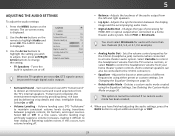
... is displayed. 2. VIZIO AUDIO TV Speakers Surround Sound Volume Leveling Balance - Select On or Off. In a few cases, volume leveling may artificially suppress volume increases, making it difficult to WaidheomeCtCheater audio system. Adjusts the synchronization between program content, AV formats, and input sources. Select Variable to control the headphones' volume from the TV's volume controls, or select Fixed to control the headphones' volume from your home theater system controls. (Some external speakers can Sleep Timer alsPioctubree...
... is displayed. 2. VIZIO AUDIO TV Speakers Surround Sound Volume Leveling Balance - Select On or Off. In a few cases, volume leveling may artificially suppress volume increases, making it difficult to WaidheomeCtCheater audio system. Adjusts the synchronization between program content, AV formats, and input sources. Select Variable to control the headphones' volume from the TV's volume controls, or select Fixed to control the headphones' volume from your home theater system controls. (Some external speakers can Sleep Timer alsPioctubree...
User Manual (English)
Page 38
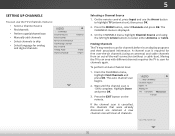
... Source and using an antenna) and cable channels from an out-of-the-wall connection (without a cable box). A channel scan is displayed. 3. The auto channel scan begins. Network Settings Help 2. A new channel scan will clear all channels. Press the MENU button, select Channels and press OK. Sleep TiFmreor m PthicteurCe HAANudNioELS menu, highlight Find Channels and press OK. Cancel the channel scan. 32 Finding Channels Exit 2D 3D The TV may need to scan for analog and digital channels Partial Channel Search Add Analog Channel Skip Channel Analog Audio Digital...
... Source and using an antenna) and cable channels from an out-of-the-wall connection (without a cable box). A channel scan is displayed. 3. The auto channel scan begins. Network Settings Help 2. A new channel scan will clear all channels. Press the MENU button, select Channels and press OK. Sleep TiFmreor m PthicteurCe HAANudNioELS menu, highlight Find Channels and press OK. Cancel the channel scan. 32 Finding Channels Exit 2D 3D The TV may need to scan for analog and digital channels Partial Channel Search Add Analog Channel Skip Channel Analog Audio Digital...
User Manual (English)
Page 52
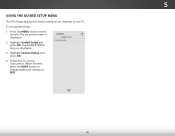
... OK. Wide Zoom Normal Panoramic Exit 2D 3D ABC Input Wide CC Sleep Timer Picture Audio Network Settings Help 46 To use guided setup: 1. Press the MENU button on -screen menu is displayed. The on the remote. The GUIDED SETUP menu is displayed. 2. When finished, press the BACK button to easily set up channels on -screen instructions. Follow the on the TV. 5 USING THE GUIDED SETUP MENU The TV's Setup App can be used to change additional settings or EXIT. Highlight Channel Setup and press OK: 4. VIZIO GUIDED SETUP Channel Setup 3.
... OK. Wide Zoom Normal Panoramic Exit 2D 3D ABC Input Wide CC Sleep Timer Picture Audio Network Settings Help 46 To use guided setup: 1. Press the MENU button on -screen menu is displayed. The on the remote. The GUIDED SETUP menu is displayed. 2. When finished, press the BACK button to easily set up channels on -screen instructions. Follow the on the TV. 5 USING THE GUIDED SETUP MENU The TV's Setup App can be used to change additional settings or EXIT. Highlight Channel Setup and press OK: 4. VIZIO GUIDED SETUP Channel Setup 3.
User Manual (English)
Page 57
..., or Backlight. The colors on the remote to the TV, scan for channels. See Adjusting the Picture Settings on page 21. • Press the INPUT button on the TV don't look right. • Adjust the Color and Tint settings in the Picture menu. see your antenna is not audible. • Turn off . • Check the audio settings. Ensure your device's user manual for the best signal. See Adjusting the Audio Settings on page 32. Devices...
..., or Backlight. The colors on the remote to the TV, scan for channels. See Adjusting the Picture Settings on page 21. • Press the INPUT button on the TV don't look right. • Adjust the Color and Tint settings in the Picture menu. see your antenna is not audible. • Turn off . • Check the audio settings. Ensure your device's user manual for the best signal. See Adjusting the Audio Settings on page 32. Devices...

User Manual (English)
Page 58
... not operate with this model. • Ensure you are inherent to change input source, the display image changes size. • The TV remembers the viewing mode on the remote aren't working. • The Red and Yellow hot key buttons below the V button do not constitute a defective product. When I see "noise" or static on the remote to this type of occurrences are using an antenna, the signal strength of the channel may...
... not operate with this model. • Ensure you are inherent to change input source, the display image changes size. • The TV remembers the viewing mode on the remote aren't working. • The Red and Yellow hot key buttons below the V button do not constitute a defective product. When I see "noise" or static on the remote to this type of occurrences are using an antenna, the signal strength of the channel may...
User Manual (English)
Page 61
... and tear, improper operation, improper voltage supply or power surges, signal issues, damages from warranty service or replacement, whichever is within the warranty period, VIZIO will cover return shipping to 6:00PM Saturday and Sunday, Central Standard Time, or visit www.VIZIO.com. Replacement parts and Products are not covered. In order to you always clear all applicable data and passwords. VIZIO Technical Support will be restored to...
... and tear, improper operation, improper voltage supply or power surges, signal issues, damages from warranty service or replacement, whichever is within the warranty period, VIZIO will cover return shipping to 6:00PM Saturday and Sunday, Central Standard Time, or visit www.VIZIO.com. Replacement parts and Products are not covered. In order to you always clear all applicable data and passwords. VIZIO Technical Support will be restored to...
Quickstart Guide (English)
Page 2
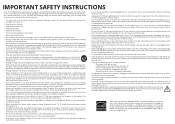
.... - Changing the factory default picture settings or enabling other features will not be used for repair. Misuse may compromise the integrity of time. Do not install your dealer for long period of the display. If you are provided for ENERGY STAR in any heat sources such as a radiator, heater, oven, amplifier etc. To totally disconnect power, unplug the power cord. • The lightning flash with...
.... - Changing the factory default picture settings or enabling other features will not be used for repair. Misuse may compromise the integrity of time. Do not install your dealer for long period of the display. If you are provided for ENERGY STAR in any heat sources such as a radiator, heater, oven, amplifier etc. To totally disconnect power, unplug the power cord. • The lightning flash with...
Quickstart Guide (English)
Page 3
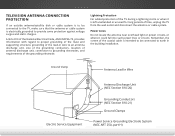
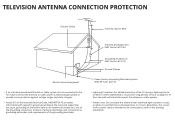
...antenna discharge unit, connection to earth in wire to an antenna discharge unit, size of the grounding conductors, location of time, unplug the TV from the wall outlet and disconnect the antenna or cable system. • Power Lines: Do not locate the antenna near overhead light or power circuits, or where it could fall into such power lines or circuits. TELEVISION ANTENNA CONNECTION PROTECTION Ground Clamp Antenna... Code, ANSI/NFPSA 70, provides information with regard to proper grounding of the mast and supporting structure, grounding of the lead-in the building installation.
...antenna discharge unit, connection to earth in wire to an antenna discharge unit, size of the grounding conductors, location of time, unplug the TV from the wall outlet and disconnect the antenna or cable system. • Power Lines: Do not locate the antenna near overhead light or power circuits, or where it could fall into such power lines or circuits. TELEVISION ANTENNA CONNECTION PROTECTION Ground Clamp Antenna... Code, ANSI/NFPSA 70, provides information with regard to proper grounding of the mast and supporting structure, grounding of the lead-in the building installation.
Quickstart Guide (English)
Page 15
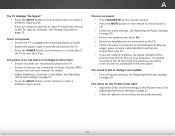
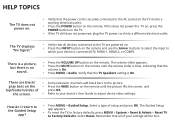
... use the Arrow buttons to select the input to Factory Defaults. HELP TOPICS The TV does not power on. • Verify that the power cord is On. The Guided Setup app appears. • To reset the TV to factory defaults, press MENU > System > Reset & Admin > Reset TV to which your settings will be lost. The TV displays "No Signal." • Verify that all devices connected to the TV are black/ • Some television channels...
... use the Arrow buttons to select the input to Factory Defaults. HELP TOPICS The TV does not power on. • Verify that the power cord is On. The Guided Setup app appears. • To reset the TV to factory defaults, press MENU > System > Reset & Admin > Reset TV to which your settings will be lost. The TV displays "No Signal." • Verify that all devices connected to the TV are black/ • Some television channels...
Quickstart Guide (English)
Page 17
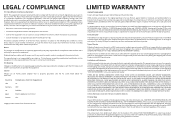
... the following two conditions: (1) this device may cause undesired operation. If this device must be defective within the warranty period. Shielded interface cables and AC power cord, if any repairs attempted by the party responsible for help. LIMITED WARRANTY ON PARTS AND LABOR Covers units purchased as installation and set-up issues or any , must accept any radio or TV interference caused...
... the following two conditions: (1) this device may cause undesired operation. If this device must be defective within the warranty period. Shielded interface cables and AC power cord, if any repairs attempted by the party responsible for help. LIMITED WARRANTY ON PARTS AND LABOR Covers units purchased as installation and set-up issues or any , must accept any radio or TV interference caused...
Quickstart Guide (English)
Page 18
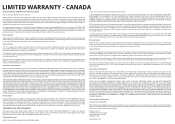
..., signal issues, power surges, and damages from warranty service or replacement, whichever is later. Replacement parts and units may be defective, within the warranty period, authorized for ninety (90) days from shipping, acts of God, any sort of customer misuse, installation, customer modifications, adjustments, and set -up issues or any type of customer misuse, modifications or adjustments, as well as installation and set -up issues. VIZIO technical support will repair, replace or...
..., signal issues, power surges, and damages from warranty service or replacement, whichever is later. Replacement parts and units may be defective, within the warranty period, authorized for ninety (90) days from shipping, acts of God, any sort of customer misuse, installation, customer modifications, adjustments, and set -up issues or any type of customer misuse, modifications or adjustments, as well as installation and set -up issues. VIZIO technical support will repair, replace or...
Quickstart Guide (English)
Page 19
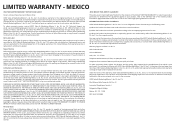
... and tear, improper operation, improper voltage supply or power surges, signal issues, damages from which this Limited Warranty. R.L. VIZIO Sales & Marketing México S. de C.V. de C.V. VIZIO Sales & Marketing México S. de. R.L. de C.V.'s one year limited warranty does not cover Products sold "AS IS", "FACTORY RECERTIFIED", or by a VIZIO Sales & Marketing México S. In order to parts, components, supplies and accessories, or contact VIZIO Sales & Marketing...
... and tear, improper operation, improper voltage supply or power surges, signal issues, damages from which this Limited Warranty. R.L. VIZIO Sales & Marketing México S. de C.V. de C.V. VIZIO Sales & Marketing México S. de. R.L. de C.V.'s one year limited warranty does not cover Products sold "AS IS", "FACTORY RECERTIFIED", or by a VIZIO Sales & Marketing México S. In order to parts, components, supplies and accessories, or contact VIZIO Sales & Marketing...


