User Manual English
Page 4
...Never push any heat source, such as power-supply cord or plug is required, contact your TV yourself. For more information, contact your dealer. • When connected to repair or service your dealer and refer all servicing to qualified service personnel. This will...removing the back cover may cause fire or electric shock. • Slots and openings in the housing. • Use only with the cart, stand, tripod, bracket, or table specified by the manufacturer, or sold with arrowhead symbol within the inside of your TV from moisture. Do not install your TV close...
...Never push any heat source, such as power-supply cord or plug is required, contact your TV yourself. For more information, contact your dealer. • When connected to repair or service your dealer and refer all servicing to qualified service personnel. This will...removing the back cover may cause fire or electric shock. • Slots and openings in the housing. • Use only with the cart, stand, tripod, bracket, or table specified by the manufacturer, or sold with arrowhead symbol within the inside of your TV from moisture. Do not install your TV close...
User Manual English
Page 5
... AC/DC power adapter, not the cord. Pulling on the apparatus. • The mains plug or appliance coupler is exposed to dripping or splashing and no objects filled with instructions. Operating your TV may function abnormally. When your TV will not be exposed to rain or other cables are for an extended period of time, unplug the power cord. •...
... AC/DC power adapter, not the cord. Pulling on the apparatus. • The mains plug or appliance coupler is exposed to dripping or splashing and no objects filled with instructions. Operating your TV may function abnormally. When your TV will not be exposed to rain or other cables are for an extended period of time, unplug the power cord. •...
User Manual English
Page 6
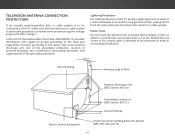
..., size of the grounding conductors, location of antenna discharge unit, connection to grounding electrodes, and requirements of time, unplug the TV from the wall outlet and disconnect the antenna or cable system. Remember, the screen of the TV during a lightning storm or when it could fall into such power lines or circuits. TELEVISION ANTENNA CONNECTION PROTECTION If an outside antenna/satellite dish or cable...
..., size of the grounding conductors, location of antenna discharge unit, connection to grounding electrodes, and requirements of time, unplug the TV from the wall outlet and disconnect the antenna or cable system. Remember, the screen of the TV during a lightning storm or when it could fall into such power lines or circuits. TELEVISION ANTENNA CONNECTION PROTECTION If an outside antenna/satellite dish or cable...
User Manual English
Page 7
... the Picture Mode Edit Settings 31 Adjusting the Color Calibration Settings 32 Adjusting the Color Tuner Settings 32 Creating a Custom Picture Mode 35 Locking and Unlocking the Custom Picture Modes 36 Deleting a Custom Picture Mode 36 Adjusting the Audio Settings 37 Changing the Equalizer Settings 38 Delete the Custom Audio Mode 38 Setting Timers 39 Setting the Sleep Timer 39 Setting the Auto Power Off Feature 39 Enabling the Screen Saver 39 Blanking the Screen 40 Using the Network Connection Menu 41 Connecting to a Wireless Network 41 Changing the Manual Setup Settings 41...
... the Picture Mode Edit Settings 31 Adjusting the Color Calibration Settings 32 Adjusting the Color Tuner Settings 32 Creating a Custom Picture Mode 35 Locking and Unlocking the Custom Picture Modes 36 Deleting a Custom Picture Mode 36 Adjusting the Audio Settings 37 Changing the Equalizer Settings 38 Delete the Custom Audio Mode 38 Setting Timers 39 Setting the Sleep Timer 39 Setting the Auto Power Off Feature 39 Enabling the Screen Saver 39 Blanking the Screen 40 Using the Network Connection Menu 41 Connecting to a Wireless Network 41 Changing the Manual Setup Settings 41...

User Manual English
Page 8
... 53 Changing the Parental Control Passcode 53 Resetting the Content Locks 53 Changing the View Mode Settings 54 Adjusting the Wide Mode (Aspect Ratio 54 Changing Your TV's DLNA Name 55 Controlling Other Devices with CEC 55 Turning the Power Indicator On or Off 56 Restoring the TV to Factory Default Settings 57 Enabling and Disabling Smart Interactivity 57 Using the Guided Setup Menu 58 Using the Info Window 59 Using the USB Media Player 60 Using the USB Media Player 60...
... 53 Changing the Parental Control Passcode 53 Resetting the Content Locks 53 Changing the View Mode Settings 54 Adjusting the Wide Mode (Aspect Ratio 54 Changing Your TV's DLNA Name 55 Controlling Other Devices with CEC 55 Turning the Power Indicator On or Off 56 Restoring the TV to Factory Default Settings 57 Enabling and Disabling Smart Interactivity 57 Using the Guided Setup Menu 58 Using the Info Window 59 Using the USB Media Player 60 Using the USB Media Player 60...
User Manual English
Page 12
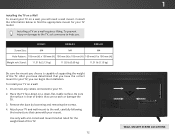
... cables connected to help you choose is clear of this TV. 12 1 WALL MOUNT SCREW LOCATIONS Place the TV face-down on a clean, flat, stable surface. Remove the base by loosening and removing the screws. 4. To prevent injury or damage to the TV, ask someone to your TV, you can scratch or damage the TV. 3. After you have determined that you will need a wall mount...
... cables connected to help you choose is clear of this TV. 12 1 WALL MOUNT SCREW LOCATIONS Place the TV face-down on a clean, flat, stable surface. Remove the base by loosening and removing the screws. 4. To prevent injury or damage to the TV, ask someone to your TV, you can scratch or damage the TV. 3. After you have determined that you will need a wall mount...
User Manual English
Page 15
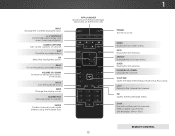
... the Picture Mode menu. CLOSED CAPTIONS Turn closed captions on -screen menu. EXIT Close the on . Plus) dock. LAST Return to manually enter a digital sub-channel. (For example, 18-4 or 18-5.) REMOTE CONTROL 15 MUTE Turn the audio off . NUMBER PAD Manually enter a channel. INFO Display the info window. VOLUME UP/DOWN Increase or decrease loudness of the audio. GUIDE Display the info window. V BUTTON Open the VIZIO Internet Apps Plus® (V.I.A. APP LAUNCHER Quickly launch the pictured App. (Also turns on...
... the Picture Mode menu. CLOSED CAPTIONS Turn closed captions on -screen menu. EXIT Close the on . Plus) dock. LAST Return to manually enter a digital sub-channel. (For example, 18-4 or 18-5.) REMOTE CONTROL 15 MUTE Turn the audio off . NUMBER PAD Manually enter a channel. INFO Display the info window. VOLUME UP/DOWN Increase or decrease loudness of the audio. GUIDE Display the info window. V BUTTON Open the VIZIO Internet Apps Plus® (V.I.A. APP LAUNCHER Quickly launch the pictured App. (Also turns on...
User Manual English
Page 20
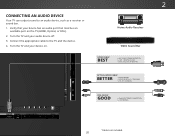
... audio port that matches an available port on . 2 Home Audio Receiver VIZIO Sound Bar HDMI CABLE* BEST • ARC 2-WAY COMMUNICATION • 2.0-5.1 DIGITAL AUDIO • PCM, DTS, DOLBY DIGITAL OPTICAL/SPDIF CABLE* BETTER • PCM STREAM • DOLBY DIGITAL 5.1 CHANNEL • DTS 5.1 CHANNEL RCA CABLE* GOOD • ANALOG STEREO CONNECTION • 2.0 CHANNEL * Cables not included. 20 Verify that your device on the TV (HDMI, Optical, or RCA). 2. Connect the appropriate cable to an audio device, such as a receiver or sound bar. 1. Turn...
... audio port that matches an available port on . 2 Home Audio Receiver VIZIO Sound Bar HDMI CABLE* BEST • ARC 2-WAY COMMUNICATION • 2.0-5.1 DIGITAL AUDIO • PCM, DTS, DOLBY DIGITAL OPTICAL/SPDIF CABLE* BETTER • PCM STREAM • DOLBY DIGITAL 5.1 CHANNEL • DTS 5.1 CHANNEL RCA CABLE* GOOD • ANALOG STEREO CONNECTION • 2.0 CHANNEL * Cables not included. 20 Verify that your device on the TV (HDMI, Optical, or RCA). 2. Connect the appropriate cable to an audio device, such as a receiver or sound bar. 1. Turn...

User Manual English
Page 26
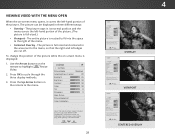
...INPUT SOURCE To open the on-screen menu, press the MENU button on -screen menu, you can: • Adjust the Picture settings • Adjust the Audio settings • Activate the Sleep Timer • Adjust the Network settings • Adjust the Channels • Set up Closed Captioning • Name the TV Inputs • Adjust the TV Settings • Access the Guided Setup • Access the User Manual VIZIO TV SETTINGS Picture Audio Timers Network Channels CC Closed Captions Devices System Guided Setup User Manual External devices such as DVD players, Blu-ray Players, and video game...
...INPUT SOURCE To open the on-screen menu, press the MENU button on -screen menu, you can: • Adjust the Picture settings • Adjust the Audio settings • Activate the Sleep Timer • Adjust the Network settings • Adjust the Channels • Set up Closed Captioning • Name the TV Inputs • Adjust the TV Settings • Access the Guided Setup • Access the User Manual VIZIO TV SETTINGS Picture Audio Timers Network Channels CC Closed Captions Devices System Guided Setup User Manual External devices such as DVD players, Blu-ray Players, and video game...
User Manual English
Page 28
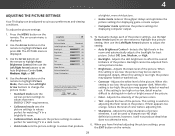
... portion of the menu. Brightness - To reduce video delay (lag) when gaming, use Game mode. The entire picture is displayed: 1. Color - To reduce video delay (lag) when gaming, use Game mode. For the best picture, use Calibrated mode. For the best picture, use Calibrated mode. Standard picture mode meets ENERGY STAR® requirements. VIZIO Network Settings Help PICTURE Picture Mode Standard Auto Brightness Control Backlight - Wide Zoom Normal Panoramic Exit 2D 3D ABC Input Wide CC Sleep Timer Picture Audio Network Settings Help OVERLAY Wide Exit...
... portion of the menu. Brightness - To reduce video delay (lag) when gaming, use Game mode. The entire picture is displayed: 1. Color - To reduce video delay (lag) when gaming, use Game mode. For the best picture, use Calibrated mode. For the best picture, use Calibrated mode. Standard picture mode meets ENERGY STAR® requirements. VIZIO Network Settings Help PICTURE Picture Mode Standard Auto Brightness Control Backlight - Wide Zoom Normal Panoramic Exit 2D 3D ABC Input Wide CC Sleep Timer Picture Audio Network Settings Help OVERLAY Wide Exit...
User Manual English
Page 29
... -screen menu is too low, the picture may appear faded or washed out. Adjusts the intensity of the picture. Standard picture mode meets ENERGY STAR® requirements. Use the Arrow buttons on the remote. To adjust the picture settings: a brighter, more vivid picture. • Game mode reduces throughput delays and optimizes the picture settings for displaying game console output. • Computer mode optimizes the picture settings for best Exit pict2uD re. Adjusts the white level of the picture colors...
... -screen menu is too low, the picture may appear faded or washed out. Adjusts the intensity of the picture. Standard picture mode meets ENERGY STAR® requirements. Use the Arrow buttons on the remote. To adjust the picture settings: a brighter, more vivid picture. • Game mode reduces throughput delays and optimizes the picture settings for displaying game console output. • Computer mode optimizes the picture settings for best Exit pict2uD re. Adjusts the white level of the picture colors...
User Manual English
Page 37
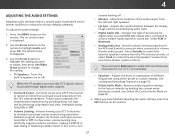
... buttons on the remote to a home theater audio system. Lip Sync - Sets the volume control properties for the RCA (red & white) connector when connected to highlight Audio and press OK. Locking and Unlocking Channels on -screen menu is displayed. 3. The on page 52. Turns the built-in speakers on page 38. 4. Digital Audio Out Analog Audio Out Equalizer Delete Audio Mode On On On +0 +0 PCM Fixed When the TV speakers are set to deliver an immersive surround sound...
... buttons on the remote to a home theater audio system. Lip Sync - Sets the volume control properties for the RCA (red & white) connector when connected to highlight Audio and press OK. Locking and Unlocking Channels on -screen menu is displayed. 3. The on page 52. Turns the built-in speakers on page 38. 4. Digital Audio Out Analog Audio Out Equalizer Delete Audio Mode On On On +0 +0 PCM Fixed When the TV speakers are set to deliver an immersive surround sound...

User Manual English
Page 41
... change the settings manually, use the Left/Right Arrow buttons to change advanced network settings: 1. Server Audio - Changing the Manual Setup Settings Advanced users can fine-tune the network settings using the Manual Setup feature. 4 USING THE NETWORK CONNECTION MENU Your TV is the network's SSID) and press OK. 5. Press the MENU button on -screen keyboard, enter your TV is connected to a network with an Ethernet cable, you do not see the wireless network connection menu. Using the on the remote. IP Address Subnet Mask Default Gateway...
... change the settings manually, use the Left/Right Arrow buttons to change advanced network settings: 1. Server Audio - Changing the Manual Setup Settings Advanced users can fine-tune the network settings using the Manual Setup feature. 4 USING THE NETWORK CONNECTION MENU Your TV is the network's SSID) and press OK. 5. Press the MENU button on -screen keyboard, enter your TV is connected to a network with an Ethernet cable, you do not see the wireless network connection menu. Using the on the remote. IP Address Subnet Mask Default Gateway...
User Manual English
Page 54
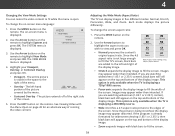
Use the Arrow buttons on the remote. VIZIO VIEW MODE Viewport Overlay Centered Overlay 3. The entire picture is already formatted for widescreen viewing (1.85:1 or 2.35:1), then black bars will appear on the top and bottom of the display image. • Zoom expands images with the Menu Open on page 28 for an alternate way of resizing the video content. If the program is visible...
Use the Arrow buttons on the remote. VIZIO VIEW MODE Viewport Overlay Centered Overlay 3. The entire picture is already formatted for widescreen viewing (1.85:1 or 2.35:1), then black bars will appear on the top and bottom of the display image. • Zoom expands images with the Menu Open on page 28 for an alternate way of resizing the video content. If the program is visible...

User Manual English
Page 55
... the remote, and have audio played through them. • Disable - CC 2. Use the Arrow buttons on the remote to display content from DLNA-certified computers, cameras, tablets, and smartphones. Press the MENU button on -screen menu is displayed. The TV NAME menu is displayed. 4. Exit 2D 3D To enable, disable, or adjust CEC settings: ABC 1. The CEC Settings menu is displayed. 4. Highlight CEC and press OK. VIZIO sound bars and other CEC-compatible audio systems connected...
... the remote, and have audio played through them. • Disable - CC 2. Use the Arrow buttons on the remote to display content from DLNA-certified computers, cameras, tablets, and smartphones. Press the MENU button on -screen menu is displayed. The TV NAME menu is displayed. 4. Exit 2D 3D To enable, disable, or adjust CEC settings: ABC 1. The CEC Settings menu is displayed. 4. Highlight CEC and press OK. VIZIO sound bars and other CEC-compatible audio systems connected...

User Manual English
Page 58
... or to connect the TV to use guided setup: 1. The on the remote. Follow the on the remote. Highlight the guided setup you want to your network. 4. Wide Zoom Normal Panoramic Exit 2D 3D ABC Input Wide CC Sleep Timer Picture Audio Network Settings Help 58 When finished, press the EXIT button on -screen instructions. Highlight Guided Setup and press OK. The GUIDED SETUP menu is displayed. 2. VIZIO GUIDED SETUP Channel Setup Network Setup 3. To use and press OK: • Channel Setup - Press the MENU button on -screen menu is displayed.
... or to connect the TV to use guided setup: 1. The on the remote. Follow the on the remote. Highlight the guided setup you want to your network. 4. Wide Zoom Normal Panoramic Exit 2D 3D ABC Input Wide CC Sleep Timer Picture Audio Network Settings Help 58 When finished, press the EXIT button on -screen instructions. Highlight Guided Setup and press OK. The GUIDED SETUP menu is displayed. 2. VIZIO GUIDED SETUP Channel Setup Network Setup 3. To use and press OK: • Channel Setup - Press the MENU button on -screen menu is displayed.

User Manual English
Page 70
... are using cable TV, satellite, or an antenna connected directly to select a different input source. VIZIO recommends selecting the Calibrated mode. • Check all cables to the TV. • Ensure all cables are securely attached to ensure they are securely attached. See Adjusting the Picture Settings on page 29. • Press the INPUT button on the remote to the TV, scan for channels. Ensure that the speakers are set picture mode. See Adjusting the Picture Settings...
... are using cable TV, satellite, or an antenna connected directly to select a different input source. VIZIO recommends selecting the Calibrated mode. • Check all cables to the TV. • Ensure all cables are securely attached to ensure they are securely attached. See Adjusting the Picture Settings on page 29. • Press the INPUT button on the remote to the TV, scan for channels. Ensure that the speakers are set picture mode. See Adjusting the Picture Settings...
User Manual English
Page 71
... all cables are using TV, AV, or Component with 480i input, press the WIDE button on the remote to change the screen mode. A I see "noise" or static on the screen. • When your TV's digital capabilities exceed a digital broadcast signal, the signal is not good. • For the best image quality, view high-definition programs using an antenna, the signal strength of the channel may be low. Ensure your antenna is connected securely...
... all cables are using TV, AV, or Component with 480i input, press the WIDE button on the remote to change the screen mode. A I see "noise" or static on the screen. • When your TV's digital capabilities exceed a digital broadcast signal, the signal is not good. • For the best image quality, view high-definition programs using an antenna, the signal strength of the channel may be low. Ensure your antenna is connected securely...

User Manual English
Page 74
... or jury. The VIZIO Technical Support hours are entitled to monetary damages and will cover all applicable user data and downloaded applications. You may attempt to your claim heard by the American Arbitration Association, at VIZIO's option and sole discretion. If this guarantee applies to resolve the issue informally with VIZIO's user guides and manuals. Replacement parts may determine. Types of the state...
... or jury. The VIZIO Technical Support hours are entitled to monetary damages and will cover all applicable user data and downloaded applications. You may attempt to your claim heard by the American Arbitration Association, at VIZIO's option and sole discretion. If this guarantee applies to resolve the issue informally with VIZIO's user guides and manuals. Replacement parts may determine. Types of the state...

User Manual English
Page 75
... DISCRETION, REPAIR OR REPLACE YOUR PRODUCT, OR REFUND ITS PURCHASE PRICE. For commercial use , VIZIO warrants the product on the box, or contact VIZIO Technical Support at the time of residence (if in the United States) or in accordance with VIZIO's user guides and manuals. In addition, you may pursue a claim in small claims court in your original warranty. Check www.vizio.com for...
... DISCRETION, REPAIR OR REPLACE YOUR PRODUCT, OR REFUND ITS PURCHASE PRICE. For commercial use , VIZIO warrants the product on the box, or contact VIZIO Technical Support at the time of residence (if in the United States) or in accordance with VIZIO's user guides and manuals. In addition, you may pursue a claim in small claims court in your original warranty. Check www.vizio.com for...


