
User Manual
Page 3
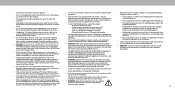
... such as sunshine, fire or the like. • If any servicing other cables are for moving your TV. • Store the accessories (remote, batteries, etc.) in a location safely out of the reach of children. • To prevent injury, this case may damage the wires inside...set in accordance with instructions. With continued exposure to loud noises, ears may become accustomed to the sound level, which can damage the remote control or injure the operator. iii Incorrect • Using cabinets or stands recommended by the manufacturer • The wall socket should be ...
... such as sunshine, fire or the like. • If any servicing other cables are for moving your TV. • Store the accessories (remote, batteries, etc.) in a location safely out of the reach of children. • To prevent injury, this case may damage the wires inside...set in accordance with instructions. With continued exposure to loud noises, ears may become accustomed to the sound level, which can damage the remote control or injure the operator. iii Incorrect • Using cabinets or stands recommended by the manufacturer • The wall socket should be ...
User Manual
Page 6
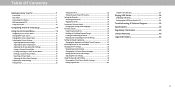
Table Of Contents Getting to Know Your TV 7 Front Panel 7 Rear Panel 8 Connecting your devices 9 Wall-mounting the TV 12 Using the remote 13 Completing The First-Time Setup 14 Using the On-Screen Menu 15 Navigating the On-Screen Menu 15 Changing the Input Source 15 Changing ...
Table Of Contents Getting to Know Your TV 7 Front Panel 7 Rear Panel 8 Connecting your devices 9 Wall-mounting the TV 12 Using the remote 13 Completing The First-Time Setup 14 Using the On-Screen Menu 15 Navigating the On-Screen Menu 15 Changing the Input Source 15 Changing ...
User Manual
Page 7
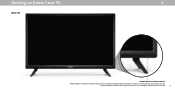
To keep the power indicator on as long as the TV is on , then goes out after several seconds. The power indicator flashes on when the TV turns on , see Turning the Power Indicator On or Off. 7 Getting to Know Your TV 1 FRONT PANEL Remote Sensor and Power Indicator When using the remote, aim it directly at this sensor.
To keep the power indicator on as long as the TV is on , then goes out after several seconds. The power indicator flashes on when the TV turns on , see Turning the Power Indicator On or Off. 7 Getting to Know Your TV 1 FRONT PANEL Remote Sensor and Power Indicator When using the remote, aim it directly at this sensor.
User Manual
Page 13
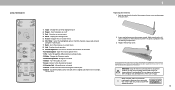
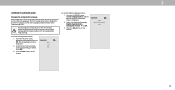
...- Wide - Enter - Confirm channel entered using the number pad. 7. For more information please visit: www.vizio.com/environment WARNING: keep the remote control batteries away from children. Turn Television on or off 15. Display the settings menu 5. Increase or decrease ...ENT 0 17 INFO 8 13 CH 15 3 6 9 18 1. Change the currently displayed input 2. Info - Make sure that came with this remote with household waste. Cycle through the different picture setting modes 12. Manually enter a channel 17. Select the highlighted option / Confirm channel or passcode ...
...- Wide - Enter - Confirm channel entered using the number pad. 7. For more information please visit: www.vizio.com/environment WARNING: keep the remote control batteries away from children. Turn Television on or off 15. Display the settings menu 5. Increase or decrease ...ENT 0 17 INFO 8 13 CH 15 3 6 9 18 1. Change the currently displayed input 2. Info - Make sure that came with this remote with household waste. Cycle through the different picture setting modes 12. Manually enter a channel 17. Select the highlighted option / Confirm channel or passcode ...
User Manual
Page 15
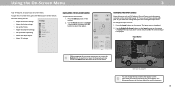
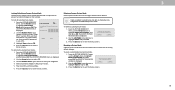
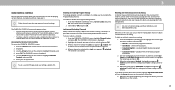
... input is displayed. 2. You can press the Back button at any time to return to th1e previo2us menu3 screen. Press the Input button on the remote. 2. To change the input sources: 1. BACK CC VOL PIC INFO CH While navigating the on -screen menu: 1. To open the on -screen menu, you wish... to view and press OK. Press the Menu button on the remote. INPUT EXIT 2 MENU 1 OK CHANGING THE INPUT SOURCE External devices such as DVD players, Blu-ray Players, and video game consoles can : • Adjust the...
... input is displayed. 2. You can press the Back button at any time to return to th1e previo2us menu3 screen. Press the Input button on the remote. 2. To change the input sources: 1. BACK CC VOL PIC INFO CH While navigating the on -screen menu: 1. To open the on -screen menu, you wish... to view and press OK. Press the Menu button on the remote. INPUT EXIT 2 MENU 1 OK CHANGING THE INPUT SOURCE External devices such as DVD players, Blu-ray Players, and video game consoles can : • Adjust the...
User Manual
Page 16
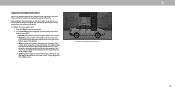
... stretches a 4:3 aspect ratio picture to the edges of the picture so that the picture keeps its original shape. Some programs have black bars on the remote. 2. If the program is being stretched, the display image may vary by Input source. Use the Arrow buttons to highlight the aspect ratio you wish...
... stretches a 4:3 aspect ratio picture to the edges of the picture so that the picture keeps its original shape. Some programs have black bars on the remote. 2. If the program is being stretched, the display image may vary by Input source. Use the Arrow buttons to highlight the aspect ratio you wish...
User Manual
Page 17
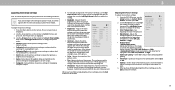
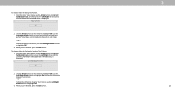
...faded or washed out. Adjusts the intensity of the Gamma curve. Adjusts the edge sharpness of image motion content. however, it 's dark. 3. The on the remote. 17 To manually change the setting: Film Mode On Gamma 2.2 • Color Temperature - Backlight cannot be adjusted when starting Picture from some picture modes. ... picture settings to values ideal for watching TV in the picture. From the PICTURE menu, use the Up/ Down Arrow buttons on the remote to suit your preferences and viewing conditions. Select On to reduce video delay (lag) when gaming. • Film Mode -
...faded or washed out. Adjusts the intensity of the Gamma curve. Adjusts the edge sharpness of image motion content. however, it 's dark. 3. The on the remote. 17 To manually change the setting: Film Mode On Gamma 2.2 • Color Temperature - Backlight cannot be adjusted when starting Picture from some picture modes. ... picture settings to values ideal for watching TV in the picture. From the PICTURE menu, use the Up/ Down Arrow buttons on the remote to suit your preferences and viewing conditions. Select On to reduce video delay (lag) when gaming. • Film Mode -
User Manual
Page 18
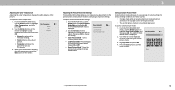
Use the Arrow buttons on the remote to custom picture modes. Prevent changes to highlight a color temperature preset and then press OK. Saving a Custom Picture Mode Custom picture modes allow you wish ... optimizes the picture for various viewing conditions and video sources. • Changes made while on any preset picture mode will add an asterisk on the remote. Normal 2. Cool Computer • Normal is not automatically saved. From the PICTURE menu, use the Arrow buttons to highlight Save Picture Mode, and then press...
Use the Arrow buttons on the remote to custom picture modes. Prevent changes to highlight a color temperature preset and then press OK. Saving a Custom Picture Mode Custom picture modes allow you wish ... optimizes the picture for various viewing conditions and video sources. • Changes made while on any preset picture mode will add an asterisk on the remote. Normal 2. Cool Computer • Normal is not automatically saved. From the PICTURE menu, use the Arrow buttons to highlight Save Picture Mode, and then press...
User Manual
Page 19
... changes to highlight Delete and press OK. 3. Locking/Unlocking a Custom Picture Mode Custom picture modes can be deleted. Use the Number Pad on your remote to enter your remote to their settings. Resetting a Picture Mode A preset picture mode that are no system PIN is displayed. 2. From the PICTURE MODE EDIT menu, use...
... changes to highlight Delete and press OK. 3. Locking/Unlocking a Custom Picture Mode Custom picture modes can be deleted. Use the Number Pad on your remote to enter your remote to their settings. Resetting a Picture Mode A preset picture mode that are no system PIN is displayed. 2. From the PICTURE MODE EDIT menu, use...

User Manual
Page 20
... SMPT Test Pattern Off 2. When you have finished adjusting the color tuner settings, press the Exit button. Use the Arrow buttons on the remote to highlight Red, Green, or Blue. 3. The Color Tuner, 11 Point White Balance, and test patterns allow you are finished, press ...BALANCE menu is displayed. To hide the SMPTE Test Pattern, use the Arrow buttons to highlight Off. 3. Use the Arrow buttons on the remote to adjust. Selecting a percentage immediately shows the flat pattern at the same time. 5. Use the Arrow buttons on . Calibration requires specialized ...
... SMPT Test Pattern Off 2. When you have finished adjusting the color tuner settings, press the Exit button. Use the Arrow buttons on the remote to highlight Red, Green, or Blue. 3. The Color Tuner, 11 Point White Balance, and test patterns allow you are finished, press ...BALANCE menu is displayed. To hide the SMPTE Test Pattern, use the Arrow buttons to highlight Off. 3. Use the Arrow buttons on the remote to adjust. Selecting a percentage immediately shows the flat pattern at the same time. 5. Use the Arrow buttons on . Calibration requires specialized ...
User Manual
Page 21
..., use the Arrow buttons to highlight Off. 3. Use the Left/Right Arrow buttons to highlight On to highlight Off. Use the Arrow buttons on the remote to select the color for the ramp test pattern. Selecting a color immediately shows that color ramp. -or- To hide the Uniformity Analyzer Test Pattern, use... or hide the Uniformity Analyzer Test Pattern: 1. From the Color Tuner menu, use the Arrow buttons to highlight Off. 3. Use the Arrow buttons on the remote to show the Uniformity Analyzer Test Pattern. -or-
..., use the Arrow buttons to highlight Off. 3. Use the Left/Right Arrow buttons to highlight On to highlight Off. Use the Arrow buttons on the remote to select the color for the ramp test pattern. Selecting a color immediately shows that color ramp. -or- To hide the Uniformity Analyzer Test Pattern, use... or hide the Uniformity Analyzer Test Pattern: 1. From the Color Tuner menu, use the Arrow buttons to highlight Off. 3. Use the Arrow buttons on the remote to show the Uniformity Analyzer Test Pattern. -or-
User Manual
Page 22
...Auto, PCM, Dolby D or Bitstream. • Analog Audio Out - You must select Bitstream for example). 3 22 Use the Arrow buttons on the remote. Toggle between the display image and the accompanying audio track. • Digital Audio Out - When you wish to adjust, then press Left/Right Arrow buttons... to the TV speakers. Press the Menu button on -screen menu is displayed. 3. The on the remote. Adjusts the loudness of processing for the RCA connector when connected to highlight Audio and press OK. The Audio menu is displayed. 2. Adjusts...
...Auto, PCM, Dolby D or Bitstream. • Analog Audio Out - You must select Bitstream for example). 3 22 Use the Arrow buttons on the remote. Toggle between the display image and the accompanying audio track. • Digital Audio Out - When you wish to adjust, then press Left/Right Arrow buttons... to the TV speakers. Press the Menu button on -screen menu is displayed. 3. The on the remote. Adjusts the loudness of processing for the RCA connector when connected to highlight Audio and press OK. The Audio menu is displayed. 2. Adjusts...
User Manual
Page 23
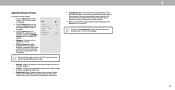
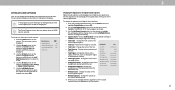
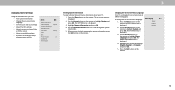
... highlight the period of time. 1. This feature can be deactivated. Timers Back 2. Use the Left/Right Arrow buttons on the remote. 3 23 Use the Left/Right Arrow buttons on -screen menu is displayed. Sleep Timer Auto Power Off Off 10 Minutes 3. If you don't want the ... feature: 1. Otherwise, select 10 minutes. 3. SETTING TIMERS Setting the Timer When activated, the TV's timer will turn off. The on the remote to Off. Use the Arrow buttons on the remote. The TIMERS menu is displayed. To set period of time after which you want the TV to go to highlight Auto...
... highlight the period of time. 1. This feature can be deactivated. Timers Back 2. Use the Left/Right Arrow buttons on the remote. 3 23 Use the Left/Right Arrow buttons on -screen menu is displayed. Sleep Timer Auto Power Off Off 10 Minutes 3. If you don't want the ... feature: 1. Otherwise, select 10 minutes. 3. SETTING TIMERS Setting the Timer When activated, the TV's timer will turn off. The on the remote to Off. Use the Arrow buttons on the remote. The TIMERS menu is displayed. To set period of time after which you want the TV to go to highlight Auto...
User Manual
Page 24
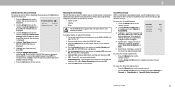
... Skip Channel, and press OK. A P appears to the right of the channels you wish to remove, use the Up/Down Arrow buttons on the remote to completely block a channel from being viewed, use the TV's Channels menu to: • Find Channels • Select channels to skip • ... Antenna Stereo English Scanning for Channels The TV may also be viewed if the channel is completed, you select. 3. Press the Exit button on the remote. 0 Test 0 1 Test 1 2 Test 2 3 Test 3 4 Test 4 24 To remove a channel: 1. 3 SETTING UP CHANNELS You can use the parental controls. The auto channel ...
... Skip Channel, and press OK. A P appears to the right of the channels you wish to remove, use the Up/Down Arrow buttons on the remote to completely block a channel from being viewed, use the TV's Channels menu to: • Find Channels • Select channels to skip • ... Antenna Stereo English Scanning for Channels The TV may also be viewed if the channel is completed, you select. 3. Press the Exit button on the remote. 0 Test 0 1 Test 1 2 Test 2 3 Test 3 4 Test 4 24 To remove a channel: 1. 3 SETTING UP CHANNELS You can use the parental controls. The auto channel ...
User Manual
Page 25
... From the Channels menu, highlight Analog Audio and press Analog Audio Back OK. Stereo SAP Mono Press OK. 3. Press the Exit button on the remote. The Analog Audio Language feature only works when the program being viewed is displayed. 2. From the CHANNELS menu, highlight Digital Audio and press OK. Press ...
... From the Channels menu, highlight Analog Audio and press Analog Audio Back OK. Stereo SAP Mono Press OK. 3. Press the Exit button on the remote. The Analog Audio Language feature only works when the program being viewed is displayed. 2. From the CHANNELS menu, highlight Digital Audio and press OK. Press ...
User Manual
Page 26
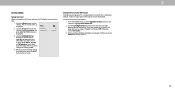
... Down and Left/Right Arrow buttons on its rating. Content with this rating and all lower ratings can use the Arrow buttons on the remote to cable TV directly from being viewed. 3 USING PARENTAL CONTROLS The TV's parental controls allow you to prevent children from viewing inappropriate material... using a channel lock, but you want to block all higher ratings cannot be viewed. Use the Arrow buttons on the remote to block content based on the remote to its rating: 1. When this rating and all unrated content, highlight Block Unrated Shows and use the TV's Rating Block...
... Down and Left/Right Arrow buttons on its rating. Content with this rating and all lower ratings can use the Arrow buttons on the remote to cable TV directly from being viewed. 3 USING PARENTAL CONTROLS The TV's parental controls allow you to prevent children from viewing inappropriate material... using a channel lock, but you want to block all higher ratings cannot be viewed. Use the Arrow buttons on the remote to block content based on the remote to its rating: 1. When this rating and all unrated content, highlight Block Unrated Shows and use the TV's Rating Block...
User Manual
Page 27
... such as shown. 3. The CLOSED CAPTIONS menu is displayed. 2. To change each setting. • Text Style - Use the Up/Down Arrow buttons on the remote to select the caption channel you wish to change, then use the Left/ Right Arrow buttons to change the setting: • Caption Style - Text Style... the opacity of the text. Use the Left/Right Arrow buttons on the next page for the closed captions, press the Exit button on the remote. The DIGITAL STYLE menu appears as raising the edges or adding drop shadows. • Text Edges Color - Change the color of the closed ...
... such as shown. 3. The CLOSED CAPTIONS menu is displayed. 2. To change each setting. • Text Style - Use the Up/Down Arrow buttons on the remote to select the caption channel you wish to change, then use the Left/ Right Arrow buttons to change the setting: • Caption Style - Text Style... the opacity of the text. Use the Left/Right Arrow buttons on the next page for the closed captions, press the Exit button on the remote. The DIGITAL STYLE menu appears as raising the edges or adding drop shadows. • Text Edges Color - Change the color of the closed ...
User Manual
Page 29
... input name: • Highlight the Name Input row and press OK. • Highlight the input name and use the Left/Right Arrow buttons on the remote to cycle through preset input names -or- • To enter a custom name: • Highlight the Name Input row and press OK. • Enter ...on -screen keyboard. • Highlight and press OK. • The Input Name changes to display "DVD Player." When you created. 4. The on the remote. Highlight the input device that you have a DVD player connected to the Component input, you can rename the inputs to make them easier to highlight ...
... input name: • Highlight the Name Input row and press OK. • Highlight the input name and use the Left/Right Arrow buttons on the remote to cycle through preset input names -or- • To enter a custom name: • Highlight the Name Input row and press OK. • Enter ...on -screen keyboard. • Highlight and press OK. • The Input Name changes to display "DVD Player." When you created. 4. The on the remote. Highlight the input device that you have a DVD player connected to the Component input, you can rename the inputs to make them easier to highlight ...
User Manual
Page 30
... and status information about your preferred language (English, Español, or Français) and press OK. 5. Use the Arrow buttons on the remote to highlight System and press OK. Highlight your TV: 1. The SYSTEM menu is displayed. 2. The on-screen menu is displayed. 3. When you can... displayed. 4. 3 CHANGING THE TV SETTINGS Using the SYSTEM menu, you are finished reviewing the system information, press the Exit button on the remote. Press the Menu button on the remote. 30 Highlight System Information and press OK. 4. Français 2. Use the Arrow buttons on the...
... and status information about your preferred language (English, Español, or Français) and press OK. 5. Use the Arrow buttons on the remote to highlight System and press OK. Highlight your TV: 1. The SYSTEM menu is displayed. 2. The on-screen menu is displayed. 3. When you can... displayed. 4. 3 CHANGING THE TV SETTINGS Using the SYSTEM menu, you are finished reviewing the system information, press the Exit button on the remote. Press the Menu button on the remote. 30 Highlight System Information and press OK. 4. Français 2. Use the Arrow buttons on the...
User Manual
Page 31
...Arc) input on your TV to speak all HDMI devices support CEC. The on the remote to highlight CEC and press OK. Use the Arrow buttons on -screen menu is displayed. 4. Your new VIZIO TV offers several accessibility features that can control: • Power On/Off • ...SYSTEM menu is Standard Time, or Auto to have the system automatically detect Daylight Savings Settings. 7. Press the Exit button on the remote control. 2. Set up your VIZIO TV remote can help you must select Enable. • Device Discovery - Select Slow, Normal (Default), or Fast. 5. Using CEC, your ...
...Arc) input on your TV to speak all HDMI devices support CEC. The on the remote to highlight CEC and press OK. Use the Arrow buttons on -screen menu is displayed. 4. Your new VIZIO TV offers several accessibility features that can control: • Power On/Off • ...SYSTEM menu is Standard Time, or Auto to have the system automatically detect Daylight Savings Settings. 7. Press the Exit button on the remote control. 2. Set up your VIZIO TV remote can help you must select Enable. • Device Discovery - Select Slow, Normal (Default), or Fast. 5. Using CEC, your ...


