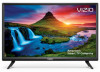
Quickstart Guide / Guide de Demarrage Rapide
Page 1
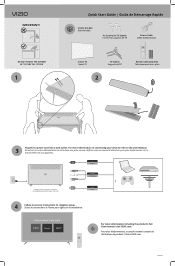
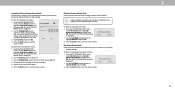
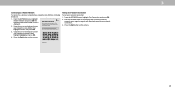
...de la tv dans une prise murale. Suivez les instructions à l'écran pour effectuer la installation. Watch Now VIZIO IMPORTANT! Des adaptateurs peuvent être requis. Cable Coaxial Coaxial 5m5mm Composite Composite 5mRCmRACA Adapters may be required. Pour ... x Vis Pour supports de TV Power Cable Câble d'alimentation Smart TV Smart TV TV Stands Supports de TV 2 Remote with Batteries Télécommande avec piles $ Watch Now HDRMCRIACTAoT3o 3 RSCtAaSntTadona3drdard OStpOatnipcdtaiacl ardl SaStealtleitlelite SatellitHeDHMDIMI Plug the tv power cord ...
...de la tv dans une prise murale. Suivez les instructions à l'écran pour effectuer la installation. Watch Now VIZIO IMPORTANT! Des adaptateurs peuvent être requis. Cable Coaxial Coaxial 5m5mm Composite Composite 5mRCmRACA Adapters may be required. Pour ... x Vis Pour supports de TV Power Cable Câble d'alimentation Smart TV Smart TV TV Stands Supports de TV 2 Remote with Batteries Télécommande avec piles $ Watch Now HDRMCRIACTAoT3o 3 RSCtAaSntTadona3drdard OStpOatnipcdtaiacl ardl SaStealtleitlelite SatellitHeDHMDIMI Plug the tv power cord ...
Manuel de l Utilisateur
Page 16
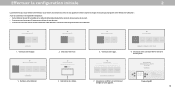
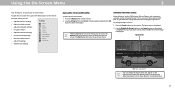
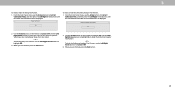
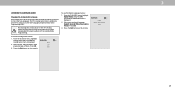
...ii) the Google Terms of Service and Privacy Policies. You can turn your phone into the ultimate remote. By pressing "Accept All", you agree to be bound by the (i) VIZIO Terms of Service and Privacy Policy and (ii) the Google Terms of this device. shows now!...GoBoegdleroToemrms & Policy Conditons Game Room Skip For Now Add Custom LoAccacteiopnt All Where is you using your phone into the ultimate remote. VIZIO Terms & Conditions VIZIO Privacy Policy Google Privacy Policy Google Terms & Conditons Encrypted 4. Skip For Now Accept All Which room is your favorite shows ...
...ii) the Google Terms of Service and Privacy Policies. You can turn your phone into the ultimate remote. By pressing "Accept All", you agree to be bound by the (i) VIZIO Terms of Service and Privacy Policy and (ii) the Google Terms of this device. shows now!...GoBoegdleroToemrms & Policy Conditons Game Room Skip For Now Add Custom LoAccacteiopnt All Where is you using your phone into the ultimate remote. VIZIO Terms & Conditions VIZIO Privacy Policy Google Privacy Policy Google Terms & Conditons Encrypted 4. Skip For Now Accept All Which room is your favorite shows ...

User Manual
Page 3
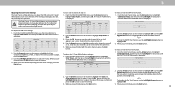
...• If your TV if any way. - Do not try to high voltages, electric shock, and other materials that can damage the remote control television set is not overhanging the edge of time. Continued use your existing television set . Pulling on cloth or other hazards. Your TV... qualified to do not touch the connector with wet hands. • Many injuries, particularly to hang onto the product. • Store the accessories (remote, batteries, etc.) in accordance with the installation instructions. • To reduce risk of electric shock, do so. • The lightning flash with ...
...• If your TV if any way. - Do not try to high voltages, electric shock, and other materials that can damage the remote control television set is not overhanging the edge of time. Continued use your existing television set . Pulling on cloth or other hazards. Your TV... qualified to do not touch the connector with wet hands. • Many injuries, particularly to hang onto the product. • Store the accessories (remote, batteries, etc.) in accordance with the installation instructions. • To reduce risk of electric shock, do so. • The lightning flash with ...

User Manual
Page 6
Table Of Contents Getting to Know Your TV 7 Front Panel 7 Rear Panel 8 Connecting Your Devices 11 Wall-mounting the TV 14 Using the Remote 15 Completing The First-Time Setup 16 Using the On-Screen Menu 17 Navigating the On-Screen Menu 17 Changing the Input Source 17 Changing ...
Table Of Contents Getting to Know Your TV 7 Front Panel 7 Rear Panel 8 Connecting Your Devices 11 Wall-mounting the TV 14 Using the Remote 15 Completing The First-Time Setup 16 Using the On-Screen Menu 17 Navigating the On-Screen Menu 17 Changing the Input Source 17 Changing ...

User Manual
Page 7
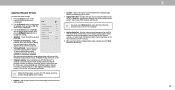
Getting to Know Your TV 1 FRONT PANEL Remote Sensor and Power Indicator When using the remote, aim it directly at this sensor. To keep the power indicator on as long as the TV is on , then goes out after several seconds. The power indicator flashes on when the TV turns on , see Turning the Power Indicator On or Off. 7
Getting to Know Your TV 1 FRONT PANEL Remote Sensor and Power Indicator When using the remote, aim it directly at this sensor. To keep the power indicator on as long as the TV is on , then goes out after several seconds. The power indicator flashes on when the TV turns on , see Turning the Power Indicator On or Off. 7
User Manual
Page 15
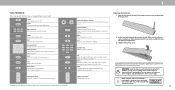
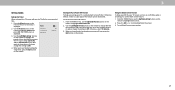
...Volume Up/Down VOL CH Increase or decrease the loudness of the audio *Enabled/disabled different accessibility features by holding down this remote with number pad to the channel last viewed Number Pad Manually enter a channel Pic Cycle through the different picture setting modes Enabled... the back of batteries infire. Insert a coin and pry open the back cover. 2. For more information please visit: www.vizio.com/environment WARNING: keep the remote control batteries away from children. Make sure that the (+) and (-) symbols on or off Last Return to manually enter a ...
...Volume Up/Down VOL CH Increase or decrease the loudness of the audio *Enabled/disabled different accessibility features by holding down this remote with number pad to the channel last viewed Number Pad Manually enter a channel Pic Cycle through the different picture setting modes Enabled... the back of batteries infire. Insert a coin and pry open the back cover. 2. For more information please visit: www.vizio.com/environment WARNING: keep the remote control batteries away from children. Make sure that the (+) and (-) symbols on or off Last Return to manually enter a ...
User Manual
Page 16
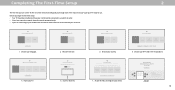
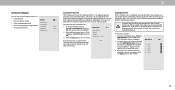
...ol Français Back 1. Home Use Store Demo 2. Start streaming your Wi-Fi and enter the password. VIZIO Terms & Conditions VIZIO Privacy Policy Google Privacy Policy Google Terms & Conditons Skip For Now Accept All 7. Next Skip 6. Congratulations! Download ...now from multiple apps into the ultimate remote. Choose your favorite shows now! Family Room Living Room Master Bedroom Game Room ...
...ol Français Back 1. Home Use Store Demo 2. Start streaming your Wi-Fi and enter the password. VIZIO Terms & Conditions VIZIO Privacy Policy Google Privacy Policy Google Terms & Conditons Skip For Now Accept All 7. Next Skip 6. Congratulations! Download ...now from multiple apps into the ultimate remote. Choose your favorite shows now! Family Room Living Room Master Bedroom Game Room ...
User Manual
Page 17
...connected to your devices easy to recognize. To use on-screen menu. Press the Input button on the remote. 2. You can change the input names that option. Press the Menu button on the remote. The Exit button will close the on the Input Menu for more information. 17 To open the ... WatchFree HDMI-1 HDMI-2 HDMI-3 HDMI-4 COMP TV Note: Inputs may vary by TV. Use the Right/Left Arrow buttons or the Input button on the remote to highlight the input you can: • Adjust the Picture settings • Adjust the Audio settings • Adjust the Network settings • Set up ...
...connected to your devices easy to recognize. To use on-screen menu. Press the Input button on the remote. 2. You can change the input names that option. Press the Menu button on the remote. The Exit button will close the on the Input Menu for more information. 17 To open the ... WatchFree HDMI-1 HDMI-2 HDMI-3 HDMI-4 COMP TV Note: Inputs may vary by TV. Use the Right/Left Arrow buttons or the Input button on the remote to highlight the input you can: • Adjust the Picture settings • Adjust the Audio settings • Adjust the Network settings • Set up ...
User Manual
Page 19
..., press the Exit button on -screen menu is displayed. 3. The on the remote. * Not applicable to D24h-G9 **Applicable models: D50x-G9, V505-G9, V405-G9 and V655-G9 19 Use the Arrow buttons on the remote to highlight that does not otherwise exist. Adjusts the intensity of picture elements. Adjusts... source. It can be adjusted when starting Picture from some picture modes. • Brightness - Specific adjustments are based on the remote. When you wish to adjust, then Reduce Noise press the Left/Right Arrow buttons to change each of the picture to highlight ...
..., press the Exit button on -screen menu is displayed. 3. The on the remote. * Not applicable to D24h-G9 **Applicable models: D50x-G9, V505-G9, V405-G9 and V655-G9 19 Use the Arrow buttons on the remote to highlight that does not otherwise exist. Adjusts the intensity of picture elements. Adjusts... source. It can be adjusted when starting Picture from some picture modes. • Brightness - Specific adjustments are based on the remote. When you wish to adjust, then Reduce Noise press the Left/Right Arrow buttons to change each of the picture to highlight ...
User Manual
Page 20
...Mode Edit settings: 1. Saving a Custom Picture Mode Custom picture modes allow you have finished adjusting the color temperature, press the Exit button on the remote. The SAVE PICTURE MODE menu is displayed. The PICTURE MODE Picture Mode Edit Back EDIT menu is displayed. 2. Save Picture Mode 2. Choose between On... Save and press OK. 4. Save Picture Mode Back abc def ghi j k l mn o p q r s t u v wx y z 0 1 2 3 4 5 6 7 8 9 .@# äêí Space Save † Only available on the remote to highlight Color Color Temperature Back Temperature, and then press OK. 2.
...Mode Edit settings: 1. Saving a Custom Picture Mode Custom picture modes allow you have finished adjusting the color temperature, press the Exit button on the remote. The SAVE PICTURE MODE menu is displayed. The PICTURE MODE Picture Mode Edit Back EDIT menu is displayed. 2. Save Picture Mode 2. Choose between On... Save and press OK. 4. Save Picture Mode Back abc def ghi j k l mn o p q r s t u v wx y z 0 1 2 3 4 5 6 7 8 9 .@# äêí Space Save † Only available on the remote to highlight Color Color Temperature Back Temperature, and then press OK. 2.
User Manual
Page 21
... If a system PIN is set , then lock/ unlock. Press the Exit button to enter your 4-digit PIN. 4. Use the Number Pad on your remote to exit the menu screens. Press the Exit button to highlight Delete Picture Mode, and then press OK. From the PICTURE MODE EDIT menu, use... defaults. Press the Exit button to enter a unique 4-digit PIN. The DELETE PICTURE MODE window is displayed. 2. Use the Number Pad on your remote to exit the menu screens. Delete Cancel 2. Deleting a Custom Picture Mode Custom picture modes that has been edited can be restored to their settings. ...
... If a system PIN is set , then lock/ unlock. Press the Exit button to enter your 4-digit PIN. 4. Use the Number Pad on your remote to exit the menu screens. Press the Exit button to highlight Delete Picture Mode, and then press OK. From the PICTURE MODE EDIT menu, use... defaults. Press the Exit button to enter a unique 4-digit PIN. The DELETE PICTURE MODE window is displayed. 2. Use the Number Pad on your remote to exit the menu screens. Delete Cancel 2. Deleting a Custom Picture Mode Custom picture modes that has been edited can be restored to their settings. ...
User Manual
Page 22
... precisely set colors, and a specialized light meter. When you wish to adjust. Use the Arrow buttons on . Use the Arrow buttons on the remote to highlight Red, Green, or Blue. 3. The Color Tuner, 11 Point White Balance, and test patterns allow you are finished, press the OK...the color tuner settings, press the Exit button. Use the Arrow buttons to highlight another color channel to turn color channels off or on the remote to highlight Off. To adjust the 11 Point White Balance settings: 1. To show or hide the SMPTE Test Pattern: 1. Selecting a percentage immediately...
... precisely set colors, and a specialized light meter. When you wish to adjust. Use the Arrow buttons on . Use the Arrow buttons on the remote to highlight Red, Green, or Blue. 3. The Color Tuner, 11 Point White Balance, and test patterns allow you are finished, press the OK...the color tuner settings, press the Exit button. Use the Arrow buttons to highlight another color channel to turn color channels off or on the remote to highlight Off. To adjust the 11 Point White Balance settings: 1. To show or hide the SMPTE Test Pattern: 1. Selecting a percentage immediately...
User Manual
Page 23
Use the Arrow buttons on the remote to highlight Calibration Test, and then press the Left/Right Arrow buttons until the RAMP TEST PATTERN menu is displayed. To hide the Ramp Test ... a color immediately shows that color ramp. -or- Ramp Test Pattern Off To show or hide the Ramp Test Pattern: 1. Use the Arrow buttons on the remote to highlight Off. 3. Uniformity Analyzer Test Pattern Off 2. When you are finished, press the Exit button. 3 23
Use the Arrow buttons on the remote to highlight Calibration Test, and then press the Left/Right Arrow buttons until the RAMP TEST PATTERN menu is displayed. To hide the Ramp Test ... a color immediately shows that color ramp. -or- Ramp Test Pattern Off To show or hide the Ramp Test Pattern: 1. Use the Arrow buttons on the remote to highlight Off. 3. Uniformity Analyzer Test Pattern Off 2. When you are finished, press the Exit button. 3 23
User Manual
Page 24
.... Select Auto, PCM, Dolby D or Bitstream. Sets the volume control properties for example). • Analog Audio Out - The on the remote Speakers Auto to highlight Audio and press OK. Use the Arrow buttons on -screen menu is displayed. Turns the built-in speakers Digital Audio ...cannot be passed through digital audio outputs. • Lip Sync - Volume leveling uses DTS TruVolume™ to hide or display the on the remote. • Balance - Surround Sound On 3. Toggle between On or Off to maintain consistent volume levels during transitions between the display image and ...
.... Select Auto, PCM, Dolby D or Bitstream. Sets the volume control properties for example). • Analog Audio Out - The on the remote Speakers Auto to highlight Audio and press OK. Use the Arrow buttons on -screen menu is displayed. Turns the built-in speakers Digital Audio ...cannot be passed through digital audio outputs. • Lip Sync - Volume leveling uses DTS TruVolume™ to hide or display the on the remote. • Balance - Surround Sound On 3. Toggle between On or Off to maintain consistent volume levels during transitions between the display image and ...

User Manual
Page 25
...Wireless Mac Back Off 0:0:0:0:0:0 0:0:0:0:0:0 • Subnet Mask - Press the Exit button on the remote. The MAC addresses for the TV at the bottom of the list. D24h-G9 , D32h-G9 and D40f-G9 support Wireless-N. You must unplug the Ethernet cable to set up your network when you have... SETUP menu is displayed. 2. Your preferred domain name server address. • Alt. D50x-G9, V405-G9, V505-G9 and V655-G9 support Wireless-AC. Press the Menu button on the remote. Using the on the remote to highlight DHCP and then use are displayed: • RJ45 MAC - To change the...
...Wireless Mac Back Off 0:0:0:0:0:0 0:0:0:0:0:0 • Subnet Mask - Press the Exit button on the remote. The MAC addresses for the TV at the bottom of the list. D24h-G9 , D32h-G9 and D40f-G9 support Wireless-N. You must unplug the Ethernet cable to set up your network when you have... SETUP menu is displayed. 2. Your preferred domain name server address. • Alt. D50x-G9, V405-G9, V505-G9 and V655-G9 support Wireless-AC. Press the Menu button on the remote. Using the on the remote to highlight DHCP and then use are displayed: • RJ45 MAC - To change the...
User Manual
Page 26
... keyboard, enter your access point name. From the NETWORK menu, highlight Hidden Network and press OK. Press the Exit button on the remote. Press the Exit button on the remote. Connect 3 26 The TEST CONNECTION screen displays the connection method, network name, signal strength, and download speed of your network connection. 3. Connecting...
... keyboard, enter your access point name. From the NETWORK menu, highlight Hidden Network and press OK. Press the Exit button on the remote. Press the Exit button on the remote. Connect 3 26 The TEST CONNECTION screen displays the connection method, network name, signal strength, and download speed of your network connection. 3. Connecting...
User Manual
Page 27
... setting the sleep timer, press the Exit button on -screen menu is displayed. From the TIMERS menu, use the Up/Down Arrow buttons on the remote. When you have finished setting the auto power off while audio is no signal, change the setting to highlight Auto Power Off. 2. Press the OK... you want the sleep timer to Off. 4. Sleep Timer Auto Power Off Blank Screen Off 10 Minutes 3. Use the Left/Right Arrow buttons on the remote to turn off after a set period of time after 10 minutes without a video or audio signal. From the TIMERS menu, use the Blank Screen feature...
... setting the sleep timer, press the Exit button on -screen menu is displayed. From the TIMERS menu, use the Up/Down Arrow buttons on the remote. When you have finished setting the auto power off while audio is no signal, change the setting to highlight Auto Power Off. 2. Press the OK... you want the sleep timer to Off. 4. Sleep Timer Auto Power Off Blank Screen Off 10 Minutes 3. Use the Left/Right Arrow buttons on the remote to turn off after a set period of time after 10 minutes without a video or audio signal. From the TIMERS menu, use the Blank Screen feature...
User Manual
Page 28
... area with different channels requires the TV to highlight the channel and press OK. Highlight Done and press OK. 3. Press the Exit button on the remote. 3 Test 3 4 Test 4 28 A new channel scan will clear all of each channel you wish to remove, press the Exit button on the... remote. The SKIP CHANNEL menu is canceled, the channels that were already discovered are too weak to watch comfortably. For each channel you may find that ...
... area with different channels requires the TV to highlight the channel and press OK. Highlight Done and press OK. 3. Press the Exit button on the remote. 3 Test 3 4 Test 4 28 A new channel scan will clear all of each channel you wish to remove, press the Exit button on the... remote. The SKIP CHANNEL menu is canceled, the channels that were already discovered are too weak to watch comfortably. For each channel you may find that ...
User Manual
Page 29
... Audio Programming. Mono 3. The Analog Audio Language feature only works when the program being viewed is displayed. Press the Exit button on the remote. To use the Analog Audio feature: 1. Not all programs are broadcast in more than one language. The DIGITAL LANGUAGE menu is displayed. ...Audio feature allows you to listen to audio in an alternate language using Secondary Audio Programming (SAP). Press the Exit button on the remote. 3 29 From the Channels menu, highlight Analog Audio and press OK. Stereo 2. Select Stereo, SAP (secondary audio SAP programming), or Mono...
... Audio Programming. Mono 3. The Analog Audio Language feature only works when the program being viewed is displayed. Press the Exit button on the remote. To use the Analog Audio feature: 1. Not all programs are broadcast in more than one language. The DIGITAL LANGUAGE menu is displayed. ...Audio feature allows you to listen to audio in an alternate language using Secondary Audio Programming (SAP). Press the Exit button on the remote. 3 29 From the Channels menu, highlight Analog Audio and press OK. Stereo 2. Select Stereo, SAP (secondary audio SAP programming), or Mono...
User Manual
Page 30
... The PARENTAL CONTROLS menu only appears when: • You are finished adjusting the rating level blocks, press the Exit button on the remote to block certain programs from displaying certain channels or programs without a password. Enter your TV signals, such as when you may wish ...select On. 5. To block or unblock content by Rating A channel may not want to block or unblock, use the Arrow buttons on the remote. 30 Other devices have a device connected using an antenna for mature audiences. Canadian French television program broadcasts. 2. Press the Menu button on ...
... The PARENTAL CONTROLS menu only appears when: • You are finished adjusting the rating level blocks, press the Exit button on the remote to block certain programs from displaying certain channels or programs without a password. Enter your TV signals, such as when you may wish ...select On. 5. To block or unblock content by Rating A channel may not want to block or unblock, use the Arrow buttons on the remote. 30 Other devices have a device connected using an antenna for mature audiences. Canadian French television program broadcasts. 2. Press the Menu button on ...


