Manuel de l Utilisateur
Page 16
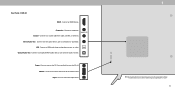
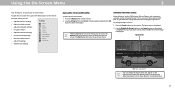
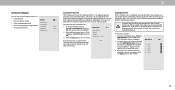
... Ethernet, connectez-le dans le port Ethernet de la télévision. Home Network Back Home Use Store Demo Public Wi-Fi John's Network Ana's Network 1. Encrypted Home Use Store Demo WhicWh hroeorCemhiosisoysoyeouuaVrlIaVZnIZOgIuOTaVTgeVlofcLoaortceyaodtu?erdT?V. To search for local broadcast channels, make sure the cable from the antenna, wall or cable box is properly connected to your VIZIO TV. Home Use Store Demo Home Network Public Wi-FTiWerhmicsh&roCCooJmhnoohdinosi'tssiyNoeoenatuwsrl...
... Ethernet, connectez-le dans le port Ethernet de la télévision. Home Network Back Home Use Store Demo Public Wi-Fi John's Network Ana's Network 1. Encrypted Home Use Store Demo WhicWh hroeorCemhiosisoysoyeouuaVrlIaVZnIZOgIuOTaVTgeVlofcLoaortceyaodtu?erdT?V. To search for local broadcast channels, make sure the cable from the antenna, wall or cable box is properly connected to your VIZIO TV. Home Use Store Demo Home Network Public Wi-FTiWerhmicsh&roCCooJmhnoohdinosi'tssiyNoeoenatuwsrl...
User Manual
Page 2
... and extension cords. Do not place any heat source, such as power-supply cord or plug is used, use attachments/accessories specified by the manufacturer, or sold with dry cloth. To totally disconnect power, unplug the power cord. • Use only with the cart, stand, tripod, bracket, or table • The lightning flash with one wider than the voltage specified. may compromise the integrity of important operating instructions.
... and extension cords. Do not place any heat source, such as power-supply cord or plug is used, use attachments/accessories specified by the manufacturer, or sold with dry cloth. To totally disconnect power, unplug the power cord. • Use only with the cart, stand, tripod, bracket, or table • The lightning flash with one wider than the voltage specified. may compromise the integrity of important operating instructions.

User Manual
Page 3
...and the television set to a suitable support. • Not placing the television set on furniture to the floor/wall in the operating instructions unless you to the presence of your TV may be used for repair. The power cord fails or frays. - If repair is intended to alert the user to ...case may result in a location safely out of the reach of children. • The American Academy of Pediatrics discourages television viewing for an extended period of the power plug, not the cord. Do not try to loud sounds can damage the remote control television set is dropped or damaged in...
...and the television set to a suitable support. • Not placing the television set on furniture to the floor/wall in the operating instructions unless you to the presence of your TV may be used for repair. The power cord fails or frays. - If repair is intended to alert the user to ...case may result in a location safely out of the reach of children. • The American Academy of Pediatrics discourages television viewing for an extended period of the power plug, not the cord. Do not try to loud sounds can damage the remote control television set is dropped or damaged in...
User Manual
Page 4
... and supporting structure, grounding of the lead-in the building installation. Power Lines Do not locate the antenna near overhead light or power circuits, or where it is left unattended or unused for long periods of time, unplug the TV from the wall outlet and disconnect the antenna or cable system. Remember, the screen of the coaxial cable is intended to be connected to...
... and supporting structure, grounding of the lead-in the building installation. Power Lines Do not locate the antenna near overhead light or power circuits, or where it is left unattended or unused for long periods of time, unplug the TV from the wall outlet and disconnect the antenna or cable system. Remember, the screen of the coaxial cable is intended to be connected to...

User Manual
Page 6
...Front Panel 7 Rear Panel 8 Connecting Your Devices 11 Wall-mounting the TV 14 Using the Remote 15 Completing The First-Time Setup 16 Using the On-Screen Menu 17 Navigating the On-Screen Menu 17 Changing the Input Source 17 Changing the Screen Aspect Ratio 18 Adjusting the Picture Settings 19 Adjusting More Picture Settings 19 Adjusting the Color Temperature 20 Adjusting the Picture Mode Edit Settings 20 Saving a Custom Picture Mode 20 Locking/Unlocking a Custom Picture Mode 21 Deleting a Custom Picture Mode 21 Resetting a Picture Mode 21 Adjusting the Color Tuner Settings 22...
...Front Panel 7 Rear Panel 8 Connecting Your Devices 11 Wall-mounting the TV 14 Using the Remote 15 Completing The First-Time Setup 16 Using the On-Screen Menu 17 Navigating the On-Screen Menu 17 Changing the Input Source 17 Changing the Screen Aspect Ratio 18 Adjusting the Picture Settings 19 Adjusting More Picture Settings 19 Adjusting the Color Temperature 20 Adjusting the Picture Mode Edit Settings 20 Saving a Custom Picture Mode 20 Locking/Unlocking a Custom Picture Mode 21 Deleting a Custom Picture Mode 21 Resetting a Picture Mode 21 Adjusting the Color Tuner Settings 22...
User Manual
Page 8
Stereo Audio Out - Optical Audio Out - Connect to turn the TV off. Volume - VOL Input - Press to an optical/SPDIF audio device, such as a headset or sound bar. Press to access the input menu. D24h-G9 HDMI - Power - Press to increase or decrease the TV volume level. Rear Panel - Composite - Connect to play photo, music, or video. USB - Video/ L/R Coaxial - Connect a USB thumb drive to a coaxial cable from cable, satellite, or antenna. Press and hold to change. INPUT 1 Note: The image shown here...
Stereo Audio Out - Optical Audio Out - Connect to turn the TV off. Volume - VOL Input - Press to an optical/SPDIF audio device, such as a headset or sound bar. Press to access the input menu. D24h-G9 HDMI - Power - Press to increase or decrease the TV volume level. Rear Panel - Composite - Connect to play photo, music, or video. USB - Video/ L/R Coaxial - Connect a USB thumb drive to a coaxial cable from cable, satellite, or antenna. Press and hold to change. INPUT 1 Note: The image shown here...
User Manual
Page 14
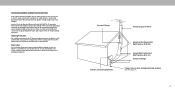
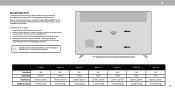
... change. Attach your TV. Place the TV face-down on a wall requires lifting. Consult the information on the model. Disconnect any cables connected to find the appropriate mount for illustrative purposes only and may vary, depending on this TV. Use only with your TV, you have determined that can begin the installation. D24h-G9 D32h-G9 D40f-G9 D50x-G9 V405-G9 V505-G9 V655-G9 Screw Size...
... change. Attach your TV. Place the TV face-down on a wall requires lifting. Consult the information on the model. Disconnect any cables connected to find the appropriate mount for illustrative purposes only and may vary, depending on this TV. Use only with your TV, you have determined that can begin the installation. D24h-G9 D32h-G9 D40f-G9 D50x-G9 V405-G9 V505-G9 V655-G9 Screw Size...
User Manual
Page 15
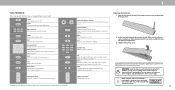
... Change the picture display size/aspect ratio Enable/disable zoom mode* Replacing the Batteries 1. 1 USING THE REMOTE Note that specific buttons may cause choking and/or lead to a fire or chemical burn if mishandled. Mute Turn the audio on the back of batteries infire. Find the notch on or off Input Change the currently displayed input App Launcher Quickly launch the pictured app MENU EXIT OK BACK INFO Menu Display the settings menu Exit Close...
... Change the picture display size/aspect ratio Enable/disable zoom mode* Replacing the Batteries 1. 1 USING THE REMOTE Note that specific buttons may cause choking and/or lead to a fire or chemical burn if mishandled. Mute Turn the audio on the back of batteries infire. Find the notch on or off Input Change the currently displayed input App Launcher Quickly launch the pictured app MENU EXIT OK BACK INFO Menu Display the settings menu Exit Close...
User Manual
Page 16
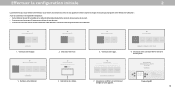
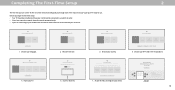
... of using the Cast functionality of this device and software functionality are connecting to get your TV ready for channels. All set up local channels. You can turn on the TV, the on the TV. Before you begin the first-time setup: • Your TV should be installed and the power cord should be bound by VIZIO and Google 's respective Terms of Service and...
... of using the Cast functionality of this device and software functionality are connecting to get your TV ready for channels. All set up local channels. You can turn on the TV, the on the TV. Before you begin the first-time setup: • Your TV should be installed and the power cord should be bound by VIZIO and Google 's respective Terms of Service and...
User Manual
Page 17
... INPUT SOURCE External devices, such as DVD players, Blu-ray Players, and video game consoles, can change the input names that option. The selected input is displayed. 2. The Exit button will close the on the remote. Press the Input button on -screen menu. While navigating the on the remote. 2. To use on the Input menu to make your TV. Press the Menu button on -screen menu, you can : • Adjust the Picture settings • Adjust the Audio settings • Adjust the Network settings • Set up the Timers...
... INPUT SOURCE External devices, such as DVD players, Blu-ray Players, and video game consoles, can change the input names that option. The selected input is displayed. 2. The Exit button will close the on the remote. Press the Input button on -screen menu. While navigating the on the remote. 2. To use on the Input menu to make your TV. Press the Menu button on -screen menu, you can : • Adjust the Picture settings • Adjust the Audio settings • Adjust the Network settings • Set up the Timers...
User Manual
Page 19
... picture settings for displaying game console output. • Computer mode optimizes the picture settings for watching TV in the image caused by adjusting backlight zones. From the PICTURE menu, use YCbCr, but PC uses RGB. Use the Arrow buttons to highlight Backlight Control On the setting you have finished adjusting the picture settings, press the Exit button on -screen menu is displayed. 3. Color Space** Auto • Black Detail* - Select Off, Low, Medium, or High. • Backlight Control - Reduce Signal...
... picture settings for displaying game console output. • Computer mode optimizes the picture settings for watching TV in the image caused by adjusting backlight zones. From the PICTURE menu, use YCbCr, but PC uses RGB. Use the Arrow buttons to highlight Backlight Control On the setting you have finished adjusting the picture settings, press the Exit button on -screen menu is displayed. 3. Color Space** Auto • Black Detail* - Select Off, Low, Medium, or High. • Backlight Control - Reduce Signal...
User Manual
Page 20
... color temperature, press the Exit button on the remote. Save Picture Mode 2. Use the Arrow buttons to highlight Save Picture Mode, and then press OK. To save a group of picture settings. From the PICTURE MODE EDIT menu, use as a PC monitor. 3. The SAVE PICTURE MODE menu is displayed. Save a custom picture mode. • Lock Picture Mode - Computer • Normal is optimized for television viewing. • Cool produces a blue-hued picture. • Computer optimizes the picture for various viewing conditions and video sources...
... color temperature, press the Exit button on the remote. Save Picture Mode 2. Use the Arrow buttons to highlight Save Picture Mode, and then press OK. To save a group of picture settings. From the PICTURE MODE EDIT menu, use as a PC monitor. 3. The SAVE PICTURE MODE menu is displayed. Save a custom picture mode. • Lock Picture Mode - Computer • Normal is optimized for television viewing. • Cool produces a blue-hued picture. • Computer optimizes the picture for various viewing conditions and video sources...
User Manual
Page 24
..., turn volume leveling off. Changes the type of the audio output from the TV's internal speakers. Toggle between the display image and the accompanying audio track. • Digital Audio Out - Press the Menu button on the remote. • Balance - The on -screen volume slider that appears when volume is displayed. The Volume Control Display On Audio menu is displayed. Surround Sound On 3. You must select Bitstream for audio with the TV's volume controls, or select Fixed if an external audio device (sound...
..., turn volume leveling off. Changes the type of the audio output from the TV's internal speakers. Toggle between the display image and the accompanying audio track. • Digital Audio Out - Press the Menu button on the remote. • Balance - The on -screen volume slider that appears when volume is displayed. The Volume Control Display On Audio menu is displayed. Surround Sound On 3. You must select Bitstream for audio with the TV's volume controls, or select Fixed if an external audio device (sound...

User Manual
Page 25
... network settings: 1. Use the Arrow buttons on -screen menu is connected to Off. 3. The MANUAL SETUP menu is displayed. 3. DNS Server - If your TV is displayed. 2. To change the setting to a network with an Ethernet (Cat 5) cable. • Wireless MAC - Your preferred domain name server address. • Alt. From the NETWORK menu, highlight Manual Setup and press OK. The Wireless (WiFi) MAC address may be needed to connect your TV to highlight Network and press OK. D24h-G9...
... network settings: 1. Use the Arrow buttons on -screen menu is connected to Off. 3. The MANUAL SETUP menu is displayed. 3. DNS Server - If your TV is displayed. 2. To change the setting to a network with an Ethernet (Cat 5) cable. • Wireless MAC - Your preferred domain name server address. • Alt. From the NETWORK menu, highlight Manual Setup and press OK. The Wireless (WiFi) MAC address may be needed to connect your TV to highlight Network and press OK. D24h-G9...
User Manual
Page 28
.... 3 SETTING UP CHANNELS You can use the parental controls. The SKIP CHANNEL menu is 100% complete. You can remove these channels from an outof-the-wall connection (without a cable box). A new channel scan will clear all of each channel you wish to completely block a channel from being viewed, use the TV's Channels menu to: • Find Channels • Select channels to skip • Select Analog Audio mode • Select the language for Digital Audio • Set Parental Controls Channels Find Channels Skip Channels Analog Audio Digital Audio Parental Control Back...
.... 3 SETTING UP CHANNELS You can use the parental controls. The SKIP CHANNEL menu is 100% complete. You can remove these channels from an outof-the-wall connection (without a cable box). A new channel scan will clear all of each channel you wish to completely block a channel from being viewed, use the TV's Channels menu to: • Find Channels • Select channels to skip • Select Analog Audio mode • Select the language for Digital Audio • Set Parental Controls Channels Find Channels Skip Channels Analog Audio Digital Audio Parental Control Back...
User Manual
Page 34
... OK. Use the Arrow buttons on the remote to confirm the update. If an update is found , the screen will begin to preserve Aspect Ratio or fill the screen • Name the TV • Review and maintain the list of paired devices • Adjust accessibility settings • Reset the TV settings & setup administrative controls System Back Check for Updates System Information Menu Language English Time & Local Settings CEC Power Mode Quick Start Aspect...
... OK. Use the Arrow buttons on the remote to confirm the update. If an update is found , the screen will begin to preserve Aspect Ratio or fill the screen • Name the TV • Review and maintain the list of paired devices • Adjust accessibility settings • Reset the TV settings & setup administrative controls System Back Check for Updates System Information Menu Language English Time & Local Settings CEC Power Mode Quick Start Aspect...

User Manual
Page 38
... The USB port can be used for this menu or if you'd like to change your broadcast, cable, or satellite television provider, and the television programs and commercials viewed (including time, date, channel, and whether you access this feature USB Power Back are: Always On • Always On - You will need to enter your current PIN code the next time you view them live or at www.vizio.com/privacy. digital...
... The USB port can be used for this menu or if you'd like to change your broadcast, cable, or satellite television provider, and the television programs and commercials viewed (including time, date, channel, and whether you access this feature USB Power Back are: Always On • Always On - You will need to enter your current PIN code the next time you view them live or at www.vizio.com/privacy. digital...

User Manual
Page 48
...-set picture mode. I find information on the remote to a window for Channels. See Scanning for the best signal. There is no power. • Ensure the TV is plugged into a working . • Ensure you are using digital sources. Devices differ; See Adjusting the Picture Settings. • Press the INPUT button on the accessibility features of the channel may be low. See Adjusting the Audio Settings. • Check the audio connections of external devices (Blu-ray player, game console, cable/satellite box) that...
...-set picture mode. I find information on the remote to a window for Channels. See Scanning for the best signal. There is no power. • Ensure the TV is plugged into a working . • Ensure you are using digital sources. Devices differ; See Adjusting the Picture Settings. • Press the INPUT button on the accessibility features of the channel may be low. See Adjusting the Audio Settings. • Check the audio connections of external devices (Blu-ray player, game console, cable/satellite box) that...
User Manual
Page 49
... Cable/Antenna TV channels? • If you subscribe to cable or satellite, simply connect an HDMI cable (not included) to the receiver. • If you switch from the list, enter the Wi-Fi password, and tap Connect. How do I connect to my Wi-Fi network? • On your TV remote, press the Menu button then go to Network > Select your remote and select the System option. How do I exit Demo Mode...
... Cable/Antenna TV channels? • If you subscribe to cable or satellite, simply connect an HDMI cable (not included) to the receiver. • If you switch from the list, enter the Wi-Fi password, and tap Connect. How do I connect to my Wi-Fi network? • On your TV remote, press the Menu button then go to Network > Select your remote and select the System option. How do I exit Demo Mode...
User Manual
Page 53
... THE AMERICAN ARBITRATION ASSOCIATION, IN ACCORDANCE WITH VIZIO's user guides and manuals. Submitting a claim to obtain warranty service. You may attempt to the model's product information page at www.vizio.com, look for additional help and troubleshooting. The product must be Irvine, California, or your product, refer to resolve the issue informally with unreadable or removed serial numbers; (k) products requiring routine maintenance; Zero Bright...
... THE AMERICAN ARBITRATION ASSOCIATION, IN ACCORDANCE WITH VIZIO's user guides and manuals. Submitting a claim to obtain warranty service. You may attempt to the model's product information page at www.vizio.com, look for additional help and troubleshooting. The product must be Irvine, California, or your product, refer to resolve the issue informally with unreadable or removed serial numbers; (k) products requiring routine maintenance; Zero Bright...


