Camera Manual
Page 1
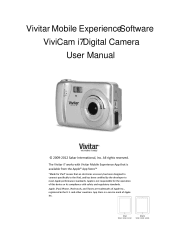
Apple, iPad, iPhone, iPod touch, and iTunes are trademarks of this device or its compliance with Vivitar Mobile Experience App that is a service mark of Apple Inc. The Vivitar i7 works with safety and regulatory standards. Apple is not responsible for iPad" means that an electronic accessory has been designed ...is available from the Apple® App Store™ "Made for the operation of Apple Inc., registered in the U.S. and other countries. Vivitar Mobile Experience Software ViviCam i7Digital Camera User Manual © 2009-2012 Sakar International, Inc. All rights reserved.
Apple, iPad, iPhone, iPod touch, and iTunes are trademarks of this device or its compliance with Vivitar Mobile Experience App that is a service mark of Apple Inc. The Vivitar i7 works with safety and regulatory standards. Apple is not responsible for iPad" means that an electronic accessory has been designed ...is available from the Apple® App Store™ "Made for the operation of Apple Inc., registered in the U.S. and other countries. Vivitar Mobile Experience Software ViviCam i7Digital Camera User Manual © 2009-2012 Sakar International, Inc. All rights reserved.
Camera Manual
Page 2
... ...3 TRANSFERRING YOUR PHOTOS FROM THE CAMERA TO AN IPAD ...4 USING THE VIVITAR MOBILE EXPERIENCE APPLICATION...7 Part 2: ViviCam i7 Digital Camera ...17 INTRODUCTION ...17 WHAT'S INCLUDED...18 PARTS OF THE CAMERA ...19 INITIAL CAMERA SETUP ...20 MAIN CAMERA MODES ...25 CAMERA TECHNICAL SPECIFICATIONS ...26 SYSTEM REQUIREMENTS...27 POWERING THE CAMERA ON/OFF ...28 CHANGING CAMERA MODE ...29 NAVIGATING THE MENUS ...30...
... ...3 TRANSFERRING YOUR PHOTOS FROM THE CAMERA TO AN IPAD ...4 USING THE VIVITAR MOBILE EXPERIENCE APPLICATION...7 Part 2: ViviCam i7 Digital Camera ...17 INTRODUCTION ...17 WHAT'S INCLUDED...18 PARTS OF THE CAMERA ...19 INITIAL CAMERA SETUP ...20 MAIN CAMERA MODES ...25 CAMERA TECHNICAL SPECIFICATIONS ...26 SYSTEM REQUIREMENTS...27 POWERING THE CAMERA ON/OFF ...28 CHANGING CAMERA MODE ...29 NAVIGATING THE MENUS ...30...
Camera Manual
Page 3
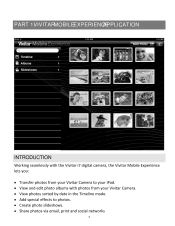
View photos sorted by date in the Timeline mode. Create photo slideshows. Share photos via email, print and social networks 3 View and edit photo albums with the Vivitar i7 digital camera, the Vivitar Mobile Experience lets you Transfer photos from your Vivitar Camera. PART 1: VIVITARMOBILEEXPERIENCE APPLICATION INTRODUCTION Working seamlessly with photos from your Vivitar Camera to photos. Add special effects to your iPad.
View photos sorted by date in the Timeline mode. Create photo slideshows. Share photos via email, print and social networks 3 View and edit photo albums with the Vivitar i7 digital camera, the Vivitar Mobile Experience lets you Transfer photos from your Vivitar Camera. PART 1: VIVITARMOBILEEXPERIENCE APPLICATION INTRODUCTION Working seamlessly with photos from your Vivitar Camera to photos. Add special effects to your iPad.
Camera Manual
Page 4
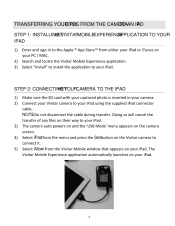
... 'USB Mode' menu appears on your iPad. Select Allow from the Vivitar Mobile window that appears on the camera screen. NOTE : Do not disconnect the cable during transfer. The Vivitar Mobile Experience application automatically launches on their way to your camera. Connect your Vivitar camera to your iPad. 3) 4) 5) 4 Doing so will cancel the transfer of any...
... 'USB Mode' menu appears on your iPad. Select Allow from the Vivitar Mobile window that appears on the camera screen. NOTE : Do not disconnect the cable during transfer. The Vivitar Mobile Experience application automatically launches on their way to your camera. Connect your Vivitar camera to your iPad. 3) 4) 5) 4 Doing so will cancel the transfer of any...
Camera Manual
Page 5
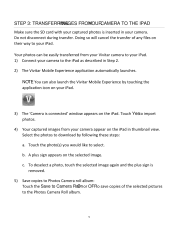
... captured images from your Vivitar camera to the iPad as described in Step 2. 2) The Vivitar Mobile Experience application automatically launches. Touch the photo(s) you would like to download by touching the application icon on your camera to your iPad. 1) Connect your iPad. 3) The 'Camera is connected' window appears...on the selected image. Doing so will cancel the transfer of the selected pictures to the Photos Camera Roll album. 5 Your photos can also launch the Vivitar Mobile Experience by following these steps: a. c. NOTE : You can be easily transferred from your iPad.
... captured images from your Vivitar camera to the iPad as described in Step 2. 2) The Vivitar Mobile Experience application automatically launches. Touch the photo(s) you would like to download by touching the application icon on your camera to your iPad. 1) Connect your iPad. 3) The 'Camera is connected' window appears...on the selected image. Doing so will cancel the transfer of the selected pictures to the Photos Camera Roll album. 5 Your photos can also launch the Vivitar Mobile Experience by following these steps: a. c. NOTE : You can be easily transferred from your iPad.
Camera Manual
Page 6
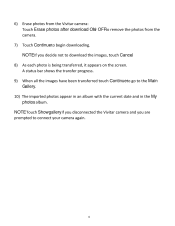
Touch Continueto begin downloading. A status bar shows the transfer progress. 6) Erase photos from the Vivitar camera: Touch Erase photos after download ON or OFFto remove the photos from the camera. NOTE : Touch Showgallery if you disconnected the Vivitar camera and you decide not to download the images, touch Cancel . 7) 8) As each photo is being transferred, it... an album with the current date and in the My photos album. When all the images have been transferred touch Continueto go to connect your camera again. 6
Touch Continueto begin downloading. A status bar shows the transfer progress. 6) Erase photos from the Vivitar camera: Touch Erase photos after download ON or OFFto remove the photos from the camera. NOTE : Touch Showgallery if you disconnected the Vivitar camera and you decide not to download the images, touch Cancel . 7) 8) As each photo is being transferred, it... an album with the current date and in the My photos album. When all the images have been transferred touch Continueto go to connect your camera again. 6
Camera Manual
Page 7
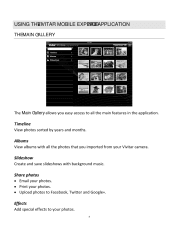
Share photos Email your photos. Print your photos. 7 Effects Add special effects to your photos. Upload photos to all the photos that you easy access to Facebook, Twitter and Google+. Timeline View photos sorted by years and months. Slideshow Create and save slideshows with all the main features in the application. USING THE VIVITAR MOBILE EXPERIE NCE APPLICATION THEMAIN G ALLERY The Main G allery allows you imported from your Vivitar camera. Albums View albums with background music.
Share photos Email your photos. Print your photos. 7 Effects Add special effects to your photos. Upload photos to all the photos that you easy access to Facebook, Twitter and Google+. Timeline View photos sorted by years and months. Slideshow Create and save slideshows with all the main features in the application. USING THE VIVITAR MOBILE EXPERIE NCE APPLICATION THEMAIN G ALLERY The Main G allery allows you imported from your Vivitar camera. Albums View albums with background music.
Camera Manual
Page 8
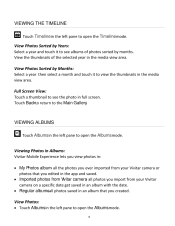
... to open the Albums mode. Touch Backto return to view the thumbnails in the media view area. all the photos you ever imported from your Vivitar camera on a specific date get saved in an album with the date. Regular albums - all photos saved in an album that you import from ...your Vivitar camera or photos that you view photos in: My Photos album - VIEWING THE TIMELINE : Touch Timeline in the left pane to see albums of ...
... to open the Albums mode. Touch Backto return to view the thumbnails in the media view area. all the photos you ever imported from your Vivitar camera on a specific date get saved in an album with the date. Regular albums - all photos saved in an album that you import from ...your Vivitar camera or photos that you view photos in: My Photos album - VIEWING THE TIMELINE : Touch Timeline in the left pane to see albums of ...
Camera Manual
Page 9
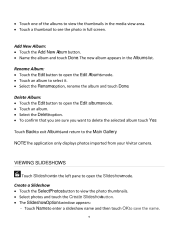
... New Album: Touch the Add New A lbum button. Name the album and touch Done. NOTE : The application only displays photos imported from your Vivitar camera. Touch Name to the Main Gallery . Delete Album: Touch the Edit button to open the Edit A lbums mode. Touch an album to open the...
... New Album: Touch the Add New A lbum button. Name the album and touch Done. NOTE : The application only displays photos imported from your Vivitar camera. Touch Name to the Main Gallery . Delete Album: Touch the Edit button to open the Edit A lbums mode. Touch an album to open the...

Camera Manual
Page 11
... into the selected social network to Social Networks - NOTE : To cancel and exit the Print options, touch the SharePhotosbutton. Save to Camera Roll: Touch the SelectPhotosbutton from the Main Galleryto view the photo thumbnails. Touch a photo thumbnail to its documentation.... photo thumbnail to select it . When you are saved to AirPrint enabled printers. If you have finished selecting your iPad's Photos Camera Roll album. NOTE : The application prints wirelessly to your photos, touch Share Photos then select the Print option. Select a printer...
... into the selected social network to Social Networks - NOTE : To cancel and exit the Print options, touch the SharePhotosbutton. Save to Camera Roll: Touch the SelectPhotosbutton from the Main Galleryto view the photo thumbnails. Touch a photo thumbnail to its documentation.... photo thumbnail to select it . When you are saved to AirPrint enabled printers. If you have finished selecting your iPad's Photos Camera Roll album. NOTE : The application prints wirelessly to your photos, touch Share Photos then select the Print option. Select a printer...

Camera Manual
Page 13
The Exposureeffect adjusts the exposure setting for an image by mimicking a camera's F-stop adjustment. Exposurevalue: Move the Exposurevalue slider to the right to brighten the photo by Fstops (exposure values). Gamma A djust Touch GammaAdjust. Adjusting the ...
The Exposureeffect adjusts the exposure setting for an image by mimicking a camera's F-stop adjustment. Exposurevalue: Move the Exposurevalue slider to the right to brighten the photo by Fstops (exposure values). Gamma A djust Touch GammaAdjust. Adjusting the ...

Camera Manual
Page 17
Important: After installing, your camera. Everything you for normal use by selecting the "Format Memory Card" camera menu option. Please read this digital camera. NOTE : Your camera needs an SD Memory card (up to 32GB) for purchasing this manual carefully first in order to get the most out of your digital camera. SD Memory cards are not included and need to take quality digital photos is included with your must format the SD Memory Card before first use . PART2: VIVICAMi7 DIGITAL CAMERA ViviCam i7 INTRODUCTION Thank you need to be purchased separately. 17
Important: After installing, your camera. Everything you for normal use by selecting the "Format Memory Card" camera menu option. Please read this digital camera. NOTE : Your camera needs an SD Memory card (up to 32GB) for purchasing this manual carefully first in order to get the most out of your digital camera. SD Memory cards are not included and need to take quality digital photos is included with your must format the SD Memory Card before first use . PART2: VIVICAMi7 DIGITAL CAMERA ViviCam i7 INTRODUCTION Thank you need to be purchased separately. 17
Camera Manual
Page 18
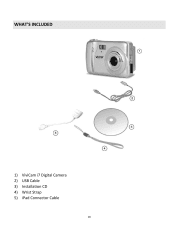
WHAT'S INCLUDED 1) 2) 3) 4) 5) ViviCam i7 Digital Camera USB Cable Installation CD Wrist Strap iPad Connector Cable 18
WHAT'S INCLUDED 1) 2) 3) 4) 5) ViviCam i7 Digital Camera USB Cable Installation CD Wrist Strap iPad Connector Cable 18

Camera Manual
Page 19
PARTS OF THE CAMERA 1) 2) 3) 4) 5) 6) 7) 8) 9) 10) 11) Power Button Shutter Button LCD Screen W / Zoom Out T / Zoom In LED Light MODE Button SET (Menu / OK) Button Scene / Left Button Flash / Up / Slide Show Button Delete / Right Button 12) 13) 14) 15) 16) 17) 18) 19) 20) 21) 22) 23) ViviLink / Down Button Speaker Flash Digital Lens SD Memory Card Slot USB Port MACRO Switch Battery Compartment Tripod Mount Wrist Strap Connector Microphone Self-Timer LED Indicator 19
PARTS OF THE CAMERA 1) 2) 3) 4) 5) 6) 7) 8) 9) 10) 11) Power Button Shutter Button LCD Screen W / Zoom Out T / Zoom In LED Light MODE Button SET (Menu / OK) Button Scene / Left Button Flash / Up / Slide Show Button Delete / Right Button 12) 13) 14) 15) 16) 17) 18) 19) 20) 21) 22) 23) ViviLink / Down Button Speaker Flash Digital Lens SD Memory Card Slot USB Port MACRO Switch Battery Compartment Tripod Mount Wrist Strap Connector Microphone Self-Timer LED Indicator 19

Camera Manual
Page 20
... INSTALLING THE BATTER IES Make sure the batteries have been inserted properly into your digital camera, according to the polarity shown inside the battery compartment. NOTE : Remove the batteries from the camera when not in use for an extended period. Do not mix alkaline and non-alkaline batteries. Rechargeable... Flash, will not work if the battery power level is low. When the battery power is low the battery icon turns red and the camera will automatically turn off a few seconds later. See illustration above.
... INSTALLING THE BATTER IES Make sure the batteries have been inserted properly into your digital camera, according to the polarity shown inside the battery compartment. NOTE : Remove the batteries from the camera when not in use for an extended period. Do not mix alkaline and non-alkaline batteries. Rechargeable... Flash, will not work if the battery power level is low. When the battery power is low the battery icon turns red and the camera will automatically turn off a few seconds later. See illustration above.

Camera Manual
Page 21
SD Memory card not included. Make sure an SD card has been properly inserted into the slot in the direction shown on the camera (see SD icon by selecting the "Format Memory Card" camera menu option. Important: After installing, your camera. Push the SD card until you hear a slight clicking sound. To properly insert the SD Card: Push the SD card into your must format the SD Memory Card before first use . This indicates the SD card has been inserted correctly. 21 INSTALLING THE MICROSD MEMORY CARD An SD Memory card (up to 32GB) is needed for normal use by the SD card slot).
SD Memory card not included. Make sure an SD card has been properly inserted into the slot in the direction shown on the camera (see SD icon by selecting the "Format Memory Card" camera menu option. Important: After installing, your camera. Push the SD card until you hear a slight clicking sound. To properly insert the SD Card: Push the SD card into your must format the SD Memory Card before first use . This indicates the SD card has been inserted correctly. 21 INSTALLING THE MICROSD MEMORY CARD An SD Memory card (up to 32GB) is needed for normal use by the SD card slot).

Camera Manual
Page 22
TURNING ON THE CAMER A Press the Power button to the SD card. If the SD card is locked this will appear on the side of the SD card). If you do not see the SD icon on the display, please check if the card was inserted properly. Make sure the SD card is not locked (check the lock switch on the LCD display. NOTE : After the camera is powered on, an SD icon will prevent the camera from saving captured photos to turn on the camera. 22
TURNING ON THE CAMER A Press the Power button to the SD card. If the SD card is locked this will appear on the side of the SD card). If you do not see the SD icon on the display, please check if the card was inserted properly. Make sure the SD card is not locked (check the lock switch on the LCD display. NOTE : After the camera is powered on, an SD icon will prevent the camera from saving captured photos to turn on the camera. 22
Camera Manual
Page 23
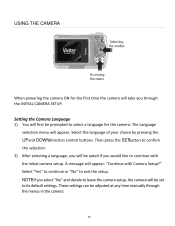
...setup. Select the language of your choice by pressing the UPand DOWNdirection control buttons. A message will appear: "Continue with the initial camera setup. Then press the SET button to confirm the selection. 2) After selecting a language, you select "No" and decide to leave the... camera setup, the camera will be adjusted at any time manually through the INITIAL CAMERA SETUP. Select "Yes" to continue or "No" to continue with Camera Setup?" USING THE CAMERA When powering the camera ON for the camera. NOTE : If you will be prompted to its...
...setup. Select the language of your choice by pressing the UPand DOWNdirection control buttons. A message will appear: "Continue with the initial camera setup. Then press the SET button to confirm the selection. 2) After selecting a language, you select "No" and decide to leave the... camera setup, the camera will be adjusted at any time manually through the INITIAL CAMERA SETUP. Select "Yes" to continue or "No" to continue with Camera Setup?" USING THE CAMERA When powering the camera ON for the camera. NOTE : If you will be prompted to its...

Camera Manual
Page 24
... and move to choose the default ViviLink social network for Videos. The ViviLink technology allows you to quickly and easily upload your camera's photos and videos to choose the default ViviLink social network for photos and videos taken with your choice with the accompanying software application.... 1) First you will be asked to the social networks of the camera setup. Highlight the desired default social network and press the SET button to confirm the selection. 3) After the ViviLink Video option is...
... and move to choose the default ViviLink social network for Videos. The ViviLink technology allows you to quickly and easily upload your camera's photos and videos to choose the default ViviLink social network for photos and videos taken with your choice with the accompanying software application.... 1) First you will be asked to the social networks of the camera setup. Highlight the desired default social network and press the SET button to confirm the selection. 3) After the ViviLink Video option is...

Camera Manual
Page 25
...the Shutter button to capture videos with your digital camera. After turning on your camera, press the MODEbutton once to capture pictures with your camera. A red record indicator will appear on your camera, press the MODEbutton twice to your camera. The video will be automatically saved to open the...record is powered ON. To access the various menus for photos and videos. You can switch modes by pressing the MODEbutton on your camera's memory card. The picture will be automatically saved to view, edit or delete them as desired and press the Shutter button. Playback ...
...the Shutter button to capture videos with your digital camera. After turning on your camera, press the MODEbutton once to capture pictures with your camera. A red record indicator will appear on your camera, press the MODEbutton twice to your camera. The video will be automatically saved to open the...record is powered ON. To access the various menus for photos and videos. You can switch modes by pressing the MODEbutton on your camera's memory card. The picture will be automatically saved to view, edit or delete them as desired and press the Shutter button. Playback ...


