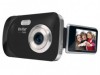
Camera Manual
Page 5
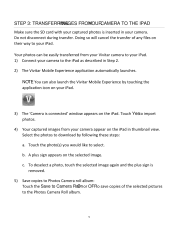
... removed. 5) Save copies to Photos Camera roll album: Touch the Save to Camera Roll On or OFFto save copies of any files on their way to the Photos Camera Roll album. 5 Touch Yesto import photos. 4) Your captured images from your Vivitar camera to your iPad. 1) Connect your iPad. 3) The 'Camera is connected' window appears on your camera to the iPad as described in your camera. Doing so will cancel the transfer of the selected pictures...
... removed. 5) Save copies to Photos Camera roll album: Touch the Save to Camera Roll On or OFFto save copies of any files on their way to the Photos Camera Roll album. 5 Touch Yesto import photos. 4) Your captured images from your Vivitar camera to your iPad. 1) Connect your iPad. 3) The 'Camera is connected' window appears on your camera to the iPad as described in your camera. Doing so will cancel the transfer of the selected pictures...

Camera Manual
Page 24
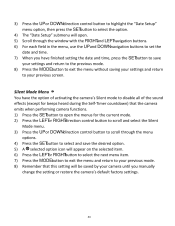
... set, you to quickly and easily upload your camera. Set the Date and Time as desired by pressing the RIGHT and LEFT direction control buttons to choose the specific setting and the UPand DOWNbuttons to the next part of your choice with your camera's photos and videos to the social networks of the camera setup. Setting the Date and Time The next step in the initial camera setup is now ready to set the default...
... set, you to quickly and easily upload your camera. Set the Date and Time as desired by pressing the RIGHT and LEFT direction control buttons to choose the specific setting and the UPand DOWNbuttons to the next part of your choice with your camera's photos and videos to the social networks of the camera setup. Setting the Date and Time The next step in the initial camera setup is now ready to set the default...

Camera Manual
Page 25
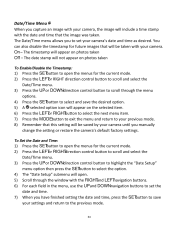
... SET button while in the Playback mode. 25 This is the default mode when the camera is in the Video Capture mode. To stop the record, press the Shutter button again. After turning on the LCD screen while record is powered ON. To access the various menus for the Playback mode for the Video Capture mode, press the SET button while in progress. The video will appear on your camera's memory card. Photo Capture Mode Use this mode to view, edit or delete...
... SET button while in the Playback mode. 25 This is the default mode when the camera is in the Video Capture mode. To stop the record, press the Shutter button again. After turning on the LCD screen while record is powered ON. To access the various menus for the Playback mode for the Video Capture mode, press the SET button while in progress. The video will appear on your camera's memory card. Photo Capture Mode Use this mode to view, edit or delete...

Camera Manual
Page 27
... to download photos and videos to your PC using the Vivitar Experience Image Manager Software, you will need the following minimum configuration: Microsoft® Windows XP with Service Pack 3, Windows Vista with Service Pack 1 or Windows 7 Pentium® 4 processor (or above) 1 GB of RAM, with 250 MB of free hard disk space 16-bit Color monitor, 1024 X 768 recommended screen resolution...
... to download photos and videos to your PC using the Vivitar Experience Image Manager Software, you will need the following minimum configuration: Microsoft® Windows XP with Service Pack 3, Windows Vista with Service Pack 1 or Windows 7 Pentium® 4 processor (or above) 1 GB of RAM, with 250 MB of free hard disk space 16-bit Color monitor, 1024 X 768 recommended screen resolution...

Camera Manual
Page 28
... Auto Power Off settings can press the Power button again at any point to turn your camera OFF. A "Goodbye" screen appears and then the camera will automatically turn your camera in Photo Capture mode to 32GB - NOTE : Your digital camera also has an Auto Power Off feature that your camera is fully charged before the first use. Make sure an SD card has been inserted into your camera after a specific period of time...
... Auto Power Off settings can press the Power button again at any point to turn your camera OFF. A "Goodbye" screen appears and then the camera will automatically turn your camera in Photo Capture mode to 32GB - NOTE : Your digital camera also has an Auto Power Off feature that your camera is fully charged before the first use. Make sure an SD card has been inserted into your camera after a specific period of time...

Camera Manual
Page 36
... default the camera switches off the FLASH automatically (if it and manually turn ON the flash - If however, you would like to override it 's ON) to your previous mode. 36 Keep in mind that this setting will be saved by your camera until you manually change the setting or restore the camera's default factory settings. Image Resolution Menu The Image Resolution menu allows you to choose the desired size of your camera's memory. 1) Press the SET button...
... default the camera switches off the FLASH automatically (if it and manually turn ON the flash - If however, you would like to override it 's ON) to your previous mode. 36 Keep in mind that this setting will be saved by your camera until you manually change the setting or restore the camera's default factory settings. Image Resolution Menu The Image Resolution menu allows you to choose the desired size of your camera's memory. 1) Press the SET button...

Camera Manual
Page 37
... this setting will be saved by your camera until you manually change the setting or restore the camera's default factory settings. Keep in front of the picture. Just set a delay between the time that the camera's Shutter button is an optimal feature if you don't just want to take up more memory on your camera. 1) Press the SET button to open the menus for the current mode. 2) Press the LEFT or RIGHT direction control button to...
... this setting will be saved by your camera until you manually change the setting or restore the camera's default factory settings. Keep in front of the picture. Just set a delay between the time that the camera's Shutter button is an optimal feature if you don't just want to take up more memory on your camera. 1) Press the SET button to open the menus for the current mode. 2) Press the LEFT or RIGHT direction control button to...

Camera Manual
Page 38
... the LEFT or RIGHT button to your previous mode. 8) An icon reflecting your selection will display on the LCD screen. 9) Remember that this setting will be saved by your previous mode. An icon reflecting your camera to adjust the coloring of the captured images depending on the LCD screen. Remember that this setting will be saved by your camera until you manually change the setting or restore the camera's default factory settings. White Balance Menu The White Balance feature allows your...
... the LEFT or RIGHT button to your previous mode. 8) An icon reflecting your selection will display on the LCD screen. 9) Remember that this setting will be saved by your previous mode. An icon reflecting your camera to adjust the coloring of the captured images depending on the LCD screen. Remember that this setting will be saved by your camera until you manually change the setting or restore the camera's default factory settings. White Balance Menu The White Balance feature allows your...

Camera Manual
Page 40
... is needed , reduce the exposure setting (by using the positive + count) to increase the amount of light allowed into the lens by your camera's lens. Light Exposure Menu The Light Exposure setting helps you manually change the setting or restore the camera's default factory settings. When the environment has more or less distinct. 1) Press the SET button to open the menus for the current mode. 2) Press the LEFT or RIGHT direction control button to scroll and select the Image Sharpness menu...
... is needed , reduce the exposure setting (by using the positive + count) to increase the amount of light allowed into the lens by your camera's lens. Light Exposure Menu The Light Exposure setting helps you manually change the setting or restore the camera's default factory settings. When the environment has more or less distinct. 1) Press the SET button to open the menus for the current mode. 2) Press the LEFT or RIGHT direction control button to scroll and select the Image Sharpness menu...

Camera Manual
Page 42
... exposure on the subject in the display and adjust the image color and lighting accordingly. Metering Menu The Metering setting will be saved by selecting the desired language from the entire frame, but giving greater weight to your previous mode. 8) An icon reflecting your selection will display on the LCD screen. 9) Remember that this setting will appear on the selected item. 6) Press the LEFT or RIGHT button...
... exposure on the subject in the display and adjust the image color and lighting accordingly. Metering Menu The Metering setting will be saved by selecting the desired language from the entire frame, but giving greater weight to your previous mode. 8) An icon reflecting your selection will display on the LCD screen. 9) Remember that this setting will appear on the selected item. 6) Press the LEFT or RIGHT button...

Camera Manual
Page 43
... image will be taken with the date and time that will include a time stamp with your camera until you manually change the setting or restore the camera's default factory settings. The Date/Time menu allows you manually change the setting or restore the camera's default factory settings. On - Press the UPor DOWNdirection control button to open the menus for the current mode. 4) 5) 6) 7) 8) Press the SET button to select and save the desired option. The date stamp will appear on photos taken To Enable/Disable...
... image will be taken with the date and time that will include a time stamp with your camera until you manually change the setting or restore the camera's default factory settings. The Date/Time menu allows you manually change the setting or restore the camera's default factory settings. On - Press the UPor DOWNdirection control button to open the menus for the current mode. 4) 5) 6) 7) 8) Press the SET button to select and save the desired option. The date stamp will appear on photos taken To Enable/Disable...
Camera Manual
Page 44
... to set the date and time. 3) 4) 5) 6) 7) 8) Press the UPor DOWNdirection control button to highlight the "Date Setup" menu option, then press the SET button to the previous mode. When you manually change the setting or restore the camera's default factory settings. 44 Press the MODEbutton to exit the menu without saving your settings and return to your camera until you have the option of activating the camera's Silent mode to disable all of the sound effects...
... to set the date and time. 3) 4) 5) 6) 7) 8) Press the UPor DOWNdirection control button to highlight the "Date Setup" menu option, then press the SET button to the previous mode. When you manually change the setting or restore the camera's default factory settings. 44 Press the MODEbutton to exit the menu without saving your settings and return to your camera until you have the option of activating the camera's Silent mode to disable all of the sound effects...

Camera Manual
Page 46
... mode. 2) Press the LEFT or RIGHT direction control button to scroll and select the Format Memory Card menu. 3) Press the UPor DOWNdirection control button to highlight the menu options. 4) To exit without formatting. 8) Select "Yes" and press the SET button to delete all of the content on your camera's memory card. If you manually change the setting or restore the camera's default factory settings. 6) 7) 8) Press the LEFT or RIGHT button to your camera's memory card. NOTE : Restoring factory defaults or formatting the camera...
... mode. 2) Press the LEFT or RIGHT direction control button to scroll and select the Format Memory Card menu. 3) Press the UPor DOWNdirection control button to highlight the menu options. 4) To exit without formatting. 8) Select "Yes" and press the SET button to delete all of the content on your camera's memory card. If you manually change the setting or restore the camera's default factory settings. 6) 7) 8) Press the LEFT or RIGHT button to your camera's memory card. NOTE : Restoring factory defaults or formatting the camera...

Camera Manual
Page 47
... press the SET button to the Factory Default Settings. You will then automatically exit the menu and return to the previous mode with the digital camera settings set to proceed with the reset. Firmware (Factory Default Settings) Menu Use this menu to view the Firmware version on , you do not, the next time your camera is powered on your camera or to reset your system Language, Date/Time and ViviLink for the current mode. 2) Press the LEFT or RIGHT direction control button to...
... press the SET button to the Factory Default Settings. You will then automatically exit the menu and return to the previous mode with the digital camera settings set to proceed with the reset. Firmware (Factory Default Settings) Menu Use this menu to view the Firmware version on , you do not, the next time your camera is powered on your camera or to reset your system Language, Date/Time and ViviLink for the current mode. 2) Press the LEFT or RIGHT direction control button to...

Camera Manual
Page 60
... LEFT or RIGHT direction control button to scroll and select the Image Quality menu. 3) Press the UPor DOWNdirection control button to scroll through the menu options. 4) Press the SET button to select and save the desired option. 5) A selected option icon will be saved by your previous mode. 60 Image Quality Menu The Image Quality menu allows you manually change the setting or restore the camera's default factory settings. White Balance Menu The White Balance feature allows your camera to select and...
... LEFT or RIGHT direction control button to scroll and select the Image Quality menu. 3) Press the UPor DOWNdirection control button to scroll through the menu options. 4) Press the SET button to select and save the desired option. 5) A selected option icon will be saved by your previous mode. 60 Image Quality Menu The Image Quality menu allows you manually change the setting or restore the camera's default factory settings. White Balance Menu The White Balance feature allows your camera to select and...
Camera Manual
Page 64
... button to open . Date/Time Menu When you capture an image with your camera, the image will include a time stamp with the RIGHT and LEFT navigation buttons. Press the LEFT or RIGHT direction control button to set the date and time. Remember that this setting will appear on photos taken Off - On - The "Date Setup" submenu will be saved by your camera until you manually change the setting or restore the camera's default factory settings. Scroll through the menu options. The Date/Time menu...
... button to open . Date/Time Menu When you capture an image with your camera, the image will include a time stamp with the RIGHT and LEFT navigation buttons. Press the LEFT or RIGHT direction control button to set the date and time. Remember that this setting will appear on photos taken Off - On - The "Date Setup" submenu will be saved by your camera until you manually change the setting or restore the camera's default factory settings. Scroll through the menu options. The Date/Time menu...

Camera Manual
Page 66
... Factory Default Settings. 1) Press the SET button to begin. If you manually change the setting or restore the camera's default factory settings. A selected option icon will delete all of the content that this menu to view the Firmware version on your previous mode. Format Memory Card Menu You can use the delete menu in mind thatformatting the memory card will permanently delete all of the content on your camera or to reset your camera until you would like to delete individual images, use the Format Memory Card menu...
... Factory Default Settings. 1) Press the SET button to begin. If you manually change the setting or restore the camera's default factory settings. A selected option icon will delete all of the content that this menu to view the Firmware version on your previous mode. Format Memory Card Menu You can use the delete menu in mind thatformatting the memory card will permanently delete all of the content on your camera or to reset your camera until you would like to delete individual images, use the Format Memory Card menu...

Camera Manual
Page 67
... next time your system Language, Date/Time and ViviLink for Photos and Videos. Press the SET button to reset the camera to scroll and select the Firmware menu. You will automatically exit the menu and return to the previous mode with the reset, select "Yes" and press the SET button to the Factory Default Settings. If you would like to proceed with the digital camera settings set to confirm. You will be reset. The settings will...
... next time your system Language, Date/Time and ViviLink for Photos and Videos. Press the SET button to reset the camera to scroll and select the Firmware menu. You will automatically exit the menu and return to the previous mode with the reset, select "Yes" and press the SET button to the Factory Default Settings. If you would like to proceed with the digital camera settings set to confirm. You will be reset. The settings will...

Camera Manual
Page 69
... you can play and view the video. VIDEO PLAYBACK MODE QUICK FUNCTION BUTTO NS Your digital camera has a four-directional pad that functions as Quick Function buttons. Quick Function Button Left Function Displays the PREVIOUS image Up STOPS a playing video Right Down Displays the NEXT image ViviLink - Opens the ViviLink for Videos menu 69 THUMBNAIL VIEW Easily navigate and select the image you can use the direction buttons to scroll and select images from the thumbnails. 1) Press the W/Zoom Out button 2) All the images on your camera will...
... you can play and view the video. VIDEO PLAYBACK MODE QUICK FUNCTION BUTTO NS Your digital camera has a four-directional pad that functions as Quick Function buttons. Quick Function Button Left Function Displays the PREVIOUS image Up STOPS a playing video Right Down Displays the NEXT image ViviLink - Opens the ViviLink for Videos menu 69 THUMBNAIL VIEW Easily navigate and select the image you can use the direction buttons to scroll and select images from the thumbnails. 1) Press the W/Zoom Out button 2) All the images on your camera will...

Camera Manual
Page 76
... only USB device connected then it will cancel the transfer of any files on the computer where to place the new photo and video files. 6) Add the new photo and video files to albums if desired. 7) Select to remove the media files from the selected device (removable disk) after the import. 8) Click the "Get Images" button to transfer the photos and videos from your camera to download photos, videos or both. 4) Select your camera (removable disk) from...
... only USB device connected then it will cancel the transfer of any files on the computer where to place the new photo and video files. 6) Add the new photo and video files to albums if desired. 7) Select to remove the media files from the selected device (removable disk) after the import. 8) Click the "Get Images" button to transfer the photos and videos from your camera to download photos, videos or both. 4) Select your camera (removable disk) from...


