
V25 Camera Manual
Page 1
Windows and the Windows logo are the property of Microsoft Corporation. ViviCam 25 Digital Camera User‟s Manual © 2010 Sakar International, Inc. All other trademarks are registered trademarks of their respective companies. All rights reserved.
Windows and the Windows logo are the property of Microsoft Corporation. ViviCam 25 Digital Camera User‟s Manual © 2010 Sakar International, Inc. All other trademarks are registered trademarks of their respective companies. All rights reserved.
V25 Camera Manual
Page 2
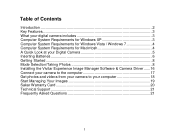
... / Windows 7 4 Computer System Requirements for Macintosh 4 A Quick Look at your Digital Camera 5 Inserting Batteries 6 Getting Started...8 Mode Selection/Taking Photos 8 Installing the Vivitar Experience Image Manager Software & Camera Driver ......16 Connect your camera to the computer 17 Get photos and videos from your camera to your computer 18 Start Managing Your Images 19 Sakar Warranty...
... / Windows 7 4 Computer System Requirements for Macintosh 4 A Quick Look at your Digital Camera 5 Inserting Batteries 6 Getting Started...8 Mode Selection/Taking Photos 8 Installing the Vivitar Experience Image Manager Software & Camera Driver ......16 Connect your camera to the computer 17 Get photos and videos from your camera to your computer 18 Start Managing Your Images 19 Sakar Warranty...

V25 Camera Manual
Page 3
... a constant charge to save the images you have installed the Vivitar Experience Image Manager software and the camera`s driver. Please read this manual carefully FIRST in your camera at this stage will cause the device to not be recognized by the computer and no images will be downloaded. 2 Do ...lost if you replace the batteries before downloading the images to the computer. Important Notice: Please do not plug the camera into the USB port of your digital camera. Download your images as often as possible. Introduction Thank you need to take quality digital photos and videos is ...
... a constant charge to save the images you have installed the Vivitar Experience Image Manager software and the camera`s driver. Please read this manual carefully FIRST in your camera at this stage will cause the device to not be recognized by the computer and no images will be downloaded. 2 Do ...lost if you replace the batteries before downloading the images to the computer. Important Notice: Please do not plug the camera into the USB port of your digital camera. Download your images as often as possible. Introduction Thank you need to take quality digital photos and videos is ...

V25 Camera Manual
Page 4
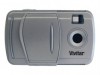
... Up to 120 Photos 1.5 Inch Color LCD monitor Shoots Video Clips 8MB Internal Memory What your digital camera includes Vivitar Experience Image Manager software and driver Installation CD USB cable Strap Manual Computer System Requirements for Windows XP To be able to ...
... Up to 120 Photos 1.5 Inch Color LCD monitor Shoots Video Clips 8MB Internal Memory What your digital camera includes Vivitar Experience Image Manager software and driver Installation CD USB cable Strap Manual Computer System Requirements for Windows XP To be able to ...

V25 Camera Manual
Page 7
Close the battery cover. Important: Do not use rechargeable batteries 6 Insert the batteries according to the polarities (+ and -) indicated on the bottom of the battery cover, also refer to the picture below: 3. Insert the batteries into the camera: 1. Inserting Batteries Your camera requires three AAA Alkaline batteries. Open the cover of the battery compartment on the inside of the camera. 2.
Close the battery cover. Important: Do not use rechargeable batteries 6 Insert the batteries according to the polarities (+ and -) indicated on the bottom of the battery cover, also refer to the picture below: 3. Insert the batteries into the camera: 1. Inserting Batteries Your camera requires three AAA Alkaline batteries. Open the cover of the battery compartment on the inside of the camera. 2.

V25 Camera Manual
Page 8
..., into the computer where you do not intend to use your camera for the computer to avoid battery leakage and corrosion. 7 Note: If you installed the Vivitar Experience Image Manager and the camera`s driver (See the section "Installing the Vivitar Experience Image Manager Software & Camera Driver"). Wait a few seconds for an extended period, download...
..., into the computer where you do not intend to use your camera for the computer to avoid battery leakage and corrosion. 7 Note: If you installed the Vivitar Experience Image Manager and the camera`s driver (See the section "Installing the Vivitar Experience Image Manager Software & Camera Driver"). Wait a few seconds for an extended period, download...

V25 Camera Manual
Page 9
.... 1. Press the Power button to install the Vivitar Experience Software and camera specific driver for this device. When you start taking photos if you need to install the Vivitar Experience Image Manager software and camera specific driver for this device. Mode Selection/Taking ... videos captured with this manual to learn how to install the software before connecting the camera to change the camera settings: 8 See the "Install the Vivitar Experience Image Manager Software" section of this camera you are : PHOTO MODE HIGH RESOLUTION -2.1 Megapixel- 1600x1280 &#...
.... 1. Press the Power button to install the Vivitar Experience Software and camera specific driver for this device. When you start taking photos if you need to install the Vivitar Experience Image Manager software and camera specific driver for this device. Mode Selection/Taking ... videos captured with this manual to learn how to install the software before connecting the camera to change the camera settings: 8 See the "Install the Vivitar Experience Image Manager Software" section of this camera you are : PHOTO MODE HIGH RESOLUTION -2.1 Megapixel- 1600x1280 &#...

V25 Camera Manual
Page 10
LCD DISPLAY LAYOUT The camera has 5 mode options on the screen. 3. Press the Menu button to change the settings in each menu. 4. Use the Shutter button to toggle between the menu icons on the Main Menu: To select the mode and to save your choice. 9 Press the Menu button, the Main Menu screen appears. 2. Use the Left/Right buttons to toggle and select the different submenu features within each mode: 1.
LCD DISPLAY LAYOUT The camera has 5 mode options on the screen. 3. Press the Menu button to change the settings in each menu. 4. Use the Shutter button to toggle between the menu icons on the Main Menu: To select the mode and to save your choice. 9 Press the Menu button, the Main Menu screen appears. 2. Use the Left/Right buttons to toggle and select the different submenu features within each mode: 1.

V25 Camera Manual
Page 11
In order to continue taking photos you attempt to take the photo. 4. Hold the camera steady and press the Shutter button to : 10 The LCD screen will beep when a photo is taken. The camera will display the number of the Preview Screen. 2. If you will need to take a photo when the ... beep 3 times continuously and "Memory is Full" will appear on the LCD screen. Compose your shot using the viewfinder. 3. a camera icon is save as a JPEG file in the camera`s memory 6. Power on top left of photos that can be still taken for a short time after a photo is taken. 5. The photo ...
In order to continue taking photos you attempt to take the photo. 4. Hold the camera steady and press the Shutter button to : 10 The LCD screen will beep when a photo is taken. The camera will display the number of the Preview Screen. 2. If you will need to take a photo when the ... beep 3 times continuously and "Memory is Full" will appear on the LCD screen. Compose your shot using the viewfinder. 3. a camera icon is save as a JPEG file in the camera`s memory 6. Power on top left of photos that can be still taken for a short time after a photo is taken. 5. The photo ...

V25 Camera Manual
Page 12
... button again to save the choice and exit the menu. 4. Download all the photos and videos from you should delete all the images from your camera memory is empty you are now ready to enter the menu. 2. Press the Menu button again to save the choice and exit the menu. 4. After... 10 seconds the photo will emit a beep for every second. The Self-timer icon now appears in the camera‟s memory. 6. 1. Once your camera. 3. Press the Menu button once to take a photo after a 10-second count down. 6. Press the Menu button once to stop the video capture...
... button again to save the choice and exit the menu. 4. Download all the photos and videos from you should delete all the images from your camera memory is empty you are now ready to enter the menu. 2. Press the Menu button again to save the choice and exit the menu. 4. After... 10 seconds the photo will emit a beep for every second. The Self-timer icon now appears in the camera‟s memory. 6. 1. Once your camera. 3. Press the Menu button once to take a photo after a 10-second count down. 6. Press the Menu button once to stop the video capture...

V25 Camera Manual
Page 13
.../AVI) stored on the bottom left corner of the Preview Screen. 4. The sequence number and the total number of files currently stored appear on your camera using the Preview Screen. 1. Press the Shutter button to play the video and press it again to save the choice and exit the menu. 4. Press... the Menu button again to pause. 12 The camera will open and show the last photo or video file that was taken. 3. The 3 Continuous Shots icon now appears in the top left corner of...
.../AVI) stored on the bottom left corner of the Preview Screen. 4. The sequence number and the total number of files currently stored appear on your camera using the Preview Screen. 1. Press the Shutter button to play the video and press it again to save the choice and exit the menu. 4. Press... the Menu button again to pause. 12 The camera will open and show the last photo or video file that was taken. 3. The 3 Continuous Shots icon now appears in the top left corner of...

V25 Camera Manual
Page 16
...once to the photo mode. This will revert to select "Yes" or "No". 5. Delete Photos & Videos To Delete All images on the camera. 6. Press the Menu button to save the setting and exit to enter the menu. 2. Press the Shutter button once for the correct frequency ...according to the electric current frequency in the area where you are: 1. Electric Current Frequency Setting The camera has 2 Frequency settings: ---60 Hz ---50 Hz Set the camera for the delete confirmation screen to appear. 4. If „Yes‟, press the Shutter button to confirm deletion...
...once to the photo mode. This will revert to select "Yes" or "No". 5. Delete Photos & Videos To Delete All images on the camera. 6. Press the Menu button to save the setting and exit to enter the menu. 2. Press the Shutter button once for the correct frequency ...according to the electric current frequency in the area where you are: 1. Electric Current Frequency Setting The camera has 2 Frequency settings: ---60 Hz ---50 Hz Set the camera for the delete confirmation screen to appear. 4. If „Yes‟, press the Shutter button to confirm deletion...

V25 Camera Manual
Page 17
... will be deleted. 3. Energy Saving Mode: To conserve battery power, if the camera is not in use the delete options with caution. Installing the Vivitar Experience Image Manager Software & Camera Driver Warning: Do not plug your camera into the computer until the Vivitar Experience Image Manager software installation is irreversible and the files will automatically...
... will be deleted. 3. Energy Saving Mode: To conserve battery power, if the camera is not in use the delete options with caution. Installing the Vivitar Experience Image Manager Software & Camera Driver Warning: Do not plug your camera into the computer until the Vivitar Experience Image Manager software installation is irreversible and the files will automatically...

V25 Camera Manual
Page 18
Follow all instructions. 5. Connect your computer. The Vivitar Experience Image Manager will automatically turn on your camera to the computer 1. If you closed the application, click on the Vivitar Experience Image Manager desktop icon or run and open the application from the Start...ROM drive. Please wait while the application continues the installation process on your computer. 2. Your camera will begin to your computer. 3. On PC only: Let the "Vivitar Experience Image Manager" installer create the folder to continue. 3. The application automatically opens. 7. Please...
Follow all instructions. 5. Connect your computer. The Vivitar Experience Image Manager will automatically turn on your camera to the computer 1. If you closed the application, click on the Vivitar Experience Image Manager desktop icon or run and open the application from the Start...ROM drive. Please wait while the application continues the installation process on your computer. 2. Your camera will begin to your computer. 3. On PC only: Let the "Vivitar Experience Image Manager" installer create the folder to continue. 3. The application automatically opens. 7. Please...

V25 Camera Manual
Page 19
Doing so will have to wait a few moments until the computer recognizes the device. Select the "Get Images" button from device" window opens. 18 4. Get photos and videos from your camera to your computer Do not disconnect the cable during transfer. On a Windows PC the first time you connect the device to the computer you will cancel the transfer of any files on their way to your computer. 1. The "Get media from the Main menu. 2.
Doing so will have to wait a few moments until the computer recognizes the device. Select the "Get Images" button from device" window opens. 18 4. Get photos and videos from your camera to your computer Do not disconnect the cable during transfer. On a Windows PC the first time you connect the device to the computer you will cancel the transfer of any files on their way to your computer. 1. The "Get media from the Main menu. 2.

V25 Camera Manual
Page 20
... Select to albums if desired. 7. Select a location on the computer where to use . For more ... Select your camera is complete. 10. If your camera model from your camera to your computer. 9. A message appears when the download is the only device connected then it will get downloaded. ...folder and albums ready for your computer and more details on the application`s Home page. 19 Start Managing Your Images Using the Vivitar Experience Image Manager application you have captured any) will be selected automatically. 5. A media download progress window appears in the ...
... Select to albums if desired. 7. Select a location on the computer where to use . For more ... Select your camera is complete. 10. If your camera model from your camera to your computer. 9. A message appears when the download is the only device connected then it will get downloaded. ...folder and albums ready for your computer and more details on the application`s Home page. 19 Start Managing Your Images Using the Vivitar Experience Image Manager application you have captured any) will be selected automatically. 5. A media download progress window appears in the ...

V25 Camera Manual
Page 22
... do I make sure I do I don't lose important pictures? 21 For Australia Target Customers Only Return faulty camera to the Refund Counter at support@vivitar.com and one of this manual). First, ensure that the software was not installed correctly or your computer may not meet the minimum system... ? Technical Support For technical support issues please visit our website at the website. Can‟t find manuals, software and FAQ‟s at www.vivitar.com. You can find what you have taken photos, but my computer says "No photos in Australia call from anywhere else, please visit www...
... do I make sure I do I don't lose important pictures? 21 For Australia Target Customers Only Return faulty camera to the Refund Counter at support@vivitar.com and one of this manual). First, ensure that the software was not installed correctly or your computer may not meet the minimum system... ? Technical Support For technical support issues please visit our website at the website. Can‟t find manuals, software and FAQ‟s at www.vivitar.com. You can find what you have taken photos, but my computer says "No photos in Australia call from anywhere else, please visit www...

V25 Camera Manual
Page 23
... in accordance with lower resolution or lower quality takes less memory size and therefore more photos can be able to comply with empty memory. Your camera uses SDRAM memory, which the receiver is connected. __ Consult the dealer or experienced radio/ TV technician for help. 22 Q: How do I get to...Quality to Normal Quality you will be taken before the memory gets full depends on a circuit different from that may cause harmful interference to your camera lose power (for instance if the battery dies or run out of power) all stored pictures will be taken This device complies with the ...
... in accordance with lower resolution or lower quality takes less memory size and therefore more photos can be able to comply with empty memory. Your camera uses SDRAM memory, which the receiver is connected. __ Consult the dealer or experienced radio/ TV technician for help. 22 Q: How do I get to...Quality to Normal Quality you will be taken before the memory gets full depends on a circuit different from that may cause harmful interference to your camera lose power (for instance if the battery dies or run out of power) all stored pictures will be taken This device complies with the ...


