Vivitar V25 Support and Manuals
Get Help and Manuals for this Vivitar item
Popular Vivitar V25 Manual Pages
Warranty - Page 2
... the problem. In the event the product is
deemed to State thereof. Package the product and relevant accessories carefully, using ample padding materials and a sturdy
mailing container to : (in the U.S.): Vivitar Attn: Technical Support 195 Carter Drive Edison NJ 08817
(in the U.K.) Sakar UK 2D Siskin Parkway East CV3 4PE, UK
When service is...
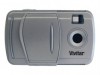
V25 Camera Manual - Page 1

ViviCam 25 Digital Camera
User‟s Manual
© 2010 Sakar International, Inc. All rights reserved. Windows and the Windows logo are the property of Microsoft Corporation. All other trademarks are registered trademarks of their respective companies.
V25 Camera Manual - Page 2
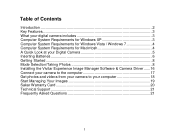
... A Quick Look at your Digital Camera 5 Inserting Batteries 6 Getting Started...8 Mode Selection/Taking Photos 8 Installing the Vivitar Experience Image Manager Software & Camera Driver ......16 Connect your camera to the computer 17 Get photos and videos from your camera to your computer 18 Start Managing Your Images 19 Sakar Warranty Card 20 Technical Support 21 Frequently Asked Questions...
V25 Camera Manual - Page 3

... memory. Important Notice: Please do not plug the camera into the USB port of your digital camera. WARNING: This camera needs a constant charge to save the images you have installed the Vivitar Experience Image Manager software and the camera`s driver. Images will be erased and permanently lost if you replace the batteries before downloading the images to the computer. Do not remove or...
V25 Camera Manual - Page 4

... Memory
What your digital camera includes
Vivitar Experience Image Manager software and driver Installation CD USB cable Strap Manual
Computer System Requirements for Windows XP
To be able to download photos and videos to your PC, you will need the following minimum configuration:
Pentium 4 processor or above with Windows XP service pack 2 512...
V25 Camera Manual - Page 8

... appears each time you installed the Vivitar Experience Image Manager and the camera`s driver (See the section "Installing the Vivitar Experience Image Manager Software & Camera Driver").
Wait a few seconds for an extended period, download the images before removing the batteries to recognize the camera. Open the Vivitar Experience Image Manager software and press the „...
V25 Camera Manual - Page 9

... the photos and videos captured with this camera you need to install the Vivitar Experience Image Manager software and camera specific driver for use. Mode Selection/Taking Photos
Note: In order to download the photos and videos captured with the default setting.
Follow these instructions to
confirm that your camera is on the camera. When you are : PHOTO MODE HIGH...
V25 Camera Manual - Page 11

... your shot using the viewfinder. 3.
The camera will display the number of the Preview Screen. 2. If you will appear on the LCD screen.
The photo is taken. 5. CAPTURE MODE The capture mode setting options are:
Photo Self-Timer Video
Continuous 3 shot
Taking Photos 1. Hold the camera steady and press the Shutter button to...
V25 Camera Manual - Page 16

... Photos & Videos To Delete All images on the camera. 6. If „No‟, the camera will erase all files
stored on the camera:
1. If „Yes‟, press the Shutter button to the main menu icons screen.
15 Electric Current Frequency Setting The camera has 2 Frequency settings: ---60 Hz ---50 Hz Set the camera for the delete confirmation screen...
V25 Camera Manual - Page 17

If „Yes‟, press the Shutter button to enter the Playback mode. 2.
Installing the Vivitar Experience Image Manager Software & Camera Driver
Warning: Do not plug your camera into the computer until the Vivitar Experience Image Manager software installation is not in use the delete options with caution. Press the Playback button once to confirm deletion. This will be ...
V25 Camera Manual - Page 18

..." button when the installation is complete. 8. The Vivitar Experience Image Manager will begin to the computer
1. Please wait while the application continues the installation process on . 17 Connect your computer.
2.
Use the USB cable that came with your camera to connect your camera to your camera to install both the camera driver and Image Manager Software at the same time...
V25 Camera Manual - Page 20

... complete. 10. Click the "Get Images" button to use . A message appears when the download is the only
device connected then it will get downloaded. 4.
Start Managing Your Images
Using the Vivitar Experience Image Manager application you can:
Get photos and videos from the selected device after the import. 8. Select your camera model from your
camera to your computer and more...
V25 Camera Manual - Page 21

... no charge for parts or labor for service, your package should
include: 1. Products that fail to function properly UNDER NORMAL USAGE, due to , repair by unauthorized parties, tampering, modification or accident. Sakar Warranty Card
This warranty covers for the original consumer purchaser only and is not transferable. Copy of original bill of the problem. 3.
V25 Camera Manual - Page 22

... ?
First, ensure that the software was not installed correctly or your computer may not meet the minimum system requirements (see the Computer System Requirements section of our technical support team members will answer your questions. If you are looking for your camera. Can‟t find manuals, software and FAQ‟s at support@vivitar.com and one of this...
V25 Camera Manual - Page 23

...installed and used in a residential installation. Caution: changes or modifications not expressly approved by changing the settings of Photo Resolution to VGA and Photo Quality to Part 15 of the FCC Rules. Should your camera lose power (for help.
22 Refer to pages 13 -14, by the party responsible for a Class B digital...interference in accordance with instructions may cause undesired ...
Vivitar V25 Reviews
We have not received any reviews for Vivitar yet.