Quick Start Guide
Page 4
... on your camera will appear as thumbnails in the Photags Express software. © 2009 Sakar International, Inc. All rights reserved. 195 Carter Drive Edison, NJ 08817 www.vivitar.com 6. Download and edit the images Vivitar makes it easier to your photos We thank you for choosing our ViviCam T328 12.1 Mega‐Pixel Digital Camera with...
... on your camera will appear as thumbnails in the Photags Express software. © 2009 Sakar International, Inc. All rights reserved. 195 Carter Drive Edison, NJ 08817 www.vivitar.com 6. Download and edit the images Vivitar makes it easier to your photos We thank you for choosing our ViviCam T328 12.1 Mega‐Pixel Digital Camera with...
User Manual
Page 1
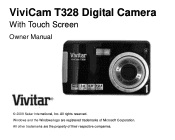
ViviCam T328 Digital Camera With Touch Screen Owner Manual © 2009 Sakar International, Inc. All rights reserved. All other trademarks are registered trademarks of their respective companies. Windows and the Windows logo are the property of Microsoft Corporation.
ViviCam T328 Digital Camera With Touch Screen Owner Manual © 2009 Sakar International, Inc. All rights reserved. All other trademarks are registered trademarks of their respective companies. Windows and the Windows logo are the property of Microsoft Corporation.
User Manual
Page 2
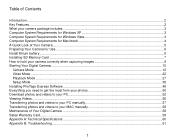
... Vista 3 Computer System Requirements for Macintosh 4 A Quick Look at Your Camera...5 Preparing Your Camera for Use...6 Install lithium battery...6 Installing SD Memory Card...7 How to hold your camera correctly when capturing images 9 Starting Your Digital Camera...10 Camera Mode...12 Video Mode ...22 Playback Mode ...27 Setup Mode ...38 Installing...photos and videos to your PC manually 57 Transferring photos and videos to your MAC manually 58 Maintenance of Your Digital Camera ...58 Sakar Warranty Card...59 Appendix A: Technical Specifications ...60 Appendix B: Troubleshooting...61 1
... Vista 3 Computer System Requirements for Macintosh 4 A Quick Look at Your Camera...5 Preparing Your Camera for Use...6 Install lithium battery...6 Installing SD Memory Card...7 How to hold your camera correctly when capturing images 9 Starting Your Digital Camera...10 Camera Mode...12 Video Mode ...22 Playback Mode ...27 Setup Mode ...38 Installing...photos and videos to your PC manually 57 Transferring photos and videos to your MAC manually 58 Maintenance of Your Digital Camera ...58 Sakar Warranty Card...59 Appendix A: Technical Specifications ...60 Appendix B: Troubleshooting...61 1
User Manual
Page 3
...; Built in Flash PhoTags Express software for purchasing the ViviCam T328 12.1 Mega-Pixel Touch Screen Digital Camera with your camera. It enriches your life. Vivitar makes capturing those special moments so easy. Your digital camera can also be used as a removable disk. Key Features Digital Video resolutions-640x480 Pixels (VGA), 320x240 Pixels (QVGA). 12...
...; Built in Flash PhoTags Express software for purchasing the ViviCam T328 12.1 Mega-Pixel Touch Screen Digital Camera with your camera. It enriches your life. Vivitar makes capturing those special moments so easy. Your digital camera can also be used as a removable disk. Key Features Digital Video resolutions-640x480 Pixels (VGA), 320x240 Pixels (QVGA). 12...
User Manual
Page 4
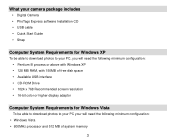
What your camera package includes Digital Camera PhoTags Express software Installation CD USB cable Quick Start Guide Strap Computer System Requirements for Windows XP To be able to ...
What your camera package includes Digital Camera PhoTags Express software Installation CD USB cable Quick Start Guide Strap Computer System Requirements for Windows XP To be able to ...
User Manual
Page 7
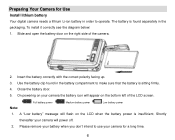
...see the diagram below: 1. On powering on your camera the battery icon will power off. 2. Full battery power Medium battery power Low battery power Note: 1. Shortly thereafter your camera for Use Install lithium battery Your digital camera needs a lithium Li-ion battery in the battery compartment... to use your camera will appear on the right side of the LCD screen. Please remove ...
...see the diagram below: 1. On powering on your camera the battery icon will power off. 2. Full battery power Medium battery power Low battery power Note: 1. Shortly thereafter your camera for Use Install lithium battery Your digital camera needs a lithium Li-ion battery in the battery compartment... to use your camera will appear on the right side of the LCD screen. Please remove ...
User Manual
Page 11
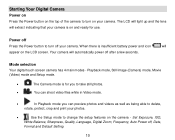
... Exposure, ISO, White Balance, Sharpness, Quality, Language, Digital Zoom, Frequency, Auto Power off, Date, Format and Default Setting. 10 Playback mode, Still Image (Camera) mode, Movie (Video) mode and Setup mode. The Camera mode is insufficient battery power and icon will appear on ...the LCD screen. Power off Press the Power button to turn on your camera. Mode selection Your digital touch screen camera has 4 main modes - Starting Your Digital Camera Power on Press the Power ...
... Exposure, ISO, White Balance, Sharpness, Quality, Language, Digital Zoom, Frequency, Auto Power off, Date, Format and Default Setting. 10 Playback mode, Still Image (Camera) mode, Movie (Video) mode and Setup mode. The Camera mode is insufficient battery power and icon will appear on ...the LCD screen. Power off Press the Power button to turn on your camera. Mode selection Your digital touch screen camera has 4 main modes - Starting Your Digital Camera Power on Press the Power ...
User Manual
Page 14
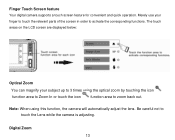
Merely use your subject up to 3 times using this function, the camera will automatically adjust the lens. Finger Touch Screen feature Your digital camera supports a touch screen feature for convenient and quick operation. Digital Zoom 13 Be careful not to activate the corresponding functions. Note: When using the optical zoom by touching the icon function... displayed below: Optical Zoom You can magnify your finger to touch the relevant parts of the screen in order to touch the Lens while the camera is adjusting.
Merely use your subject up to 3 times using this function, the camera will automatically adjust the lens. Finger Touch Screen feature Your digital camera supports a touch screen feature for convenient and quick operation. Digital Zoom 13 Be careful not to activate the corresponding functions. Note: When using the optical zoom by touching the icon function... displayed below: Optical Zoom You can magnify your finger to touch the relevant parts of the screen in order to touch the Lens while the camera is adjusting.

User Manual
Page 15
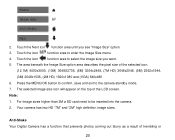
...screen. 3. Touch the icon function area to 80cm: 1. Macro/Far shooting The camera has the function that allows you can magnify your subject with 3x optical and 4x digital zoom. Note: you to 8 times using the digital zoom by touching the icon and function area. 1. Touch the icon or function ...area to zoom in /out of your subject with Optical/Digital Zoom together. You can zoom in or out ...
...screen. 3. Touch the icon function area to 80cm: 1. Macro/Far shooting The camera has the function that allows you can magnify your subject with 3x optical and 4x digital zoom. Note: you to 8 times using the digital zoom by touching the icon and function area. 1. Touch the icon or function ...area to zoom in /out of your subject with Optical/Digital Zoom together. You can zoom in or out ...
User Manual
Page 21
... selected image size icon will appear on the top of trembling or 20 Touch the icon function area to be inserted into the camera. 2. Note: 1. Anti-Shake Your Digital Camera has a function that prevents photos coming out blurry as a result of the LCD screen. The area beneath the Image Size option area describes... to confirm, save and exit to select the image size you see "Image Size" option. 3. Touch the Next icon function area until you want. 5. Your camera has two HD "7M" and "2M" high definition image sizes. 2.
... selected image size icon will appear on the top of trembling or 20 Touch the icon function area to be inserted into the camera. 2. Note: 1. Anti-Shake Your Digital Camera has a function that prevents photos coming out blurry as a result of the LCD screen. The area beneath the Image Size option area describes... to confirm, save and exit to select the image size you see "Image Size" option. 3. Touch the Next icon function area until you want. 5. Your camera has two HD "7M" and "2M" high definition image sizes. 2.
User Manual
Page 43
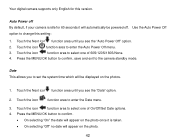
... Touch the icon function area to enter the Date menu. 3. Touch the icon function area to select one of 60S/120S/180S/None. 4. Your digital camera supports only English for 60 seconds it is idle for this setting: 1. Touch the Next icon function area until you to confirm. On ... the date will automatically be displayed on the photo once it will appear on the photos. 1. Use the Auto Power Off option to the camera standby mode. Touch the icon function area to select one of On/Off/Set Date options. 4. Press the MENU/OK button to confirm, save...
... Touch the icon function area to enter the Date menu. 3. Touch the icon function area to select one of 60S/120S/180S/None. 4. Your digital camera supports only English for 60 seconds it is idle for this setting: 1. Touch the Next icon function area until you to confirm. On ... the date will automatically be displayed on the photo once it will appear on the photos. 1. Use the Auto Power Off option to the camera standby mode. Touch the icon function area to select one of On/Off/Set Date options. 4. Press the MENU/OK button to confirm, save...
User Manual
Page 59
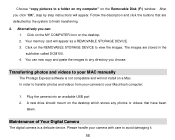
... the desktop which stores any directory you choose. The images are defaulted by step instructions will appear as a REMOVABLE STORAGE DEVICE. 3. Plug the camera into an available USB port 2. Alternatively you click "OK", step by the system to finish transferring. 2. Your memory card will appear. You ... description and click the buttons that have been taken. In order to transfer photos and videos from your camera to a folder on my computer" on a Mac. Maintenance of Your Digital Camera The digital camera is not compatible and will not install on the Removable Disk (F:) window.
... the desktop which stores any directory you choose. The images are defaulted by step instructions will appear as a REMOVABLE STORAGE DEVICE. 3. Plug the camera into an available USB port 2. Alternatively you click "OK", step by the system to finish transferring. 2. Your memory card will appear. You ... description and click the buttons that have been taken. In order to transfer photos and videos from your camera to a folder on my computer" on a Mac. Maintenance of Your Digital Camera The digital camera is not compatible and will not install on the Removable Disk (F:) window.

