

Camera Manual
Page 3
Everything you for normal use an SDHC Class 4 SD card or higher. SD Memory cards are not included and need to take quality digital photos and videos is recommended to use . What‟s Included 1) Digital Video Camera 2) AV Cable 3) USB Cable 4) Vivitar Experience Image Manager Software Installation CD 5) Wrist Strap 6) AC Charger 7) Built-in order...
Everything you for normal use an SDHC Class 4 SD card or higher. SD Memory cards are not included and need to take quality digital photos and videos is recommended to use . What‟s Included 1) Digital Video Camera 2) AV Cable 3) USB Cable 4) Vivitar Experience Image Manager Software Installation CD 5) Wrist Strap 6) AC Charger 7) Built-in order...

Camera Manual
Page 4
Camera Technical Specifications Image Sensor Image Resolution Video Resolution File Format External Memory LCD Display Lens Zoom Exposure White Balance ISO Scene Language Flash Self-Timer Anti-Shake Print Photos Interface System Requirements Battery... Working Temperature CMOS Sensor 2592x1944(5M) / 2048x1536(3M) / 1600x1200(2M) / 1280x1024(1M) / 640x480(VGA) 1280X720 (HD), VGA 640X480, QVGA 320X240 JPEG/AVI SDHC Card (up to 32GB) 2.0 Inch TFT f=6.5mm, F3.0 4X Digital Zoom -3.0EV ~ +3.0EV Auto, Daylight, Cloudy, Incandescent , Fluorescent Auto / 100 / 200 / 400 Auto / ...
Camera Technical Specifications Image Sensor Image Resolution Video Resolution File Format External Memory LCD Display Lens Zoom Exposure White Balance ISO Scene Language Flash Self-Timer Anti-Shake Print Photos Interface System Requirements Battery... Working Temperature CMOS Sensor 2592x1944(5M) / 2048x1536(3M) / 1600x1200(2M) / 1280x1024(1M) / 640x480(VGA) 1280X720 (HD), VGA 640X480, QVGA 320X240 JPEG/AVI SDHC Card (up to 32GB) 2.0 Inch TFT f=6.5mm, F3.0 4X Digital Zoom -3.0EV ~ +3.0EV Auto, Daylight, Cloudy, Incandescent , Fluorescent Auto / 100 / 200 / 400 Auto / ...
Camera Manual
Page 6
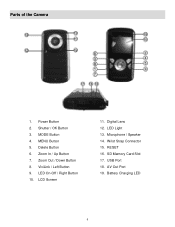
Zoom Out / Down Button 8. ViviLink / Left Button 9. LCD Screen 11. Wrist Strap Connector 15. AV Out Port 19. Digital Lens 12. Delete Button 6. Zoom In / Up Button 7. LED On-Off / Right Button 10. MENU Button 5. Microphone / Speaker 14. Parts of the Camera 1. Shutter / OK Button 3. SD Memory Card Slot 17. Power Button 2. LED Light 13. RESET 16. MODE Button 4. USB Port 18. Battery Charging LED 5
Zoom Out / Down Button 8. ViviLink / Left Button 9. LCD Screen 11. Wrist Strap Connector 15. AV Out Port 19. Digital Lens 12. Delete Button 6. Zoom In / Up Button 7. LED On-Off / Right Button 10. MENU Button 5. Microphone / Speaker 14. Parts of the Camera 1. Shutter / OK Button 3. SD Memory Card Slot 17. Power Button 2. LED Light 13. RESET 16. MODE Button 4. USB Port 18. Battery Charging LED 5
Camera Manual
Page 7
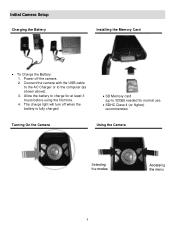
Allow the battery to charge for normal use. SDHC Class 4 (or higher) recommended. The charge light will turn off the camera. 2. Turning On the Camera Using the Camera Selecting the modes Accessing the menu 6 Initial Camera Setup Charging the Battery Installing the Memory Card To Charge the Battery: 1. Power off when the battery is fully charged. SD Memory card (up to the computer (as shown above). 3. Connect the camera with the USB cable to the AC Charger or to 32GB) needed for at least 3 hours before using the first time. 4.
Allow the battery to charge for normal use. SDHC Class 4 (or higher) recommended. The charge light will turn off the camera. 2. Turning On the Camera Using the Camera Selecting the modes Accessing the menu 6 Initial Camera Setup Charging the Battery Installing the Memory Card To Charge the Battery: 1. Power off when the battery is fully charged. SD Memory card (up to the computer (as shown above). 3. Connect the camera with the USB cable to the AC Charger or to 32GB) needed for at least 3 hours before using the first time. 4.

Camera Manual
Page 8
... camera is not locked (check the lock switch on the camera. 7 If the SD card is displayed on LCD as shown below: Full battery power Medium battery power Low battery power 2) Installing the SD Memory Card Push the lever to turn on the side of the power is locked this will prevent...icon on the display, please check if the card was inserted properly. Make sure the SD card is powered on, an SD icon will take you hear a slight clicking sound. The energy status of the SD card). Make sure a Class 4 (or higher) SDHC Memory Card (up to 32GB) has been properly inserted into...
... camera is not locked (check the lock switch on the camera. 7 If the SD card is displayed on LCD as shown below: Full battery power Medium battery power Low battery power 2) Installing the SD Memory Card Push the lever to turn on the side of the power is locked this will prevent...icon on the display, please check if the card was inserted properly. Make sure the SD card is powered on, an SD icon will take you hear a slight clicking sound. The energy status of the SD card). Make sure a Class 4 (or higher) SDHC Memory Card (up to 32GB) has been properly inserted into...

Camera Manual
Page 12
... Opens the Delete Menu - Saves your selected option in Video Capture Mode. Note: Use the LEFT/RIGHT/UP/DOWN buttons to the camera‟s SD memory card. STARTS/STOPS the video capture - UP/Zoom In and DOWN/Zoom Out buttons to better set the camera display 3) Press the RIGHT/LED ON-OFF...
... Opens the Delete Menu - Saves your selected option in Video Capture Mode. Note: Use the LEFT/RIGHT/UP/DOWN buttons to the camera‟s SD memory card. STARTS/STOPS the video capture - UP/Zoom In and DOWN/Zoom Out buttons to better set the camera display 3) Press the RIGHT/LED ON-OFF...

Camera Manual
Page 22
...desired menu selection. 4) Press the OK button to your previous mode. 8) Remember that this setting will appear on your camera‟s memory card. Format Memory Card/Format SD Menu You can use the delete menu in the camera‟s Playback mode or press the Delete button. 1) Press the MENU... Frequency Menu The options in the Frequency menu represent the frequency of the electrical current in fluorescent lighting sources in mind that formatting the memory card will permanently delete all of the content on the selected item. 6) Push the direction button LEFT or RIGHT to select the next menu...
...desired menu selection. 4) Press the OK button to your previous mode. 8) Remember that this setting will appear on your camera‟s memory card. Format Memory Card/Format SD Menu You can use the delete menu in the camera‟s Playback mode or press the Delete button. 1) Press the MENU... Frequency Menu The options in the Frequency menu represent the frequency of the electrical current in fluorescent lighting sources in mind that formatting the memory card will permanently delete all of the content on the selected item. 6) Push the direction button LEFT or RIGHT to select the next menu...

Camera Manual
Page 23
... in Europe 1) Press the MENU button to open the menus for you manually change the setting or restore the camera‟s default factory settings. The memory card will appear on the selected item. 6) Push the direction button LEFT or RIGHT to select the next menu item. 7) Press the MENU button to exit...
... in Europe 1) Press the MENU button to open the menus for you manually change the setting or restore the camera‟s default factory settings. The memory card will appear on the selected item. 6) Push the direction button LEFT or RIGHT to select the next menu item. 7) Press the MENU button to exit...

Camera Manual
Page 24
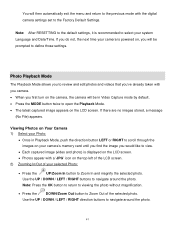
... Language and Date/Time. If you do not, the next time your camera is powered on, you will be prompted to select your camera‟s memory card until you find the video you first turn on the camera, the camera will be in Playback mode, push the direction button LEFT or RIGHT...
... Language and Date/Time. If you do not, the next time your camera is powered on, you will be prompted to select your camera‟s memory card until you find the video you first turn on the camera, the camera will be in Playback mode, push the direction button LEFT or RIGHT...

Camera Manual
Page 26
.... 5) To delete this one video, select "Delete Video". 6) To delete all the images (including all unlocked photos and videos) on your camera‟s memory card, select "Delete All". 7) Press the OK button to select and save the desired option. 8) You will be asked to confirm your selection. 9) The ... technology allows you to quickly and easily upload your camera‟s photos and videos to the social networks of your choice with the accompanying Vivitar Experience Image Manager application. 1) Press the MENU button to open the menus for the current mode. 2) Push the direction button LEFT or...
.... 5) To delete this one video, select "Delete Video". 6) To delete all the images (including all unlocked photos and videos) on your camera‟s memory card, select "Delete All". 7) Press the OK button to select and save the desired option. 8) You will be asked to confirm your selection. 9) The ... technology allows you to quickly and easily upload your camera‟s photos and videos to the social networks of your choice with the accompanying Vivitar Experience Image Manager application. 1) Press the MENU button to open the menus for the current mode. 2) Push the direction button LEFT or...

Camera Manual
Page 40
... 1) Press the MENU button to open the menus for the current mode. 2) Push the direction button LEFT or RIGHT to scroll and select the Format Memory Card menu. 3) Push the direction button UP or DOWN to highlight the desired menu selection. 4) To exit without formatting. Select "Yes" and ... the frequency of the content on the images taken by your camera until you may see flickering or waves on your camera‟s memory card. Format Memory Card Menu You can use the delete menu in mind that does not match your locale. You will permanently delete all of the electrical ...
... 1) Press the MENU button to open the menus for the current mode. 2) Push the direction button LEFT or RIGHT to scroll and select the Format Memory Card menu. 3) Push the direction button UP or DOWN to highlight the desired menu selection. 4) To exit without formatting. Select "Yes" and ... the frequency of the content on the images taken by your camera until you may see flickering or waves on your camera‟s memory card. Format Memory Card Menu You can use the delete menu in mind that does not match your locale. You will permanently delete all of the electrical ...

Camera Manual
Page 41
television and video standard used in America, Canada PAL - The memory card will be asked to confirm the resetting to the factory default settings. Select "No" and press the SET button to exit the menu and ...
television and video standard used in America, Canada PAL - The memory card will be asked to confirm the resetting to the factory default settings. Select "No" and press the SET button to exit the menu and ...
Camera Manual
Page 42
... is powered on, you will be in Playback Mode, push the direction button LEFT or RIGHT to scroll through the images on your camera‟s memory card until you find the image you first turn on the LCD screen.
... is powered on, you will be in Playback Mode, push the direction button LEFT or RIGHT to scroll through the images on your camera‟s memory card until you find the image you first turn on the LCD screen.

Camera Manual
Page 44
... menu options. 5) To delete this one video, select "Delete Video". 6) To delete all the images (including all unlocked photos and videos) on your camera‟s memory card, select "Delete All". 7) Press the OK button to scroll through the Delete menu.
... menu options. 5) To delete this one video, select "Delete Video". 6) To delete all the images (including all unlocked photos and videos) on your camera‟s memory card, select "Delete All". 7) Press the OK button to scroll through the Delete menu.
Camera Manual
Page 47
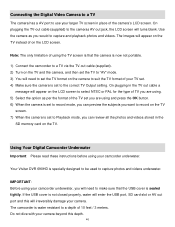
... 4) Make sure the camera is set to record mode, you will enter the USB port, SD card slot or AV out port and this depth. 46 On plugging in the TV out cable a message...) to Playback mode, you can preview the subjects you would to capture photos and videos underwater. Your Vivitar DVR 690HD is not closed properly, water will need to set the TV format on the TV screen. 7) When... as per the format of the TV set you are using your larger TV screen in the SD memory card on the LCD screen. The images will turns blank. The camcorder is sealed tightly. Connecting the Digital...
... 4) Make sure the camera is set to record mode, you will enter the USB port, SD card slot or AV out port and this depth. 46 On plugging in the TV out cable a message...) to Playback mode, you can preview the subjects you would to capture photos and videos underwater. Your Vivitar DVR 690HD is not closed properly, water will need to set the TV format on the TV screen. 7) When... as per the format of the TV set you are using your larger TV screen in the SD memory card on the LCD screen. The images will turns blank. The camcorder is sealed tightly. Connecting the Digital...

Camera Manual
Page 57
... photos should appear. Troubleshooting Q: I do not appear on the SD memory card. What do I make sure I deleted images using the Vivitar Experience Image Manager are not stored in the camera‟s memory. This camera requires an SD card for ? Q: I don‟t lose important pictures? Can‟t ...find manuals, software and FAQ‟s at support@vivitar.com and one of our ...
... photos should appear. Troubleshooting Q: I do not appear on the SD memory card. What do I make sure I deleted images using the Vivitar Experience Image Manager are not stored in the camera‟s memory. This camera requires an SD card for ? Q: I don‟t lose important pictures? Can‟t ...find manuals, software and FAQ‟s at support@vivitar.com and one of our ...


