
DVR-550
Page 2
Content Section 1 Getting to Know Your Camera 2 Section 2 Getting Up and Running 5 Section 3 Record Mode 7 Section 4 Playback Mode 34 Section 5 Listening to MP3 Music 47 Section 6 Reading eBook 49 Section 7 Viewing MPEG4 Movie on PC 51 Section 8 Viewing Pictures and Movies on a TV 52 Section 9 Video File Converter 53 Section 10 Burning the Recorded Clip into DVD 53 Section 11 Transferring Data to a Computer 9 Section 12 Specifications and System Requirements ...... 11 1
Content Section 1 Getting to Know Your Camera 2 Section 2 Getting Up and Running 5 Section 3 Record Mode 7 Section 4 Playback Mode 34 Section 5 Listening to MP3 Music 47 Section 6 Reading eBook 49 Section 7 Viewing MPEG4 Movie on PC 51 Section 8 Viewing Pictures and Movies on a TV 52 Section 9 Video File Converter 53 Section 10 Burning the Recorded Clip into DVD 53 Section 11 Transferring Data to a Computer 9 Section 12 Specifications and System Requirements ...... 11 1

DVR-550
Page 3
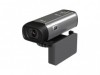
...take . The memory card slot allows users to increase the storage capacity up to take pictures and movies without memory card. The camera is used for using MPEG-4 technology, more videos can be changed manually. High quality images with 5 Mega Pixel sensor can compose ...-in 64MB memory is also ideally suited for Firmware code ‹ Standard Accessories Unpack the package and make sure all standard accessories listed are included: z Camera z USB Cable z Power Adaptor z AV Cable z Lithium-ion Rechargeable Battery z Quick Guide z CD-ROM ( Driver, Arcsoft Software and User Manual) z ...
...take . The memory card slot allows users to increase the storage capacity up to take pictures and movies without memory card. The camera is used for using MPEG-4 technology, more videos can be changed manually. High quality images with 5 Mega Pixel sensor can compose ...-in 64MB memory is also ideally suited for Firmware code ‹ Standard Accessories Unpack the package and make sure all standard accessories listed are included: z Camera z USB Cable z Power Adaptor z AV Cable z Lithium-ion Rechargeable Battery z Quick Guide z CD-ROM ( Driver, Arcsoft Software and User Manual) z ...

DVR-550
Page 6
Eject ‹ Inserting and Removing an SD Card(Optional) The camera comes with internal memory which allows you to release it from its slot. To remove an installed SD card, press the card inwards to store ... recording any media. When the card pops out, gently remove it . 3. You can be recorded when the SD card is read-only by using the camera, end users must load NP60 rechargeable Li-ion Battery. 1. No pictures, movies and voice can expand the memory capacity by locking the SD card. Insert...
Eject ‹ Inserting and Removing an SD Card(Optional) The camera comes with internal memory which allows you to release it from its slot. To remove an installed SD card, press the card inwards to store ... recording any media. When the card pops out, gently remove it . 3. You can be recorded when the SD card is read-only by using the camera, end users must load NP60 rechargeable Li-ion Battery. 1. No pictures, movies and voice can expand the memory capacity by locking the SD card. Insert...

DVR-550
Page 7
Press a second time to return to Record Mode. ‹ Turning the Camera Off To turn off the Camera, you can either press the Power Button for one second to turn on the camera: (1) Flip out the LCD panel; the camera will turn on automatically. (2) Or press Power Button for one second, or you can... place the LCD panel back to Playback Mode. ‹ Turning the Camera On and Getting Started To turn on it. Ö To take a movie, press the Movie Shutter Button ( ). Ö To take a picture, press the Picture ...
Press a second time to return to Record Mode. ‹ Turning the Camera Off To turn off the Camera, you can either press the Power Button for one second to turn on the camera: (1) Flip out the LCD panel; the camera will turn on automatically. (2) Or press Power Button for one second, or you can... place the LCD panel back to Playback Mode. ‹ Turning the Camera On and Getting Started To turn on it. Ö To take a movie, press the Movie Shutter Button ( ). Ö To take a picture, press the Picture ...

DVR-550
Page 8
Movie Shutter Button: 1. Return to turn on or turn off the camera. Tele-Wide Button: Digital Zoom in and out. Start to take movie, or record voice. 2. Picture Shutter Button: Start to take picture Macro switch: Switch ...
Movie Shutter Button: 1. Return to turn on or turn off the camera. Tele-Wide Button: Digital Zoom in and out. Start to take movie, or record voice. 2. Picture Shutter Button: Start to take picture Macro switch: Switch ...

DVR-550
Page 11
... the LCD monitor. 10 Press Picture Shutter Button ( ) to 140 cm. The digital zoom can be used for object located at close -up Pictures The camera has two close range. Rotate the lens ring to switch to 8x and the magnification ratio is shown on the LCD monitor. ) positions. Press Upper...
... the LCD monitor. 10 Press Picture Shutter Button ( ) to 140 cm. The digital zoom can be used for object located at close -up Pictures The camera has two close range. Rotate the lens ring to switch to 8x and the magnification ratio is shown on the LCD monitor. ) positions. Press Upper...

DVR-550
Page 12
... to exit submenu. ‹ Options for Record Mode Operation 1. Submenu will pop out while move to move between main menu options, which are Movie Mode, Camera Mode, Voice Mode, Effect, and Set. Enter Button 11 Use Right/Left Buttons to each main option. 3.
... to exit submenu. ‹ Options for Record Mode Operation 1. Submenu will pop out while move to move between main menu options, which are Movie Mode, Camera Mode, Voice Mode, Effect, and Set. Enter Button 11 Use Right/Left Buttons to each main option. 3.

DVR-550
Page 13
... setting as well as its validation. 1.Always: The setting always keeps valid. 2.One Time: The setting is only valid either once or till camera power off. Resolution Validation Always Exposure Sharpness White Balance Motion Stabilization Motion Detect Two in One Photo Frame Flash Self-Timer Multi-Snap Backlight Mode ...
... setting as well as its validation. 1.Always: The setting always keeps valid. 2.One Time: The setting is only valid either once or till camera power off. Resolution Validation Always Exposure Sharpness White Balance Motion Stabilization Motion Detect Two in One Photo Frame Flash Self-Timer Multi-Snap Backlight Mode ...

DVR-550
Page 14
‹ Movie Mode submenu Setting Record main menu includes camera setting and other advanced setting. Use Up/Down Buttons to select Resolution then press Enter Button to switch to record menu screen. 2. Use Up/Down ...
‹ Movie Mode submenu Setting Record main menu includes camera setting and other advanced setting. Use Up/Down Buttons to select Resolution then press Enter Button to switch to record menu screen. 2. Use Up/Down ...

DVR-550
Page 15
... Exposure Option. To change can be previewed immediately. 5. Use Up/Down Buttons to move to record menu screen. 2. The change Exposure setting: 1. ‹ Exposure The camera adjusts image exposure automatically. In certain circumstances you may wish to choose preferred EV value. Use Up/Down Buttons to adjust the exposure compensation setting.
... Exposure Option. To change can be previewed immediately. 5. Use Up/Down Buttons to move to record menu screen. 2. The change Exposure setting: 1. ‹ Exposure The camera adjusts image exposure automatically. In certain circumstances you may wish to choose preferred EV value. Use Up/Down Buttons to adjust the exposure compensation setting.
DVR-550
Page 17
... White Balance submenu. 4. Press Enter Button to validate the setting and exit. Submenu of images automatically. The change White Balance Setting: 1. ‹ White Balance The camera adjusts the color balance of Movie Mode will pop out on the screen. 3. Tungsten: Under tungsten light condition. Auto (Default): The...
... White Balance submenu. 4. Press Enter Button to validate the setting and exit. Submenu of images automatically. The change White Balance Setting: 1. ‹ White Balance The camera adjusts the color balance of Movie Mode will pop out on the screen. 3. Tungsten: Under tungsten light condition. Auto (Default): The...

DVR-550
Page 19
... Button to Motion Detect submenu. 4. Use Up/Down Buttons to select Motion Detect then press Enter Buttons to switch to validate the setting and exit. 6. Camera will pop out on the screen. 3. ‹ Motion Detection To enable Motion Detection: 1. Use Up/Down Buttons to record video once if there is no...
... Button to Motion Detect submenu. 4. Use Up/Down Buttons to select Motion Detect then press Enter Buttons to switch to validate the setting and exit. 6. Camera will pop out on the screen. 3. ‹ Motion Detection To enable Motion Detection: 1. Use Up/Down Buttons to record video once if there is no...

DVR-550
Page 20
Use Right/Left Buttons to validate the setting and exit. Press Enter Button to select Camera Mode. Submenu of Camera Mode will pop out on the screen. 3. Use Up/Down Buttons to select Resolution then press Enter Button to switch to move between three settings. 5. Display Screen Video Resolution Option Enter Button 19 ‹ Camera Mode Setting ‹ Picture Resolution To change Picture Resolution: 1. Use Up/Down Buttons to Resolution submenu. 4. In Movie/Picture Record Mode, press Enter Button to switch to record menu screen. 2.
Use Right/Left Buttons to validate the setting and exit. Press Enter Button to select Camera Mode. Submenu of Camera Mode will pop out on the screen. 3. Use Up/Down Buttons to select Resolution then press Enter Button to switch to move between three settings. 5. Display Screen Video Resolution Option Enter Button 19 ‹ Camera Mode Setting ‹ Picture Resolution To change Picture Resolution: 1. Use Up/Down Buttons to Resolution submenu. 4. In Movie/Picture Record Mode, press Enter Button to switch to record menu screen. 2.

DVR-550
Page 21
.... Display Screen Exposure Option Enter Button 20 In certain circumstances you may wish to record menu screen. 2. Submenu of Camera Mode will pop out on the screen 3. In Movie/Picture Record Mode, press Enter Button to switch to adjust the exposure compensation setting. Press the .... 4. Use Up/Down Buttons to move to validate the setting and exit. Press Enter Button to Exposure Option. The change Exposure setting: 1. ‹ Exposure The camera adjusts image exposure automatically.
.... Display Screen Exposure Option Enter Button 20 In certain circumstances you may wish to record menu screen. 2. Submenu of Camera Mode will pop out on the screen 3. In Movie/Picture Record Mode, press Enter Button to switch to adjust the exposure compensation setting. Press the .... 4. Use Up/Down Buttons to move to validate the setting and exit. Press Enter Button to Exposure Option. The change Exposure setting: 1. ‹ Exposure The camera adjusts image exposure automatically.

DVR-550
Page 22
Use Right/Left Buttons to validate the setting and exit. Press Enter Button to select Camera Mode. Display Screen Two in One submenu. 4. Use Up/Down Buttons to record menu screen. 2. Press Picture Shutter Button to take second picture. 8. Use Up/... choose ON or OFF. 5. Press the RECORD/PLAY Button to Two in One Option Enter Button 6. To enable Two in One picture. 21 Submenu of Camera Mode will pop out on the screen. 3. Press Picture Shutter Button to Two in One mode, you can combine two snapshots into one picture. ‹...
Use Right/Left Buttons to validate the setting and exit. Press Enter Button to select Camera Mode. Display Screen Two in One submenu. 4. Use Up/Down Buttons to record menu screen. 2. Press Picture Shutter Button to take second picture. 8. Use Up/... choose ON or OFF. 5. Press the RECORD/PLAY Button to Two in One Option Enter Button 6. To enable Two in One picture. 21 Submenu of Camera Mode will pop out on the screen. 3. Press Picture Shutter Button to Two in One mode, you can combine two snapshots into one picture. ‹...

DVR-550
Page 23
Use Up/Down Buttons to validate the setting and exit. To enable Photo Frame: 1. Then select Set option and press Enter Button to locate preferred photo frame. Display Screen Photo Frame Option Enter Button 22 When in Camera Mode, use Up/Down Buttons to select Photo Frame option, then press Enter Button to switch to Photo Frame submenu. 2. You can take your picture with preferred electronic photo frame. ‹ Photo Frame (Picture Record Mode Only) Your camera features popular electronic photo frame.
Use Up/Down Buttons to validate the setting and exit. To enable Photo Frame: 1. Then select Set option and press Enter Button to locate preferred photo frame. Display Screen Photo Frame Option Enter Button 22 When in Camera Mode, use Up/Down Buttons to select Photo Frame option, then press Enter Button to switch to Photo Frame submenu. 2. You can take your picture with preferred electronic photo frame. ‹ Photo Frame (Picture Record Mode Only) Your camera features popular electronic photo frame.

DVR-550
Page 24
...of the flash). To change flash setting by either hot key (Right Button) or Option Setting. Use this mode when taking images in Camera Mode, use Up/Down Buttons to select Flash Option, then press Enter Button to switch to light conditions. Press Enter Button to move ...between 2 settings. 3. ‹ Flash (Picture Record Mode Only) This camera has two flash settings. Use Up/Down Buttons to validate the setting and exit. Auto-flash( ):the flash fires automatically according to Flash submenu...
...of the flash). To change flash setting by either hot key (Right Button) or Option Setting. Use this mode when taking images in Camera Mode, use Up/Down Buttons to select Flash Option, then press Enter Button to switch to light conditions. Press Enter Button to move ...between 2 settings. 3. ‹ Flash (Picture Record Mode Only) This camera has two flash settings. Use Up/Down Buttons to validate the setting and exit. Auto-flash( ):the flash fires automatically according to Flash submenu...

DVR-550
Page 25
... Press Enter Button to take pictures with a ten-second time delay. Display Screen Change Sharpness Setting Enter Button 24 The speed of the camera beneath the flash light will increase just before the picture is taken. ‹ Self-timer (Picture Record Mode Only) The self-timer allows... Button) or Option Setting. To enable Self-timer: 1. To change can soften and sharpen images to Self-timer submenu. 2. When in Camera Mode, use Up/Down Buttons to select Sharpness Option, then press Enter Button to switch to Sharpness submenu. 2. The change Sharpness setting: 1.
... Press Enter Button to take pictures with a ten-second time delay. Display Screen Change Sharpness Setting Enter Button 24 The speed of the camera beneath the flash light will increase just before the picture is taken. ‹ Self-timer (Picture Record Mode Only) The self-timer allows... Button) or Option Setting. To enable Self-timer: 1. To change can soften and sharpen images to Self-timer submenu. 2. When in Camera Mode, use Up/Down Buttons to select Sharpness Option, then press Enter Button to switch to Sharpness submenu. 2. The change Sharpness setting: 1.

DVR-550
Page 26
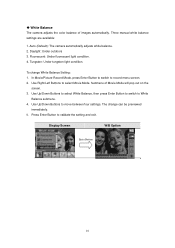
Fluorescent: Under fluorescent light condition. 4. Use Right/Left Buttons to move between four settings. Use Up/Down Buttons to select Camera Mode. Daylight: Under outdoors 3. To change can be previewed immediately. 5. Display Screen W/B Option Enter Button 25 Tungsten: Under...White Balance, then press Enter Button to switch to record menu screen. 2. ‹ White Balance The camera adjusts the color balance of Camera Mode will pop out on the screen. 3. Auto (Default): The camera automatically adjusts white balance. 2. Press Enter Button to validate the setting and exit.
Fluorescent: Under fluorescent light condition. 4. Use Right/Left Buttons to move between four settings. Use Up/Down Buttons to select Camera Mode. Daylight: Under outdoors 3. To change can be previewed immediately. 5. Display Screen W/B Option Enter Button 25 Tungsten: Under...White Balance, then press Enter Button to switch to record menu screen. 2. ‹ White Balance The camera adjusts the color balance of Camera Mode will pop out on the screen. 3. Auto (Default): The camera automatically adjusts white balance. 2. Press Enter Button to validate the setting and exit.

DVR-550
Page 27
... Screen Multi-Snap Option Enter Button ‹ Backlight (Picture Record Mode Only) With the camera set to Multi-Snap Mode, you can take shots when bright light is behind the subject. When in Camera Mode, use Up/Down Buttons to select Multi-Snap, then press Enter Button to switch to... Multi-Snap submenu. 2. To enable Backlight: 1. When in Camera Mode, use Up/Down Buttons to select Backlight, then press Enter Buttons to switch to Backlight submenu. 2. To enable Multi-Snap: 1. ‹ Multi-Snap...
... Screen Multi-Snap Option Enter Button ‹ Backlight (Picture Record Mode Only) With the camera set to Multi-Snap Mode, you can take shots when bright light is behind the subject. When in Camera Mode, use Up/Down Buttons to select Multi-Snap, then press Enter Button to switch to... Multi-Snap submenu. 2. To enable Backlight: 1. When in Camera Mode, use Up/Down Buttons to select Backlight, then press Enter Buttons to switch to Backlight submenu. 2. To enable Multi-Snap: 1. ‹ Multi-Snap...


