Camera Manual
Page 2
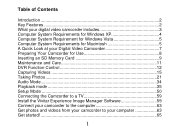
... for Use 8 Inserting an SD Memory Card 9 Maintenance and Care 11 DVR Function Control 12 Capturing Videos 15 Taking Photos 21 Audio Mode 34 Playback mode 35 Setup Mode 50 Connecting the Camcorder to a TV 59 Install the Vivitar Experience Image Manager Software 59 Connect your camcorder to the computer 63 Get photos and...
... for Use 8 Inserting an SD Memory Card 9 Maintenance and Care 11 DVR Function Control 12 Capturing Videos 15 Taking Photos 21 Audio Mode 34 Playback mode 35 Setup Mode 50 Connecting the Camcorder to a TV 59 Install the Vivitar Experience Image Manager Software 59 Connect your camcorder to the computer 63 Get photos and...
Camera Manual
Page 4
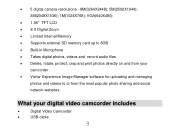
What your camcorder Vivitar Experience Image Manager software for uploading and managing photos and videos to or from the most popular photo sharing and social network websites. VGA(640X480) 1.96" TFT LCD 8 X Digital Zoom ...
What your camcorder Vivitar Experience Image Manager software for uploading and managing photos and videos to or from the most popular photo sharing and social network websites. VGA(640X480) 1.96" TFT LCD 8 X Digital Zoom ...
Camera Manual
Page 5
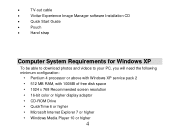
TV-out cable Vivitar Experience Image Manager software Installation CD Quick Start Guide Pouch Hand strap Computer System Requirements for Windows XP To be able to download photos and ...
TV-out cable Vivitar Experience Image Manager software Installation CD Quick Start Guide Pouch Hand strap Computer System Requirements for Windows XP To be able to download photos and ...

Camera Manual
Page 23
... top right of the LCD screen. 4. When the camcorder's internal memory is reduced by one. 5. Either download the photos to your computer using the Vivitar Experience Image Manager software as described below in the section "Transfer photos and videos to your computer" or insert an SD card to continue taking more memory on...
... top right of the LCD screen. 4. When the camcorder's internal memory is reduced by one. 5. Either download the photos to your computer using the Vivitar Experience Image Manager software as described below in the section "Transfer photos and videos to your computer" or insert an SD card to continue taking more memory on...
Camera Manual
Page 28
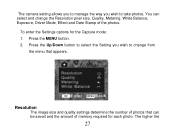
To enter the Settings options for each photo. Resolution The image size and quality settings determine the number of photos that appears. The higher the 27 Press the Up/Down button to select the Setting you wish to change from the menu that can select and change the Resolution pixel size, Quality, Metering, White Balance, Exposure, Driver Mode, Effect and Date Stamp of memory required for the Capture mode: 1. The camera setting allows you to manage the way you wish to take photos. Press the MENU button. 2. You can be saved and the amount of the photos.
To enter the Settings options for each photo. Resolution The image size and quality settings determine the number of photos that appears. The higher the 27 Press the Up/Down button to select the Setting you wish to change from the menu that can select and change the Resolution pixel size, Quality, Metering, White Balance, Exposure, Driver Mode, Effect and Date Stamp of memory required for the Capture mode: 1. The camera setting allows you to manage the way you wish to take photos. Press the MENU button. 2. You can be saved and the amount of the photos.

Camera Manual
Page 60
... the computer until the software installation is set the TV to record, capture or playback mode, you want to record on the TV. Install the Vivitar Experience Image Manager Software Warning: Do not plug your camcorder into your CD-ROM drive. Lift up the cover and insert the cable. 2. The TV slot is... appear on the TV and the video camcorder. Power on the TV screen. 1. When the video camcorder is situated next to install and run the Vivitar Experience Image Manager software. 1. Connecting the Camcorder to a TV Connect the video camcorder to a TV via the supplied cable.
... the computer until the software installation is set the TV to record, capture or playback mode, you want to record on the TV. Install the Vivitar Experience Image Manager Software Warning: Do not plug your camcorder into your CD-ROM drive. Lift up the cover and insert the cable. 2. The TV slot is... appear on the TV and the video camcorder. Power on the TV screen. 1. When the video camcorder is situated next to install and run the Vivitar Experience Image Manager software. 1. Connecting the Camcorder to a TV Connect the video camcorder to a TV via the supplied cable.

Camera Manual
Page 61
If you do not have internet access at the time of inserting the CD-ROM, connect to the internet and then click the "Install Vivitar Experience Image Manager" button to transfer photos and videos from the camcorder. 2. Click the "How to begin the installation Note: If you do not have internet... access, you can still download media from my 60 On Macintosh: Click the icon to launch the installer. 3. On PC: The Vivitar Experience Image Manager Installer window appears. If the window does not appear, open the application's CD/DVD drive and click on "Setup.bat" to install the...
If you do not have internet access at the time of inserting the CD-ROM, connect to the internet and then click the "Install Vivitar Experience Image Manager" button to transfer photos and videos from the camcorder. 2. Click the "How to begin the installation Note: If you do not have internet... access, you can still download media from my 60 On Macintosh: Click the icon to launch the installer. 3. On PC: The Vivitar Experience Image Manager Installer window appears. If the window does not appear, open the application's CD/DVD drive and click on "Setup.bat" to install the...

Camera Manual
Page 63
... click "Next" to continue. 10. On Macintosh: Click the "Quit" button when the installation is complete. 9. Click the "Launch Vivitar Experience Image Manager" to where the program will be installed, and then click "Install". 11. Please wait while the application continues the installation process on... will be included in the installation process. On PC only: Let the "Vivitar Experience Image Manager" installer create the folder to open the application or close the window and run the Vivitar Experience Image Manager from your computer. 12. On PC: Click the "Close" button when ...
... click "Next" to continue. 10. On Macintosh: Click the "Quit" button when the installation is complete. 9. Click the "Launch Vivitar Experience Image Manager" to where the program will be installed, and then click "Install". 11. Please wait while the application continues the installation process on... will be included in the installation process. On PC only: Let the "Vivitar Experience Image Manager" installer create the folder to open the application or close the window and run the Vivitar Experience Image Manager from your computer. 12. On PC: Click the "Close" button when ...

Camera Manual
Page 66
...window. Click the "Get media" button to transfer the photos and videos from one social network to your computer. Using the Vivitar Experience Image Manager, you selected are now downloaded to your computer to the selected folder and albums ready for your camcorder to another. Seamlessly ... to albums if desired. 7. Facebook, Flickr, MySpace, Picasa, Photobucket and YouTube. Organize your camcorder is complete. 9. You can upload and manage photos and videos to download photos, videos or both. 4. If your 65 Get started! The photo and video files that you can select...
...window. Click the "Get media" button to transfer the photos and videos from one social network to your computer. Using the Vivitar Experience Image Manager, you selected are now downloaded to your computer to the selected folder and albums ready for your camcorder to another. Seamlessly ... to albums if desired. 7. Facebook, Flickr, MySpace, Picasa, Photobucket and YouTube. Organize your camcorder is complete. 9. You can upload and manage photos and videos to download photos, videos or both. 4. If your 65 Get started! The photo and video files that you can select...

Camera Manual
Page 67
Use automatic "Geotagging" with built in Mass Storage Mode. 3. For more details on how to use the Vivitar Experience Image Manager open the Help file or click the "Take the Tour" button on the bottom left of options, select Open folder to view files and click ... the Edit menu. 7. Then select a folder and choose Paste from the Edit menu. Doing so will appear on the LCD, indicating that you copy the images into the Pictures/My Pictures folder and the videos into your camcorder is in Google Maps. Transfer media from this folder into the Videos/My...
Use automatic "Geotagging" with built in Mass Storage Mode. 3. For more details on how to use the Vivitar Experience Image Manager open the Help file or click the "Take the Tour" button on the bottom left of options, select Open folder to view files and click ... the Edit menu. 7. Then select a folder and choose Paste from the Edit menu. Doing so will appear on the LCD, indicating that you copy the images into the Pictures/My Pictures folder and the videos into your camcorder is in Google Maps. Transfer media from this folder into the Videos/My...


