
Camera Manual
Page 2
Contents Introduction ...2 What's Included...2 Parts of the Camera ...3 Initial Camera Setup...4 Camcorder Mounts and Accessories 7 Main Camera Mode...10 Using your Helmet Camcorder ...11 Technical Specifications ...13 Computer System Requirements 14 Installing the Software ...15 Connecting the Camcorder to the Computer 16 Getting Videos from your Camcorder to Your Computer 17 Get started!...18 Transferring Videos from my Camcorder to my Computer Manually 18 Camcorder Maintenance ...19 Sakar Warranty Card...20 Technical Support...21 Troubleshooting...21 1
Contents Introduction ...2 What's Included...2 Parts of the Camera ...3 Initial Camera Setup...4 Camcorder Mounts and Accessories 7 Main Camera Mode...10 Using your Helmet Camcorder ...11 Technical Specifications ...13 Computer System Requirements 14 Installing the Software ...15 Connecting the Camcorder to the Computer 16 Getting Videos from your Camcorder to Your Computer 17 Get started!...18 Transferring Videos from my Camcorder to my Computer Manually 18 Camcorder Maintenance ...19 Sakar Warranty Card...20 Technical Support...21 Troubleshooting...21 1
Camera Manual
Page 3
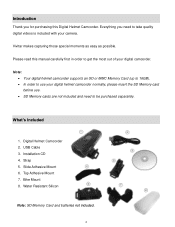
Vivitar makes capturing those special moments as easy as possible. Slide Adhesive Mount 6. Top Adhesive Mount 7. Note: Your digital helmet camcorder supports an SD or MMC Memory Card (up to 16GB). In order to use . SD Memory cards ... before use your digital camcorder. Water Resistant Silicon Note: SD Memory Card and batteries not included. 2 Introduction Thank you need to be purchased separately. Bike Mount 8. Digital Helmet Camcorder 2. Installation CD 4.
Vivitar makes capturing those special moments as easy as possible. Slide Adhesive Mount 6. Top Adhesive Mount 7. Note: Your digital helmet camcorder supports an SD or MMC Memory Card (up to 16GB). In order to use . SD Memory cards ... before use your digital camcorder. Water Resistant Silicon Note: SD Memory Card and batteries not included. 2 Introduction Thank you need to be purchased separately. Bike Mount 8. Digital Helmet Camcorder 2. Installation CD 4.
Camera Manual
Page 4
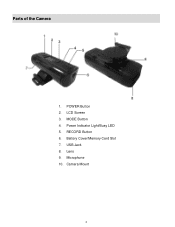
Power Indicator Light/Busy LED 5. Battery Cover/Memory Card Slot 7. Camera Mount 3 USB Jack 8. POWER Button 2. MODE Button 4. LCD Screen 3. Microphone 10. RECORD Button 6. Lens 9. Parts of the Camera 1.
Power Indicator Light/Busy LED 5. Battery Cover/Memory Card Slot 7. Camera Mount 3 USB Jack 8. POWER Button 2. MODE Button 4. LCD Screen 3. Microphone 10. RECORD Button 6. Lens 9. Parts of the Camera 1.
Camera Manual
Page 8
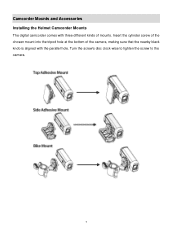
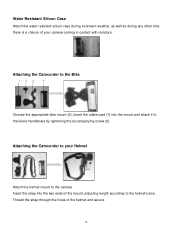
Turn the screw's disc clock-wise to tighten the screw to the camera. 7 Insert the cylinder screw of the chosen mount into the tripod hole at the bottom of mounts. Camcorder Mounts and Accessories Installing the Helmet Camcorder Mounts The digital camcorder comes with three different kinds of the camera, making sure that the nearby black knob is aligned with the parallel hole.
Turn the screw's disc clock-wise to tighten the screw to the camera. 7 Insert the cylinder screw of the chosen mount into the tripod hole at the bottom of mounts. Camcorder Mounts and Accessories Installing the Helmet Camcorder Mounts The digital camcorder comes with three different kinds of the camera, making sure that the nearby black knob is aligned with the parallel hole.
Camera Manual
Page 9
... length according to the bike's handlebars by tightening the accompanying screw (2). Insert the strap into the mount and attach it to the helmet's size. Attaching the Camcorder to your camera coming in contact with moisture. Attaching the Camcorder to the camera. Water ... Attach the water resistant silicon case during inclement weather, as well as during any other time there is a chance of your Helmet Attach the helmet mount to the Bike 1 2 3 4 Choose the appropriate bike mount (3), insert the rubber pad (1) into the two ends of the helmet and secure. 8
... length according to the bike's handlebars by tightening the accompanying screw (2). Insert the strap into the mount and attach it to the helmet's size. Attaching the Camcorder to your camera coming in contact with moisture. Attaching the Camcorder to the camera. Water ... Attach the water resistant silicon case during inclement weather, as well as during any other time there is a chance of your Helmet Attach the helmet mount to the Bike 1 2 3 4 Choose the appropriate bike mount (3), insert the rubber pad (1) into the two ends of the helmet and secure. 8
Camera Manual
Page 10
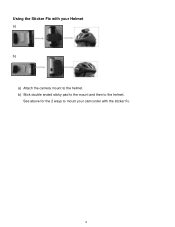
b) Stick double ended sticky pad to the mount and then to the helmet. Using the Sticker Fix with your camcorder with the sticker fix. 9 See above for the 2 ways to mount your Helmet a) b) a) Attach the camera mount to the helmet.
b) Stick double ended sticky pad to the mount and then to the helmet. Using the Sticker Fix with your camcorder with the sticker fix. 9 See above for the 2 ways to mount your Helmet a) b) a) Attach the camera mount to the helmet.

