Camera Manual
Page 2
... for Windows Vista 4 Computer System Requirements for Macintosh 4 A Quick Look at Your Camera...5 Preparing Your Camera for Use...6 Install lithium battery...6 Installing SD Memory Card...8 How to hold your camera correctly when capturing images 10 Starting Your Digital Camera...11 Camera Mode...12 Video Mode... ...34 Playback Mode ...37 Install the Vivitar Experience Image Manager Software 48 Connect your camera to the computer...50 Get photos and videos from your camera to your computer...
... for Windows Vista 4 Computer System Requirements for Macintosh 4 A Quick Look at Your Camera...5 Preparing Your Camera for Use...6 Install lithium battery...6 Installing SD Memory Card...8 How to hold your camera correctly when capturing images 10 Starting Your Digital Camera...11 Camera Mode...12 Video Mode... ...34 Playback Mode ...37 Install the Vivitar Experience Image Manager Software 48 Connect your camera to the computer...50 Get photos and videos from your camera to your computer...
Camera Manual
Page 7
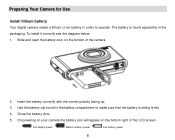
... Camera for Use Install lithium battery Your digital camera needs a lithium Li-ion battery in the battery compartment to operate. Slide and open the battery door on the bottom right of the camera. 2. Use the battery clip found in order to make sure that the battery is found separately in the ...packaging. The battery is sitting firmly. 4. On...
... Camera for Use Install lithium battery Your digital camera needs a lithium Li-ion battery in the battery compartment to operate. Slide and open the battery door on the bottom right of the camera. 2. Use the battery clip found in order to make sure that the battery is found separately in the ...packaging. The battery is sitting firmly. 4. On...

Camera Manual
Page 8
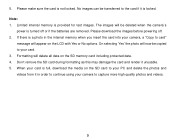
In order to charge your lithium battery, make sure the battery is fully charged after a few hours. 2. Please remove your battery when you don‟t intend to use your camera to replace the battery. 7 Shortly thereafter your camera is inserted correctly and then connect your camera for a long time. 4. Test ...photos taken with the USB cable provided. A "Low battery" message will flash on and running PC with the camera should be downloaded otherwise they will be lost when the camera loses power and ...
In order to charge your lithium battery, make sure the battery is fully charged after a few hours. 2. Please remove your battery when you don‟t intend to use your camera to replace the battery. 7 Shortly thereafter your camera is inserted correctly and then connect your camera for a long time. 4. Test ...photos taken with the USB cable provided. A "Low battery" message will flash on and running PC with the camera should be downloaded otherwise they will be lost when the camera loses power and ...
Camera Manual
Page 9
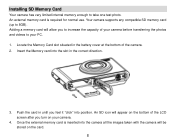
... the images taken with the camera will appear on the bottom of the LCD screen after you feel it "click" into the slot in the battery cover at the bottom of your camera before transferring the photos and videos to your camera. 4. Once the external memory card is required for normal...
... the images taken with the camera will appear on the bottom of the LCD screen after you feel it "click" into the slot in the battery cover at the bottom of your camera before transferring the photos and videos to your camera. 4. Once the external memory card is required for normal...
Camera Manual
Page 10
... „Yes‟ the photo will appear on the SD memory card including protected data. 4. Please download the images before powering off or if the batteries are removed. Don‟t remove the SD card during formatting as this may damage the card and render it in the internal memory when you...
... „Yes‟ the photo will appear on the SD memory card including protected data. 4. Please download the images before powering off or if the batteries are removed. Don‟t remove the SD card during formatting as this may damage the card and render it in the internal memory when you...
Camera Manual
Page 12
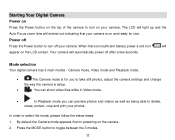
... as being able to delete, rotate, protect, crop and print your photos. Camera mode, Video mode and Playback mode. The Camera mode is insufficient battery power a red icon will automatically power off your camera. In order to toggle between the 3 modes. 11 Press the MODE button to select the mode...
... as being able to delete, rotate, protect, crop and print your photos. Camera mode, Video mode and Playback mode. The Camera mode is insufficient battery power a red icon will automatically power off your camera. In order to toggle between the 3 modes. 11 Press the MODE button to select the mode...
Camera Manual
Page 15
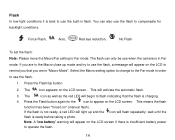
... flash can also use the flash to use the flash. 1. Press the Flash/Up button. 2. Press the Flash button again for backlight conditions. Note: A "low battery" warning will begin to Far mode. Force Flash, Auto, Red eye reduction, No Flash To set the flash: Note: Please move the Macro/Far setting... the icon will activate the automatic flash. 3. The icon as well as the red LED will appear on the LCD screen if there is insufficient battery power to appear on the LCD to use the built-in Far mode. If the flash is ready before taking a photo. wait until the flash...
... flash can also use the flash to use the flash. 1. Press the Flash/Up button. 2. Press the Flash button again for backlight conditions. Note: A "low battery" warning will begin to Far mode. Force Flash, Auto, Red eye reduction, No Flash To set the flash: Note: Please move the Macro/Far setting... the icon will activate the automatic flash. 3. The icon as well as the red LED will appear on the LCD screen if there is insufficient battery power to appear on the LCD to use the built-in Far mode. If the flash is ready before taking a photo. wait until the flash...
Camera Manual
Page 31
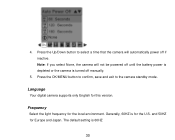
Press the Up/Down button to the camera standby mode. Press the OK/MENU button to confirm, save and exit to select a time that the camera will not be powered off until the battery power is depleted or the camera is 60HZ 30 and 50HZ for the local environment. The default setting is turned off if inactive. Note: If you select None, the camera will automatically power off manually. 5. Frequency Select the light frequency for Europe and Japan. Generally, 60HZ is for this version. 4. Language Your digital camera supports only English for the U.S.
Press the Up/Down button to the camera standby mode. Press the OK/MENU button to confirm, save and exit to select a time that the camera will not be powered off until the battery power is depleted or the camera is 60HZ 30 and 50HZ for the local environment. The default setting is turned off if inactive. Note: If you select None, the camera will automatically power off manually. 5. Frequency Select the light frequency for Europe and Japan. Generally, 60HZ is for this version. 4. Language Your digital camera supports only English for the U.S.

Camera Manual
Page 57
.../Off 2, 5 or 10 sec delay Anti-Shake Yes PictBridge Yes Face Detect Interface Yes USB 2.0 System Requirements Windows XP/ Vista/ Mac OS X (10.4.6 or higher) Battery Lithium rechargeable battery Working Temperature 0~40 ℃ 56
.../Off 2, 5 or 10 sec delay Anti-Shake Yes PictBridge Yes Face Detect Interface Yes USB 2.0 System Requirements Windows XP/ Vista/ Mac OS X (10.4.6 or higher) Battery Lithium rechargeable battery Working Temperature 0~40 ℃ 56
Camera Manual
Page 58
...which requires a constant electric current to your test photos. A00-090513NES 57 This camera requires an SD card for instance if the battery dies or run out of power) all the photos should be lost. Appendix B: Troubleshooting Q: I don't lose important pictures? All images deleted ...using the Vivitar Experience Image Manager. If the camera powers off . Q: How do ? How do I get a message that you upload them again. Press ...
...which requires a constant electric current to your test photos. A00-090513NES 57 This camera requires an SD card for instance if the battery dies or run out of power) all the photos should be lost. Appendix B: Troubleshooting Q: I don't lose important pictures? All images deleted ...using the Vivitar Experience Image Manager. If the camera powers off . Q: How do ? How do I get a message that you upload them again. Press ...


