ViviCam5022
Page 2
... Vista 3 Computer System Requirements for Macintosh 4 A Quick Look at Your Camera...4 Preparing Your Camera for Use...5 Installing SD Memory Card...6 Starting Your Camera ...8 Camera Modes...8 Install the Vivitar Experience Image Manager Software 19 Connect your camera to the computer...22 Get photos and videos from your camera to your computer 22 Get started! ...23 Transfer media from my...
... Vista 3 Computer System Requirements for Macintosh 4 A Quick Look at Your Camera...4 Preparing Your Camera for Use...5 Installing SD Memory Card...6 Starting Your Camera ...8 Camera Modes...8 Install the Vivitar Experience Image Manager Software 19 Connect your camera to the computer...22 Get photos and videos from your camera to your computer 22 Get started! ...23 Transfer media from my...
ViviCam5022
Page 3
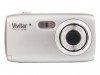
... RAM 8MB. Supports SD/MMC memory card (not included) up to 8GB. 2.4 inch TFT Color LCD Vivitar Experience Image Manager software for purchasing the ViviCam 5022 5.1 Mega-Pixel Digital Camera. Your digital camera can also be used as a removable disk. Please read this manual carefully first in order to or from the...
... RAM 8MB. Supports SD/MMC memory card (not included) up to 8GB. 2.4 inch TFT Color LCD Vivitar Experience Image Manager software for purchasing the ViviCam 5022 5.1 Mega-Pixel Digital Camera. Your digital camera can also be used as a removable disk. Please read this manual carefully first in order to or from the...
ViviCam5022
Page 9
... card, "Card removed, change to turn on the LCD screen. Starting Your Camera Press and hold the Power button again for about 3 seconds. The LCD screen will appear on your computer using the Vivitar Experience Image Manager software as appears in the top left corner of video. Hold the... camera steady and compose your camera, press and hold the Power button to Internal RAM" will light up indicating that ...
... card, "Card removed, change to turn on the LCD screen. Starting Your Camera Press and hold the Power button again for about 3 seconds. The LCD screen will appear on your computer using the Vivitar Experience Image Manager software as appears in the top left corner of video. Hold the... camera steady and compose your camera, press and hold the Power button to Internal RAM" will light up indicating that ...
ViviCam5022
Page 20
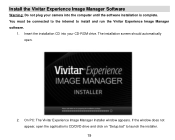
The installation screen should automatically open the application‟s CD/DVD drive and click on "Setup.bat" to install and run the Vivitar Experience Image Manager software. 1. Install the Vivitar Experience Image Manager Software Warning: Do not plug your CD-ROM drive. On PC: The Vivitar Experience Image Manager Installer window appears. Insert the installation CD into your camera into the computer until the software installation is complete. If the window does not appear, open . 2. You must be connected to the internet to launch the installer. 19
The installation screen should automatically open the application‟s CD/DVD drive and click on "Setup.bat" to install and run the Vivitar Experience Image Manager software. 1. Install the Vivitar Experience Image Manager Software Warning: Do not plug your CD-ROM drive. On PC: The Vivitar Experience Image Manager Installer window appears. Insert the installation CD into your camera into the computer until the software installation is complete. If the window does not appear, open . 2. You must be connected to the internet to launch the installer. 19

