
Owner Manual
Page 4
Contents Getting Started...4 Charging the remote control 4 Keys to using this manual 5 Remote Control Information 6 Control Center 7 Status Screen Icons 8 Using your System 10 Commands and Confirmations 10 Navigation 10 Performing Commands 10 Fault Condition Alerts 11 Basic commands (function level 1 12 Arm 12 AUX/Trunk 12 Disarm 13 Remote Start 13 Advanced commands: Function Level 2 14 Silent Arm 14 AUX 1 14 Silent Disarm 15 Runtime Reset 15 Advanced commands...
Contents Getting Started...4 Charging the remote control 4 Keys to using this manual 5 Remote Control Information 6 Control Center 7 Status Screen Icons 8 Using your System 10 Commands and Confirmations 10 Navigation 10 Performing Commands 10 Fault Condition Alerts 11 Basic commands (function level 1 12 Arm 12 AUX/Trunk 12 Disarm 13 Remote Start 13 Advanced commands: Function Level 2 14 Silent Arm 14 AUX 1 14 Silent Disarm 15 Runtime Reset 15 Advanced commands...
Owner Manual
Page 5
... Fault Report 37 Alarm Trigger Report 37 Last Trigger Report 38 Nuisance Prevention (NPC 38 Remote Start Features 39 Pit Stop Mode 39 Key Takeover 39 Remote Start Safe-lock 40 Disabling Remote Start 40 Advanced Start 40 Temperature Reporting 41 Remote Start Time-out Alert 42 Manual Transmission Start (MTS mode 42 Turbo Timer Mode 43 Remote Start Not Available 44 Remote and System Operations 45 Passive Arming 45 Auto Re-arming 45 Valet Mode 46 Power...
... Fault Report 37 Alarm Trigger Report 37 Last Trigger Report 38 Nuisance Prevention (NPC 38 Remote Start Features 39 Pit Stop Mode 39 Key Takeover 39 Remote Start Safe-lock 40 Disabling Remote Start 40 Advanced Start 40 Temperature Reporting 41 Remote Start Time-out Alert 42 Manual Transmission Start (MTS mode 42 Turbo Timer Mode 43 Remote Start Not Available 44 Remote and System Operations 45 Passive Arming 45 Auto Re-arming 45 Valet Mode 46 Power...
Owner Manual
Page 6
... Function Assigned 48 1-way Companion Remote Control 49 Accessing Commands 50 Sensor Bypass operation 50 Button Auto Lock 50 Car Select 50 Programming 51 Battery Information (1-Way 52 System Expansion Options 53 Battery Information (Responder HD 55 Low Battery 55 Battery Life 56 Battery Disposal 57 Glossary of Terms 58 Specifications...59 Government Regulations 60 Warning! Safety First 62 Installation 62 Remote Start Capable 62 Manual Transmission Vehicles 62 Interference 64 Upgrades...
... Function Assigned 48 1-way Companion Remote Control 49 Accessing Commands 50 Sensor Bypass operation 50 Button Auto Lock 50 Car Select 50 Programming 51 Battery Information (1-Way 52 System Expansion Options 53 Battery Information (Responder HD 55 Low Battery 55 Battery Life 56 Battery Disposal 57 Glossary of Terms 58 Specifications...59 Government Regulations 60 Warning! Safety First 62 Installation 62 Remote Start Capable 62 Manual Transmission Vehicles 62 Interference 64 Upgrades...
Owner Manual
Page 9
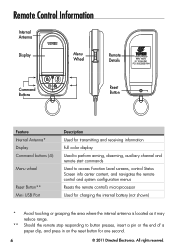
Remote Control Information Internal Antenna Display Menu Wheel Remote Details 1-800-274-0200 RPN 7941V IC: 1513A-7941 FCC ID:EZSDEI7941 Command Buttons Reset Button Feature Internal Antenna* Display Command buttons (4): Menu wheel Reset Button** Mini USB Port Description Used for transmitting and receiving information Full color display Used to perform arming, disarming, auxiliary channel and remote start commands Used to access Function Level screens, control Status Screen info...
Remote Control Information Internal Antenna Display Menu Wheel Remote Details 1-800-274-0200 RPN 7941V IC: 1513A-7941 FCC ID:EZSDEI7941 Command Buttons Reset Button Feature Internal Antenna* Display Command buttons (4): Menu wheel Reset Button** Mini USB Port Description Used for transmitting and receiving information Full color display Used to perform arming, disarming, auxiliary channel and remote start commands Used to access Function Level screens, control Status Screen info...
Owner Manual
Page 11
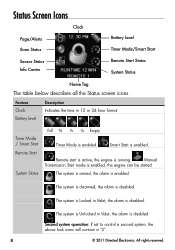
... operation: If set to control a second system, the above lock icons will contain a "2". 8 © 2011 Directed Electronics. Manual Transmission Start mode is enabled, the engine can be started The system is armed, the alarm is disabled. Remote start is active, the engine is disabled. The system is disarmed, the alarm is running. All rights reserved. Feature Clock Battery level Description Indicates the time in Valet, the alarm is enabled. Status...
... operation: If set to control a second system, the above lock icons will contain a "2". 8 © 2011 Directed Electronics. Manual Transmission Start mode is enabled, the engine can be started The system is armed, the alarm is disabled. Remote start is active, the engine is disabled. The system is disarmed, the alarm is running. All rights reserved. Feature Clock Battery level Description Indicates the time in Valet, the alarm is enabled. Status...
Owner Manual
Page 12
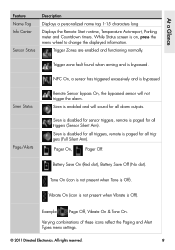
... bypass On, the bypassed sensor will sound for all alarm outputs. Siren is disabled for all triggers, remote is paged for all triggers (Sensor Silent Arm). While Status screen is Off). Trigger Zones are enabled and functioning normally. Siren is disabled for sensor triggers, remote is paged for all triggers (Full Silent Arm). Battery Save On (Red dot), Battery Save Off (No dot). Pager On, Pager Off. Tone...
... bypass On, the bypassed sensor will sound for all alarm outputs. Siren is disabled for all triggers, remote is paged for all triggers (Sensor Silent Arm). While Status screen is Off). Trigger Zones are enabled and functioning normally. Siren is disabled for sensor triggers, remote is paged for all triggers (Full Silent Arm). Battery Save On (Red dot), Battery Save Off (No dot). Pager On, Pager Off. Tone...
Owner Manual
Page 16
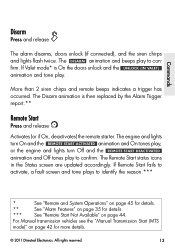
.... © 2011 Directed Electronics. Commands Disarm Press and release The alarm disarms, doors unlock (if connected), and the siren chirps and lights flash twice. For Manual transmission vehicles see the "Manual Transmission Start (MTS mode)" on page 44. All rights reserved. 13 More than 2 siren chirps and remote beeps indicates a trigger has occurred. The Disarm animation is On the doors unlock and the UNLOCK (IN VALET) animation and tone...
.... © 2011 Directed Electronics. Commands Disarm Press and release The alarm disarms, doors unlock (if connected), and the siren chirps and lights flash twice. For Manual transmission vehicles see the "Manual Transmission Start (MTS mode)" on page 44. All rights reserved. 13 More than 2 siren chirps and remote beeps indicates a trigger has occurred. The Disarm animation is On the doors unlock and the UNLOCK (IN VALET) animation and tone...
Owner Manual
Page 18
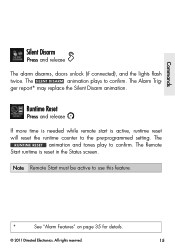
...; 2011 Directed Electronics. Commands Silent Disarm Press and release The alarm disarms, doors unlock (if connected), and the lights flash twice. The SILENT DISARM animation plays to confirm. Runtime Reset Press and release If more time is needed while remote start is reset in the Status screen. Note Remote Start must be active to the pre-programmed setting. All rights reserved. 15 The Alarm Trigger report* may replace the Silent Disarm animation.
...; 2011 Directed Electronics. Commands Silent Disarm Press and release The alarm disarms, doors unlock (if connected), and the lights flash twice. The SILENT DISARM animation plays to confirm. Runtime Reset Press and release If more time is needed while remote start is reset in the Status screen. Note Remote Start must be active to the pre-programmed setting. All rights reserved. 15 The Alarm Trigger report* may replace the Silent Disarm animation.

Owner Manual
Page 19
... 2 output. Shock sensor Press and release : shock sensor warn- Perform arm command any time to access menu The Sensor Bypass menu screen has four options, pressing the appropriate button as shown below activates that bypass level. All rights reserved. An appropriate screen and beeps play to the remote are defeated. Note System needs to be armed to...
... 2 output. Shock sensor Press and release : shock sensor warn- Perform arm command any time to access menu The Sensor Bypass menu screen has four options, pressing the appropriate button as shown below activates that bypass level. All rights reserved. An appropriate screen and beeps play to the remote are defeated. Note System needs to be armed to...
Owner Manual
Page 26
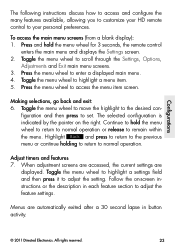
... to move the highlight to the desired con- figuration and then press to your HD remote control to set. The selected configuration is indicated by the pointer on -screen instructions or the description in button activity. © 2011 Directed Electronics. Menus are displayed. All rights reserved. 23 To access the main menu screens (from...
... to move the highlight to the desired con- figuration and then press to your HD remote control to set. The selected configuration is indicated by the pointer on -screen instructions or the description in button activity. © 2011 Directed Electronics. Menus are displayed. All rights reserved. 23 To access the main menu screens (from...
Owner Manual
Page 29
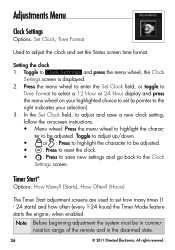
...: Set Clock, Time Format Used to adjust the clock and set how many times (1 - 24 starts) and how often (every 1-24 hours) the Timer Mode feature starts the engine, when enabled. Toggle to highlight the charac- Note Before beginning adjustment the system must be in communication range of the remote and in the disarmed state. 26 © 2011 Directed...
...: Set Clock, Time Format Used to adjust the clock and set how many times (1 - 24 starts) and how often (every 1-24 hours) the Timer Mode feature starts the engine, when enabled. Toggle to highlight the charac- Note Before beginning adjustment the system must be in communication range of the remote and in the disarmed state. 26 © 2011 Directed...
Owner Manual
Page 30
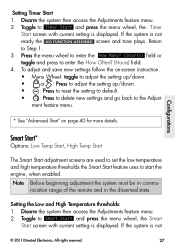
... See "Advanced Start" on -screen instruction. Note Before beginning adjustment the system must be in the disarmed state. Toggle to adjust the setting up /down . If the system is not © 2011 Directed Electronics. Press ...range of the remote and in commu- If the system is not ready the NO FUNCTION ASSIGNED screen and tone plays. Toggle to default. Smart Start* Options: Low Temp Start, High Temp Start The Smart Start adjustment screens are used to set the low temperature and high temperature thresholds the Smart Start feature uses to Step 1. 3. Setting Timer Start 1. Disarm...
... See "Advanced Start" on -screen instruction. Note Before beginning adjustment the system must be in the disarmed state. Toggle to adjust the setting up /down . If the system is not © 2011 Directed Electronics. Press ...range of the remote and in commu- If the system is not ready the NO FUNCTION ASSIGNED screen and tone plays. Toggle to default. Smart Start* Options: Low Temp Start, High Temp Start The Smart Start adjustment screens are used to set the low temperature and high temperature thresholds the Smart Start feature uses to Step 1. 3. Setting Timer Start 1. Disarm...
Owner Manual
Page 32
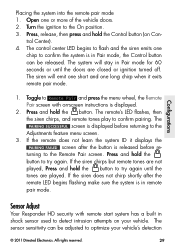
... Remote Pair screen. If the siren chirps but remote tones are closed or ignition turned off. trol Center). 4. If the remote does not learn the system ID it exits remote pair mode. 1. Sensor Adjust Your Responder HD security with on-screen instructions is in Pair mode, the Control button can be released. Press, release, then press and hold the button. The PAIRING SUCCESSFUL screen is in remote pair mode. Open one chirp...
... Remote Pair screen. If the siren chirps but remote tones are closed or ignition turned off. trol Center). 4. If the remote does not learn the system ID it exits remote pair mode. 1. Sensor Adjust Your Responder HD security with on-screen instructions is in Pair mode, the Control button can be released. Press, release, then press and hold the button. The PAIRING SUCCESSFUL screen is in remote pair mode. Open one chirp...
Owner Manual
Page 40
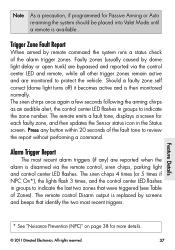
... via the remote control, siren chirps, parking light and control center LED flashes. Note As a precaution, if programmed for Passive Arming or Auto re-arming the system should be placed into Valet Mode until a remote is then monitored normally. Alarm Trigger Report The most recent triggers. The remote control Disarm output is disarmed via the control center LED and remote, while all other trigger zones remain active and are reported when the alarm is replaced by remote command the...
... via the remote control, siren chirps, parking light and control center LED flashes. Note As a precaution, if programmed for Passive Arming or Auto re-arming the system should be placed into Valet Mode until a remote is then monitored normally. Alarm Trigger Report The most recent triggers. The remote control Disarm output is disarmed via the control center LED and remote, while all other trigger zones remain active and are reported when the alarm is replaced by remote command the...
Owner Manual
Page 48
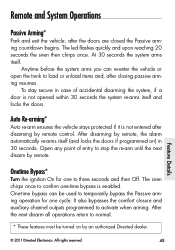
... passive arming resumes. Remote and System Operations Passive Arming* Park and exit the vehicle, after disarming by remote control. To stay secure in 30 seconds. It also bypasses the comfort closure and auxiliary channel outputs programmed to temporarily bypass the Passive arming operation for one -time bypass is enabled. The led flashes quickly and upon reaching 20 seconds the siren then chirps once. Auto Re-arming* Auto...
... passive arming resumes. Remote and System Operations Passive Arming* Park and exit the vehicle, after disarming by remote control. To stay secure in 30 seconds. It also bypasses the comfort closure and auxiliary channel outputs programmed to temporarily bypass the Passive arming operation for one -time bypass is enabled. The led flashes quickly and upon reaching 20 seconds the siren then chirps once. Auto Re-arming* Auto...

Owner Manual
Page 49
Arm and Disarm commands lock and unlock the doors while the LOCKED IN VALET and UNLOCK IN VALET animations and beeps play to manually enter and exit Valet Mode: 1. Power Save To reduce power consumption the control center status LED modifies its output if the vehicle is turned off after any major action has occurred. When the remote receives this message it was in at the...
Arm and Disarm commands lock and unlock the doors while the LOCKED IN VALET and UNLOCK IN VALET animations and beeps play to manually enter and exit Valet Mode: 1. Power Save To reduce power consumption the control center status LED modifies its output if the vehicle is turned off after any major action has occurred. When the remote receives this message it was in at the...

Owner Manual
Page 52
1-way Companion Remote Control LED Command Buttons A U X Function Button Level Button Basic Commands (Function Level 1) Direct Access Function Level 2 x 1 Advanced Commands Function Function Level 3 Level 4 x 2 x 3 Function Level 5 x 4 Arm/Lock (Panic) Silent Arm Sensor Bypass Sensor Silent Full Silent Mode Mode* Disarm/ Silent Disarm Remote Valet Car Finder Unlock Remote Start Runtime Reset Timer Mode* Smart Start* Defroster* A U X Aux/Trunk AUX 1 AUX 2 AUX 3 AUX 4 Not Used Used to access function levels for Advanced Commands ( with multiplier in third row ...
1-way Companion Remote Control LED Command Buttons A U X Function Button Level Button Basic Commands (Function Level 1) Direct Access Function Level 2 x 1 Advanced Commands Function Function Level 3 Level 4 x 2 x 3 Function Level 5 x 4 Arm/Lock (Panic) Silent Arm Sensor Bypass Sensor Silent Full Silent Mode Mode* Disarm/ Silent Disarm Remote Valet Car Finder Unlock Remote Start Runtime Reset Timer Mode* Smart Start* Defroster* A U X Aux/Trunk AUX 1 AUX 2 AUX 3 AUX 4 Not Used Used to access function levels for Advanced Commands ( with multiplier in third row ...
Owner Manual
Page 55
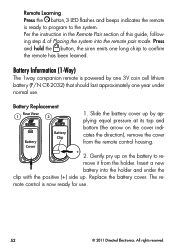
... cover indicates the direction), remove the cover from the holder. Replace the battery cover. Slide the battery cover up by one 3V coin cell lithium battery (P/N CR-2032) that should last approximately one long chirp to the system. Insert a new battery into the remote pair mode. The re- Battery Replacement Rear View 1 2 1. All rights reserved. Per the instruction in the Remote Pair section of this...
... cover indicates the direction), remove the cover from the holder. Replace the battery cover. Slide the battery cover up by one 3V coin cell lithium battery (P/N CR-2032) that should last approximately one long chirp to the system. Insert a new battery into the remote pair mode. The re- Battery Replacement Rear View 1 2 1. All rights reserved. Per the instruction in the Remote Pair section of this...
Owner Manual
Page 56
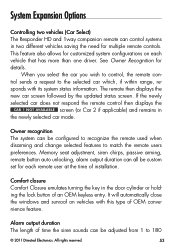
... If the newly selected car does not respond the remote control then displays the CAR 1 NOT AVAILABLE screen (or Car 2 if applicable) and remains in the newly selected car mode. Memory seat adjustment, siren chirps, passive arming, remote button auto unlocking, alarm output duration can all be configured to recognize the remote used when disarming and change selected features to the selected car which, if within range, responds with this type...
... If the newly selected car does not respond the remote control then displays the CAR 1 NOT AVAILABLE screen (or Car 2 if applicable) and remains in the newly selected car mode. Memory seat adjustment, siren chirps, passive arming, remote button auto unlocking, alarm output duration can all be configured to recognize the remote used when disarming and change selected features to the selected car which, if within range, responds with this type...
Owner Manual
Page 67
... CEASE THE USE OF THE UNIT AND SEEK THE ASSISTANCE OF AN AUTHORIZED Directed DEALER TO REPAIR OR DISCONNECT THE INSTALLED REMOTE START MODULE. DIRECTED WILL NOT BE HELD RESPONSIBLE OR PAY FOR INSTALLATION OR REINSTALLATION COSTS. Installation in strict accordance with a manual transmission. OPERATING THE REMOTE START SYSTEM UNDER THESE CONDITIONS MAY RESULT IN PROPERTY DAMAGE OR PERSONAL INJURY. This...
... CEASE THE USE OF THE UNIT AND SEEK THE ASSISTANCE OF AN AUTHORIZED Directed DEALER TO REPAIR OR DISCONNECT THE INSTALLED REMOTE START MODULE. DIRECTED WILL NOT BE HELD RESPONSIBLE OR PAY FOR INSTALLATION OR REINSTALLATION COSTS. Installation in strict accordance with a manual transmission. OPERATING THE REMOTE START SYSTEM UNDER THESE CONDITIONS MAY RESULT IN PROPERTY DAMAGE OR PERSONAL INJURY. This...


