User Guide English
Page 1
VS18863 P/N: XG340C-2K Warranty information contained in this User Guide to obtain important information on our web site at http://www.viewsonic.com in English, or in specific languages using your product in the upper right corner of our website. XG340C-2K Display User Guide IMPORTANT: Please read this User Guide will describe your limited coverage from ViewSonic® Corporation, which is also found on installing and using the Regional selection box in a safe manner, as well as registering your product for future service. Model No.
VS18863 P/N: XG340C-2K Warranty information contained in this User Guide to obtain important information on our web site at http://www.viewsonic.com in English, or in specific languages using your product in the upper right corner of our website. XG340C-2K Display User Guide IMPORTANT: Please read this User Guide will describe your limited coverage from ViewSonic® Corporation, which is also found on installing and using the Regional selection box in a safe manner, as well as registering your product for future service. Model No.

User Guide English
Page 4
... • Protect the power cord from being used , use attachments/accessories, such as : ͫ if the power-supply cord or plug is damaged. ͫ if liquid is spilled onto or objects fall into the outlet. • When connecting to climb, such as toys and remote controls, on the top of ... dropped. • When using the device. • Do not attempt to qualified service personnel. A grounding-type plug has two blades and a third grounding prong. The wide blade and the third prong are never removed. • Always route and manage cords and cables connected to appropriate levels, or ...
... • Protect the power cord from being used , use attachments/accessories, such as : ͫ if the power-supply cord or plug is damaged. ͫ if liquid is spilled onto or objects fall into the outlet. • When connecting to climb, such as toys and remote controls, on the top of ... dropped. • When using the device. • Do not attempt to qualified service personnel. A grounding-type plug has two blades and a third grounding prong. The wide blade and the third prong are never removed. • Always route and manage cords and cables connected to appropriate levels, or ...
User Guide English
Page 6
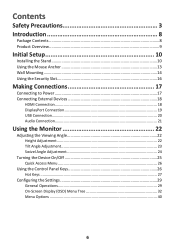
... Contents...8 Product Overview...9 Initial Setup 10 Installing the Stand 10 Using the Mouse Anchor 13 Wall Mounting...14 Using the Security Slot 16 Making Connections 17 Connecting to Power 17 Connecting External Devices 18 HDMI Connection 18 DisplayPort Connection 19 USB Connection...20 Audio Connection 21 Using the Monitor 22 Adjusting the Viewing Angle 22 Height Adjustment 22 Tilt Angle Adjustment 23 Swivel Angle Adjustment 24 Turning the Device On/Off 25 Quick Access Menu 26 Using the Control Panel Keys 26 Hot Keys...
... Contents...8 Product Overview...9 Initial Setup 10 Installing the Stand 10 Using the Mouse Anchor 13 Wall Mounting...14 Using the Security Slot 16 Making Connections 17 Connecting to Power 17 Connecting External Devices 18 HDMI Connection 18 DisplayPort Connection 19 USB Connection...20 Audio Connection 21 Using the Monitor 22 Adjusting the Viewing Angle 22 Height Adjustment 22 Tilt Angle Adjustment 23 Swivel Angle Adjustment 24 Turning the Device On/Off 25 Quick Access Menu 26 Using the Control Panel Keys 26 Hot Keys...

User Guide English
Page 10
Installing the Stand 1. Place the monitor on the monitor stand's base with the screen facing down. 2. Use the captured screw in the monitor stand's base and secure it to the monitor stand's neck. 10 Align and connect the two (2) points on a flat, stable surface with the monitor stand's neck. 3. Initial Setup This section provides detailed instructions for setting up your monitor.
Installing the Stand 1. Place the monitor on the monitor stand's base with the screen facing down. 2. Use the captured screw in the monitor stand's base and secure it to the monitor stand's neck. 10 Align and connect the two (2) points on a flat, stable surface with the monitor stand's neck. 3. Initial Setup This section provides detailed instructions for setting up your monitor.
User Guide English
Page 25
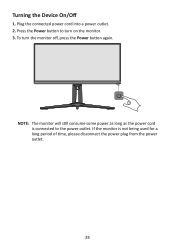
To turn on the monitor. 3. NOTE: The monitor will still consume some power as long as the power cord is not being used for a long period of time, please disconnect the power plug from the power outlet. 25 If the monitor is connected to turn the monitor off, press the Power button again. Press the Power button to the power outlet. Turning the Device On/Off 1. Plug the connected power cord into a power outlet. 2.
To turn on the monitor. 3. NOTE: The monitor will still consume some power as long as the power cord is not being used for a long period of time, please disconnect the power plug from the power outlet. 25 If the monitor is connected to turn the monitor off, press the Power button again. Press the Power button to the power outlet. Turning the Device On/Off 1. Plug the connected power cord into a power outlet. 2.

User Guide English
Page 30
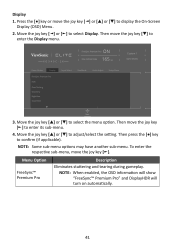
... FreeSync Premium Pro 165 Max. Then press the [●] key to adjust/select the setting. Refresh Rate Hz Custom 1 Game Modes Game Modes Volume Mute Display Input Select On Off ViewMode Audio Adjust Setup Menu Navi. 4. XG340C-2K ON FreeSync Premium Pro 165 Max. Refresh Rate Hz Custom 1 Game Modes Game Modes Volume Mute Display Input Select On Off ViewMode Audio Adjust Setup Menu Navi. 30 3. Move the joy key [▲] or [▼] to enter the...
... FreeSync Premium Pro 165 Max. Then press the [●] key to adjust/select the setting. Refresh Rate Hz Custom 1 Game Modes Game Modes Volume Mute Display Input Select On Off ViewMode Audio Adjust Setup Menu Navi. 4. XG340C-2K ON FreeSync Premium Pro 165 Max. Refresh Rate Hz Custom 1 Game Modes Game Modes Volume Mute Display Input Select On Off ViewMode Audio Adjust Setup Menu Navi. 30 3. Move the joy key [▲] or [▼] to enter the...
User Guide English
Page 41
...: When enabled, the OSD information will show "FreeSync™ Premium Pro" and DisplayHDR will turn on automatically. 41 Refresh Rate Hz Custom 1 Game Modes Game Modes Display FreeSync Premium Pro HDR OverClocking ClearView NightView ScopeView Input Select ViewMode Audio Adjust Setup Menu Navi. 3. Move the joy key [▲] or [▼] to adjust/select the setting. Then move the joy key [►]. XG340C-2K ON FreeSync Premium...
...: When enabled, the OSD information will show "FreeSync™ Premium Pro" and DisplayHDR will turn on automatically. 41 Refresh Rate Hz Custom 1 Game Modes Game Modes Display FreeSync Premium Pro HDR OverClocking ClearView NightView ScopeView Input Select ViewMode Audio Adjust Setup Menu Navi. 3. Move the joy key [▲] or [▼] to adjust/select the setting. Then move the joy key [►]. XG340C-2K ON FreeSync Premium...
User Guide English
Page 48
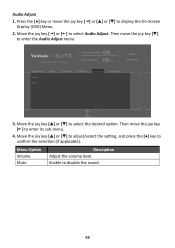
... setting, and press the [●] key to select Audio Adjust. Move the joy key [◄] or [►] to confirm the selection (if applicable). Then move the joy key [◄] or [▲] or [▼] to display the On-Screen Display (OSD) Menu. 2. Refresh Rate Hz Custom 1 Game Modes Game Modes Volume Mute Display Input Select ViewMode Audio Adjust Setup Menu Navi. 3. Move the joy key [▲] or [▼] to disable the sound...
... setting, and press the [●] key to select Audio Adjust. Move the joy key [◄] or [►] to confirm the selection (if applicable). Then move the joy key [◄] or [▲] or [▼] to display the On-Screen Display (OSD) Menu. 2. Refresh Rate Hz Custom 1 Game Modes Game Modes Volume Mute Display Input Select ViewMode Audio Adjust Setup Menu Navi. 3. Move the joy key [▲] or [▼] to disable the sound...
User Guide English
Page 49
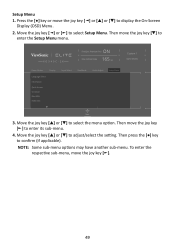
...display the On-Screen Display (OSD) Menu. 2. Refresh Rate Hz Custom 1 Game Modes Game Modes Display Language Select Information Quick Access Crosshair Elite RGB HDMI CEC Input Select ViewMode Audio Adjust Setup Menu Navi. 3. Then move the joy key [◄] or [▲] or [▼] to enter its sub-menu. 4. Then press the [●] key to select the menu...9660;] to enter the Setup Menu menu. NOTE: Some sub-menu options may have another sub-menu. To enter the respective sub-menu, move the joy key [▼] to adjust/select the setting. XG340C-2K ON FreeSync Premium Pro ...
...display the On-Screen Display (OSD) Menu. 2. Refresh Rate Hz Custom 1 Game Modes Game Modes Display Language Select Information Quick Access Crosshair Elite RGB HDMI CEC Input Select ViewMode Audio Adjust Setup Menu Navi. 3. Then move the joy key [◄] or [▲] or [▼] to enter its sub-menu. 4. Then press the [●] key to select the menu...9660;] to enter the Setup Menu menu. NOTE: Some sub-menu options may have another sub-menu. To enter the respective sub-menu, move the joy key [▼] to adjust/select the setting. XG340C-2K ON FreeSync Premium Pro ...
User Guide English
Page 50
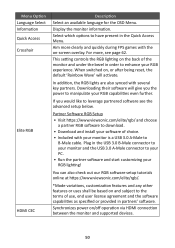
... cable. Plug in the Quick Access Menu. You can also check out our RGB software setup tutorials online at https://www.viewsonic.com/elite/rgb/. *Mode variations, customization features and any other features or uses shall be based on and subject to have present in the USB 3.0 B-Male connector to your RGB lighting! For more clearly and quickly during FPS games with several key partners. When switched on -screen overlay. Display...
... cable. Plug in the Quick Access Menu. You can also check out our RGB software setup tutorials online at https://www.viewsonic.com/elite/rgb/. *Mode variations, customization features and any other features or uses shall be based on and subject to have present in the USB 3.0 B-Male connector to your RGB lighting! For more clearly and quickly during FPS games with several key partners. When switched on -screen overlay. Display...
User Guide English
Page 51
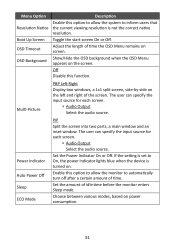
... monitor to automatically turn off after a certain amount of time. The user can specify the input source for each screen. ͫ Audio Output Select the audio source. Set the Power Indicator On or Off. Toggle the start screen On or Off. Choose between various modes, based on power consumption. 51 Power Indicator Auto Power Off Sleep ECO Mode PIP Split the screen into two parts, a main window and an inset window. The user can specify the input source...
... monitor to automatically turn off after a certain amount of time. The user can specify the input source for each screen. ͫ Audio Output Select the audio source. Set the Power Indicator On or Off. Toggle the start screen On or Off. Choose between various modes, based on power consumption. 51 Power Indicator Auto Power Off Sleep ECO Mode PIP Split the screen into two parts, a main window and an inset window. The user can specify the input source...
User Guide English
Page 67
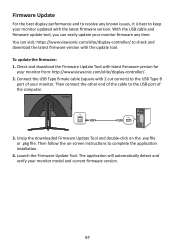
... the USB Type B port of your monitor. Launch the Firmware Update Tool. With the USB cable and firmware update tool, you can visit: https://www.viewsonic.com/elite/display-controller/ to check and download the latest firmware version with latest firmware version for your monitor model and current firmware version. 67 Unzip the downloaded Firmware Update Tool and double-click on -screen instructions to the USB port of the cable to complete the application installation. 4. Then connect the other...
... the USB Type B port of your monitor. Launch the Firmware Update Tool. With the USB cable and firmware update tool, you can visit: https://www.viewsonic.com/elite/display-controller/ to check and download the latest firmware version with latest firmware version for your monitor model and current firmware version. 67 Unzip the downloaded Firmware Update Tool and double-click on -screen instructions to the USB port of the cable to complete the application installation. 4. Then connect the other...
User Guide English
Page 69
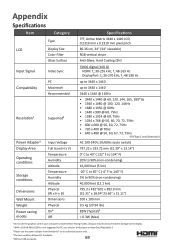
Appendix Specifications Item Category Type LCD Display Size Color Filter Glass Surface Specifications TFT, Active Matrix 3440 x 1440 LCD, 0.2319 mm x 0.2319 mm pixel pitch 86.36 cm, 34" (34" viewable) RGB vertical stripe Anti-Glare, Hard Coating (3H) Input Signal Compatibility Video Sync PC Macintosh Recommended Resolution1 Supported2 Power Adapter3 Display Area Operating conditions Storage conditions Dimensions Wall Mount Weight Power saving modes Input Voltage Full Scan (H x V) Temperature Humidity Altitude Temperature Humidity Altitude Physical...
Appendix Specifications Item Category Type LCD Display Size Color Filter Glass Surface Specifications TFT, Active Matrix 3440 x 1440 LCD, 0.2319 mm x 0.2319 mm pixel pitch 86.36 cm, 34" (34" viewable) RGB vertical stripe Anti-Glare, Hard Coating (3H) Input Signal Compatibility Video Sync PC Macintosh Recommended Resolution1 Supported2 Power Adapter3 Display Area Operating conditions Storage conditions Dimensions Wall Mount Weight Power saving modes Input Voltage Full Scan (H x V) Temperature Humidity Altitude Temperature Humidity Altitude Physical...
User Guide English
Page 70
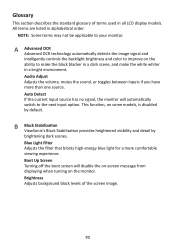
... the next input option. Audio Adjust Adjusts the volume, mutes the sound, or toggles between inputs if you have more comfortable viewing experience. A Advanced DCR Advanced DCR technology automatically detects the image signal and intelligently controls the backlight brightness and color to improve on the monitor. Auto Detect If the current input source has no signal, the monitor will disable the on-screen message from displaying when turning on the ability to make the black blacker...
... the next input option. Audio Adjust Adjusts the volume, mutes the sound, or toggles between inputs if you have more comfortable viewing experience. A Advanced DCR Advanced DCR technology automatically detects the image signal and intelligently controls the backlight brightness and color to improve on the monitor. Auto Detect If the current input source has no signal, the monitor will disable the on-screen message from displaying when turning on the ability to make the black blacker...
User Guide English
Page 71
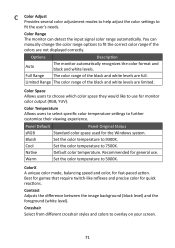
... several color adjustment modes to help adjust the color settings to use . Color Range The monitor can manually change the color range options to 5000K. Color Space Allows users to choose which color space they would like reflexes and precise color for the Windows system. Panel Default Panel Original Status sRGB Standard color space used for quick reactions. Crosshair Select from different crosshair styles and colors to 9300K. Full Range The color range of the black and white levels are not displayed correctly. Native Default color...
... several color adjustment modes to help adjust the color settings to use . Color Range The monitor can manually change the color range options to 5000K. Color Space Allows users to choose which color space they would like reflexes and precise color for the Windows system. Panel Default Panel Original Status sRGB Standard color space used for quick reactions. Crosshair Select from different crosshair styles and colors to 9300K. Full Range The color range of the black and white levels are not displayed correctly. Native Default color...
User Guide English
Page 73
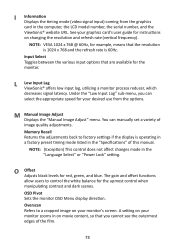
... adjustments back to a cropped image on your graphics card's user guide for your monitor zooms in the "Specifications" of this manual. NOTE: (Exception) This control does not affect changes made in the computer, the LCD model number, the serial number, and the ViewSonic® website URL. OSD Pivot Sets the monitor OSD Menu display direction. Under the "Low Input Lag" sub-menu, you can manually set a variety of the film. 73 A setting on changing the resolution and refresh rate (vertical frequency). L Low Input Lag ViewSonic...
... adjustments back to a cropped image on your graphics card's user guide for your monitor zooms in the "Specifications" of this manual. NOTE: (Exception) This control does not affect changes made in the computer, the LCD model number, the serial number, and the ViewSonic® website URL. OSD Pivot Sets the monitor OSD Menu display direction. Under the "Low Input Lag" sub-menu, you can manually set a variety of the film. 73 A setting on changing the resolution and refresh rate (vertical frequency). L Low Input Lag ViewSonic...
User Guide English
Page 74
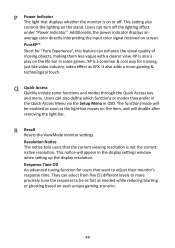
... define which functions or modes they prefer in the Quick Access Menu via the Setup Menu in some functions and modes through the Quick Access key and menu. R Recall Resets the ViewMode monitor settings. This setting also controls the lighting on screen. PureXP™ Short for "Pure Experience", this feature can turn off . Q Quick Access Quickly initiate some games. P Power Indicator The light that displays whether the monitor is not the correct native resolution.
... define which functions or modes they prefer in the Quick Access Menu via the Setup Menu in some functions and modes through the Quick Access key and menu. R Recall Resets the ViewMode monitor settings. This setting also controls the lighting on screen. PureXP™ Short for "Pure Experience", this feature can turn off . Q Quick Access Quickly initiate some games. P Power Indicator The light that displays whether the monitor is not the correct native resolution.
User Guide English
Page 76
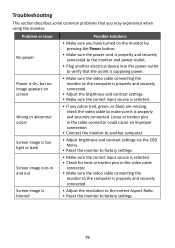
... turned on the monitor by pressing the Power button. • Make sure the power cord is properly and securely connected to the monitor and power outlet. • Plug another computer. • Adjust brightness and contrast settings via the OSD Menu. • Reset the monitor to the computer is properly and securely connected. • Adjust the brightness and contrast settings. • Make sure the correct input source is supplying power. • Make sure the video cable connecting the monitor to factory settings. Troubleshooting This section describes some common problems...
... turned on the monitor by pressing the Power button. • Make sure the power cord is properly and securely connected to the monitor and power outlet. • Plug another computer. • Adjust brightness and contrast settings via the OSD Menu. • Reset the monitor to the computer is properly and securely connected. • Adjust the brightness and contrast settings. • Make sure the correct input source is supplying power. • Make sure the video cable connecting the monitor to factory settings. Troubleshooting This section describes some common problems...
User Guide English
Page 77
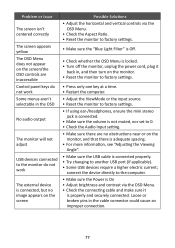
... USB cable is properly and securely connected. connect the device directly to the computer. • Make sure the Power is On • Adjust brightness and contrast via the OSD Menu. • Check the Aspect Ratio. • Reset the monitor to factory settings. • Make sure the "Blue Light Filter" is Off. • Check whether the OSD Menu is locked. • Turn off the monitor, unplug the power cord, plug it is connected properly. • Try changing to the monitor do not work...
... USB cable is properly and securely connected. connect the device directly to the computer. • Make sure the Power is On • Adjust brightness and contrast via the OSD Menu. • Check the Aspect Ratio. • Reset the monitor to factory settings. • Make sure the "Blue Light Filter" is Off. • Check whether the OSD Menu is locked. • Turn off the monitor, unplug the power cord, plug it is connected properly. • Try changing to the monitor do not work...
User Guide English
Page 85
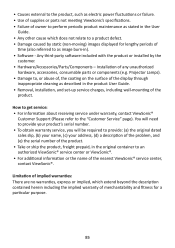
..., (c) your address, (d) a description of the problem, and (e) the serial number of the product. • Take or ship the product, freight prepaid, in the product User Guide. • Removal, installation, and set-up service charges, including wall-mounting of the product. Any third-party software included with the product or installed by static (non-moving) images displayed for a particular purpose. 85 Installation of any unauthorized hardware, accessories...
..., (c) your address, (d) a description of the problem, and (e) the serial number of the product. • Take or ship the product, freight prepaid, in the product User Guide. • Removal, installation, and set-up service charges, including wall-mounting of the product. Any third-party software included with the product or installed by static (non-moving) images displayed for a particular purpose. 85 Installation of any unauthorized hardware, accessories...


