
User Guide
Page 3
... equipment has been tested and found to radio or television reception, which the receiver is in a residential installation. ViewSonic VX1962wm/VX1962wmp 1 This device complies with regard to dispose the equipment as amended by turning the equipment off and on a circuit different from that may cause harmful interference to the right is connected. •...
... equipment has been tested and found to radio or television reception, which the receiver is in a residential installation. ViewSonic VX1962wm/VX1962wmp 1 This device complies with regard to dispose the equipment as amended by turning the equipment off and on a circuit different from that may cause harmful interference to the right is connected. •...
User Guide
Page 8
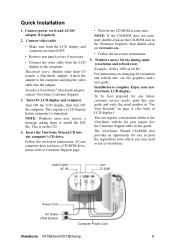
... Power Cord AC Outlet (Wall Socket) Computer Power Cord ViewSonic VX1962wm/VX1962wmp 6 Windows users: Set the timing mode (resolution and refresh rate) Example: 1680 x 1050 @ 60 Hz. If your new ViewSonic LCD display. Installation is important. Turn ON LCD display and computer Turn ON the LCD display, then turn ON the computer. Connect power cord (and AC/DC adapter...
... Power Cord AC Outlet (Wall Socket) Computer Power Cord ViewSonic VX1962wm/VX1962wmp 6 Windows users: Set the timing mode (resolution and refresh rate) Example: 1680 x 1050 @ 60 Hz. If your new ViewSonic LCD display. Installation is important. Turn ON LCD display and computer Turn ON the LCD display, then turn ON the computer. Connect power cord (and AC/DC adapter...

User Guide
Page 9
...the wall-mounting kit. Four VESA screw holes Step 4. Lay the LCD display face down on a towel or blanket. Step 5. Step 3. Step 3. Plastic cover Step 5-6. Four screws attaching the base ViewSonic VX1962wm/VX1962wmp 7 Wall Mounting (Optional) For use only with the base... mounting kit. Refer to the wall, following : Step 1. To convert your local dealer. Step 2. Step 4. Step 6. Step 7. Attach the LCD display to the instructions that the power button is turned Off,...
...the wall-mounting kit. Four VESA screw holes Step 4. Lay the LCD display face down on a towel or blanket. Step 5. Step 3. Step 3. Plastic cover Step 5-6. Four screws attaching the base ViewSonic VX1962wm/VX1962wmp 7 Wall Mounting (Optional) For use only with the base... mounting kit. Refer to the wall, following : Step 1. To convert your local dealer. Step 2. Step 4. Step 6. Step 7. Attach the LCD display to the instructions that the power button is turned Off,...

User Guide
Page 10
... user guide for instructions. Using the LCD Display Setting the Timing Mode Setting the timing mode is important for maximizing the quality of 75Hz; Set the resolution: Right-click on the Windows desktop > Properties > Settings > set the Timing Mode: 1. ViewSonic VX1962wm/VX1962wmp 8 After setting the timing mode... damage to exceed the maximum refresh rate of the screen image and minimizing eye strain. Set the refresh rate: See your LCD display's power will automatically turn ON when power is restored. • Power Button Unlock: Press and hold [1] and the down arrow T again for ...
... user guide for instructions. Using the LCD Display Setting the Timing Mode Setting the timing mode is important for maximizing the quality of 75Hz; Set the resolution: Right-click on the Windows desktop > Properties > Settings > set the Timing Mode: 1. ViewSonic VX1962wm/VX1962wmp 8 After setting the timing mode... damage to exceed the maximum refresh rate of the screen image and minimizing eye strain. Set the refresh rate: See your LCD display's power will automatically turn ON when power is restored. • Power Button Unlock: Press and hold [1] and the down arrow T again for ...

User Guide
Page 15
... width of the screen image. Dynamic Contrast allows the user to turn the contrast ratio enhancement on or off. H. Control Explanation Manual Image Adjust displays the Manual Image Adjust menu. Sharpness adjusts the clarity and focus of the screen image. ViewSonic VX1962wm/VX1962wmp 13 Response Time adjusts the response time of liquid-crystal...
... width of the screen image. Dynamic Contrast allows the user to turn the contrast ratio enhancement on or off. H. Control Explanation Manual Image Adjust displays the Manual Image Adjust menu. Sharpness adjusts the clarity and focus of the screen image. ViewSonic VX1962wm/VX1962wmp 13 Response Time adjusts the response time of liquid-crystal...

User Guide
Page 16
Resolution Notice advises the optimal resolution to turn the OSD background On or Off. Exception: This control does not affect changes made with a "15 second" setting, if a control is not pushed within 15 seconds, the display screen disappears. ViewSonic VX1962wm/VX1962wmp 14 For example, with the User Color control, Language Select or Power Lock...
Resolution Notice advises the optimal resolution to turn the OSD background On or Off. Exception: This control does not affect changes made with a "15 second" setting, if a control is not pushed within 15 seconds, the display screen disappears. ViewSonic VX1962wm/VX1962wmp 14 For example, with the User Color control, Language Select or Power Lock...

User Guide
Page 20
... based glass cleaner onto a clean, soft, lint-free cloth, and wipe the screen. This removes dust and other particles. 2. ViewSonic VX1962wm/VX1962wmp 18 Cleaning the LCD Display • MAKE SURE THE LCD DISPLAY IS TURNED OFF. • NEVER SPRAY OR POUR ANY LIQUID DIRECTLY ONTO THE SCREEN OR CASE. To clean the case: 1. Use a soft...
... based glass cleaner onto a clean, soft, lint-free cloth, and wipe the screen. This removes dust and other particles. 2. ViewSonic VX1962wm/VX1962wmp 18 Cleaning the LCD Display • MAKE SURE THE LCD DISPLAY IS TURNED OFF. • NEVER SPRAY OR POUR ANY LIQUID DIRECTLY ONTO THE SCREEN OR CASE. To clean the case: 1. Use a soft...


