Brochure
Page 1
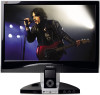
... even DOWNLOAD MUSIC DIRECTLY TO YOUR IPOD on the ViewDock. VX1945wm 19" WIDESCREEN VIEWDOCK™ LCD WITH IPOD® DOCK IN MULTIMEDIA BASE Bring your connectivity Multi-mode input technology supports both digital (DVI) and analog (VGA) signals for ultimate compatibility and configuration flexibility. > Ultra-high brightness and contrast 300-nit brightness (typ) and 700:1 contrast ratio (typ) for rich, detailed images. > Windows Vista approved > PC and Mac® compatible > MPR...
... even DOWNLOAD MUSIC DIRECTLY TO YOUR IPOD on the ViewDock. VX1945wm 19" WIDESCREEN VIEWDOCK™ LCD WITH IPOD® DOCK IN MULTIMEDIA BASE Bring your connectivity Multi-mode input technology supports both digital (DVI) and analog (VGA) signals for ultimate compatibility and configuration flexibility. > Ultra-high brightness and contrast 300-nit brightness (typ) and 700:1 contrast ratio (typ) for rich, detailed images. > Windows Vista approved > PC and Mac® compatible > MPR...
Brochure
Page 2
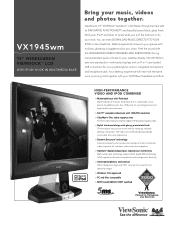
... (typ) Anti-glare RGB analog (75 ohms, 0.7 Vp-p)/DVI-D (TMDS, 100 ohms) Fh: 30~82kHz, Fv: 50~85Hz H/V separated (TTL), composite, sync-on-green VGA up to ISO 9001 & ISO 14001, respectively, by country; size, H. VX1945wm 19" WIDESCREEN LCD WITH IPOD® DOCK IN MULTIMEDIA BASE LCD Type Display Area Optimum Resolution Contrast Ratio Viewing Angles Response Time Light Source Brightness Panel Surface VIDEO INPUT Analog/Digital Frequency Sync COMPATIBILITY PC Mac®* CONNECTOR Analog/Digital Power Base AUDIO POWER CONTROLS Speakers Sub-woofer Voltage...
... (typ) Anti-glare RGB analog (75 ohms, 0.7 Vp-p)/DVI-D (TMDS, 100 ohms) Fh: 30~82kHz, Fv: 50~85Hz H/V separated (TTL), composite, sync-on-green VGA up to ISO 9001 & ISO 14001, respectively, by country; size, H. VX1945wm 19" WIDESCREEN LCD WITH IPOD® DOCK IN MULTIMEDIA BASE LCD Type Display Area Optimum Resolution Contrast Ratio Viewing Angles Response Time Light Source Brightness Panel Surface VIDEO INPUT Analog/Digital Frequency Sync COMPATIBILITY PC Mac®* CONNECTOR Analog/Digital Power Base AUDIO POWER CONTROLS Speakers Sub-woofer Voltage...
VX1945wm-3 User Guide, English
Page 2
... 4 Getting Started Package Contents 5 Precautions 5 Quick Installation 6 ViewDockTM Connecting to PC 7 Wall Mounting (Optional 8 Using the LCD Display Setting the Timing Mode 9 OSD and Power Lock Settings 9 Adjusting the Screen Image 10 Main Menu Controls 12 ViewDockTM Key Features 16 Physical Description 17 Card reader Installation 18 USB Hub Installation 19 ViewDockTM Connecting with iPod 20 Volume control of Sub Woofer 20 Other Information Specifications 21 Troubleshooting 22 Customer Support 23 Cleaning the LCD Display 24 Limited Warranty 25 ViewSonic VX1945wm
... 4 Getting Started Package Contents 5 Precautions 5 Quick Installation 6 ViewDockTM Connecting to PC 7 Wall Mounting (Optional 8 Using the LCD Display Setting the Timing Mode 9 OSD and Power Lock Settings 9 Adjusting the Screen Image 10 Main Menu Controls 12 ViewDockTM Key Features 16 Physical Description 17 Card reader Installation 18 USB Hub Installation 19 ViewDockTM Connecting with iPod 20 Volume control of Sub Woofer 20 Other Information Specifications 21 Troubleshooting 22 Customer Support 23 Cleaning the LCD Display 24 Limited Warranty 25 ViewSonic VX1945wm

VX1945wm-3 User Guide, English
Page 3
...which can radiate radio frequency energy, and if not installed and used in a particular installation. Following information is connected. • Consult the dealer or an experienced radio/TV technician for EU-member states: The mark shown to part 15 of the EEC...digital apparatus complies with part 15 of the following two conditions: (1) this device may not cause harmful interference, and (2) this equipment does cause harmful interference to radio or television reception, which the receiver is only for help. However, there is no guarantee that to radio communications. ViewSonic...
...which can radiate radio frequency energy, and if not installed and used in a particular installation. Following information is connected. • Consult the dealer or an experienced radio/TV technician for EU-member states: The mark shown to part 15 of the EEC...digital apparatus complies with part 15 of the following two conditions: (1) this device may not cause harmful interference, and (2) this equipment does cause harmful interference to radio or television reception, which the receiver is only for help. However, there is no guarantee that to radio communications. ViewSonic...
VX1945wm-3 User Guide, English
Page 4
...'s instructions. 8. Install the equipment in a safe place. 3. Use only with the cart, stand, tripod, bracket, or table specified by the manufacturer. 12. Keep these instructions completely before using the equipment. 2. Warning: To reduce the risk of the polarized or grounding-type plug. Do not block any way, such as radiators, heat registers, stoves, or other . Protect the power cord from...
...'s instructions. 8. Install the equipment in a safe place. 3. Use only with the cart, stand, tripod, bracket, or table specified by the manufacturer. 12. Keep these instructions completely before using the equipment. 2. Warning: To reduce the risk of the polarized or grounding-type plug. Do not block any way, such as radiators, heat registers, stoves, or other . Protect the power cord from...
VX1945wm-3 User Guide, English
Page 7
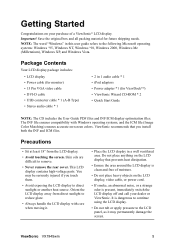
... the LCD panel, as it . • Place the LCD display in 1 audio cable * 1 • iPod adaptors • Power adapter *1 (for future shipping needs. Save the original box and all packing material for ViewDockTM) • ViewSonic Wizard CD-ROM * 2 • Quick Start Guide NOTE: The CD includes the User Guide PDF files and INF/ICM display optimization files. You may permanently damage the screen. NOTE: The word "Windows" in this user guide refers to remove...
... the LCD panel, as it . • Place the LCD display in 1 audio cable * 1 • iPod adaptors • Power adapter *1 (for future shipping needs. Save the original box and all packing material for ViewDockTM) • ViewSonic Wizard CD-ROM * 2 • Quick Start Guide NOTE: The CD includes the User Guide PDF files and INF/ICM display optimization files. You may permanently damage the screen. NOTE: The word "Windows" in this user guide refers to remove...
VX1945wm-3 User Guide, English
Page 8
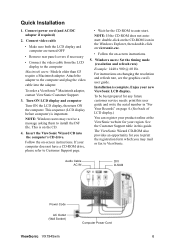
... refresh rate, see the graphics card's user guide. For instructions on -screen instructions. Windows users: Set the timing mode (resolution and refresh rate) Example: 1440 x 900 @ 60 Hz. See the Customer Support table in this user guide and write the serial number in the Windows Explorer, then double-click on viewsonic.exe. • Follow the on the CD. 4. The ViewSonic Wizard CD-ROM also provides an opportunity for your new ViewSonic LCD display. Quick Installation 1. Audio Cable AC IN DVI D-SUB Power Code...
... refresh rate, see the graphics card's user guide. For instructions on -screen instructions. Windows users: Set the timing mode (resolution and refresh rate) Example: 1440 x 900 @ 60 Hz. See the Customer Support table in this user guide and write the serial number in the Windows Explorer, then double-click on viewsonic.exe. • Follow the on the CD. 4. The ViewSonic Wizard CD-ROM also provides an opportunity for your new ViewSonic LCD display. Quick Installation 1. Audio Cable AC IN DVI D-SUB Power Code...

VX1945wm-3 User Guide, English
Page 10
... the instructions that the Power button is turned Off, then disconnect the power cord. 2. Verify that come with the base mounting kit. Attach the mounting bracket from inside the four VESA screw holes. 6. Remove the four screws attaching the base. 5. Remove the Rubber Plugs from the VESA compatible wall mounting kit (100 mm x 100 mm distance). 7. Attach the LCD display to a wall-mounted display, do the following the instructions in the wall-mounting kit. Lay the LCD display face down...
... the instructions that the Power button is turned Off, then disconnect the power cord. 2. Verify that come with the base mounting kit. Attach the mounting bracket from inside the four VESA screw holes. 6. Remove the four screws attaching the base. 5. Remove the Rubber Plugs from the VESA compatible wall mounting kit (100 mm x 100 mm distance). 7. Attach the LCD display to a wall-mounted display, do the following the instructions in the wall-mounting kit. Lay the LCD display face down...
VX1945wm-3 User Guide, English
Page 11
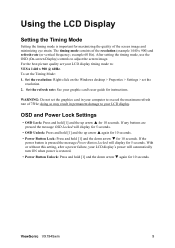
... Power Button Locked will display for 5 seconds. • OSD Unlock: Press and hold [1] and the down arrow T again for instructions. For the best picture quality set the graphics card in permanent damage to : VESA 1440 x 900 @ 60Hz. The timing mode consists of the screen image and minimizing eye strain. To set the resolution. 2. With or without this setting, after a power failure, your graphic card's user guide for 10 seconds. Set the refresh rate: See your LCD display's power...
... Power Button Locked will display for 5 seconds. • OSD Unlock: Press and hold [1] and the down arrow T again for instructions. For the best picture quality set the graphics card in permanent damage to : VESA 1440 x 900 @ 60Hz. The timing mode consists of the screen image and minimizing eye strain. To set the resolution. 2. With or without this setting, after a power failure, your graphic card's user guide for 10 seconds. Set the refresh rate: See your LCD display's power...

VX1945wm-3 User Guide, English
Page 12
... OSD controls Front Control Panel shown below in "Main Menu Controls" on page 12. ViewSonic VX1945wm 10 Adjusting the Screen Image Use the buttons on the front control panel to display and adjust the OSD controls which display on some screens. The OSD controls are explained at the top of the next page and are defined in detail Displays the control screen for the highlighted control. Standby Power On/Off Power light Blue = ON Orange = Power Saving Scrolls through menu options and adjusts the displayed control...
... OSD controls Front Control Panel shown below in "Main Menu Controls" on page 12. ViewSonic VX1945wm 10 Adjusting the Screen Image Use the buttons on the front control panel to display and adjust the OSD controls which display on some screens. The OSD controls are explained at the top of the next page and are defined in detail Displays the control screen for the highlighted control. Standby Power On/Off Power light Blue = ON Orange = Power Saving Scrolls through menu options and adjusts the displayed control...
VX1945wm-3 User Guide, English
Page 13
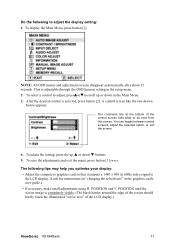
... video signal to do next from this screen. To display the Main Menu, press button [1]. NOTE: All OSD menus and adjustment screens disappear automatically after about 15 seconds. POSITION until the screen image is completely visible. (The black border around the edge of the screen should barely touch the illuminated "active area" of the control screen tells what to the LCD display. (Look for instructions on "changing the refresh rate" in the graphics card's user guide...
... video signal to do next from this screen. To display the Main Menu, press button [1]. NOTE: All OSD menus and adjustment screens disappear automatically after about 15 seconds. POSITION until the screen image is completely visible. (The black border around the edge of the screen should barely touch the illuminated "active area" of the control screen tells what to the LCD display. (Look for instructions on "changing the refresh rate" in the graphics card's user guide...

VX1945wm-3 User Guide, English
Page 14
... color adjustment modes, including preset color temperatures and a User Color mode which allows independent adjustment of the screen image. Mute temporarily silences audio output. Contrast adjusts the difference between inputs if you have more than one computer connected to the VX1945wm. Brightness adjusts background black level of red (R), green (G), and blue (B). Control Explanation Auto Image Adjust sizes and centers the screen image automatically. Audio Adjust Volume increases the volume, decreases the volume, and mutes the audio. ViewSonic VX1945wm 12 The factory setting...
... color adjustment modes, including preset color temperatures and a User Color mode which allows independent adjustment of the screen image. Mute temporarily silences audio output. Contrast adjusts the difference between inputs if you have more than one computer connected to the VX1945wm. Brightness adjusts background black level of red (R), green (G), and blue (B). Control Explanation Auto Image Adjust sizes and centers the screen image automatically. Audio Adjust Volume increases the volume, decreases the volume, and mutes the audio. ViewSonic VX1945wm 12 The factory setting...
VX1945wm-3 User Guide, English
Page 15
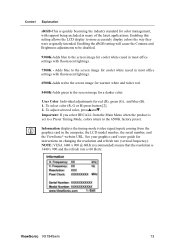
User Color Individual adjustments for instructions on changing the resolution and refresh rate (vertical frequency). Important: If you select RECALL from the graphics card in many of the latest applications. Information displays the timing mode (video signal input) coming from the Main Menu when the product is set to a Preset Timing Mode, colors return to the screen image for warmer white and richer red. 5400K-Adds green to more accurately display colors the way they were originally intended...
User Color Individual adjustments for instructions on changing the resolution and refresh rate (vertical frequency). Important: If you select RECALL from the graphics card in many of the latest applications. Information displays the timing mode (video signal input) coming from the Main Menu when the product is set to a Preset Timing Mode, colors return to the screen image for warmer white and richer red. 5400K-Adds green to more accurately display colors the way they were originally intended...

VX1945wm-3 User Guide, English
Page 16
H./V. Fine Tune sharpens the focus by aligning text and/or graphics with pixel boundaries. NOTE: Try Auto Image Adjust first. Control Explanation Manual Image Adjust Sub-menu H. Sharpness adjusts the clarity and focus of the screen image. ViewSonic VX1945wm 14 Size (Horizontal Size) adjusts the width of the screen image. Position (Horizontal/Vertical Position) moves the screen image left or right and up or down. Setup Menu displays the menu shown below: Language Select allows the user to choose the language used in the menus and control screens.
H./V. Fine Tune sharpens the focus by aligning text and/or graphics with pixel boundaries. NOTE: Try Auto Image Adjust first. Control Explanation Manual Image Adjust Sub-menu H. Sharpness adjusts the clarity and focus of the screen image. ViewSonic VX1945wm 14 Size (Horizontal Size) adjusts the width of the screen image. Position (Horizontal/Vertical Position) moves the screen image left or right and up or down. Setup Menu displays the menu shown below: Language Select allows the user to choose the language used in the menus and control screens.

VX1945wm-3 User Guide, English
Page 17
... displayed. ViewSonic VX1945wm 15 Control Explanation Resolution Notice allows the user to enable or disable this manual. Memory Recall returns the adjustments back to factory settings if the display is set at a resolution other than 1440 x 900, the following screen appears. OSD Position allows the user to turn the OSD background On or Off. If you enable the Resolution Notice shown above and your computer is operating in a factory Preset Timing Mode...
... displayed. ViewSonic VX1945wm 15 Control Explanation Resolution Notice allows the user to enable or disable this manual. Memory Recall returns the adjustments back to factory settings if the display is set at a resolution other than 1440 x 900, the following screen appears. OSD Position allows the user to turn the OSD background On or Off. If you enable the Resolution Notice shown above and your computer is operating in a factory Preset Timing Mode...
VX1945wm-3 User Guide, English
Page 21
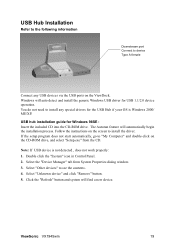
... in Control Panel. 2. If the setup program does not start automatically, go to "My Computer" and double-click on the ViewDock. Select "Unknown device" and click "Remove" button. 5. USB Hub Installation Refer to the following information Downstream port Connect to install any USB devices via the USB ports on the CD-ROM drive, and select "Setup.exe" from System Properties dialog window. 3. ViewSonic VX1945wm 19 Click the "Refresh" button...
... in Control Panel. 2. If the setup program does not start automatically, go to "My Computer" and double-click on the ViewDock. Select "Unknown device" and click "Remove" button. 5. USB Hub Installation Refer to the following information Downstream port Connect to install any USB devices via the USB ports on the CD-ROM drive, and select "Setup.exe" from System Properties dialog window. 3. ViewSonic VX1945wm 19 Click the "Refresh" button...
VX1945wm-3 User Guide, English
Page 22
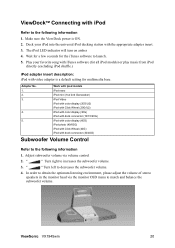
... volume. 4. Make sure the ViewDock power is a default setting for multimedia base. Adapter No. 1. 2. 3. 4. 5. " " Turn left to increases the subwoofer volume. 3. Dock your favorite song with iTunes software (for all iPod models) or play music from iPod directly (excluding iPod shuffle.) iPod adapter insert description: iPod with iPod Refer to the following information 1. The iPod LED indicator will turn on amber 4. Adjust subwoofer volume via the monitor OSD menu...
... volume. 4. Make sure the ViewDock power is a default setting for multimedia base. Adapter No. 1. 2. 3. 4. 5. " " Turn left to increases the subwoofer volume. 3. Dock your favorite song with iTunes software (for all iPod models) or play music from iPod directly (excluding iPod shuffle.) iPod adapter insert description: iPod with iPod Refer to the following information 1. The iPod LED indicator will turn on amber 4. Adjust subwoofer volume via the monitor OSD menu...
VX1945wm-3 User Guide, English
Page 23
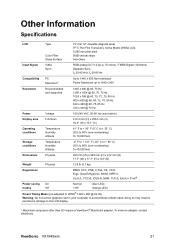
... Information Specifications LCD Type Color Filter Glass Surface 19" (full 19" viewable diagonal area), TFT (Thin Film Transistor), Active Matrix WXGA LCD, 0.285 mm pixel pitch RGB vertical stripe Anti-Glare Input Signal Video Sync RGB analog (0.7/1.0 Vp-p, 75 ohms) / TMDS Digital (100ohms) Separate Sync, fh:30-82 kHz, fv:50-85 Hz Compatibility PC Macintosh1 Up to 1440 x 900 Non-interlaced Power Macintosh up to 1440 x 900 Resolution...
... Information Specifications LCD Type Color Filter Glass Surface 19" (full 19" viewable diagonal area), TFT (Thin Film Transistor), Active Matrix WXGA LCD, 0.285 mm pixel pitch RGB vertical stripe Anti-Glare Input Signal Video Sync RGB analog (0.7/1.0 Vp-p, 75 ohms) / TMDS Digital (100ohms) Separate Sync, fh:30-82 kHz, fv:50-85 Hz Compatibility PC Macintosh1 Up to 1440 x 900 Non-interlaced Power Macintosh up to 1440 x 900 Resolution...

VX1945wm-3 User Guide, English
Page 24
... colors (red, green, or blue) are missing, check the video cable to make sure it to the LCD display. • Adjust brightness and contrast. • If you are using an Macintosh older than G3, you have an older graphics card, contact ViewSonic® for a non-DDC adapter. Control buttons do not work • Press only one button at a time. Power is ON but no screen image • Make sure the video cable supplied with the LCD display is supplying proper voltage. ViewSonic...
... colors (red, green, or blue) are missing, check the video cable to make sure it to the LCD display. • Adjust brightness and contrast. • If you are using an Macintosh older than G3, you have an older graphics card, contact ViewSonic® for a non-DDC adapter. Control buttons do not work • Press only one button at a time. Power is ON but no screen image • Make sure the video cable supplied with the LCD display is supplying proper voltage. ViewSonic...

VX1945wm-3 User Guide, English
Page 27
... or refurbished parts or components. e. Sales outside of the first consumer purchase. The warranty period for all labor from defects in material and workmanship, under warranty, contact ViewSonic Customer Support (Please refer to get service: 1. Limited Warranty VIEWSONIC® LCD DISPLAY What the warranty covers: ViewSonic warrants its sole option, repair or replace the product with a like product. f. Removal, installation, and set-up service charges...
... or refurbished parts or components. e. Sales outside of the first consumer purchase. The warranty period for all labor from defects in material and workmanship, under warranty, contact ViewSonic Customer Support (Please refer to get service: 1. Limited Warranty VIEWSONIC® LCD DISPLAY What the warranty covers: ViewSonic warrants its sole option, repair or replace the product with a like product. f. Removal, installation, and set-up service charges...


