
User Guide
Page 1
VS17484 P/N: VS2412-H VS2412-h Display User Guide IMPORTANT: Please read this User Guide will describe your limited coverage from ViewSonic® Corporation, which is also found on installing and using the Regional selection box in a safe manner, as well as registering your product .... "Antes de operar su equipo lea cu idadosamente las instrucciones en este manual" Model No. Warranty information contained in this User Guide to obtain important information on our web site at http://www.viewsonic.com in English, or in specific languages using your product for future service.
VS17484 P/N: VS2412-H VS2412-h Display User Guide IMPORTANT: Please read this User Guide will describe your limited coverage from ViewSonic® Corporation, which is also found on installing and using the Regional selection box in a safe manner, as well as registering your product .... "Antes de operar su equipo lea cu idadosamente las instrucciones en este manual" Model No. Warranty information contained in this User Guide to obtain important information on our web site at http://www.viewsonic.com in English, or in specific languages using your product for future service.

User Guide
Page 3
... a third grounding prong. If the plug does not fit into your outlet, obtain an adapter and do not expose the device to moisture. • Avoid exposing the device to direct sunlight or other sources of sustained heat. • Do not install near water. To reduce the risk ... or connection cables. • If smoke, an abnormal noise, or a strange odor is dangerous to continue using the device. • Keep this user guide in a safe place for your safety. To clean the greasy spots on the screen, refer to the "Maintenance" section on an uneven or unstable surface. A polarized plug has ...
... a third grounding prong. If the plug does not fit into your outlet, obtain an adapter and do not expose the device to moisture. • Avoid exposing the device to direct sunlight or other sources of sustained heat. • Do not install near water. To reduce the risk ... or connection cables. • If smoke, an abnormal noise, or a strange odor is dangerous to continue using the device. • Keep this user guide in a safe place for your safety. To clean the greasy spots on the screen, refer to the "Maintenance" section on an uneven or unstable surface. A polarized plug has ...

User Guide
Page 4
... period of time. • Refer all servicing to avoid injury from tipping over. • Disconnect the power plug from the equipment. When using ear-/headphones, adjust the volume to the graphics card's user guide. 4 Service will be required when the unit has been damaged in any way, such as: ͫ if the power supply cord or plug is damaged ͫ if liquid is spilled...
... period of time. • Refer all servicing to avoid injury from tipping over. • Disconnect the power plug from the equipment. When using ear-/headphones, adjust the volume to the graphics card's user guide. 4 Service will be required when the unit has been damaged in any way, such as: ͫ if the power supply cord or plug is damaged ͫ if liquid is spilled...

User Guide
Page 5
... and Rear View 8 I/O Ports ...8 Initial Setup 9 Installing the Stand 9 Wall Mounting...10 Using the Security Slot 11 Making Connections 12 Connecting to Power 12 Connecting External Devices 13 Using the Monitor 14 Adjusting the Viewing Angle 14 Height Adjustment 14 Tilt Angle Adjustment 15 Screen Orientation Adjustment (Monitor Pivot 16 Turning the Device On/Off 17 Quick Menu...18 Hot Keys...19 Configuring the Settings 21 General Operations 21 On-Screen Display (OSD) Menu Tree 23 Appendix 26 Specifications...26 Glossary...27 Troubleshooting...31...
... and Rear View 8 I/O Ports ...8 Initial Setup 9 Installing the Stand 9 Wall Mounting...10 Using the Security Slot 11 Making Connections 12 Connecting to Power 12 Connecting External Devices 13 Using the Monitor 14 Adjusting the Viewing Angle 14 Height Adjustment 14 Tilt Angle Adjustment 15 Screen Orientation Adjustment (Monitor Pivot 16 Turning the Device On/Off 17 Quick Menu...18 Hot Keys...19 Configuring the Settings 21 General Operations 21 On-Screen Display (OSD) Menu Tree 23 Appendix 26 Specifications...26 Glossary...27 Troubleshooting...31...

User Guide
Page 8
Product Overview Front and Rear View I/O Ports VGA AC IN Jack t HDMI 1.4 Port VGA Port Audio Out Port NOTE: For more information about the 1(«)/2/3/4/5( ) key and its functions, refer to "Hot Keys" on page 19. 8
Product Overview Front and Rear View I/O Ports VGA AC IN Jack t HDMI 1.4 Port VGA Port Audio Out Port NOTE: For more information about the 1(«)/2/3/4/5( ) key and its functions, refer to "Hot Keys" on page 19. 8

User Guide
Page 10
Remove the monitor stand. 1 2 4. Follow the instructions that come with the wall mounting kit to the table below for the standard dimensions for wall mount kits. Wall Mounting NOTE: Only use UL Certified wall mount kits. 100 mm 100 mm Refer to mount the monitor onto the wall. 10 Place the device on a flat, stable surface with four (4) screws (M4 x 12 mm). 5. Maximum Hole pattern Loading (W x H) Interface Pad (W x H x D) Pad...
Remove the monitor stand. 1 2 4. Follow the instructions that come with the wall mounting kit to the table below for the standard dimensions for wall mount kits. Wall Mounting NOTE: Only use UL Certified wall mount kits. 100 mm 100 mm Refer to mount the monitor onto the wall. 10 Place the device on a flat, stable surface with four (4) screws (M4 x 12 mm). 5. Maximum Hole pattern Loading (W x H) Interface Pad (W x H x D) Pad...

User Guide
Page 17
... power cord is not being used for a long period of time, please disconnect the power plug from the power outlet. Turning the Device On/Off 1. Press the Power button to turn the monitor off, press the Power button again. Using the Control Panel Keys Use the control panel keys to the power outlet. To turn on the monitor. 3. If the monitor is connected to access the Quick Menu, activate Hot Keys, navigate the On-Screen Display (OSD) Menu, and change the settings...
... power cord is not being used for a long period of time, please disconnect the power plug from the power outlet. Turning the Device On/Off 1. Press the Power button to turn the monitor off, press the Power button again. Using the Control Panel Keys Use the control panel keys to the power outlet. To turn on the monitor. 3. If the monitor is connected to access the Quick Menu, activate Hot Keys, navigate the On-Screen Display (OSD) Menu, and change the settings...

User Guide
Page 18
... 18 View Mode Standard Game Movie Web Text Mac Mono VViieewwmmooddee CCoonnttrraasstt//BBrriigghhttnneessss NOTE: Follow Viewmode IInnppuutt SSeelleecctt the key guide that appears on the bottom of the preset color settings. Input Select Select the input source. Contrast/Brightness Adjust the contrast or brightness level. Exit the Quick Menu. Menu ewmode Input Select EExxiitt ntrast/BrigMhtaninesMsenu put Select Exit ViewMode Description Select one of the screen to activate the Quick Menu. Quick Menu...
... 18 View Mode Standard Game Movie Web Text Mac Mono VViieewwmmooddee CCoonnttrraasstt//BBrriigghhttnneessss NOTE: Follow Viewmode IInnppuutt SSeelleecctt the key guide that appears on the bottom of the preset color settings. Input Select Select the input source. Contrast/Brightness Adjust the contrast or brightness level. Exit the Quick Menu. Menu ewmode Input Select EExxiitt ntrast/BrigMhtaninesMsenu put Select Exit ViewMode Description Select one of the screen to activate the Quick Menu. Quick Menu...

User Guide
Page 20
When the menu appears on the screen, continue holding both keys for 10s to lock power If the Power button is locked, the below message will appear on the screen: Power Lock/Unlock Power Button Locked 3 + 4 Press the keys to display/hide the boot up screen when the device is turned on 20 Key 2 + 3 Description Press and hold for 10 seconds to lock/unlock the Power button. Boot Up Screen On/Off Off Press to lock/unlock the Power button. Power Lock/Unlock Locking Power Button 3 Press and hold the keys to turn on .
When the menu appears on the screen, continue holding both keys for 10s to lock power If the Power button is locked, the below message will appear on the screen: Power Lock/Unlock Power Button Locked 3 + 4 Press the keys to display/hide the boot up screen when the device is turned on 20 Key 2 + 3 Description Press and hold for 10 seconds to lock/unlock the Power button. Boot Up Screen On/Off Off Press to lock/unlock the Power button. Power Lock/Unlock Locking Power Button 3 Press and hold the keys to turn on .

User Guide
Page 21
Then press the 3 key to select the main menu. Input Select Audio Adjust ViewMode Color Adjust Manual Image Setup Menu Adjust Contrast/Brightness Color Temperature Color Space Color Range Contrast Brightness 75% 1920 x 1080 @ 60Hz 21 Press the 1(«) or 2 key to enter the selected menu. Input Select Audio Adjust ViewMode Color Adjust Manual Image Setup Menu Adjust D-Sub HDMI 75% 1920 x 1080 @ 60Hz 2. Configuring the Settings General Operations 1. Press the 2/3/4 key to display the On-Screen Display (OSD) Menu.
Then press the 3 key to select the main menu. Input Select Audio Adjust ViewMode Color Adjust Manual Image Setup Menu Adjust Contrast/Brightness Color Temperature Color Space Color Range Contrast Brightness 75% 1920 x 1080 @ 60Hz 21 Press the 1(«) or 2 key to enter the selected menu. Input Select Audio Adjust ViewMode Color Adjust Manual Image Setup Menu Adjust D-Sub HDMI 75% 1920 x 1080 @ 60Hz 2. Configuring the Settings General Operations 1. Press the 2/3/4 key to display the On-Screen Display (OSD) Menu.

User Guide
Page 22
.... NOTE: To exit the OSD Menu, press the 5( ) key. 22 Press the 1(«) or 2 key to confirm. Input Select Audio Adjust ViewMode Color Adjust Manual Image Setup Menu Adjust Contrast/Brightness Color Temperature Color Space Color Range sRGB Bluish Cool Native Warm User Color 75% 1920 x 1080 @ 60Hz NOTE: Certain menu option adjustments do not require the user to press the 3 key to select the option or make adjustments. 5. Follow the key guide to confirm the selection...
.... NOTE: To exit the OSD Menu, press the 5( ) key. 22 Press the 1(«) or 2 key to confirm. Input Select Audio Adjust ViewMode Color Adjust Manual Image Setup Menu Adjust Contrast/Brightness Color Temperature Color Space Color Range sRGB Bluish Cool Native Warm User Color 75% 1920 x 1080 @ 60Hz NOTE: Certain menu option adjustments do not require the user to press the 3 key to select the option or make adjustments. 5. Follow the key guide to confirm the selection...
User Guide
Page 26
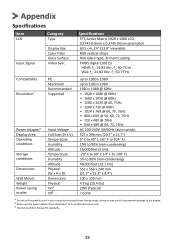
... display. 2 Please use the power adapter from ViewSonic® or an authorized source only. 3 The test condition follows EEI standards. 26 Appendix Specifications Item LCD Input Signal Compatibility Resolution1 Power Adapter2 Display Area Operating conditions Storage conditions Dimensions Wall Mount Weight Power saving modes Category Type Display Size Color Filter Glass Surface Video Sync PC Macintosh Recommended Supported Input Voltage Full Scan (H x V) Temperature Humidity Altitude Temperature Humidity Altitude Physical (W x H x D) Dimensions Physical On3 Off Specifications TFT, Active...
... display. 2 Please use the power adapter from ViewSonic® or an authorized source only. 3 The test condition follows EEI standards. 26 Appendix Specifications Item LCD Input Signal Compatibility Resolution1 Power Adapter2 Display Area Operating conditions Storage conditions Dimensions Wall Mount Weight Power saving modes Category Type Display Size Color Filter Glass Surface Video Sync PC Macintosh Recommended Supported Input Voltage Full Scan (H x V) Temperature Humidity Altitude Temperature Humidity Altitude Physical (W x H x D) Dimensions Physical On3 Off Specifications TFT, Active...

User Guide
Page 27
.... Audio Adjust Adjusts the volume, mutes the sound, or toggles between inputs if you have more comfortable viewing experience. B Blue Light Filter Adjusts the filter that blocks high-energy blue light for a more than one source. Auto Image Adjust Automatically sizes, centers, and fine tunes the video signal to make the black blacker in a dark scene, and make the white whiter in a bright environment. Glossary This section describes the standard glossary of the screen image. 27...
.... Audio Adjust Adjusts the volume, mutes the sound, or toggles between inputs if you have more comfortable viewing experience. B Blue Light Filter Adjusts the filter that blocks high-energy blue light for a more than one source. Auto Image Adjust Automatically sizes, centers, and fine tunes the video signal to make the black blacker in a dark scene, and make the white whiter in a bright environment. Glossary This section describes the standard glossary of the screen image. 27...
User Guide
Page 28
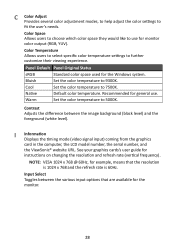
...are available for monitor color output (RGB, YUV). I Information Displays the timing mode (video signal input) coming from the graphics card in the computer, the LCD model number, the serial number, and the ViewSonic® website URL. Input Select Toggles between the image background (black level) and the foreground (white level). Panel Default Panel Original Status sRGB Standard color space used for instructions on changing the resolution and refresh rate (vertical frequency). C Color Adjust Provides several color adjustment modes, to help adjust the color settings to use .
...are available for monitor color output (RGB, YUV). I Information Displays the timing mode (video signal input) coming from the graphics card in the computer, the LCD model number, the serial number, and the ViewSonic® website URL. Input Select Toggles between the image background (black level) and the foreground (white level). Panel Default Panel Original Status sRGB Standard color space used for instructions on changing the resolution and refresh rate (vertical frequency). C Color Adjust Provides several color adjustment modes, to help adjust the color settings to use .

User Guide
Page 29
... monitor zooms in the "Specifications" of image quality adjustments. S Setup Menu Adjusts On-Screen Display (OSD) Menu settings. Sharpness Adjusts the picture quality of the film. A setting on movie content, so that the current viewing resolution is not the correct native resolution. This notice will appear in the "Language Select" or "Power Lock" setting. Many of these settings can manually set a variety of this manual. You can activate on-screen display notifications so users do not have to factory settings if the display...
... monitor zooms in the "Specifications" of image quality adjustments. S Setup Menu Adjusts On-Screen Display (OSD) Menu settings. Sharpness Adjusts the picture quality of the film. A setting on movie content, so that the current viewing resolution is not the correct native resolution. This notice will appear in the "Language Select" or "Power Lock" setting. Many of these settings can manually set a variety of this manual. You can activate on-screen display notifications so users do not have to factory settings if the display...
User Guide
Page 31
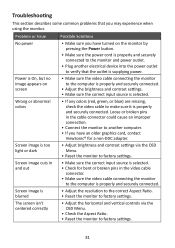
... and securely connected. • Adjust the brightness and contrast settings. • Make sure the correct input source is selected. • If any colors (red, green, or blue) are missing, check the video cable to make sure it is properly and securely connected. Problem or Issue No power Power is On, but no image appears on screen Wrong or abnormal colors Screen image is too light or dark Screen image cuts in the video cable connector. • Make sure the video cable connecting the monitor to the...
... and securely connected. • Adjust the brightness and contrast settings. • Make sure the correct input source is selected. • If any colors (red, green, or blue) are missing, check the video cable to make sure it is properly and securely connected. Problem or Issue No power Power is On, but no image appears on screen Wrong or abnormal colors Screen image is too light or dark Screen image cuts in the video cable connector. • Make sure the video cable connecting the monitor to the...
User Guide
Page 32
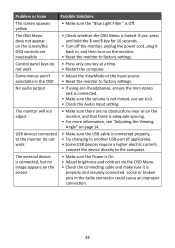
... input source. USB devices connected to factory settings. connect the device directly to factory settings. Loose or broken pins in , and then turn on the screen • Make sure the Power is On • Adjust brightness and contrast via the OSD Menu. • Check the connecting cable and make sure it back in the cable connector could cause an improper connection. 32 Problem or Issue Possible Solutions The screen appears yellow • Make sure the "Blue Light Filter" is locked. not work...
... input source. USB devices connected to factory settings. connect the device directly to factory settings. Loose or broken pins in , and then turn on the screen • Make sure the Power is On • Adjust brightness and contrast via the OSD Menu. • Check the connecting cable and make sure it back in the cable connector could cause an improper connection. 32 Problem or Issue Possible Solutions The screen appears yellow • Make sure the "Blue Light Filter" is locked. not work...

User Guide
Page 34
...B digital device, pursuant to nameplate labels and relevant markings on the unit. FCC Compliance Statement This device complies with the instructions, ...installation. Confirmed corresponding applications shall refer to part 15 of the FCC Rules. Regulatory and Service Information Compliance Information This section addresses all connected requirements and statements regarding regulations. This equipment generates, uses...turning the equipment off and on a circuit different from that may cause harmful interference to which can radiate radio frequency energy, and if not installed and used...
...B digital device, pursuant to nameplate labels and relevant markings on the unit. FCC Compliance Statement This device complies with the instructions, ...installation. Confirmed corresponding applications shall refer to part 15 of the FCC Rules. Regulatory and Service Information Compliance Information This section addresses all connected requirements and statements regarding regulations. This equipment generates, uses...turning the equipment off and on a circuit different from that may cause harmful interference to which can radiate radio frequency energy, and if not installed and used...

User Guide
Page 40
..., (d) a description of the problem, and (e) the serial number of the product. • Take or ship the product, freight prepaid, in the product User Guide. • Removal, installation, and set-up service charges, including wall-mounting of the product. • Causes external to the product, such as electric power fluctuations or failure. • Use of supplies or parts not meeting ViewSonic's specifications. • Failure of owner to perform periodic...
..., (d) a description of the problem, and (e) the serial number of the product. • Take or ship the product, freight prepaid, in the product User Guide. • Removal, installation, and set-up service charges, including wall-mounting of the product. • Causes external to the product, such as electric power fluctuations or failure. • Use of supplies or parts not meeting ViewSonic's specifications. • Failure of owner to perform periodic...

User Guide
Page 42
... purchase. If a product proves to be free from the date of time. • Removal, installation, insurance, and set-up service charges. 42 Replacement product or parts may include remanufactured or refurbished parts or components & accessories. What the warranty excludes and does not cover: • Any product on your country of supplies or parts not meeting ViewSonic®'s specifications. ͫ Normal wear and tear...
... purchase. If a product proves to be free from the date of time. • Removal, installation, insurance, and set-up service charges. 42 Replacement product or parts may include remanufactured or refurbished parts or components & accessories. What the warranty excludes and does not cover: • Any product on your country of supplies or parts not meeting ViewSonic®'s specifications. ͫ Normal wear and tear...


