

User Guide
Page 2
... the cable 18 Using the security keylock 19 Cleaning the LCD Display 19 Troubleshooting ...20 Symptom list ...20 Danger Statements...22 Notices ...24 Attention...24 LCD considerations 24 Considerations on the display resolution 24 Operating considerations 24 License inquiries ...25 Trademarks...25 Specifications ...26 Supported display modes 27 Extended modes...28 Updating the settings for your display 29 Applicable models ...29 Procedure ...29 Caution ...29 Valid settings ...32 Customer Support ...33 ViewSonic VP2290b i
... the cable 18 Using the security keylock 19 Cleaning the LCD Display 19 Troubleshooting ...20 Symptom list ...20 Danger Statements...22 Notices ...24 Attention...24 LCD considerations 24 Considerations on the display resolution 24 Operating considerations 24 License inquiries ...25 Trademarks...25 Specifications ...26 Supported display modes 27 Extended modes...28 Updating the settings for your display 29 Applicable models ...29 Procedure ...29 Caution ...29 Valid settings ...32 Customer Support ...33 ViewSonic VP2290b i

User Guide
Page 5
.... Before setting up and operate the ViewSonic VP2290b LCD Display, hereafter called the DVI) To date, the following cards have been tested to drop it. Be careful not to work with both hands, as shown below. Hold the bottom of unsupported cards. Open the carton box and carefully remove the display. This chapter describes the following: • Prerequisites • Unpacking • Checking parts Prerequisites...
.... Before setting up and operate the ViewSonic VP2290b LCD Display, hereafter called the DVI) To date, the following cards have been tested to drop it. Be careful not to work with both hands, as shown below. Hold the bottom of unsupported cards. Open the carton box and carefully remove the display. This chapter describes the following: • Prerequisites • Unpacking • Checking parts Prerequisites...

User Guide
Page 6
Checking parts Check the box for Windows Note: The digital signal cable is shipped with one end connected to the display. 3 ViewSonic VP2290b Display Power adapter and cord Digital signal cable P/N: 07N2227 ViewSonic Wizard CD Connector tool Power cord Liquid View Scaling Software for the following items. If any items are missing or damaged, contact your place of purchase immediately.
Checking parts Check the box for Windows Note: The digital signal cable is shipped with one end connected to the display. 3 ViewSonic VP2290b Display Power adapter and cord Digital signal cable P/N: 07N2227 ViewSonic Wizard CD Connector tool Power cord Liquid View Scaling Software for the following items. If any items are missing or damaged, contact your place of purchase immediately.

User Guide
Page 7
Hardware setup This chapter describes the following: • The location of the controls, switches, and connectors. • The procedure for setting up the display. Locations Front view Monitor screen Serial number label OSD control Brightness control Power switch Base stand Rear view DC-IN connector Video connector Security keyhole Power light (Power on/Standby) VESA wall mount holes Connector cover Stand rear cover Cable hook Cable clamp ViewSonic VP2290b 4
Hardware setup This chapter describes the following: • The location of the controls, switches, and connectors. • The procedure for setting up the display. Locations Front view Monitor screen Serial number label OSD control Brightness control Power switch Base stand Rear view DC-IN connector Video connector Security keyhole Power light (Power on/Standby) VESA wall mount holes Connector cover Stand rear cover Cable hook Cable clamp ViewSonic VP2290b 4
User Guide
Page 8
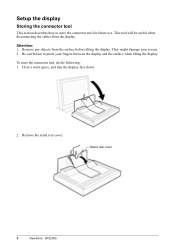
Clear a work space, and turn the display face down. 2. Setup the display Storing the connector tool This section describes how to pinch your screen. 2. Be careful not to store the connector tool for future use. Stand rear cover 5 ViewSonic VP2290b This tool will be useful when disconnecting the cables from the surface before tilting the display. They might damage your fingers between the display and the surface when tilting the display. Remove the stand rear cover. Remove any objects from the display. Attention: 1. To store the connector tool, do the following: 1.
Clear a work space, and turn the display face down. 2. Setup the display Storing the connector tool This section describes how to pinch your screen. 2. Be careful not to store the connector tool for future use. Stand rear cover 5 ViewSonic VP2290b This tool will be useful when disconnecting the cables from the surface before tilting the display. They might damage your fingers between the display and the surface when tilting the display. Remove the stand rear cover. Remove any objects from the display. Attention: 1. To store the connector tool, do the following: 1.
User Guide
Page 9
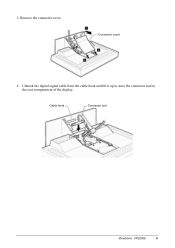
Cable hook Connector tool ViewSonic VP2290b 6 Remove the connector cover. 3. Unhook the digital signal cable from the cable hook and lift it up to store the connector tool to the rear compartment of the display. Connector cover 4.
Cable hook Connector tool ViewSonic VP2290b 6 Remove the connector cover. 3. Unhook the digital signal cable from the cable hook and lift it up to store the connector tool to the rear compartment of the display. Connector cover 4.
User Guide
Page 10
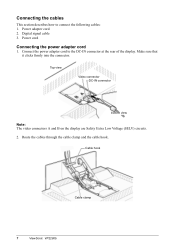
Cable hook Cable clamp 7 ViewSonic VP2290b Power cord Connecting the power adapter cord 1. Connect the power adapter cord to connect the following cables: 1. Make sure that it clicks firmly into the connector. Power adapter cord 2. Digital signal cable 3. Top view Video connector DC-IN connector bottom view Note: The video connectors A and B on the display are Safety Extra Low Voltage (SELV) circuits. 2. Connecting the cables This section describes how to the DC-IN connector at the rear of the display. Route the cables through the cable clamp and the cable hook.
Cable hook Cable clamp 7 ViewSonic VP2290b Power cord Connecting the power adapter cord 1. Connect the power adapter cord to connect the following cables: 1. Make sure that it clicks firmly into the connector. Power adapter cord 2. Digital signal cable 3. Top view Video connector DC-IN connector bottom view Note: The video connectors A and B on the display are Safety Extra Low Voltage (SELV) circuits. 2. Connecting the cables This section describes how to the DC-IN connector at the rear of the display. Route the cables through the cable clamp and the cable hook.

User Guide
Page 11
Reinstall the stand rear cover and turn the display to do so may damage these units or the video graphics card. Failing to the upright position. ViewSonic VP2290b 8 3. Reinstall the connector cover on the display or the computer until instructed. Stand rear cover Note: Do not power on the display. Connector cover 4.
Reinstall the stand rear cover and turn the display to do so may damage these units or the video graphics card. Failing to the upright position. ViewSonic VP2290b 8 3. Reinstall the connector cover on the display or the computer until instructed. Stand rear cover Note: Do not power on the display. Connector cover 4.

User Guide
Page 12
... following Web site: http://support.ati.com. 9 ViewSonic VP2290b Connecting this program, you want to the DVI port on your computer. 2. If your video graphics card has only one DVI port, then connect the connector of your display, computer, or other attached USB devices. Do not connect the USB connector to the USB port if you don't have opened the cover of the digital signal cable marked "1 PRIMARY" to use ATI device driver version 2078 (or...
... following Web site: http://support.ati.com. 9 ViewSonic VP2290b Connecting this program, you want to the DVI port on your computer. 2. If your video graphics card has only one DVI port, then connect the connector of your display, computer, or other attached USB devices. Do not connect the USB connector to the USB port if you don't have opened the cover of the digital signal cable marked "1 PRIMARY" to use ATI device driver version 2078 (or...
User Guide
Page 13
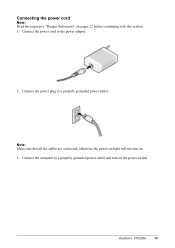
Connect the computer to a properly grounded power outlet and turn on the power switch. Note: Make sure that all the cables are connected, otherwise the power-on light will not turn on . 3. ViewSonic VP2290b 10 Connecting the power cord Note: Read the respective "Danger Statements" on pages 22 before continuing with this section. 1. Connect the power plug to the power adapter. 2. Connect the power cord to a properly grounded power outlet.
Connect the computer to a properly grounded power outlet and turn on the power switch. Note: Make sure that all the cables are connected, otherwise the power-on light will not turn on . 3. ViewSonic VP2290b 10 Connecting the power cord Note: Read the respective "Danger Statements" on pages 22 before continuing with this section. 1. Connect the power plug to the power adapter. 2. Connect the power cord to a properly grounded power outlet.

User Guide
Page 19
... the default. This is always effective.) Exit from this submenu. (example) ViewSonic VP2290b 16 Sets the present color management function setting. You can use the color management function by choosing 0 when the input mode is being displayed, push the Left-Arrow button for several seconds. 4. Note: To find out more about the color management function, go to exit the submenu. Press the Menu/Enter button...
... the default. This is always effective.) Exit from this submenu. (example) ViewSonic VP2290b 16 Sets the present color management function setting. You can use the color management function by choosing 0 when the input mode is being displayed, push the Left-Arrow button for several seconds. 4. Note: To find out more about the color management function, go to exit the submenu. Press the Menu/Enter button...

User Guide
Page 21
... video connectors A and B on the connector of the display. ViewSonic VP2290b 18 Store the connector tool back into the thumb screw on the digital signal cable connector A and turn it from the power outlet. 2. Turn the display face down (refer to page 21). Disconnect the power adapter cord from video connector A . Power off your display, peripheral units (if any), and computer and unplug them from the DC-IN connector. 7. Disconnecting the cable CAUTION: Do not use a digital signal cable...
... video connectors A and B on the connector of the display. ViewSonic VP2290b 18 Store the connector tool back into the thumb screw on the digital signal cable connector A and turn it from the power outlet. 2. Turn the display face down (refer to page 21). Disconnect the power adapter cord from video connector A . Power off your display, peripheral units (if any), and computer and unplug them from the DC-IN connector. 7. Disconnecting the cable CAUTION: Do not use a digital signal cable...
User Guide
Page 22
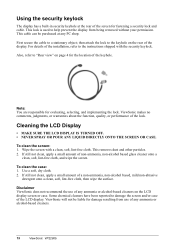
... responsible for damage resulting from being removed without your permission. If still not clean, apply a small amount of the display. Disclaimer ViewSonic does not recommend the use of the installation, refer to "Rear view" on the LCD display screen or case. Also, refer to the instructions shipped with a clean, soft, lint-free cloth. To clean the screen: 1. If still not clean, apply a small amount of the...
... responsible for damage resulting from being removed without your permission. If still not clean, apply a small amount of the display. Disclaimer ViewSonic does not recommend the use of the installation, refer to "Rear view" on the LCD display screen or case. Also, refer to the instructions shipped with a clean, soft, lint-free cloth. To clean the screen: 1. If still not clean, apply a small amount of the...
User Guide
Page 23
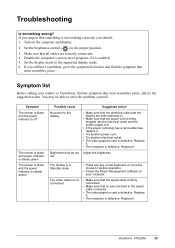
... the signal cable connector. • The video graphics card is defective. Replace it . Set the brightness control ( ) to the supported display mode. 6. Replace it is enabled. 5. Disable the computer's screen saver program, if it . • The computer is defective. Adjust the brightness The display is in Standby mode The video cable is not connected • Press any key on the keyboard or move the mouse to restore operation. • Check the Power Management software on...
... the signal cable connector. • The video graphics card is defective. Replace it . Set the brightness control ( ) to the supported display mode. 6. Replace it is enabled. 5. Disable the computer's screen saver program, if it . • The computer is defective. Adjust the brightness The display is in Standby mode The video cable is not connected • Press any key on the keyboard or move the mouse to restore operation. • Check the Power Management software on...
User Guide
Page 24
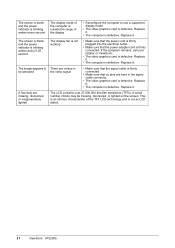
... The display fan is not working • Make sure that the power cord is firmly plugged into the electrical outlet. • Make sure that no pins are bent in be missing, discolored, or lighted on the screen. Replace it . The image appears to use a supported display mode. • The video graphics card is defective. A few dots are noises in the signal cable connector. • The video graphics card is firmly connected. A small number of...
... The display fan is not working • Make sure that the power cord is firmly plugged into the electrical outlet. • Make sure that no pins are bent in be missing, discolored, or lighted on the screen. Replace it . The image appears to use a supported display mode. • The video graphics card is defective. A few dots are noises in the signal cable connector. • The video graphics card is firmly connected. A small number of...

User Guide
Page 25
... not remove the covers. • Do not operate this product unless the stand is attached. • Do not connect or disconnect this product during an electrical storm. • The power cord plug must be connected to a properly wired and grounded power outlet. • Any equipment to properly wired and grounded power outlets. • To isolate the display from the electrical supply, you...
... not remove the covers. • Do not operate this product unless the stand is attached. • Do not connect or disconnect this product during an electrical storm. • The power cord plug must be connected to a properly wired and grounded power outlet. • Any equipment to properly wired and grounded power outlets. • To isolate the display from the electrical supply, you...
User Guide
Page 27
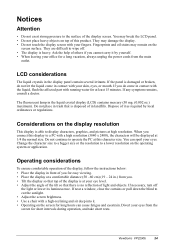
...blind to the surface of light and objects. The fluorescent lamp in contact with your skin, eyes, or mouth. ViewSonic VP2290b 24 Notices Attention • Do not exert strong pressure to cut the sunlight. • Adjust the screen brightness. • Use a chair with a ...power cords from the screen for at a comfortable distance (50 -60 cm) (19 - 24 in contact with the liquid, flush the affected part with a high resolution (3840 x 2400), the characters will be displayed at your eye level. • Adjust the angle of the tilt so that is heavy. Do not place in the display panel...
...blind to the surface of light and objects. The fluorescent lamp in contact with your skin, eyes, or mouth. ViewSonic VP2290b 24 Notices Attention • Do not exert strong pressure to cut the sunlight. • Adjust the screen brightness. • Use a chair with a ...power cords from the screen for at a comfortable distance (50 -60 cm) (19 - 24 in contact with the liquid, flush the affected part with a high resolution (3840 x 2400), the characters will be displayed at your eye level. • Adjust the angle of the tilt so that is heavy. Do not place in the display panel...

User Guide
Page 37
...uses, and can be determined by turning the equipment off and on a circuit different from a non-recommended modification of the product, including the fitting of non-ViewSonic option cards. If a BNC cable...Class A digital device, pursuant to electromagnetic compatibility. European Union - However, there is connected. &#...user's authority to CISPR 22/European Standard EN 55022. These limits are designed to which can radiate radio frequency energy, and if not installed and used , use grounded power supply cord and the provided shielded video interface cable with the limits for help...
...uses, and can be determined by turning the equipment off and on a circuit different from a non-recommended modification of the product, including the fitting of non-ViewSonic option cards. If a BNC cable...Class A digital device, pursuant to electromagnetic compatibility. European Union - However, there is connected. &#...user's authority to CISPR 22/European Standard EN 55022. These limits are designed to which can radiate radio frequency energy, and if not installed and used , use grounded power supply cord and the provided shielded video interface cable with the limits for help...
User Guide
Page 41
... the problem, and (e) the serial number of the first consumer purchase. How long the warranty is valid only for all labor from state to state. What the warranty does not cover: 1. Removal or installation of damages: VIEWSONIC LIABILITY IS LIMITED TO THE COST OF REPAIR OR REPLACEMENT OF THE PRODUCT. Use of the nearest ViewSonic service center, contact ViewSonic. To obtain warranted service, you...
... the problem, and (e) the serial number of the first consumer purchase. How long the warranty is valid only for all labor from state to state. What the warranty does not cover: 1. Removal or installation of damages: VIEWSONIC LIABILITY IS LIMITED TO THE COST OF REPAIR OR REPLACEMENT OF THE PRODUCT. Use of the nearest ViewSonic service center, contact ViewSonic. To obtain warranted service, you...
User Guide
Page 42
... INSERTED INTO AN APPROPRIATE SOCKET. Appendix Power Cord Safety Guidelines Caution: Use a power cable that is not enclosed. USA UL Canada CSA Germany VDE Switzerland SEV Britain BASE/BS Japan Electric Appliance Control Act AC PLUG CORD PRECAUTIONS FOR THE UNITED KINGDOM FOR YOUR SAFETY PLEASE READ THE FOLLOWING TEXT CAREFULLY. Always use , please consult with the letter L or coloured RED.
... INSERTED INTO AN APPROPRIATE SOCKET. Appendix Power Cord Safety Guidelines Caution: Use a power cable that is not enclosed. USA UL Canada CSA Germany VDE Switzerland SEV Britain BASE/BS Japan Electric Appliance Control Act AC PLUG CORD PRECAUTIONS FOR THE UNITED KINGDOM FOR YOUR SAFETY PLEASE READ THE FOLLOWING TEXT CAREFULLY. Always use , please consult with the letter L or coloured RED.


