
User Manual
Page 1
China) (Korean) (Arabic) ® VP181 ViewPanel With Landscape & Portrait Display Modes Full 18.1" Diagonal Viewable Screen User's Guide Guide de l'utilisateur Bedienungsanleitung (Latin American Spanish) (Italian) (Brazilian Portuguese) (Swedish) (Russian) (Polish) (Japanese) (Traditional Chinese -Taiwan) (Simplified Chinese -
China) (Korean) (Arabic) ® VP181 ViewPanel With Landscape & Portrait Display Modes Full 18.1" Diagonal Viewable Screen User's Guide Guide de l'utilisateur Bedienungsanleitung (Latin American Spanish) (Italian) (Brazilian Portuguese) (Swedish) (Russian) (Polish) (Japanese) (Traditional Chinese -Taiwan) (Simplified Chinese -

User Manual
Page 2
... and other areas, use AC cord which meets local safety standards. Product Name: ViewSonic VP181 ViewPanel Model Number: VLCDS21535-1 Serial Number: Purchase Date: Power Cord Safety Guidelines Caution : Use a power cable that this document may be liable for incidental or consequential damages resulting from ViewSonic Corporation. All right reserved. Microsoft, Windows, Windows NT, and the Windows logo are registered trademarks of the Video Electronics Standards Association. has...
... and other areas, use AC cord which meets local safety standards. Product Name: ViewSonic VP181 ViewPanel Model Number: VLCDS21535-1 Serial Number: Purchase Date: Power Cord Safety Guidelines Caution : Use a power cable that this document may be liable for incidental or consequential damages resulting from ViewSonic Corporation. All right reserved. Microsoft, Windows, Windows NT, and the Windows logo are registered trademarks of the Video Electronics Standards Association. has...

User Manual
Page 3
.... Opening or removing covers may cause E N the product to service this product from the wall outlet before cleaning. G 6 Slots and openings in performance, indicating a need for ventilation. Important Safety Instructions 1 Read these ventilation slots by the operating instructions, since improper adjustment of any object on the power cord. See the Cleaning the ViewPanel® on page 18. 4 Do not use an extension cord with the power recommendation...
.... Opening or removing covers may cause E N the product to service this product from the wall outlet before cleaning. G 6 Slots and openings in performance, indicating a need for ventilation. Important Safety Instructions 1 Read these ventilation slots by the operating instructions, since improper adjustment of any object on the power cord. See the Cleaning the ViewPanel® on page 18. 4 Do not use an extension cord with the power recommendation...

User Manual
Page 4
... that to which can radiate radio frequency energy, and if not installed and used in a particular installation. Department of Industry Canada (IC) Compliance Notice This digital apparatus does not exceed the Class B limits for help. FCC Warning: To assure continued FCC compliance, the user must use the provided grounded power supply cord and the shielded video interface cable with bonded ferrite cores. L ●...
... that to which can radiate radio frequency energy, and if not installed and used in a particular installation. Department of Industry Canada (IC) Compliance Notice This digital apparatus does not exceed the Class B limits for help. FCC Warning: To assure continued FCC compliance, the user must use the provided grounded power supply cord and the shielded video interface cable with bonded ferrite cores. L ●...

User Manual
Page 5
CONTENTS Important Safety Instructions 2 FCC Information 3 Getting Started* E N G Precautions 5 L Package Contents 6 I S Installation (Desk Mount 7 H Installation (Wall Mount 9 Operation Landscape/Portrait Modes 10 Front Control Panel 10 OnView® Main Menu 11 Other Information Specifications 16 Troubleshooting 17 Cleaning the ViewPanel 18 Limited Warranty 19 Customer Support back cover *To meet your future needs, and to receive any additional product information as it becomes available, please register your ViewPanel...
CONTENTS Important Safety Instructions 2 FCC Information 3 Getting Started* E N G Precautions 5 L Package Contents 6 I S Installation (Desk Mount 7 H Installation (Wall Mount 9 Operation Landscape/Portrait Modes 10 Front Control Panel 10 OnView® Main Menu 11 Other Information Specifications 16 Troubleshooting 17 Cleaning the ViewPanel 18 Limited Warranty 19 Customer Support back cover *To meet your future needs, and to receive any additional product information as it becomes available, please register your ViewPanel...

User Manual
Page 6
... a well ventilated area to position your ViewPanel to continue using the ViewPanel. • Never remove the rear cover. You may suffer electric shock if you touch these parts. • Always handle your ViewPanel with virtually any analog or digital source. N G Important! I The word "Windows®" in a desk mount or wall mount configuration. You have selected one of heat. The LCD screen is very delicate. •...
... a well ventilated area to position your ViewPanel to continue using the ViewPanel. • Never remove the rear cover. You may suffer electric shock if you touch these parts. • Always handle your ViewPanel with virtually any analog or digital source. N G Important! I The word "Windows®" in a desk mount or wall mount configuration. You have selected one of heat. The LCD screen is very delicate. •...

User Manual
Page 7
The DC Power supply connects to DC Power supply • Power cord/SCHUKO type for 6 Getting Started ViewSonic VP181 ViewPanel® E N • Detachable video cable (15 G pin HD D-sub) L I Required to receive Analog RGB S video signal from PC H • Power cord/USA type Connects wall outlet to DC IN port on base. Package Contents • ViewSonic VP181 ViewPanel • DC Power supply Power cables connect to DC Power supply.
The DC Power supply connects to DC Power supply • Power cord/SCHUKO type for 6 Getting Started ViewSonic VP181 ViewPanel® E N • Detachable video cable (15 G pin HD D-sub) L I Required to receive Analog RGB S video signal from PC H • Power cord/USA type Connects wall outlet to DC IN port on base. Package Contents • ViewSonic VP181 ViewPanel • DC Power supply Power cables connect to DC Power supply.

User Manual
Page 8
... Connect video cable 3 Connect DC power supply Connect the cord from the DC ViewPanel® to the computer using the proper cord adapter for an analog data (CPU) connection, composite video connection (VCR, camera, etc.), audio connection, and a USB connection. Installation (Desk Mount) A desk installation allows for your Macintosh® users: Connect the video cable to the head. region. this step will be completed by 5a Connect video cable E N G the factory. Adapter is included with the VP181. PC users: Connect the video cable L 2 Connect DFP cord from...
... Connect video cable 3 Connect DC power supply Connect the cord from the DC ViewPanel® to the computer using the proper cord adapter for an analog data (CPU) connection, composite video connection (VCR, camera, etc.), audio connection, and a USB connection. Installation (Desk Mount) A desk installation allows for your Macintosh® users: Connect the video cable to the head. region. this step will be completed by 5a Connect video cable E N G the factory. Adapter is included with the VP181. PC users: Connect the video cable L 2 Connect DFP cord from...
User Manual
Page 10
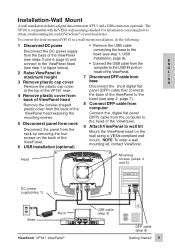
... power supply(step 1) Base Neck ViewSonic VP181 ViewPanel® USB cable (step 6) DFP cable (step 8) Getting Started 9 Installation-Wall Mount A wall installation includes a digital data connection (CPU) and a USB connection (optional). panel (DFP) cable that connects 4 Remove plastic cover from the base of the ViewPanel. 7 Disconnect DFP cable from the N (see step 1 in figure below). For information concerning how to the head (see steps 3 and 4, page 6) and Installation, page 8). computer to the USB IN port on the wall using a VESA...
... power supply(step 1) Base Neck ViewSonic VP181 ViewPanel® USB cable (step 6) DFP cable (step 8) Getting Started 9 Installation-Wall Mount A wall installation includes a digital data connection (CPU) and a USB connection (optional). panel (DFP) cable that connects 4 Remove plastic cover from the base of the ViewPanel. 7 Disconnect DFP cable from the N (see step 1 in figure below). For information concerning how to the head (see steps 3 and 4, page 6) and Installation, page 8). computer to the USB IN port on the wall using a VESA...

User Manual
Page 11
... switch from Portrait to Landscape mode, follow the instructions for description of ViewPanel toward you must first install the PerfectPortraitTM* software included with your graphics card. 10 Operation ViewSonic VP181 ViewPanel® The power light will provide information on the VP181 will then turn the ViewPanel off brightness Base Control buttons (See page 11 for Landscape/Portrait Mode, or begin using the H portrait display mode, you to tilt bottom...
... switch from Portrait to Landscape mode, follow the instructions for description of ViewPanel toward you must first install the PerfectPortraitTM* software included with your graphics card. 10 Operation ViewSonic VP181 ViewPanel® The power light will provide information on the VP181 will then turn the ViewPanel off brightness Base Control buttons (See page 11 for Landscape/Portrait Mode, or begin using the H portrait display mode, you to tilt bottom...

User Manual
Page 12
... displays main menu Button [2] activates control screen for highlighted control, and allows selection of screen image. [▲] increases contrast, [▼] decreases contrast. Digital source uses only the brightness control on ViewPanel head (see page 10 for adjustment 1 Press the [1] button to an analog source. Shortcut: Before displaying the OnView menu, press the [▼] or [▲] button to toggle between brightness and contrast. Press button [2] to adjust. ViewSonic VP181 ViewPanel® Operation 11 Contrast adjusts foreground white level of active analog input...
... displays main menu Button [2] activates control screen for highlighted control, and allows selection of screen image. [▲] increases contrast, [▼] decreases contrast. Digital source uses only the brightness control on ViewPanel head (see page 10 for adjustment 1 Press the [1] button to an analog source. Shortcut: Before displaying the OnView menu, press the [▼] or [▲] button to toggle between brightness and contrast. Press button [2] to adjust. ViewSonic VP181 ViewPanel® Operation 11 Contrast adjusts foreground white level of active analog input...
User Manual
Page 13
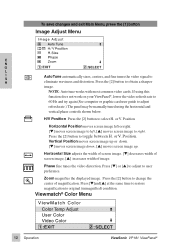
...;] moves screen image down, [▲] moves screen image up. If using the horizontal and vertical phase controls shown below. To save changes and exit Main Menu, press the [1] button Image Adjust Menu E N G L I S AutoTune automatically sizes, centers, and fine tunes the video signal to adjust refresh rate.) The panel may be manually tuned using this function does not work on your ViewPanel®, lower the video refresh rate to 60 Hz and try again (See computer or graphic card user guide to...
...;] moves screen image down, [▲] moves screen image up. If using the horizontal and vertical phase controls shown below. To save changes and exit Main Menu, press the [1] button Image Adjust Menu E N G L I S AutoTune automatically sizes, centers, and fine tunes the video signal to adjust refresh rate.) The panel may be manually tuned using this function does not work on your ViewPanel®, lower the video refresh rate to 60 Hz and try again (See computer or graphic card user guide to...

User Manual
Page 14
... of the sound to be adjusted by using the following controls. E 5400K--Adds green to screen image for cooler white (used in RGB (computer) mode, and only affects composite video sources. AUDIO INPUT SELECT selects which audio input to the second speaker. NOTE: Video color option is not available in most office settings with fluorescent lighting). 6500K--Adds re to screen image for improved brightness and color saturation. ViewSonic VP181 ViewPanel® Operation 13 Press button [2] to select...
... of the sound to be adjusted by using the following controls. E 5400K--Adds green to screen image for cooler white (used in RGB (computer) mode, and only affects composite video sources. AUDIO INPUT SELECT selects which audio input to the second speaker. NOTE: Video color option is not available in most office settings with fluorescent lighting). 6500K--Adds re to screen image for improved brightness and color saturation. ViewSonic VP181 ViewPanel® Operation 13 Press button [2] to select...

User Manual
Page 15
... about changing the resolution and refresh rate. 14 Operation ViewSonic VP181 ViewPanel® Press [▼] or [▲] to select from the following options: 1:1 adjusts the video signal so that the height and width of a non-SXGA (1280 x 1024) RGB signal. PIP Position allows the user to place the Picture-in Picture allows the user to the screen size using the following options: Small, Medium, or Large. ViewMeter® displays information...
... about changing the resolution and refresh rate. 14 Operation ViewSonic VP181 ViewPanel® Press [▼] or [▲] to select from the following options: 1:1 adjusts the video signal so that the height and width of a non-SXGA (1280 x 1024) RGB signal. PIP Position allows the user to place the Picture-in Picture allows the user to the screen size using the following options: Small, Medium, or Large. ViewMeter® displays information...

User Manual
Page 16
To save changes and exit Main Menu, press the [1] button Setup Menu E N G L I Input Select allows the user to select the current signal from video A, B, or composite input. OSDTimeout sets the length of time the OnScreen Display screen is operating in a factory preset mode.) Press the [2] button to select the Memory Recall menu option. Vertical OSD Position vertically repositions all On-ScreenDisplay (OSD) screens. [▼] moves OSD left, [▲] moves the OSD right. ViewSonic VP181 ViewPanel® Operation 15...
To save changes and exit Main Menu, press the [1] button Setup Menu E N G L I Input Select allows the user to select the current signal from video A, B, or composite input. OSDTimeout sets the length of time the OnScreen Display screen is operating in a factory preset mode.) Press the [2] button to select the Memory Recall menu option. Vertical OSD Position vertically repositions all On-ScreenDisplay (OSD) screens. [▼] moves OSD left, [▲] moves the OSD right. ViewSonic VP181 ViewPanel® Operation 15...

User Manual
Page 17
Other Information Specifications LCD Type 18.1" (diagonal viewable) SXGA Active Matrix TFT Panel, 0.2805mm pixel pitch Color Filter RGB, vertical stripe E Glass surface Anti-glare & hard coating N Input Signal Video RGB Analog (0.7 - 1.0 Vp-p, 75 ohms) G L I S DVI by H Video H/V Separated (TTL), Composite, Sync-onGreen fh: 30-95 kHz, fv: 50-75 Hz Digital VESA® Digital Video (DFP compliant), adapter Composite video: NTSC, PAL, SECAM, HDTV Compatibility Recommended PC Macintosh® User Modes: 1280 x 1024 @ 60 Hz...
Other Information Specifications LCD Type 18.1" (diagonal viewable) SXGA Active Matrix TFT Panel, 0.2805mm pixel pitch Color Filter RGB, vertical stripe E Glass surface Anti-glare & hard coating N Input Signal Video RGB Analog (0.7 - 1.0 Vp-p, 75 ohms) G L I S DVI by H Video H/V Separated (TTL), Composite, Sync-onGreen fh: 30-95 kHz, fv: 50-75 Hz Digital VESA® Digital Video (DFP compliant), adapter Composite video: NTSC, PAL, SECAM, HDTV Compatibility Recommended PC Macintosh® User Modes: 1280 x 1024 @ 60 Hz...
User Manual
Page 18
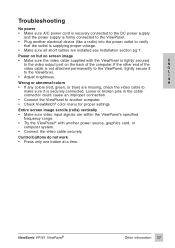
... any colors (red, green, or blue) are installed see Installation section pg 7. ViewSonic VP181 ViewPanel® Other Information 17 Control buttons do not work • Press only one button at a time. If the other end of the computer. Power on the back of the N video cable is not attached permanently to the ViewPanel, tightly secure it is securely connected. Troubleshooting No power • Make sure A/C power cord is securely connected to...
... any colors (red, green, or blue) are installed see Installation section pg 7. ViewSonic VP181 ViewPanel® Other Information 17 Control buttons do not work • Press only one button at a time. If the other end of the computer. Power on the back of the N video cable is not attached permanently to the ViewPanel, tightly secure it is securely connected. Troubleshooting No power • Make sure A/C power cord is securely connected to...
User Manual
Page 19
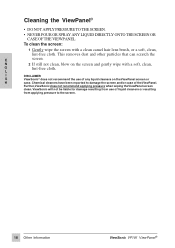
... DIRECTLY ONTO THE SCREEN OR CASE OF THE VIEWPANEL. L I DISCLAIMER S ViewSonic® does not recommend the use of liquid cleaners or resulting from applying pressure to damage the screen and/or case of any liquid cleaners on the screen and gently wipe with a clean camel hair lens brush, or a soft, clean, lint-free cloth. This removes dust and other...
... DIRECTLY ONTO THE SCREEN OR CASE OF THE VIEWPANEL. L I DISCLAIMER S ViewSonic® does not recommend the use of liquid cleaners or resulting from applying pressure to damage the screen and/or case of any liquid cleaners on the screen and gently wipe with a clean camel hair lens brush, or a soft, clean, lint-free cloth. This removes dust and other...

User Manual
Page 20
... nature, unauthorized product modification, or failure to a product defect. 3. Use of this user's guide. How to shipment. See the back cover of supplies or parts not meeting ViewSonic's specifications. To obtain service under warranty, contact ViewSonic Customer Support. REV 7/16/98 ViewSonic VP181 ViewPanel® Other Information 19 I S b. f. Normal wear and tear. Removal, installation, and set-up service charges. Accident, misuse, neglect, fire, water, lightning, or...
... nature, unauthorized product modification, or failure to a product defect. 3. Use of this user's guide. How to shipment. See the back cover of supplies or parts not meeting ViewSonic's specifications. To obtain service under warranty, contact ViewSonic Customer Support. REV 7/16/98 ViewSonic VP181 ViewPanel® Other Information 19 I S b. f. Normal wear and tear. Removal, installation, and set-up service charges. Accident, misuse, neglect, fire, water, lightning, or...
User Manual
Page 22
...@viewsonic.com World Wide Web: http://www.viewsonic.com ViewSonic® Corporation 381 Brea Canyon Road Walnut, CA 91789 Tel (909) 869-7976 Tel (800) 688-6688 05/99 Fax (909) 468-1202 U.S. Customer Service To receive the most prompt assistance, dial the appropriate number below and listen to all menu options before making your selection: Customer Support, Technical Support, Parts...
...@viewsonic.com World Wide Web: http://www.viewsonic.com ViewSonic® Corporation 381 Brea Canyon Road Walnut, CA 91789 Tel (909) 869-7976 Tel (800) 688-6688 05/99 Fax (909) 468-1202 U.S. Customer Service To receive the most prompt assistance, dial the appropriate number below and listen to all menu options before making your selection: Customer Support, Technical Support, Parts...


