User Guide English
Page 1
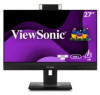
VS19249 P/N: VG2756V-2K Warranty information contained in this User Guide to obtain important information on our web site at http://www.viewsonic.com in English, or in specific languages using your product in the upper right corner of our website. VG2756V-2K Display User Guide IMPORTANT: Please read this User Guide will describe your limited coverage from ViewSonic® Corporation, which is also found on installing and using the Regional selection box in a safe manner, as well as registering your product for future service. Model No.
VS19249 P/N: VG2756V-2K Warranty information contained in this User Guide to obtain important information on our web site at http://www.viewsonic.com in English, or in specific languages using your product in the upper right corner of our website. VG2756V-2K Display User Guide IMPORTANT: Please read this User Guide will describe your limited coverage from ViewSonic® Corporation, which is also found on installing and using the Regional selection box in a safe manner, as well as registering your product for future service. Model No.

User Guide English
Page 3
... removing the rear cover of the monitor. This monitor contains high-voltage parts. • Do not use furniture that can safely support the monitor. • Always ensure the monitor is required, see the "Maintenance" section in this equipment near any heat sources such as it . • Always use cabinets or stands or installation methods recommended by the manufacturer of the monitor set. • Always use this guide...
... removing the rear cover of the monitor. This monitor contains high-voltage parts. • Do not use furniture that can safely support the monitor. • Always ensure the monitor is required, see the "Maintenance" section in this equipment near any heat sources such as it . • Always use cabinets or stands or installation methods recommended by the manufacturer of the monitor set. • Always use this guide...

User Guide English
Page 4
... as toys and remote controls, on the display, video cable, or power cord. • Do not place items that it will be unused for your safety. Service will be required when the unit has been damaged in a well-ventilated area. If the plug does not fit into the unit, if the unit is present, immediately switch the display off and contact...
... as toys and remote controls, on the display, video cable, or power cord. • Do not place items that it will be unused for your safety. Service will be required when the unit has been damaged in a well-ventilated area. If the plug does not fit into the unit, if the unit is present, immediately switch the display off and contact...

User Guide English
Page 11
Remove the monitor stand's base and neck. NOTE: The monitor comes packaged in the monitor stand's base and secure it to make installation easy. Installing the Stand 1. Remove the top tray. 2. Use the captured screw in a user-friendly box to the monitor stand's neck. 1 2 11 Initial Setup This section provides detailed instructions for setting up your monitor. Place the box on the monitor stand's base with the monitor stand's neck. 3. Align and connect the two (2) points on a flat, stable surface and open the front flap of the box to reveal the contents.
Remove the monitor stand's base and neck. NOTE: The monitor comes packaged in the monitor stand's base and secure it to make installation easy. Installing the Stand 1. Remove the top tray. 2. Use the captured screw in a user-friendly box to the monitor stand's neck. 1 2 11 Initial Setup This section provides detailed instructions for setting up your monitor. Place the box on the monitor stand's base with the monitor stand's neck. 3. Align and connect the two (2) points on a flat, stable surface and open the front flap of the box to reveal the contents.

User Guide English
Page 34
Input Select Conference Mode ViewMode Color Adjust Manual Image Setup Menu Adjust Contrast/Brightness Color Temperature Color Space Color Range Gamma Contrast Brightness 34 2560 X 1440 @ 60Hz Press the 5 key to display the Main Settings menu, then press the 4 key to enter the selected menu. Input Select Conference Mode ViewMode Color Adjust Manual Image Setup Menu Adjust HDMI DisplayPort Type-C 2560 X 1440 @ 60Hz 2. Configuring the Settings General Operations 1920 X 1080 @ 60Hz 1920 X 1080 @ 60Hz Key Guide 1. Then press the 3 key to enter the OSD Menu. Press...
Input Select Conference Mode ViewMode Color Adjust Manual Image Setup Menu Adjust Contrast/Brightness Color Temperature Color Space Color Range Gamma Contrast Brightness 34 2560 X 1440 @ 60Hz Press the 5 key to display the Main Settings menu, then press the 4 key to enter the selected menu. Input Select Conference Mode ViewMode Color Adjust Manual Image Setup Menu Adjust HDMI DisplayPort Type-C 2560 X 1440 @ 60Hz 2. Configuring the Settings General Operations 1920 X 1080 @ 60Hz 1920 X 1080 @ 60Hz Key Guide 1. Then press the 3 key to enter the OSD Menu. Press...

User Guide English
Page 35
...sub-menu. Input Select Conference Mode ViewMode Color Adjust Manual Image Setup Menu Adjust Contrast/Brightness Color Temperature Color Space Color Range Gamma sRGB Bluish Cool Native Warm User Color 2560 X 1440 @ 60Hz 35 Then press the 3 key to confirm. Press the 1 or 2 key to select the desired menu option. 3. Input Select Conference Mode ViewMode Color Adjust Manual Image Setup Menu Adjust Contrast/Brightness Color Temperature Color Space Color Range Gamma sRGB Bluish Cool Native Warm User Color 2560 X 1440 @ 60Hz 4. Press the 1 or 2 key to adjust/select the setting...
...sub-menu. Input Select Conference Mode ViewMode Color Adjust Manual Image Setup Menu Adjust Contrast/Brightness Color Temperature Color Space Color Range Gamma sRGB Bluish Cool Native Warm User Color 2560 X 1440 @ 60Hz 35 Then press the 3 key to confirm. Press the 1 or 2 key to select the desired menu option. 3. Input Select Conference Mode ViewMode Color Adjust Manual Image Setup Menu Adjust Contrast/Brightness Color Temperature Color Space Color Range Gamma sRGB Bluish Cool Native Warm User Color 2560 X 1440 @ 60Hz 4. Press the 1 or 2 key to adjust/select the setting...

User Guide English
Page 43
... background noise level of the user. Then press the 3 key to enter its sub-menu. 4. Press the 1 or 2 key to a limited angle (600). Voice Focus Only My Voice The monitor will narrow the microphone range to adjust/select the setting. Input Select Conference Mode ViewMode Color Adjust Manual Image Setup Menu Adjust LED Fill Light Audio Focus Speaker Volume Speaker Mute Voice Focus Microphone Mute 2560 X 1440 @ 60Hz 3. Conference Mode 1. Speaker Volume Adjust the speaker volume level.
... background noise level of the user. Then press the 3 key to enter its sub-menu. 4. Press the 1 or 2 key to a limited angle (600). Voice Focus Only My Voice The monitor will narrow the microphone range to adjust/select the setting. Input Select Conference Mode ViewMode Color Adjust Manual Image Setup Menu Adjust LED Fill Light Audio Focus Speaker Volume Speaker Mute Voice Focus Microphone Mute 2560 X 1440 @ 60Hz 3. Conference Mode 1. Speaker Volume Adjust the speaker volume level.
User Guide English
Page 45
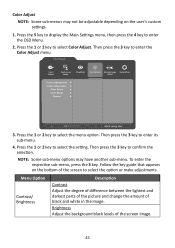
... menu option. Follow the key guide that appears on the user's custom settings. 1. Brightness Adjust the background black levels of the screen to enter the Color Adjust menu. Menu Option Contrast/ Brightness Description Contrast Adjust the degree of difference between the lightest and darkest parts of the picture and change the amount of black and white in the image. To enter the respective sub-menu, press the 3 key. Input Select Conference Mode ViewMode Color Adjust Manual Image Setup Menu Adjust Contrast/Brightness Color Temperature Color Space Color Range...
... menu option. Follow the key guide that appears on the user's custom settings. 1. Brightness Adjust the background black levels of the screen to enter the Color Adjust menu. Menu Option Contrast/ Brightness Description Contrast Adjust the degree of difference between the lightest and darkest parts of the picture and change the amount of black and white in the image. To enter the respective sub-menu, press the 3 key. Input Select Conference Mode ViewMode Color Adjust Manual Image Setup Menu Adjust Contrast/Brightness Color Temperature Color Space Color Range...
User Guide English
Page 47
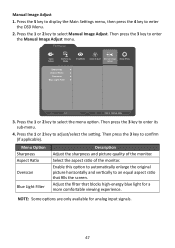
...-energy blue light for analog input signals. 47 Enable this option to automatically enlarge the original picture horizontally and vertically to adjust/select the setting. Adjust the filter that fills the screen. Press the 1 or 2 key to confirm (if applicable). Then press the 3 key to select the menu option. Then press the 3 key to enter the OSD Menu. 2. Input Select Conference Mode ViewMode Color Adjust Manual Image Setup Menu Adjust Sharpness Aspect Ratio Overscan Blue Light...
...-energy blue light for analog input signals. 47 Enable this option to automatically enlarge the original picture horizontally and vertically to adjust/select the setting. Adjust the filter that fills the screen. Press the 1 or 2 key to confirm (if applicable). Then press the 3 key to select the menu option. Then press the 3 key to enter the OSD Menu. 2. Input Select Conference Mode ViewMode Color Adjust Manual Image Setup Menu Adjust Sharpness Aspect Ratio Overscan Blue Light...

User Guide English
Page 48
... the Setup Menu menu. Follow the key guide that appears on the bottom of the screen to enter the OSD Menu. 2. To enter the respective sub-menu, press the 3 key. Press the 5 key to display the Main Settings menu, then press the 4 key to select the option or make adjustments. 48 Input Select Conference Mode ViewMode Color Adjust Manual Image Setup Menu Adjust Language Select Resolution Notice Information OSD Timeout OSD Background OSD Pivot Power Indicator Auto Power Off Sleep ECO Mode...
... the Setup Menu menu. Follow the key guide that appears on the bottom of the screen to enter the OSD Menu. 2. To enter the respective sub-menu, press the 3 key. Press the 5 key to display the Main Settings menu, then press the 4 key to select the option or make adjustments. 48 Input Select Conference Mode ViewMode Color Adjust Manual Image Setup Menu Adjust Language Select Resolution Notice Information OSD Timeout OSD Background OSD Pivot Power Indicator Auto Power Off Sleep ECO Mode...

User Guide English
Page 49
... 1.2 support. Resets all settings to allow the monitor control via the graphics card. Display the monitor information. Enable this option to allow the system to On, the power indicator lights blue when the device is not the correct native resolution. Automatically detect the input signal. Enable this option to allow the monitor to automatically turn off . Set the length of idle time before the monitor enters Sleep mode. Choose between various modes, based...
... 1.2 support. Resets all settings to allow the monitor control via the graphics card. Display the monitor information. Enable this option to allow the system to On, the power indicator lights blue when the device is not the correct native resolution. Automatically detect the input signal. Enable this option to allow the monitor to automatically turn off . Set the length of idle time before the monitor enters Sleep mode. Choose between various modes, based...
User Guide English
Page 52
...) This control does not affect changes made with the "Language Select" or "Power Lock setting". Auto Image Adjust Automatically sizes, centers, and fine tunes the video signal to factory settings if the display is disabled by brightening dark scenes. Blue Light Filter Adjusts the filter that blocks high-energy blue light for a more than one source. Brightness Adjusts background black levels of this manual. Audio Adjust Adjusts the volume, mutes the sound, or toggles between inputs if you have more comfortable viewing experience.
...) This control does not affect changes made with the "Language Select" or "Power Lock setting". Auto Image Adjust Automatically sizes, centers, and fine tunes the video signal to factory settings if the display is disabled by brightening dark scenes. Blue Light Filter Adjusts the filter that blocks high-energy blue light for a more than one source. Brightness Adjusts background black levels of this manual. Audio Adjust Adjusts the volume, mutes the sound, or toggles between inputs if you have more comfortable viewing experience.

User Guide English
Page 53
...adjustment modes, to help adjust the color settings to fit the correct color range if the colors are not displayed correctly. You can detect the input signal color range automatically. Options Description Auto The monitor automatically recognizes the color format and black and white levels. Color Temperature Allows users to select specific color temperature settings to 7500K. Cool Set the color temperature to further customize their viewing experience. Panel Default Panel Original Status sRGB Standard color space used for monitor color output (RGB...
...adjustment modes, to help adjust the color settings to fit the correct color range if the colors are not displayed correctly. You can detect the input signal color range automatically. Options Description Auto The monitor automatically recognizes the color format and black and white levels. Color Temperature Allows users to select specific color temperature settings to 7500K. Cool Set the color temperature to further customize their viewing experience. Panel Default Panel Original Status sRGB Standard color space used for monitor color output (RGB...
User Guide English
Page 54
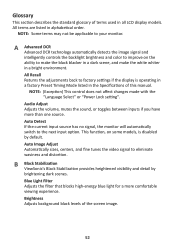
... graphics cards's user guide for instructions on its horizontal axis. There are available for example, means that are six selections: 1.8, 2.0, 2.2, 2.4, 2.6 and 2.8. Horizontal Size Manually stretch or shorten the screen image on changing the resolution and refresh rate (vertical frequency). NOTE: VESA 1024 x 768 @ 60Hz, for the monitor. H H./V. G Game Mode Integrates a gaming-oriented On-Screen Display (OSD) design, including: pre-calibrated FPS, RTS, and MOBA gaming settings. Each mode is 60Hz. Hue Adjusts the tint of each color (red, green, blue...
... graphics cards's user guide for instructions on its horizontal axis. There are available for example, means that are six selections: 1.8, 2.0, 2.2, 2.4, 2.6 and 2.8. Horizontal Size Manually stretch or shorten the screen image on changing the resolution and refresh rate (vertical frequency). NOTE: VESA 1024 x 768 @ 60Hz, for the monitor. H H./V. G Game Mode Integrates a gaming-oriented On-Screen Display (OSD) design, including: pre-calibrated FPS, RTS, and MOBA gaming settings. Each mode is 60Hz. Hue Adjusts the tint of each color (red, green, blue...

User Guide English
Page 55
... changes made in the "Specifications" of power-saving guidelines issued by the U.S. O OSD Pivot Sets the monitor's On-Screen Display (OSD) Menu display direction. M Manual Image Adjust Displays the "Manual Image Adjust" menu. Memory Recall is a joint program of Energy helping us all save money and protect the environment through energy efficient products and practices. ENERGY STAR® is the default as-shipped display configuration and settings. A setting on your monitor's screen. Memory Recall Returns the adjustments back to default...
... changes made in the "Specifications" of power-saving guidelines issued by the U.S. O OSD Pivot Sets the monitor's On-Screen Display (OSD) Menu display direction. M Manual Image Adjust Displays the "Manual Image Adjust" menu. Memory Recall is a joint program of Energy helping us all save money and protect the environment through energy efficient products and practices. ENERGY STAR® is the default as-shipped display configuration and settings. A setting on your monitor's screen. Memory Recall Returns the adjustments back to default...

User Guide English
Page 56
... correct native resolution. Setup Menu Adjusts On-Screen Display (OSD) Menu settings. R Recall Resets the ViewMode monitor settings. Resolution Notice The notice tells users that allow for color image and video processing; Response Time Adjusts the response time, creating smooth images without perceptual distortion. 56 V ViewMode ViewSonic's unique ViewMode feature offers "Game", "Movie", "Web", "Text", "MAC", and "Mono" presets. Red, green, and blue light are specifically designed to reopen the menu. Sharpness Adjusts the picture quality of each color (red, green, blue, cyan...
... correct native resolution. Setup Menu Adjusts On-Screen Display (OSD) Menu settings. R Recall Resets the ViewMode monitor settings. Resolution Notice The notice tells users that allow for color image and video processing; Response Time Adjusts the response time, creating smooth images without perceptual distortion. 56 V ViewMode ViewSonic's unique ViewMode feature offers "Game", "Movie", "Web", "Text", "MAC", and "Mono" presets. Red, green, and blue light are specifically designed to reopen the menu. Sharpness Adjusts the picture quality of each color (red, green, blue, cyan...

User Guide English
Page 57
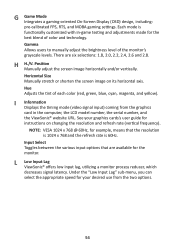
... supplying power. • Make sure the video cable connecting the monitor to the computer is properly and securely connected. • Adjust the brightness and contrast settings. • Make sure the correct input source is selected. • If any colors (red, green, or blue) are missing, check the video cable to make sure it is properly and securely connected. • Adjust the resolution to the correct Aspect Ratio. • Reset the monitor to factory settings. • Adjust the horizontal and vertical controls via the OSD Menu. • Check...
... supplying power. • Make sure the video cable connecting the monitor to the computer is properly and securely connected. • Adjust the brightness and contrast settings. • Make sure the correct input source is selected. • If any colors (red, green, or blue) are missing, check the video cable to make sure it is properly and securely connected. • Adjust the resolution to the correct Aspect Ratio. • Reset the monitor to factory settings. • Adjust the horizontal and vertical controls via the OSD Menu. • Check...

User Guide English
Page 58
... in the OSD No audio output The monitor will not adjust USB devices connected to the monitor do not work The external device is connected, but no image appears on the screen Possible Solutions • Make sure the "Blue Light Filter" is Off. • Check whether the OSD Menu is locked. • Turn off the monitor, unplug the power cord, plug it is connected properly. • Try changing to 0. • Check the Audio Input setting. • Make sure there are...
... in the OSD No audio output The monitor will not adjust USB devices connected to the monitor do not work The external device is connected, but no image appears on the screen Possible Solutions • Make sure the "Blue Light Filter" is Off. • Check whether the OSD Menu is locked. • Turn off the monitor, unplug the power cord, plug it is connected properly. • Try changing to 0. • Check the Audio Input setting. • Make sure there are...
User Guide English
Page 69
... coating on the surface of the display through inappropriate cleaning as image burn-in the original container to the "Customer Service" page). Limitation of implied warranties: There are no warranties, express or implied, which does not relate to as described in the product User Guide. • Removal, installation, and set-up service charges, including wall-mounting of time (also referred to a product...
... coating on the surface of the display through inappropriate cleaning as image burn-in the original container to the "Customer Service" page). Limitation of implied warranties: There are no warranties, express or implied, which does not relate to as described in the product User Guide. • Removal, installation, and set-up service charges, including wall-mounting of time (also referred to a product...
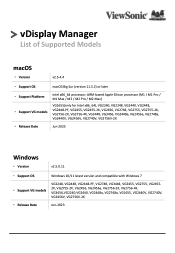
vDisplay Manager 2.0 supported models
Page 1
...), VG2240, VG2248, VG2440, VG2448, VG2448-PF, VG2455, VG2455-2K, VG2456, VG2748, VG2755, VG2755-2K, VG2756-2K, VG2756-4K, VG3448, VG3456, VG2448a, VG2456a, VG2748a, VG2440V, VG2456V, VG2740V, VG2756V-2K • Release Date Jun-2023 Windows • Version v2.5.0.11 • Support OS Windows 10/11 latest version and compatible with Windows 7 • Support VG models VG2248, VG2448, VG2448-PF, VG2748, VG3448, VG2455, VG2755...
...), VG2240, VG2248, VG2440, VG2448, VG2448-PF, VG2455, VG2455-2K, VG2456, VG2748, VG2755, VG2755-2K, VG2756-2K, VG2756-4K, VG3448, VG3456, VG2448a, VG2456a, VG2748a, VG2440V, VG2456V, VG2740V, VG2756V-2K • Release Date Jun-2023 Windows • Version v2.5.0.11 • Support OS Windows 10/11 latest version and compatible with Windows 7 • Support VG models VG2248, VG2448, VG2448-PF, VG2748, VG3448, VG2455, VG2755...


