

User Manual
Page 2
Contents Product Registration 2 For Your Records 2 Getting Started Package Contents 3 Precautions 3 Quick Installation 4 Landscape/Portrait Modes 5 To Raise and Lower the display 5 Installation of Wall Mount (Optional 6 Using the ViewPanel Setting the Timing Mode 7 OSD and Power Button Lock Modes 7 Adjusting the Screen Image 8 Other Information Specifications 15 Troubleshooting 16 Customer Support 17 Cleaning the ViewPanel 18 Limited Warranty 19 Appendix Safety Guidelines 20 Compliance Information 21 CE Conformity 21 ViewSonic VG191/VG191b 1
Contents Product Registration 2 For Your Records 2 Getting Started Package Contents 3 Precautions 3 Quick Installation 4 Landscape/Portrait Modes 5 To Raise and Lower the display 5 Installation of Wall Mount (Optional 6 Using the ViewPanel Setting the Timing Mode 7 OSD and Power Button Lock Modes 7 Adjusting the Screen Image 8 Other Information Specifications 15 Troubleshooting 16 Customer Support 17 Cleaning the ViewPanel 18 Limited Warranty 19 Appendix Safety Guidelines 20 Compliance Information 21 CE Conformity 21 ViewSonic VG191/VG191b 1

User Manual
Page 4
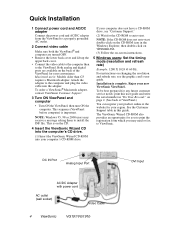
Getting Started Congratulations on your purchase of moisture. • Do not place heavy objects on your ViewPanel in a well-ventilated area. Important! Package Contents Your VG191/VG191b package includes: • VG191/VG191b ViewPanel • Quick Start Guide • U.S. ViewSonic VG191/VG191b 3 Skin oils are difficult to Microsoft Windows 95, NT, 98, 2000 and Me (Millennium). Do not...
Getting Started Congratulations on your purchase of moisture. • Do not place heavy objects on your ViewPanel in a well-ventilated area. Important! Package Contents Your VG191/VG191b package includes: • VG191/VG191b ViewPanel • Quick Start Guide • U.S. ViewSonic VG191/VG191b 3 Skin oils are difficult to Microsoft Windows 95, NT, 98, 2000 and Me (Millennium). Do not...
User Manual
Page 5
... into the adapter. DC IN Port Analog Input Port AC/DC Adapter with power cord AC outlet (wall socket) Video Cable 4 ViewSonic VG191/VG191b DVI Input For instructions on the back of ViewPanel.) You can register your region. Installation is important. Quick Installation 1 Connect power cord and AC/DC adapter Connect the power...
... into the adapter. DC IN Port Analog Input Port AC/DC Adapter with power cord AC outlet (wall socket) Video Cable 4 ViewSonic VG191/VG191b DVI Input For instructions on the back of ViewPanel.) You can register your region. Installation is important. Quick Installation 1 Connect power cord and AC/DC adapter Connect the power...

User Manual
Page 6
... to the ViewSonic website, http:// www.viewsonic.com To switch from the base. 3 Manually rotate the VG191/VG191b clockwise 90 degrees as shown above. Landscape/Portrait Modes The VG191/VG191b ViewPanel can easily ...ViewPanel outward and away from Landscape (default) to Portrait mode, do the following: 1 From the front, gently raise the ViewPanel to allow more clearance. 2 Pull the bottom of the head and pull up or down. Perfect Portrait software is compatible with your VG191/VG191b ViewPanel. Follow the instructions that accompany the Perfect Portrait software. ViewSonic VG191...
... to the ViewSonic website, http:// www.viewsonic.com To switch from the base. 3 Manually rotate the VG191/VG191b clockwise 90 degrees as shown above. Landscape/Portrait Modes The VG191/VG191b ViewPanel can easily ...ViewPanel outward and away from Landscape (default) to Portrait mode, do the following: 1 From the front, gently raise the ViewPanel to allow more clearance. 2 Pull the bottom of the head and pull up or down. Perfect Portrait software is compatible with your VG191/VG191b ViewPanel. Follow the instructions that accompany the Perfect Portrait software. ViewSonic VG191...

User Manual
Page 7
...the head of Wall Mount (Optional) To obtain a wall-mounting kit, contact ViewSonic or your ViewPanel from a desk-mounted to a wall-mounted display, do the following the instructions in the wall-mounting kit. 6 ViewSonic VG191/VG191b Notice the four screws. 4 Remove the four screws from the back plate.... 5 Attach the mounting bracket from the VESA compatible wallmounting kit (100 mm x 100 mm distance). 6 Attach the ViewPanel to the instructions that come with the...
...the head of Wall Mount (Optional) To obtain a wall-mounting kit, contact ViewSonic or your ViewPanel from a desk-mounted to a wall-mounted display, do the following the instructions in the wall-mounting kit. 6 ViewSonic VG191/VG191b Notice the four screws. 4 Remove the four screws from the back plate.... 5 Attach the mounting bracket from the VESA compatible wallmounting kit (100 mm x 100 mm distance). 6 Attach the ViewPanel to the instructions that come with the...

User Manual
Page 8
...mode was active, your ViewPanel. doing so may result in your graphic card's user guide for instructions. While in the ON position. • To lock the power of the ViewPanel ON, press and hold both the [1] button and the M (down arrow) again for 10 seconds. ViewSonic VG191/VG191b 7 Power Button ...Lock This mode locks the power of the ViewPanel in this mode, when the power button is restored. •...
...mode was active, your ViewPanel. doing so may result in your graphic card's user guide for instructions. While in the ON position. • To lock the power of the ViewPanel ON, press and hold both the [1] button and the M (down arrow) again for 10 seconds. ViewSonic VG191/VG191b 7 Power Button ...Lock This mode locks the power of the ViewPanel in this mode, when the power button is restored. •...

User Manual
Page 10
...and V POSITION until the screen image is adjustable through the Setup menu and the OSD timeout control described on the Front Control Panel of the ViewPanel®.) • Adjust FINE TUNE so that it outputs a video signal 1280 x 1024 @ 60Hz to adjust the screen image: 1 To ...Look for instructions on "changing the refresh rate" in your computer's graphic card so that the screen image looks focused, crisp, and sharp. ViewSonic VG191/VG191b 9 NOTE: All OnView menus and adjustment screens disappear automatically after about 15 seconds. Do the following tips may help you want to ...
...and V POSITION until the screen image is adjustable through the Setup menu and the OSD timeout control described on the Front Control Panel of the ViewPanel®.) • Adjust FINE TUNE so that it outputs a video signal 1280 x 1024 @ 60Hz to adjust the screen image: 1 To ...Look for instructions on "changing the refresh rate" in your computer's graphic card so that the screen image looks focused, crisp, and sharp. ViewSonic VG191/VG191b 9 NOTE: All OnView menus and adjustment screens disappear automatically after about 15 seconds. Do the following tips may help you want to ...

User Manual
Page 11
... The menu items shown below can be adjusted by using the up L and down M buttons. If this function does not work on your ViewPanel®, then lower the video refresh rate to 60 Hz and set the resolution to bypass the Main Menu and switch ports. Shortcut: From ... level of the screen image. On-screen display will show Input Analog or Input Digital, depending upon the currently selected input source. 10 ViewSonic VG191/VG191b Control Explanation AUTO IMAGE ADJUST automatically sizes, centers, autocontrasts and fine tunes the video signal to eliminate waviness and distortion.
... The menu items shown below can be adjusted by using the up L and down M buttons. If this function does not work on your ViewPanel®, then lower the video refresh rate to 60 Hz and set the resolution to bypass the Main Menu and switch ports. Shortcut: From ... level of the screen image. On-screen display will show Input Analog or Input Digital, depending upon the currently selected input source. 10 ViewSonic VG191/VG191b Control Explanation AUTO IMAGE ADJUST automatically sizes, centers, autocontrasts and fine tunes the video signal to eliminate waviness and distortion.

User Manual
Page 13
... width of computer that will be used with the ViewPanel. Control Explanation MANUAL IMAGE ADJUST displays the following menu . Horizontal moves the screen image to the left or to the right. SHARPNESS adjusts the clarity and focus of the screen image. 12 ViewSonic VG191/VG191b NOTE: Try the Auto Image Adjust (see page...
... width of computer that will be used with the ViewPanel. Control Explanation MANUAL IMAGE ADJUST displays the following menu . Horizontal moves the screen image to the left or to the right. SHARPNESS adjusts the clarity and focus of the screen image. 12 ViewSonic VG191/VG191b NOTE: Try the Auto Image Adjust (see page...

User Manual
Page 15
MEMORY RECALL returns adjustments to the OnView ViewPanel controls. Control Explanation BACKGROUND allows the simultaneous viewing of open software applications, or Windows desktop, while adjustments are made to the original factory settings if the display is operating in a factory Preset Timing Mode listed in this user guide. 14 ViewSonic VG191/VG191b
MEMORY RECALL returns adjustments to the OnView ViewPanel controls. Control Explanation BACKGROUND allows the simultaneous viewing of open software applications, or Windows desktop, while adjustments are made to the original factory settings if the display is operating in a factory Preset Timing Mode listed in this user guide. 14 ViewSonic VG191/VG191b

User Manual
Page 16
...; only) Minimum Height 460 mm (W) x 522 mm (H) x 238.5 mm (D) 18.1" (W) x 20.6" (H) x 9.4" (D) 462 mm (H) Weight Net 9 kg (19.8 lbs) ViewPanel only Regulations2 UL, FCC-B, C -UL, CB, CE, TCO99 (VG191), TCO95 (VG191B), TUV/GS, NEMKO, SEMKO, DEMKO, FEMKO, PSB, PCBC, EPA, E2000, BSMI, VCCI, TUV/ Ergo, GOST-R + Hygienic, NOM, C-Tick, CCIB, CCEE Power saving...
...; only) Minimum Height 460 mm (W) x 522 mm (H) x 238.5 mm (D) 18.1" (W) x 20.6" (H) x 9.4" (D) 462 mm (H) Weight Net 9 kg (19.8 lbs) ViewPanel only Regulations2 UL, FCC-B, C -UL, CB, CE, TCO99 (VG191), TCO95 (VG191B), TUV/GS, NEMKO, SEMKO, DEMKO, FEMKO, PSB, PCBC, EPA, E2000, BSMI, VCCI, TUV/ Ergo, GOST-R + Hygienic, NOM, C-Tick, CCIB, CCEE Power saving...

User Manual
Page 17
... adapter. Loose or broken pins in Manual Image Adjust submenu to improve text readability. 16 ViewSonic VG191/VG191b Power on but no screen image • Make sure the video cable supplied with the ViewPanel is tightly secured to the video output port on the back of focus • Select ... into the power outlet to verify that the outlet is not attached permanently to the ViewPanel, tightly secure it to the ViewPanel. • Adjust brightness and contrast. • If you have an older graphics card, contact ViewSonic® for a non-DDC adapter. Control buttons do not work • Press ...
... adapter. Loose or broken pins in Manual Image Adjust submenu to improve text readability. 16 ViewSonic VG191/VG191b Power on but no screen image • Make sure the video cable supplied with the ViewPanel is tightly secured to the video output port on the back of focus • Select ... into the power outlet to verify that the outlet is not attached permanently to the ViewPanel, tightly secure it to the ViewPanel. • Adjust brightness and contrast. • If you have an older graphics card, contact ViewSonic® for a non-DDC adapter. Control buttons do not work • Press ...

User Manual
Page 19
... and other particles. 2 If still not clean, apply a small amount of the ViewPanel. ViewSonic will not be liable for damage resulting from use of any ammonia or alcohol-based cleaners. 18 ViewSonic VG191/VG191b Disclaimer ViewSonic® does not recommend the use of a non-ammonia, non-alcohol based, mild... Use a soft, dry cloth. 2 If still not clean, apply a small amount of any ammonia or alcohol-based cleaners on the ViewPanel screen or case. Cleaning the ViewPanel • MAKE SURE THE VIEWPANEL IS TURNED OFF. • NEVER SPRAY OR POUR ANY LIQUID DIRECTLY ONTO THE SCREEN OR CASE.
... and other particles. 2 If still not clean, apply a small amount of the ViewPanel. ViewSonic will not be liable for damage resulting from use of any ammonia or alcohol-based cleaners. 18 ViewSonic VG191/VG191b Disclaimer ViewSonic® does not recommend the use of a non-ammonia, non-alcohol based, mild... Use a soft, dry cloth. 2 If still not clean, apply a small amount of any ammonia or alcohol-based cleaners on the ViewPanel screen or case. Cleaning the ViewPanel • MAKE SURE THE VIEWPANEL IS TURNED OFF. • NEVER SPRAY OR POUR ANY LIQUID DIRECTLY ONTO THE SCREEN OR CASE.

User Manual
Page 20
... warranty gives you specific legal rights, and you may also have other rights which vary from : a. ViewSonic LCD Warranty (V2.0) Release Date: 10-15-1999 ViewSonic VG191/VG191b 19 Replacement product or parts may not apply to you will be required to provide your product's... purchase. Removal, installation, and set-up service charges. To obtain service under warranty, contact ViewSonic Customer Support. Who the warranty protects: This warranty is effective: ViewSonic LCD ViewPanels are warranted for three (3) years for all parts including the light source and three (3) years...
... warranty gives you specific legal rights, and you may also have other rights which vary from : a. ViewSonic LCD Warranty (V2.0) Release Date: 10-15-1999 ViewSonic VG191/VG191b 19 Replacement product or parts may not apply to you will be required to provide your product's... purchase. Removal, installation, and set-up service charges. To obtain service under warranty, contact ViewSonic Customer Support. Who the warranty protects: This warranty is effective: ViewSonic LCD ViewPanels are warranted for three (3) years for all parts including the light source and three (3) years...