
Brochure
Page 1
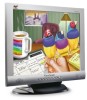
... high contrast ratio (typ) • Full 15.0" viewable screen • 1024x768 optimum resolution • Bezel-integrated speakers The dual 2-watt built-in a 15" multimedia LCD. ViewSonic® VE510+ LCD Display UltraBrite™ Series • UltraBrite technology UltraBrite LCD's are optimized for ...pictures and pie charts. The UltraBrite technology enables gaming, TV, video, and movie applications to LCDs with the ViewSonic UltraBrite VE510+ LCD. ViewSonic brings extreme brightness to come alive with bright, rich, saturated color. • 300 nits of -screen multimedia...
... high contrast ratio (typ) • Full 15.0" viewable screen • 1024x768 optimum resolution • Bezel-integrated speakers The dual 2-watt built-in a 15" multimedia LCD. ViewSonic® VE510+ LCD Display UltraBrite™ Series • UltraBrite technology UltraBrite LCD's are optimized for ...pictures and pie charts. The UltraBrite technology enables gaming, TV, video, and movie applications to LCDs with the ViewSonic UltraBrite VE510+ LCD. ViewSonic brings extreme brightness to come alive with bright, rich, saturated color. • 300 nits of -screen multimedia...
Brochure
Page 2
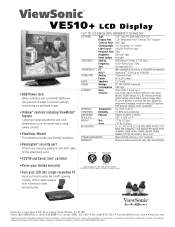
... Canada (866) 262-1967 • Fax (909) 839-7922 • SalesInfo@ViewSonic.com • ViewSonic.com *Adapter may vary by country; All rights reserved. [10588-04B-03/03_0M] VE510+-1 ViewSonic® VE510+ LCD Display • OSD/Power lock When activated, user controlled OSD/Power lock..., labor and backlight. • TCO'99 and ENERGY STAR® certified • Three-year limited warranty • Turn your LCD into a high-resolution TV Hook up , 2 OnView® Auto image adjust, contrast, brightness, color adjust (9300K, 6500K-default, R, G, B), information (mode, model...
... Canada (866) 262-1967 • Fax (909) 839-7922 • SalesInfo@ViewSonic.com • ViewSonic.com *Adapter may vary by country; All rights reserved. [10588-04B-03/03_0M] VE510+-1 ViewSonic® VE510+ LCD Display • OSD/Power lock When activated, user controlled OSD/Power lock..., labor and backlight. • TCO'99 and ENERGY STAR® certified • Three-year limited warranty • Turn your LCD into a high-resolution TV Hook up , 2 OnView® Auto image adjust, contrast, brightness, color adjust (9300K, 6500K-default, R, G, B), information (mode, model...

User Manual
Page 5
...Adapter with power cord AC outlet (wall socket) Audio Cable Video Cable 4 ViewSonic VE510+ This is on the CD. 4 Insert the ViewSonic Wizard CD into the adapter. If your new ViewSonic ViewPanel. The ViewSonic Wizard CD-ROM also provides an opportunity for any future customer service needs:...does not auto-start . See the Customer Support table in the Windows Explorer, then double-click on viewsonic.exe. (2) Follow the on-screen instructions. 5 Windows users: Set the timing mode (resolution and refresh rate) Example: 1024 X 768 @ 60 Hz. This sequence (ViewPanel before computer) is...
...Adapter with power cord AC outlet (wall socket) Audio Cable Video Cable 4 ViewSonic VE510+ This is on the CD. 4 Insert the ViewSonic Wizard CD into the adapter. If your new ViewSonic ViewPanel. The ViewSonic Wizard CD-ROM also provides an opportunity for any future customer service needs:...does not auto-start . See the Customer Support table in the Windows Explorer, then double-click on viewsonic.exe. (2) Follow the on-screen instructions. 5 Windows users: Set the timing mode (resolution and refresh rate) Example: 1024 X 768 @ 60 Hz. This sequence (ViewPanel before computer) is...

User Manual
Page 7
...ViewPanel in the ON position. • Power Button Lock: Press and hold [1] and the down arrow ▼ again for 10 seconds. 6 ViewSonic VE510+ Power Button Lock This mode locks the power of the screen image and minimizing eye strain. For the best picture quality set your ViewPanel®...; timing mode to adjust the screen image. To set the Timing Mode: 1 Set the resolution: Right-click on the Windows desktop > Properties > Settings > set the graphics card in permanent damage to the control menus until this setting, ...
...ViewPanel in the ON position. • Power Button Lock: Press and hold [1] and the down arrow ▼ again for 10 seconds. 6 ViewSonic VE510+ Power Button Lock This mode locks the power of the screen image and minimizing eye strain. For the best picture quality set your ViewPanel®...; timing mode to adjust the screen image. To set the Timing Mode: 1 Set the resolution: Right-click on the Windows desktop > Properties > Settings > set the graphics card in permanent damage to the control menus until this setting, ...

User Manual
Page 10
Press the [2] button to eliminate waviness and distortion. When you to its pre-set the resolution to adjust red (R), green (G), and blue (B). Control Explanation Auto Image Adjust automatically sizes, centers, and fine tunes the video signal to obtain a...). 1 2 3 To select color (R, G or B) press button [2]. The factory setting for cooler white (used in most office settings with most common video cards. ViewSonic VE510+ 9 Default setting. 9300K - Adds blue to the screen image for warmer white and richer red. User - Individual adjustments for red, green, and blue. 6500K -...
Press the [2] button to eliminate waviness and distortion. When you to its pre-set the resolution to adjust red (R), green (G), and blue (B). Control Explanation Auto Image Adjust automatically sizes, centers, and fine tunes the video signal to obtain a...). 1 2 3 To select color (R, G or B) press button [2]. The factory setting for cooler white (used in most office settings with most common video cards. ViewSonic VE510+ 9 Default setting. 9300K - Adds blue to the screen image for warmer white and richer red. User - Individual adjustments for red, green, and blue. 6500K -...

User Manual
Page 11
... allows you to choose the language used in your graphic card's user guide for instructions on changing the resolution and refresh rate (vertical frequency). Vertical moves the screen image up and down. 10 ViewSonic VE510+ See your computer. H. Horizontal moves the screen image to the left or to bypass the Main Menu and...
... allows you to choose the language used in your graphic card's user guide for instructions on changing the resolution and refresh rate (vertical frequency). Vertical moves the screen image up and down. 10 ViewSonic VE510+ See your computer. H. Horizontal moves the screen image to the left or to bypass the Main Menu and...
User Manual
Page 12
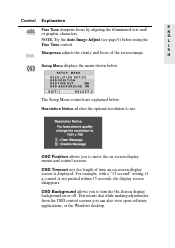
...below . OSD Timeout sets the length of the screen image. NOTE: Try the Auto Image Adjust (see page 9) before using the Fine Tune control. ViewSonic VE510+ 11 For example, with a "15 second" setting, if a control is displayed. OSD Background allows you to move the on or off. OSD ...Position allows you can also view open software applications, or the Windows desktop. Resolution Notice advises the optimal resolution to use. Control Explanation Fine Tune sharpens focus by aligning the illuminated text and/ or graphic characters.
...below . OSD Timeout sets the length of the screen image. NOTE: Try the Auto Image Adjust (see page 9) before using the Fine Tune control. ViewSonic VE510+ 11 For example, with a "15 second" setting, if a control is displayed. OSD Background allows you to move the on or off. OSD ...Position allows you can also view open software applications, or the Windows desktop. Resolution Notice advises the optimal resolution to use. Control Explanation Fine Tune sharpens focus by aligning the illuminated text and/ or graphic characters.


