
Brochure
Page 1
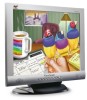
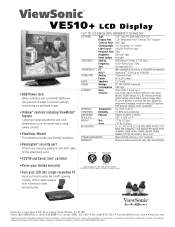
... bright idea in a 15" multimedia LCD. Additional user-friendly features include OSD and power lock functions to prevent accidental changes to your display settings and a compact base which conveniently folds up 90º for wall mounting. Perfect for intense, vivid colors for viewing of video and graphics applications. Add a bright idea to your desk with the ViewSonic UltraBrite VE510+ LCD. ViewSonic® VE510+ LCD Display UltraBrite™ Series • UltraBrite technology UltraBrite LCD's are optimized for video...
... bright idea in a 15" multimedia LCD. Additional user-friendly features include OSD and power lock functions to prevent accidental changes to your display settings and a compact base which conveniently folds up 90º for wall mounting. Perfect for intense, vivid colors for viewing of video and graphics applications. Add a bright idea to your desk with the ViewSonic UltraBrite VE510+ LCD. ViewSonic® VE510+ LCD Display UltraBrite™ Series • UltraBrite technology UltraBrite LCD's are optimized for video...
Brochure
Page 2
... LCD PANEL Type 15.0" color TFT active matrix XGA LCD Display Area 12.0" (horizontal) X 9.0" (vertical); 15.0" diagonal Contrast Ratio 450:1 (typ) Viewing Angle 150° horizontal, 110° vertical Light Source Long life, 50,000 hrs. (typ) Response Time 25ms Brightness 300 cd/m2 (typ) Panel Surface Anti-glare VIDEO INPUT Analog RGB Analog (75 ohms, 0.7/1.0 Vp-p) Frequency Fh:30~62kHz, fv:50~75Hz Sync H/V separated (TTL) COMPATIBILITY PC IBM compatible from ViewSonic. Specifications subject to change without...
... LCD PANEL Type 15.0" color TFT active matrix XGA LCD Display Area 12.0" (horizontal) X 9.0" (vertical); 15.0" diagonal Contrast Ratio 450:1 (typ) Viewing Angle 150° horizontal, 110° vertical Light Source Long life, 50,000 hrs. (typ) Response Time 25ms Brightness 300 cd/m2 (typ) Panel Surface Anti-glare VIDEO INPUT Analog RGB Analog (75 ohms, 0.7/1.0 Vp-p) Frequency Fh:30~62kHz, fv:50~75Hz Sync H/V separated (TTL) COMPATIBILITY PC IBM compatible from ViewSonic. Specifications subject to change without...
User Manual
Page 2
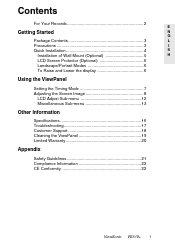
... Contents ...3 Precautions ...3 Quick Installation ...4 Installation of Wall Mount (Optional) ...5 LCD Screen Protector (Optional) ...6 Landscape/Portrait Modes ...6 To Raise and Lower the display ...6 E N G L I S H Using the ViewPanel Setting the Timing Mode ...7 Adjusting the Screen Image ...8 LCD Adjust Sub-menu ...12 Miscellaneous Sub-menu ...13 Other Information Specifications ...16 Troubleshooting...17 Customer Support ...18 Cleaning the ViewPanel ...19 Limited Warranty ...20 Appendix Safety Guidelines ...21 Compliance Information ...22 CE Conformity ...22 ViewSonic VE510+ 1
... Contents ...3 Precautions ...3 Quick Installation ...4 Installation of Wall Mount (Optional) ...5 LCD Screen Protector (Optional) ...6 Landscape/Portrait Modes ...6 To Raise and Lower the display ...6 E N G L I S H Using the ViewPanel Setting the Timing Mode ...7 Adjusting the Screen Image ...8 LCD Adjust Sub-menu ...12 Miscellaneous Sub-menu ...13 Other Information Specifications ...16 Troubleshooting...17 Customer Support ...18 Cleaning the ViewPanel ...19 Limited Warranty ...20 Appendix Safety Guidelines ...21 Compliance Information ...22 CE Conformity ...22 ViewSonic VE510+ 1

User Manual
Page 3
... the Video Electronics Standards Association. All rights reserved. Environmental Protection Agency (EPA). Copyright © ViewSonic Corporation, 2002. ENERGY STAR® is a registered trademark of Apple Computer, Inc. E N G L I S H Macintosh and Power Macintosh are trademarks of the U.S. VESA is a registered trademark of VESA. Your local waste disposal company may change product specifications without notice. nor for technical or editorial errors...
... the Video Electronics Standards Association. All rights reserved. Environmental Protection Agency (EPA). Copyright © ViewSonic Corporation, 2002. ENERGY STAR® is a registered trademark of Apple Computer, Inc. E N G L I S H Macintosh and Power Macintosh are trademarks of the U.S. VESA is a registered trademark of VESA. Your local waste disposal company may change product specifications without notice. nor for technical or editorial errors...

User Manual
Page 4
... that you touch them. • Avoid exposing your ViewPanel to direct sunlight or another heat source. Your ViewPanel contains high-voltage parts. Your ViewPanel package includes: • ViewPanel • Power cords • Audio cable • Video cable • AC/DC Adapter • ViewSonic Wizard CD-ROM NOTE: The CD jacket contains the Quick Start Guide, and the CD includes User Guide PDF files and INF/ICM display optimization files...
... that you touch them. • Avoid exposing your ViewPanel to direct sunlight or another heat source. Your ViewPanel contains high-voltage parts. Your ViewPanel package includes: • ViewPanel • Power cords • Audio cable • Video cable • AC/DC Adapter • ViewSonic Wizard CD-ROM NOTE: The CD jacket contains the Quick Start Guide, and the CD includes User Guide PDF files and INF/ICM display optimization files...

User Manual
Page 5
... plug the video cable into the computer's CD drive. • Follow the on -screen instructions. 5 Windows users: Set the timing mode (resolution and refresh rate) Example: 1024 X 768 @ 60 Hz. NOTE: If the CD-ROM does not auto-start . See the Customer Support table in the Windows Explorer, then double-click on viewsonic.exe. (2) Follow the on -screen instructions Audio IN Analog IN Port AC IN AC/DC Adapter with power cord AC outlet (wall socket) Audio Cable Video Cable 4 ViewSonic VE510...
... plug the video cable into the computer's CD drive. • Follow the on -screen instructions. 5 Windows users: Set the timing mode (resolution and refresh rate) Example: 1024 X 768 @ 60 Hz. NOTE: If the CD-ROM does not auto-start . See the Customer Support table in the Windows Explorer, then double-click on viewsonic.exe. (2) Follow the on -screen instructions Audio IN Analog IN Port AC IN AC/DC Adapter with power cord AC outlet (wall socket) Audio Cable Video Cable 4 ViewSonic VE510...

User Manual
Page 6
... down on the bottom of Wall Mount (Optional) To obtain a wall-mounting kit, contact ViewSonic or your ViewPanel from the VESA compatible wallmounting kit (75 mm x 75 mm distance). 4 Four screw holes 5 Attach the ViewPanel to the instructions that come with the base mounting kit. Notice the four screw holes on a towel or blanket. Installation of the base. Mounted on the wall ViewSonic VE510+ 5 To convert your local...
... down on the bottom of Wall Mount (Optional) To obtain a wall-mounting kit, contact ViewSonic or your ViewPanel from the VESA compatible wallmounting kit (75 mm x 75 mm distance). 4 Four screw holes 5 Attach the ViewPanel to the instructions that come with the base mounting kit. Notice the four screw holes on a towel or blanket. Installation of the base. Mounted on the wall ViewSonic VE510+ 5 To convert your local...

User Manual
Page 7
... the best picture quality set the resolution. 2 Set the refresh rate: See your ViewPanel's power will automatically turn ON when power is important for instructions. doing so may result in the ON position. • Power Button Lock: Press and hold [1] and the down arrow ▼ again for 10 seconds. 6 ViewSonic VE510+ OSD and Power Button Lock Modes OSD Lock This mode locks all current control settings and prevents access to adjust the screen image. If any buttons are pressed the message OSD Locked will display...
... the best picture quality set the resolution. 2 Set the refresh rate: See your ViewPanel's power will automatically turn ON when power is important for instructions. doing so may result in the ON position. • Power Button Lock: Press and hold [1] and the down arrow ▼ again for 10 seconds. 6 ViewSonic VE510+ OSD and Power Button Lock Modes OSD Lock This mode locks all current control settings and prevents access to adjust the screen image. If any buttons are pressed the message OSD Locked will display...

User Manual
Page 8
...Power light Green = ON Orange = Power Saving Power On/Off Temporarily silences audio output. Also a shortcut to display the Contrast adjustment control screen. The OnView controls are explained at the top of the next page and are defined in detail Speaker Speaker Scrolls through menu options and adjusts the displayed control. Decreases or increase volume. Displays the control screen for the highlighted control. Displays the Main Menu or exits the control screen and saves adjustments. ViewSonic VE510+ 7 Adjusting the Screen Image Use the buttons on the front control panel...
...Power light Green = ON Orange = Power Saving Power On/Off Temporarily silences audio output. Also a shortcut to display the Contrast adjustment control screen. The OnView controls are explained at the top of the next page and are defined in detail Speaker Speaker Scrolls through menu options and adjusts the displayed control. Decreases or increase volume. Displays the control screen for the highlighted control. Displays the Main Menu or exits the control screen and saves adjustments. ViewSonic VE510+ 7 Adjusting the Screen Image Use the buttons on the front control panel...

User Manual
Page 9
... Setup menu and the OSD timeout control described on "changing the refresh rate" in your graphic card's user guide.) • If necessary, make small adjustments using H POSITION and V POSITION until the screen image is completely visible. (The black border around the edge of the screen should barely touch the illuminated "active area" of the screen tells you what you want to adjust, press ▲ or ▼ to adjust the screen image: E N G L I S H 1 To display the Main Menu, press button...
... Setup menu and the OSD timeout control described on "changing the refresh rate" in your graphic card's user guide.) • If necessary, make small adjustments using H POSITION and V POSITION until the screen image is completely visible. (The black border around the edge of the screen should barely touch the illuminated "active area" of the screen tells you what you want to adjust, press ▲ or ▼ to adjust the screen image: E N G L I S H 1 To display the Main Menu, press button...

User Manual
Page 10
...-set value. ViewSonic VE510+ 9 To adjust selected color, press or . Main Menu Controls Adjust the menu items shown below by using the up and down buttons. Brightness adjusts background black level of the screen image. The factory setting for warmer white and richer red. If this product is 6500K (6500 Kelvin). User - Individual adjustments for red, green, and blue. 6500K - Adds red to the screen image for this function does not work on your ViewPanel®, then lower the video refresh rate...
...-set value. ViewSonic VE510+ 9 To adjust selected color, press or . Main Menu Controls Adjust the menu items shown below by using the up and down buttons. Brightness adjusts background black level of the screen image. The factory setting for warmer white and richer red. If this product is 6500K (6500 Kelvin). User - Individual adjustments for red, green, and blue. 6500K - Adds red to the screen image for this function does not work on your ViewPanel®, then lower the video refresh rate...

User Manual
Page 11
... card's user guide for instructions on changing the resolution and refresh rate (vertical frequency). Shortcut: From the Windows desktop, press button [2] to the right. NOTE: Vertical size is 60 Hertz.] Language allows you to choose the language used in your computer. Vertical moves the screen image up and down. 10 ViewSonic VE510+ Position adjusts horizontal and vertical position of the screen image. H./V. Control E N G L I S H Explanation Information displays the timing mode (video signal input) coming from the graphics card in the menus and control screens. Horizontal...
... card's user guide for instructions on changing the resolution and refresh rate (vertical frequency). Shortcut: From the Windows desktop, press button [2] to the right. NOTE: Vertical size is 60 Hertz.] Language allows you to choose the language used in your computer. Vertical moves the screen image up and down. 10 ViewSonic VE510+ Position adjusts horizontal and vertical position of the screen image. H./V. Control E N G L I S H Explanation Information displays the timing mode (video signal input) coming from the graphics card in the menus and control screens. Horizontal...
User Manual
Page 12
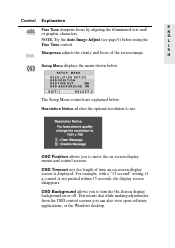
... the optimal resolution to turn the On-Screen display background on or off. E N G L I S H The Setup Menu controls are explained below . Setup Menu displays the menu shown below . OSD Position allows you to move the on -screen display screen is not pushed within 15 seconds, the display screen disappears. OSD Timeout sets the length of the screen image. For example, with a "15 second" setting, if a control is displayed. This means that while making adjustments from the OSD control screens you to use. ViewSonic VE510+ 11 OSD...
... the optimal resolution to turn the On-Screen display background on or off. E N G L I S H The Setup Menu controls are explained below . Setup Menu displays the menu shown below . OSD Position allows you to move the on -screen display screen is not pushed within 15 seconds, the display screen disappears. OSD Timeout sets the length of the screen image. For example, with a "15 second" setting, if a control is displayed. This means that while making adjustments from the OSD control screens you to use. ViewSonic VE510+ 11 OSD...
User Manual
Page 13
Control E N G L I S H Explanation Memory Recall returns adjustments to the original factory settings if the display is operating in a factory Preset Timing Mode listed in this user guide. Exception: This control does not effect changes made with the User Color control. 12 ViewSonic VE510+
Control E N G L I S H Explanation Memory Recall returns adjustments to the original factory settings if the display is operating in a factory Preset Timing Mode listed in this user guide. Exception: This control does not effect changes made with the User Color control. 12 ViewSonic VE510+

User Manual
Page 15
Troubleshooting E N G L I S H No power • Make sure power button (or switch) is ON. • Make sure A/C power cord is securely connected to the DC power supply and the power supply is firmly connected to the ViewPanel®. • c 14 ViewSonic VE510+
Troubleshooting E N G L I S H No power • Make sure power button (or switch) is ON. • Make sure A/C power cord is securely connected to the DC power supply and the power supply is firmly connected to the ViewPanel®. • c 14 ViewSonic VE510+

User Manual
Page 16
NOTE: You will need the product serial number. Customer Support For technical support or product service, see the table below or contact your reseller viewsonic.com.au viewsonic.com.sg T: +61 2 9929 3955 service.au@ F: +61 2 9929 8393 viewsonic.com T: 65 273 4018 F: 65 273 1566 service.sg@ viewsonic.com viewsonic.com.tw viewsonic.com/asia T: 886 2 2246 3456 service.ap@ F: 886 2 8242 3668 viewsonic.com T: 886...
NOTE: You will need the product serial number. Customer Support For technical support or product service, see the table below or contact your reseller viewsonic.com.au viewsonic.com.sg T: +61 2 9929 3955 service.au@ F: +61 2 9929 8393 viewsonic.com T: 65 273 4018 F: 65 273 1566 service.sg@ viewsonic.com viewsonic.com.tw viewsonic.com/asia T: 886 2 2246 3456 service.ap@ F: 886 2 8242 3668 viewsonic.com T: 886...

User Manual
Page 17
...-based cleaners. 16 ViewSonic VE510+ To clean the case: 1 2 Use a soft, dry cloth. If still not clean, apply a small amount of any ammonia or alcohol-based cleaners on the ViewPanel screen or case. Disclaimer ViewSonic® does not recommend the use of non-ammonia, non-alcohol based glass cleaner onto a clean, soft, lint-free cloth, and wipe the screen. To clean the screen: 1 2 Wipe the screen with a clean...
...-based cleaners. 16 ViewSonic VE510+ To clean the case: 1 2 Use a soft, dry cloth. If still not clean, apply a small amount of any ammonia or alcohol-based cleaners on the ViewPanel screen or case. Disclaimer ViewSonic® does not recommend the use of non-ammonia, non-alcohol based glass cleaner onto a clean, soft, lint-free cloth, and wipe the screen. To clean the screen: 1 2 Wipe the screen with a clean...

User Manual
Page 18
... warranty is effective: ViewSonic LCD ViewPanels are warranted for three (3) year for all parts including the light source and one (1) year for the first consumer purchaser. c. d. Removal or installation of supplies or parts not meeting ViewSonic's specifications. Causes external to shipment. Removal, installation, and set-up service charges. For information about receiving service under warranty, you may also have other rights which the serial number has been defaced...
... warranty is effective: ViewSonic LCD ViewPanels are warranted for three (3) year for all parts including the light source and one (1) year for the first consumer purchaser. c. d. Removal or installation of supplies or parts not meeting ViewSonic's specifications. Causes external to shipment. Removal, installation, and set-up service charges. For information about receiving service under warranty, you may also have other rights which the serial number has been defaced...

User Manual
Page 19
... selected according to the current rating for your unit. CAUTION: Use a power cable that is properly grounded. Always use a cord set is marked by the letter E or by the Earth symbol or coloured GREEN or GREEN-AND-YELLOW. CAUTION: The socket-outlet should be installed near the equipment and should be connected to the terminal in the plug which is appropriate for...
... selected according to the current rating for your unit. CAUTION: Use a power cable that is properly grounded. Always use a cord set is marked by the letter E or by the Earth symbol or coloured GREEN or GREEN-AND-YELLOW. CAUTION: The socket-outlet should be installed near the equipment and should be connected to the terminal in the plug which is appropriate for...
User Manual
Page 20
... in a particular installation. E N G L I S H FCC Warning To assure continued FCC compliance, the user must use the equipment according to correct the interference by 93/68/EEC Art.13 with regard to provide reasonable protection against harmful interference in accordance with bonded ferrite cores. Install and use grounded power supply cord and the provided shielded video interface cable with the instructions, may cause...
... in a particular installation. E N G L I S H FCC Warning To assure continued FCC compliance, the user must use the equipment according to correct the interference by 93/68/EEC Art.13 with regard to provide reasonable protection against harmful interference in accordance with bonded ferrite cores. Install and use grounded power supply cord and the provided shielded video interface cable with the instructions, may cause...


