
User Guide
Page 1
... Display User Guide IMPORTANT: Please read this User Guide will describe your product for future service. Warranty information contained in this User Guide to obtain important information on installing and using your product in a safe manner, as well as registering your limited coverage from ViewSonic Corporation, which is also found on our web site at http:// www.viewsonic.com in English, or in specific languages using...
... Display User Guide IMPORTANT: Please read this User Guide will describe your product for future service. Warranty information contained in this User Guide to obtain important information on installing and using your product in a safe manner, as well as registering your limited coverage from ViewSonic Corporation, which is also found on our web site at http:// www.viewsonic.com in English, or in specific languages using...

User Guide
Page 3
...radiate radio frequency energy, and if not installed and used in a particular installation. However, there is no guarantee that changes or modifications not expressly approved by the party responsible for European Countries The device complies with part 15 of ...instructions, may cause harmful interference to nameplate labels and relevant markings on , the user is in a residential installation. FCC Compliance Statement This device complies with the EMC Directive 2014/30/EU and Low Voltage Directive 2014/35/EU. Compliance Information NOTE: This section addresses all connected...
...radiate radio frequency energy, and if not installed and used in a particular installation. However, there is no guarantee that changes or modifications not expressly approved by the party responsible for European Countries The device complies with part 15 of ...instructions, may cause harmful interference to nameplate labels and relevant markings on , the user is in a residential installation. FCC Compliance Statement This device complies with the EMC Directive 2014/30/EU and Low Voltage Directive 2014/35/EU. Compliance Information NOTE: This section addresses all connected...
User Guide
Page 5
... remove the ground prong. Only use this guide for replacement of fire or electric shock, do not expose this apparatus to reduce glare. 9. Cautions and Warnings 1. Heed all warnings and follow all instructions. 4. Never remove the rear cover. Do not use attachments/accessories specified by the manufacturer. (Continued on the LCD display, video cable, or power cord. 16. If further cleaning is required, see "Cleaning the Display...
... remove the ground prong. Only use this guide for replacement of fire or electric shock, do not expose this apparatus to reduce glare. 9. Cautions and Warnings 1. Heed all warnings and follow all instructions. 4. Never remove the rear cover. Do not use attachments/accessories specified by the manufacturer. (Continued on the LCD display, video cable, or power cord. 16. If further cleaning is required, see "Cleaning the Display...
User Guide
Page 7
...Indian Restriction of Hazardous Substances ii Cautions and Warnings iii Copyright Information Product Registration 2 For Your Records 2 Getting Started Package Contents 3 Quick Installation...4 Additional Software Installation (Optional 4 Wall Mounting (Optional 5 Using the Display Setting the Timing Mode 6 OSD and Power Lock Settings 6 Adjusting the Screen Image 7 Main Menu Controls 8 Main Menu Explanation 8 Power Management 9 Other Information Specifications...10 Cleaning the Display 11 Troubleshooting...12 Customer Support 13 Limited Warranty 14 Mexico Limited Warranty 16 v
...Indian Restriction of Hazardous Substances ii Cautions and Warnings iii Copyright Information Product Registration 2 For Your Records 2 Getting Started Package Contents 3 Quick Installation...4 Additional Software Installation (Optional 4 Wall Mounting (Optional 5 Using the Display Setting the Timing Mode 6 OSD and Power Lock Settings 6 Adjusting the Screen Image 7 Main Menu Controls 8 Main Menu Explanation 8 Power Management 9 Other Information Specifications...10 Cleaning the Display 11 Troubleshooting...12 Customer Support 13 Limited Warranty 14 Mexico Limited Warranty 16 v

User Guide
Page 9
... product will best prepare you for future customer service needs. Your display serial number is committed to learn more. Product Name: Model Number: Document Number: Serial Number: Purchase Date: For Your Records TD2430/TD2430-CN ViewSonic Widescreen Display VS16495 TD2430/TD2430-CN_UG_ENG Rev. 1B 10-26-16 Product disposal at end of the display. USA & Canada: http://www.viewsonic.com/company/green/recycle-program/ Europe: http://www.viewsoniceurope.com/uk/support/recycling...
... product will best prepare you for future customer service needs. Your display serial number is committed to learn more. Product Name: Model Number: Document Number: Serial Number: Purchase Date: For Your Records TD2430/TD2430-CN ViewSonic Widescreen Display VS16495 TD2430/TD2430-CN_UG_ENG Rev. 1B 10-26-16 Product disposal at end of the display. USA & Canada: http://www.viewsonic.com/company/green/recycle-program/ Europe: http://www.viewsoniceurope.com/uk/support/recycling...
User Guide
Page 10
... on the "Support" tab on the front page. • Save the original box and all packing material for more information. 3 Package Contents Your display package includes: • Display • Power cord • Audio cable (stereo mini jack) • Video cable • USB cable • Quick Start Guide IMPORTANT: • The word "Windows" in this user guide refers to the ViewSonic website in this user guide refers to register your ViewSonic monitor! Simply login...
... on the "Support" tab on the front page. • Save the original box and all packing material for more information. 3 Package Contents Your display package includes: • Display • Power cord • Audio cable (stereo mini jack) • Video cable • USB cable • Quick Start Guide IMPORTANT: • The word "Windows" in this user guide refers to the ViewSonic website in this user guide refers to register your ViewSonic monitor! Simply login...

User Guide
Page 11
... the computer. Connect power cord (and AC/DC adapter if required) HDMI DisplayPort VGA Audio In USB UP USB Down Audio out Power Cord 3. Connect video cable • Make sure both the display and computer are turned OFF. • Remove rear panel covers if necessary. • Connect the video cable from the display to the computer and plug the video cable into the adapter. 2. Windows users: Set the timing mode (example: 1024 x 768) For instructions on the ViewSonic website. 4. Installation is important. This sequence (display before computer...
... the computer. Connect power cord (and AC/DC adapter if required) HDMI DisplayPort VGA Audio In USB UP USB Down Audio out Power Cord 3. Connect video cable • Make sure both the display and computer are turned OFF. • Remove rear panel covers if necessary. • Connect the video cable from the display to the computer and plug the video cable into the adapter. 2. Windows users: Set the timing mode (example: 1024 x 768) For instructions on the ViewSonic website. 4. Installation is important. This sequence (display before computer...

User Guide
Page 12
... a wall-mounted display, do the following the instructions in the wall-mounting kit. 5 Attach the mounting bracket from a desk-mounted to the instructions that the power button is turned Off, then disconnect the power cord. 3. Lay the display face down on a towel or blanket. 4. To obtain a wall-mounting kit or height adjustment base, contact ViewSonic® or your display from the wall mounting kit using screws of the appropriate length. 6. Wall Mounting (Optional) NOTE: For use only with the base mounting...
... a wall-mounted display, do the following the instructions in the wall-mounting kit. 5 Attach the mounting bracket from a desk-mounted to the instructions that the power button is turned Off, then disconnect the power cord. 3. Lay the display face down on a towel or blanket. 4. To obtain a wall-mounting kit or height adjustment base, contact ViewSonic® or your display from the wall mounting kit using screws of the appropriate length. 6. Wall Mounting (Optional) NOTE: For use only with the base mounting...

User Guide
Page 13
... message Power Button Locked will display for 3 seconds. For optimal picture quality, please use the OSD (On-screen Display) controls to adjust the screen image. The timing mode consists of Range" will appear on the "Specification" page. Choosing a nonsupported timing mode setting may result in no image being displayed, and a message showing "Out of the resolution (example 1024 x 768) and refresh rate (or vertical frequency; After setting the timing mode, use the recommended timing mode specific to 60Hz vertical refresh rate as the recommended setting...
... message Power Button Locked will display for 3 seconds. For optimal picture quality, please use the OSD (On-screen Display) controls to adjust the screen image. The timing mode consists of Range" will appear on the "Specification" page. Choosing a nonsupported timing mode setting may result in no image being displayed, and a message showing "Out of the resolution (example 1024 x 768) and refresh rate (or vertical frequency; After setting the timing mode, use the recommended timing mode specific to 60Hz vertical refresh rate as the recommended setting...
User Guide
Page 14
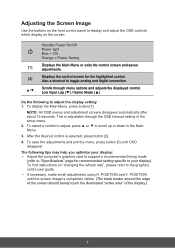
... black border around the edge of the screen should barely touch the illuminated "active area" of the display.) 7 POSITION until OSD disappear. Low Input Lag (▼) / Game Mode (▲) Do the following tips may help you optimize your display). Adjusting the Screen Image Use the buttons on the front control panel to display and adjust the OSD controls which display on "changing the refresh rate", please refer to the graphics card's user guide. • If necessary, make small adjustments using H. NOTE: All OSD...
... black border around the edge of the screen should barely touch the illuminated "active area" of the display.) 7 POSITION until OSD disappear. Low Input Lag (▼) / Game Mode (▲) Do the following tips may help you optimize your display). Adjusting the Screen Image Use the buttons on the front control panel to display and adjust the OSD controls which display on "changing the refresh rate", please refer to the graphics card's user guide. • If necessary, make small adjustments using H. NOTE: All OSD...
User Guide
Page 15
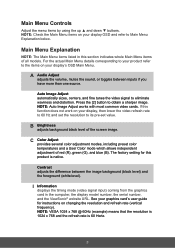
... display OSD and refer to Main Menu Explanation below. Auto Image Adjust automatically sizes, centers, and fine tunes the video signal to obtain a sharper image. B Brightness adjusts background black level of the screen image. Main Menu Controls Adjust the menu items by using the up ▲ and down ▼ buttons. NOTE: VESA 1024 x 768 @ 60Hz (example) means that the resolution is 1024 x 768 and the refresh rate is native. NOTE: Check the Main Menu items on changing the resolution and refresh rate (vertical frequency...
... display OSD and refer to Main Menu Explanation below. Auto Image Adjust automatically sizes, centers, and fine tunes the video signal to obtain a sharper image. B Brightness adjusts background black level of the screen image. Main Menu Controls Adjust the menu items by using the up ▲ and down ▼ buttons. NOTE: VESA 1024 x 768 @ 60Hz (example) means that the resolution is 1024 x 768 and the refresh rate is native. NOTE: Check the Main Menu items on changing the resolution and refresh rate (vertical frequency...

User Guide
Page 16
...M Manual Image Adjust displays the Manual Image Adjust menu. Exception: This control does not affect changes made with black screen and reduced power consumption within 3 seconds of no signal input. 9 Memory Recall returns the adjustments back to Sleep/Off mode with the Language Select or Power Lock setting. S Setup Menu adjusts On-screen Display (OSD) settings. You can manually set a variety of this manual. Power Management This product will enter to factory settings if the display is operating in a factory Preset Timing Mode listed in the Specifications of image quality adjustments...
...M Manual Image Adjust displays the Manual Image Adjust menu. Exception: This control does not affect changes made with black screen and reduced power consumption within 3 seconds of no signal input. 9 Memory Recall returns the adjustments back to Sleep/Off mode with the Language Select or Power Lock setting. S Setup Menu adjusts On-screen Display (OSD) settings. You can manually set a variety of this manual. Power Management This product will enter to factory settings if the display is operating in a factory Preset Timing Mode listed in the Specifications of image quality adjustments...
User Guide
Page 17
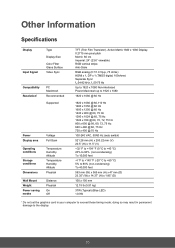
Other Information Specifications Display Input Signal Type Display Size Color Filter Glass Surface Video Sync Compatibility Resolution1 PC Macintosh Recommended Supported Power Display area Voltage Full Scan Operating conditions Storage conditions Dimensions Temperature Humidity Altitude Temperature Humidity Altitude Physical Wall Mount Weight Power saving modes Distance Physical On Off TFT (Thin Film Transistor), Active Matrix 1920 x 1080 Display, 0.2715 mm pixel pitch Metric: 60 cm Imperial: 24" (23.6" viewable) RGB vertical stripe Anti-Glare RGB analog (0.7/1.0 Vp...
Other Information Specifications Display Input Signal Type Display Size Color Filter Glass Surface Video Sync Compatibility Resolution1 PC Macintosh Recommended Supported Power Display area Voltage Full Scan Operating conditions Storage conditions Dimensions Temperature Humidity Altitude Temperature Humidity Altitude Physical Wall Mount Weight Power saving modes Distance Physical On Off TFT (Thin Film Transistor), Active Matrix 1920 x 1080 Display, 0.2715 mm pixel pitch Metric: 60 cm Imperial: 24" (23.6" viewable) RGB vertical stripe Anti-Glare RGB analog (0.7/1.0 Vp...

User Guide
Page 18
... the display screen or case. If the screen still not clean, apply a small amount of a non-ammonia, non-alcohol based, mild non-abrasive detergent onto a clean, soft, lint-free cloth, then wipe the surface. Disclaimer • ViewSonic® does not recommend the use of any ammonia or alcoholbased cleaners. 11 Use a soft, dry cloth. 2. Cleaning the Display • MAKE SURE THE DISPLAY IS TURNED OFF...
... the display screen or case. If the screen still not clean, apply a small amount of a non-ammonia, non-alcohol based, mild non-abrasive detergent onto a clean, soft, lint-free cloth, then wipe the surface. Disclaimer • ViewSonic® does not recommend the use of any ammonia or alcoholbased cleaners. 11 Use a soft, dry cloth. 2. Cleaning the Display • MAKE SURE THE DISPLAY IS TURNED OFF...

User Guide
Page 19
... card, contact ViewSonic® for a non-DDC adapter. Power is ON but no screen image • Make sure the video cable supplied with the display is securely connected. If the other end of the computer. Control buttons do not work • Press only one button at a time. 12 Troubleshooting No power • Make sure power button (or switch) is ON. • Make sure A/C power cord is securely connected to the display. • Plug another computer. • If you need...
... card, contact ViewSonic® for a non-DDC adapter. Power is ON but no screen image • Make sure the video cable supplied with the display is securely connected. If the other end of the computer. Control buttons do not work • Press only one button at a time. 12 Troubleshooting No power • Make sure power button (or switch) is ON. • Make sure A/C power cord is securely connected to the display. • Plug another computer. • If you need...
User Guide
Page 21
... other cause which results when a static image is valid only for an extended period of time. 4. d. g. Replacement product or parts may include remanufactured or refurbished parts or components. Removal or installation of supplies or parts not meeting ViewSonic's specifications. Removal, installation, one way transportation, insurance, and set-up service charges. e. Any product exhibiting a condition commonly known as electrical power fluctuations or failure. Damage, deterioration or...
... other cause which results when a static image is valid only for an extended period of time. 4. d. g. Replacement product or parts may include remanufactured or refurbished parts or components. Removal or installation of supplies or parts not meeting ViewSonic's specifications. Removal, installation, one way transportation, insurance, and set-up service charges. e. Any product exhibiting a condition commonly known as electrical power fluctuations or failure. Damage, deterioration or...
User Guide
Page 22
... not apply to the cost of repair or replacement of goodwill, interference with business relationships, or other damages, whether incidental, consequential or otherwise. 3. The warranty period for : 1. viewsoniceurope.com under Support/Warranty Information. ViewSonic shall not be found in www. For users in the product, damages based upon inconvenience, loss of use of the product, loss of...
... not apply to the cost of repair or replacement of goodwill, interference with business relationships, or other damages, whether incidental, consequential or otherwise. 3. The warranty period for : 1. viewsoniceurope.com under Support/Warranty Information. ViewSonic shall not be found in www. For users in the product, damages based upon inconvenience, loss of use of the product, loss of...
User Guide
Page 23
... attempted repair, or failure to a product defect. 3. b. Use of the product. 2. Any other cause which does not relate to follow instructions supplied with the product. Removal, installation, insurance, and set-up service charges. Please retain your receipt of proof of purchase to an authorized ViewSonic service center. 3. Take or ship the product in the original container packaging to support your future use. ViewSonic...
... attempted repair, or failure to a product defect. 3. b. Use of the product. 2. Any other cause which does not relate to follow instructions supplied with the product. Removal, installation, insurance, and set-up service charges. Please retain your receipt of proof of purchase to an authorized ViewSonic service center. 3. Take or ship the product in the original container packaging to support your future use. ViewSonic...

Carbon Footprint Report
Page 1
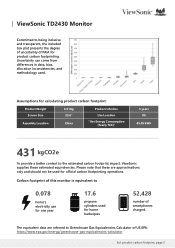
... product carbon footprint. product carbon footprint, page 1 Developed by better understanding the significance of the product life cycle through product carbon footprinting. ViewSonic TD2430 Monitor Report produced September, 2020 As part of ViewSonic's pledge to corporate citizenship and lowering our environmental footprint, we strive to Impact Algorithm (PAIA). This product's estimated carbon footprint: 431 kgCO2e...
... product carbon footprint. product carbon footprint, page 1 Developed by better understanding the significance of the product life cycle through product carbon footprinting. ViewSonic TD2430 Monitor Report produced September, 2020 As part of ViewSonic's pledge to corporate citizenship and lowering our environmental footprint, we strive to Impact Algorithm (PAIA). This product's estimated carbon footprint: 431 kgCO2e...
Carbon Footprint Report
Page 2
... data, bias, allocation inconsistencies, and methodology used for calculating product carbon footprint: Product Weight Screen Size Assembly Location 6.91Kg 23.6" China Product Lifetime Use Location "Use Energy Consumption (Yearly TEC)" 3 years US 45.05 kWh 431 kgCO2e To provide a better context to Greenhouse Gas Equivalencies Calculator of US.EPA. ViewSonic TD2430 Monitor Committed to being inclusive and transparent, the...
... data, bias, allocation inconsistencies, and methodology used for calculating product carbon footprint: Product Weight Screen Size Assembly Location 6.91Kg 23.6" China Product Lifetime Use Location "Use Energy Consumption (Yearly TEC)" 3 years US 45.05 kWh 431 kgCO2e To provide a better context to Greenhouse Gas Equivalencies Calculator of US.EPA. ViewSonic TD2430 Monitor Committed to being inclusive and transparent, the...


