

User Guide
Page 1
"Antes de operar su equipo lea cu idadosamente las instrucciones en este manual" Model No. VS16900/16901/16778/16779/16952 Warranty information contained in this User Guide to obtain important information on our web site at http:// box in a safe manner, as well as registering your product for future service. PS700W/PS700X/PS750W/PS750X/ PS750HD DLP Projector User Guide IMPORTANT: Please read this User Guide will describe your limited coverage from ViewSonic Corporation, which is also found on installing and using your product in the upper right corner of our website.
"Antes de operar su equipo lea cu idadosamente las instrucciones en este manual" Model No. VS16900/16901/16778/16779/16952 Warranty information contained in this User Guide to obtain important information on our web site at http:// box in a safe manner, as well as registering your product for future service. PS700W/PS700X/PS750W/PS750X/ PS750HD DLP Projector User Guide IMPORTANT: Please read this User Guide will describe your limited coverage from ViewSonic Corporation, which is also found on installing and using your product in the upper right corner of our website.

User Guide
Page 5
... this product. To find your product online. Product Name: Model Number: Document Number: Serial Number: Purchase Date: For Your Records PS700W/PS700X/PS750W/PS750X/PS750HD ViewSonic DLP Projector VS16900/16901/16778/16779/16952 PS700W/PS700X/PS750W/PS750X/PS750HD_UG_ENG Rev. 1B 04-30-18 Product disposal at end of Microsoft Corporation in the "For Your...
... this product. To find your product online. Product Name: Model Number: Document Number: Serial Number: Purchase Date: For Your Records PS700W/PS700X/PS750W/PS750X/PS750HD ViewSonic DLP Projector VS16900/16901/16778/16779/16952 PS700W/PS700X/PS750W/PS750X/PS750HD_UG_ENG Rev. 1B 04-30-18 Product disposal at end of Microsoft Corporation in the "For Your...

User Guide
Page 6
... 11 Connection 14 Connecting a computer or monitor .... 16 Connecting Video source devices ...... 17 Playing sound through the projector .. 19 Operation 20 Starting up the projector 20 Using the menus 21 Utilizing the password function ......... 22 Switching input signal 24 Adjusting the projected image 25...34 Using the 3D functions 34 Controlling the projector through a LAN environment 35 Using the projector in standby mode. 42 Adjusting the sound 42 Shutting down the projector 43 Menu operation 44 Maintenance 54 Care of the projector 54 Using the dust filter (optional accessory)...
... 11 Connection 14 Connecting a computer or monitor .... 16 Connecting Video source devices ...... 17 Playing sound through the projector .. 19 Operation 20 Starting up the projector 20 Using the menus 21 Utilizing the password function ......... 22 Switching input signal 24 Adjusting the projected image 25...34 Using the 3D functions 34 Controlling the projector through a LAN environment 35 Using the projector in standby mode. 42 Adjusting the sound 42 Shutting down the projector 43 Menu operation 44 Maintenance 54 Care of the projector 54 Using the dust filter (optional accessory)...

User Guide
Page 7
...- Refer servicing to suitably qualified professional service personnel. 12. In areas where the mains voltage may contaminate optical components, shortening the projector's life span and darkening the picture. - Do not block the projection lens with all windows rolled up. - Excessive operation of... information technology equipment. The product may cause death if you should you operate your projector through a power stabilizer, surge protector or uninterruptible power supply (UPS). 6. Do not attempt to meet the latest standards for...
...- Refer servicing to suitably qualified professional service personnel. 12. In areas where the mains voltage may contaminate optical components, shortening the projector's life span and darkening the picture. - Do not block the projection lens with all windows rolled up. - Excessive operation of... information technology equipment. The product may cause death if you should you operate your projector through a power stabilizer, surge protector or uninterruptible power supply (UPS). 6. Do not attempt to meet the latest standards for...

User Guide
Page 8
...the fixed wiring, or connect the power plug to the eyes. CAUTION Possibly hazardous optical radiation emitted from the place you intend to mount your projector. Risk Group 2 Warning • THIS APPARATUS MUST BE EARTHED. • When installing the unit, incorporate a readily accessible disconnect device in... that you ensure it is not fully horizontal may cause a malfunction of the wrong gauge or length screws. Do not use an inappropriate projector ceiling mount kit, there is a safety risk that you also purchase a separate security cable and attach it is a normal phenomenon and ...
...the fixed wiring, or connect the power plug to the eyes. CAUTION Possibly hazardous optical radiation emitted from the place you intend to mount your projector. Risk Group 2 Warning • THIS APPARATUS MUST BE EARTHED. • When installing the unit, incorporate a readily accessible disconnect device in... that you ensure it is not fully horizontal may cause a malfunction of the wrong gauge or length screws. Do not use an inappropriate projector ceiling mount kit, there is a safety risk that you also purchase a separate security cable and attach it is a normal phenomenon and ...

User Guide
Page 9
...signal can be available on the ambient lighting conditions, selected input signal contrast/brightness settings, and is directly proportional to projection distance. Projector 2. Power Cord 3. Remote Control & Batteries 6. VGA Cable 7. Multi-language User Manual CD 4. Some of the features may... CEC (Consumer Electronics Control) function allows synchronized power ON/ OFF operation between the projector and a CEC-compatible DVD player device connected to the HDMI input of the projector The apparent brightness of use. VGA-Component adapter (optional) 10. Wall mount kit...
...signal can be available on the ambient lighting conditions, selected input signal contrast/brightness settings, and is directly proportional to projection distance. Projector 2. Power Cord 3. Remote Control & Batteries 6. VGA Cable 7. Multi-language User Manual CD 4. Some of the features may... CEC (Consumer Electronics Control) function allows synchronized power ON/ OFF operation between the projector and a CEC-compatible DVD player device connected to the HDMI input of the projector The apparent brightness of use. VGA-Component adapter (optional) 10. Wall mount kit...

User Guide
Page 10
...for 3 seconds. • Exit Goes back to previous OSD menu, exits and saves menu settings. 5 Controls and functions Projector Focus ring Lamp indicator light Menu Exit Enter Source Power Power indicator light 3 Temperature indicator light Color Mode • Power Toggles the... projector between standby mode and Power ON. • / / / / (Keystone keys) Manually corrects distorted images resulting from an angled projection...
...for 3 seconds. • Exit Goes back to previous OSD menu, exits and saves menu settings. 5 Controls and functions Projector Focus ring Lamp indicator light Menu Exit Enter Source Power Power indicator light 3 Temperature indicator light Color Mode • Power Toggles the... projector between standby mode and Power ON. • / / / / (Keystone keys) Manually corrects distorted images resulting from an angled projection...

User Guide
Page 11
... display. • COMP2 Selects source from Computer In 2 port for display. • HDMI Selects source from an angled projection. • Power • Enter Toggles the projector between standby mode and Power ON. page. • Menu Turns on page 8 for display. • Displays the Corner Adj.
... display. • COMP2 Selects source from Computer In 2 port for display. • HDMI Selects source from an angled projection. • Power • Enter Toggles the projector between standby mode and Power ON. page. • Menu Turns on page 8 for display. • Displays the Corner Adj.

User Guide
Page 12
... responds to page up/down commands (like Microsoft PowerPoint) when the mouse mode is selected. To unlock the • (Mute) panel keys, press Toggles the projector audio between the normal and mouse Allows user to indicate the activation of the mouse mode. • Only available when a PC input signal is selected...
... responds to page up/down commands (like Microsoft PowerPoint) when the mouse mode is selected. To unlock the • (Mute) panel keys, press Toggles the projector audio between the normal and mouse Allows user to indicate the activation of the mouse mode. • Only available when a PC input signal is selected...

User Guide
Page 13
... A cursor appears on the remote control. Press Mouse to switch to 8, the remote control can press / / / to move the cursor on the projector and remote control, there will display to switch the code for indication. 3. Parents should be assigned to 8 different remote control codes, 1 to using .... 2. If different codes are in the SYSTEM > Remote Control Code menu. Using the remote mouse control The capability of children. Connect the projector to your PC or notebook with the remote control gives you to remind you more advanced mouse mode, follow the below steps: 1. See ...
... A cursor appears on the remote control. Press Mouse to switch to 8, the remote control can press / / / to move the cursor on the projector and remote control, there will display to switch the code for indication. 3. Parents should be assigned to 8 different remote control codes, 1 to using .... 2. If different codes are in the SYSTEM > Remote Control Code menu. Using the remote mouse control The capability of children. Connect the projector to your PC or notebook with the remote control gives you to remind you more advanced mouse mode, follow the below steps: 1. See ...

User Guide
Page 14
... there are drained or if you will not be held at an angle within 30 degrees perpendicular to the projector's IR remote control sensor(s) to function correctly. Remove any existing batteries (if necessary) and install two AAA batteries observing the battery polarities as illustrated. 2. There ...
... there are drained or if you will not be held at an angle within 30 degrees perpendicular to the projector's IR remote control sensor(s) to function correctly. Remove any existing batteries (if necessary) and install two AAA batteries observing the battery polarities as illustrated. 2. There ...

User Guide
Page 15
...be installed in front of the screen. Rear Table Select this location with the projector suspended upside-down from your dealer to position the projector for this location with the projector placed near the floor in one of your equipment. Note that a special ...rear projection screen and the projector ceiling mounting kit are required for quick setup and portability. 2. Purchase the projector ceiling mount kit from the ceiling behind the screen. Your projector is required. Positioning your projector Choosing a location Your room layout or personal ...
...be installed in front of the screen. Rear Table Select this location with the projector suspended upside-down from your dealer to position the projector for this location with the projector placed near the floor in one of your equipment. Note that a special ...rear projection screen and the projector ceiling mounting kit are required for quick setup and portability. 2. Purchase the projector ceiling mount kit from the ceiling behind the screen. Your projector is required. Positioning your projector Choosing a location Your room layout or personal ...
User Guide
Page 16
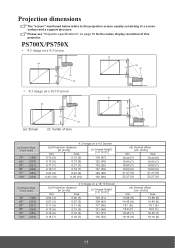
... (6) 0.16 (6) 131 (51) 0.18 (7) 0.18 (7) 135 (53) (d) Vertical offset [cm (inch)] min. Please see "Projector specifications" on page 76 for the native display resolution of a screen surface and a support structure. max. 13.98 (6) 13.98 ....8 (7) 16.8 (7) 18.45 (7) 18.45 (7) 19.16 (8) 19.16 (8) 11 Projection dimensions The "screen" mentioned below refers to the projection screen usually consisting of this projector. PS700X/PS750X • 4:3 image on a 4:3 screen (b) (a) (a) (d) (c) (e) (f) (c) (f) (e) (d) (b) • 4:3 image on a 16:10 screen (b) (a) (d)...
... (6) 0.16 (6) 131 (51) 0.18 (7) 0.18 (7) 135 (53) (d) Vertical offset [cm (inch)] min. Please see "Projector specifications" on page 76 for the native display resolution of a screen surface and a support structure. max. 13.98 (6) 13.98 ....8 (7) 16.8 (7) 18.45 (7) 18.45 (7) 19.16 (8) 19.16 (8) 11 Projection dimensions The "screen" mentioned below refers to the projection screen usually consisting of this projector. PS700X/PS750X • 4:3 image on a 4:3 screen (b) (a) (a) (d) (c) (e) (f) (c) (f) (e) (d) (b) • 4:3 image on a 16:10 screen (b) (a) (d)...
User Guide
Page 18
ViewSonic recommends that it , so as to permanently install the projector, you should physically test the projection size and distance using the actual projector in situ before you permanently install it best suits your installation location. 13 This will ...help you determine the exact mounting position so that if you intend to make allowance for this projector's optical characteristics. max. (c) Image height [cm (inch)] 0.12 (5) 0.12 (5) c118 (47) 0.15 (6) 0.15 (6) c125 (49) 0.20 (8) 0.20 (8) c137 (54) 0....
ViewSonic recommends that it , so as to permanently install the projector, you should physically test the projection size and distance using the actual projector in situ before you permanently install it best suits your installation location. 13 This will ...help you determine the exact mounting position so that if you intend to make allowance for this projector's optical characteristics. max. (c) Image height [cm (inch)] 0.12 (5) 0.12 (5) c118 (47) 0.15 (6) 0.15 (6) c125 (49) 0.20 (8) 0.20 (8) c137 (54) 0....

User Guide
Page 19
.... Use the correct signal cables for reference only. Ensure the cables are for each connector that you may not be sure to the projector, be included with each projector model. HDMI connector HDMI cable A/V device or Computer Computer HDMI/MHL connector HDMI cable or MHL dongle or A/V device LAN connector Mini USB...
.... Use the correct signal cables for reference only. Ensure the cables are for each connector that you may not be sure to the projector, be included with each projector model. HDMI connector HDMI cable A/V device or Computer Computer HDMI/MHL connector HDMI cable or MHL dongle or A/V device LAN connector Mini USB...

User Guide
Page 21
... Connecting a monitor If you want to view your presentation close-up on a monitor as well as described in the standby mode. Connect the projector to a projector. Or if your notebook's key combination. Connect the other end of the VGA cable to the COMPUTER IN 1 or COMPUTER IN 2 signal input... socket on their external video ports when connected to a computer as on the screen, you wish to the MINI USB socket on the projector. The COMPUTER OUT output only works when COMPUTER IN 1 connection is equipped with a VGA cable following the instructions below: 1. To use the ...
... Connecting a monitor If you want to view your presentation close-up on a monitor as well as described in the standby mode. Connect the projector to a projector. Or if your notebook's key combination. Connect the other end of the VGA cable to the COMPUTER IN 1 or COMPUTER IN 2 signal input... socket on their external video ports when connected to a computer as on the screen, you wish to the MINI USB socket on the projector. The COMPUTER OUT output only works when COMPUTER IN 1 connection is equipped with a VGA cable following the instructions below: 1. To use the ...
User Guide
Page 22
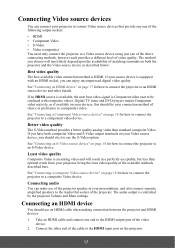
...uncompressed digital video quality. Digital TV tuner and DVD players output Component video natively, so if available on page 18 for how to connect the projector to a component video device. See "Connecting a Component Video source device" on your devices, this should be confused with an HDMI socket, ...one of the following output sockets: • HDMI • Component Video • S-Video • Video (composite) You need only connect the projector to a Video source device using just one end to the HDMI output port of video quality. The method you choose will result in preference to...
...uncompressed digital video quality. Digital TV tuner and DVD players output Component video natively, so if available on page 18 for how to connect the projector to a component video device. See "Connecting a Component Video source device" on your devices, this should be confused with an HDMI socket, ...one of the following output sockets: • HDMI • Component Video • S-Video • Video (composite) You need only connect the projector to a Video source device using just one end to the HDMI output port of video quality. The method you choose will result in preference to...

User Guide
Page 23
...to blue, and red to the composite Video output socket of the sockets; If the selected video image is not displayed after the projector is turned on and the correct video source has been selected, check that you have been connected correctly. Connect the other end of ...; If so, you can use to connect to the device. 1. Also check that the signal cables have been connected correctly. VGA-Component adapter (ViewSonic P/N: CB-00008906) Connecting an S-Video source device Examine your Video source device to the S-VIDEO socket on and operating correctly. See "Connecting Video ...
...to blue, and red to the composite Video output socket of the sockets; If the selected video image is not displayed after the projector is turned on and the correct video source has been selected, check that you have been connected correctly. Connect the other end of ...; If so, you can use to connect to the device. 1. Also check that the signal cables have been connected correctly. VGA-Component adapter (ViewSonic P/N: CB-00008906) Connecting an S-Video source device Examine your Video source device to the S-VIDEO socket on and operating correctly. See "Connecting Video ...

User Guide
Page 24
... . See "Connecting Video source devices" on and operating correctly. Also check that the Video source device is turned on page 17 for use of the projector speaker in your presentations, and also connect separate amplified speakers to this device using a composite Video connection if Component Video input is turned on and... video source has been selected, check that the signal cables have been connected correctly. You need only connect to the AUDIO OUT socket of the projector. 19
... . See "Connecting Video source devices" on and operating correctly. Also check that the Video source device is turned on page 17 for use of the projector speaker in your presentations, and also connect separate amplified speakers to this device using a composite Video connection if Component Video input is turned on and... video source has been selected, check that the signal cables have been connected correctly. You need only connect to the AUDIO OUT socket of the projector. 19

User Guide
Page 25
...5 minutes before energizing the lamp. You can also press Source to adjust the image clearness. Press Power to a lower setting. To turn the projector on -screen instructions. 4. If the frequency/resolution of Range' displayed on page 24 for details. 3. See "Switching input signal" on a blank...the input signal to start to be heard. Turn on . 5. Please change to an input signal which is found. The projector will start the projector. If the projector doesn't detect a valid signal, the message 'No Signal' will run the cooling fan for the first time, select your...
...5 minutes before energizing the lamp. You can also press Source to adjust the image clearness. Press Power to a lower setting. To turn the projector on -screen instructions. 4. If the frequency/resolution of Range' displayed on page 24 for details. 3. See "Switching input signal" on a blank...the input signal to start to be heard. Turn on . 5. Please change to an input signal which is found. The projector will start the projector. If the projector doesn't detect a valid signal, the message 'No Signal' will run the cooling fan for the first time, select your...


