
PJD5153 User Guide English
Page 8
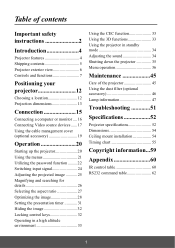
... Care of the projector 46 Using the dust filter (optional accessory 47 Lamp information 48 Troubleshooting 52 Specifications 53 Projector specifications 53 Dimensions 55 Ceiling mount installation 55 Timing chart 56 Copyright information...60 Appendix 61 IR control table 61 RS232 command table 62 1
... Care of the projector 46 Using the dust filter (optional accessory 47 Lamp information 48 Troubleshooting 52 Specifications 53 Projector specifications 53 Dimensions 55 Ceiling mount installation 55 Timing chart 56 Copyright information...60 Appendix 61 IR control table 61 RS232 command table 62 1
PJD5153 User Guide English
Page 10
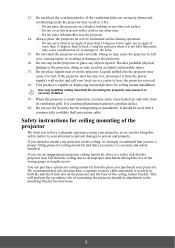
...the projector on end vertically. Do not place liquids near the projector. 14. We recommend that the projector may result in damage to mount your projector. If the ventilation holes are seriously obstructed, overheating inside the projector may fall over, causing injury or resulting in a ...fire. - Safety instructions for ceiling mount installation. This product is a safety risk that you to both the anti-theft lock slot on the projector or place any other item...
...the projector on end vertically. Do not place liquids near the projector. 14. We recommend that the projector may result in damage to mount your projector. If the ventilation holes are seriously obstructed, overheating inside the projector may fall over, causing injury or resulting in a ...fire. - Safety instructions for ceiling mount installation. This product is a safety risk that you to both the anti-theft lock slot on the projector or place any other item...

PJD5153 User Guide English
Page 19
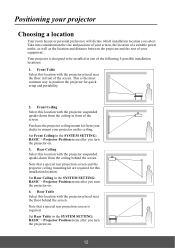
...to be installed in front of the following 4 possible installation locations: 1. Note that a special rear projection screen and the projector ceiling mounting kit are required for quick setup and portability. 2. Positioning your projector Choosing a location Your room layout or personal preference will dictate ... to position the projector for this location with the projector placed near the floor behind the screen. Purchase the projector ceiling mount kit from the ceiling in one of the screen. Rear Table Select this location with the projector suspended upside-down from ...
...to be installed in front of the following 4 possible installation locations: 1. Note that a special rear projection screen and the projector ceiling mounting kit are required for quick setup and portability. 2. Positioning your projector Choosing a location Your room layout or personal preference will dictate ... to position the projector for this location with the projector placed near the floor behind the screen. Purchase the projector ceiling mount kit from the ceiling in one of the screen. Rear Table Select this location with the projector suspended upside-down from ...

PJD5153 User Guide English
Page 21
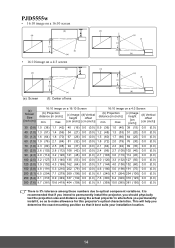
...) 404 (159) 0.0 (0.0) 9.1 (359) 10.0 (395) 381 (150) 0.0 (0.0) There is recommended that it , so as to optical component variations. This will help you determine the exact mounting position so that if you intend to permanently install the projector, you should physically test the projection size and distance using the actual projector in...
...) 404 (159) 0.0 (0.0) 9.1 (359) 10.0 (395) 381 (150) 0.0 (0.0) There is recommended that it , so as to optical component variations. This will help you determine the exact mounting position so that if you intend to permanently install the projector, you should physically test the projection size and distance using the actual projector in...
PJD5153 User Guide English
Page 26
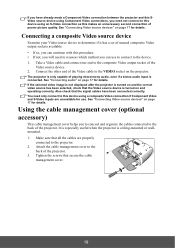
... only connect to the device. 1. Attach the cable management cover to the back of playing mixed mono audio, even if a stereo audio input is ceiling-mounted or wallmounted. 1. The projector is only capable of the projector. 3.
... only connect to the device. 1. Attach the cable management cover to the back of playing mixed mono audio, even if a stereo audio input is ceiling-mounted or wallmounted. 1. The projector is only capable of the projector. 3.
PJD5153 User Guide English
Page 54
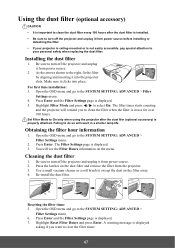
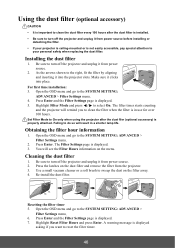
...; Be sure to turn off the projector and unplug it from power source before installing or detaching the filter. • If your projector is ceiling-mounted or is not easily accessible, pay special attention to your personal safety when replacing the dust filter. The filter timer starts counting and the projector...
...; Be sure to turn off the projector and unplug it from power source before installing or detaching the filter. • If your projector is ceiling-mounted or is not easily accessible, pay special attention to your personal safety when replacing the dust filter. The filter timer starts counting and the projector...
PJD5153 User Guide English
Page 62
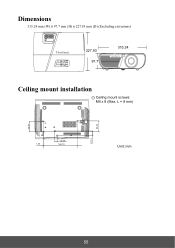
L = 8 mm) 63.62 60.87 27.13 13.00 1.45 198.10 Unit: mm 55 Dimensions 315.24 mm (W) x 97.7 mm (H) x 227.93 mm (D) (Excluding extrusions) 227.93 315.24 97.7 / Ceiling mount installation Ceiling mount screws: M4 x 8 (Max.
L = 8 mm) 63.62 60.87 27.13 13.00 1.45 198.10 Unit: mm 55 Dimensions 315.24 mm (W) x 97.7 mm (H) x 227.93 mm (D) (Excluding extrusions) 227.93 315.24 97.7 / Ceiling mount installation Ceiling mount screws: M4 x 8 (Max.
PJD5153 Datasheet English
Page 2
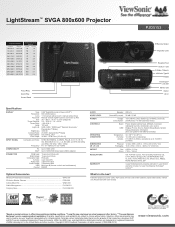
L. LightStream™ SVGA 800x600 Projector PJD5153 PProjection Distance Inches 59.5-65.3 Meters 1.51-1.66 74.4-81.6 1.89-2.07 89.3-97.9 2.27-2.49 104.2-114.2 2.65-2.9 119.0-130.6 3.02-3.32 133.9-146.9 3.4-3.... jack 3.5mm mini jack Mini type B (mouse control and maintenance) RS232 Optional Accessories Wireless Presentation Gateway WPG-370 3D Active Shutter Glasses PGD-350 Ceiling Mount Kit WMK-005 Cable Management PJ-CM-001 Carrying Case PJ-CASE-008 AUDIO NOISE LEVEL POWER CONTROLS OPERATING CONDITIONS DIMENSIONS (W x H x D) WEIGHT REGULATIONS WARRANTY Speaker...
L. LightStream™ SVGA 800x600 Projector PJD5153 PProjection Distance Inches 59.5-65.3 Meters 1.51-1.66 74.4-81.6 1.89-2.07 89.3-97.9 2.27-2.49 104.2-114.2 2.65-2.9 119.0-130.6 3.02-3.32 133.9-146.9 3.4-3.... jack 3.5mm mini jack Mini type B (mouse control and maintenance) RS232 Optional Accessories Wireless Presentation Gateway WPG-370 3D Active Shutter Glasses PGD-350 Ceiling Mount Kit WMK-005 Cable Management PJ-CM-001 Carrying Case PJ-CASE-008 AUDIO NOISE LEVEL POWER CONTROLS OPERATING CONDITIONS DIMENSIONS (W x H x D) WEIGHT REGULATIONS WARRANTY Speaker...
PJD5153 User Guide English
Page 8
... Care of the projector 45 Using the dust filter (optional accessory 46 Lamp information 47 Troubleshooting 51 Specifications 52 Projector specifications 52 Dimensions 54 Ceiling mount installation 54 Timing chart 55 Copyright information...59 Appendix 60 IR control table 60 RS232 command table 62 1
... Care of the projector 45 Using the dust filter (optional accessory 46 Lamp information 47 Troubleshooting 51 Specifications 52 Projector specifications 52 Dimensions 54 Ceiling mount installation 54 Timing chart 55 Copyright information...59 Appendix 60 IR control table 60 RS232 command table 62 1

PJD5153 User Guide English
Page 10
... using your attention to prevent damage to fail. Do not block the ventilation holes. Do not use a proper fitting projector ceiling mount kit and that you intend to both the anti-theft lock slot on the projector and the base of displaying inverted pictures for ceiling...- Do not place liquids near the projector. 14. This product is under operation, you use the Security bar for mounting the projector and ensure it securely to mount your projector. Always place the projector on the projector. Besides probable physical damage to back. When the projector is capable...
... using your attention to prevent damage to fail. Do not block the ventilation holes. Do not use a proper fitting projector ceiling mount kit and that you intend to both the anti-theft lock slot on the projector and the base of displaying inverted pictures for ceiling...- Do not place liquids near the projector. 14. This product is under operation, you use the Security bar for mounting the projector and ensure it securely to mount your projector. Always place the projector on the projector. Besides probable physical damage to back. When the projector is capable...
PJD5153 User Guide English
Page 19
... in the SYSTEM SETTING: BASIC > Projector Position menu after you turn the projector on. 12 Purchase the projector ceiling mount kit from the ceiling behind the screen. Rear Ceiling Select this installation location. Note that a special rear projection screen and the ... Rear Ceiling in front of your equipment. Front Ceiling Select this location with the projector suspended upside-down from your dealer to mount your projector on the ceiling. Positioning your projector Choosing a location Your room layout or personal preference will dictate which installation location ...
... in the SYSTEM SETTING: BASIC > Projector Position menu after you turn the projector on. 12 Purchase the projector ceiling mount kit from the ceiling behind the screen. Rear Ceiling Select this installation location. Note that a special rear projection screen and the ... Rear Ceiling in front of your equipment. Front Ceiling Select this location with the projector suspended upside-down from your dealer to mount your projector on the ceiling. Positioning your projector Choosing a location Your room layout or personal preference will dictate which installation location ...
PJD5153 User Guide English
Page 21
It is 3% tolerance among these numbers due to optical component variations. This will help you determine the exact mounting position so that if you permanently install it best suits your installation location. 14 max. (c) Image height [cm (inch)] (d) Vertical offset [cm (inch)] 30 (0.8) 1.0 (38) 1.1 (...
It is 3% tolerance among these numbers due to optical component variations. This will help you determine the exact mounting position so that if you permanently install it best suits your installation location. 14 max. (c) Image height [cm (inch)] (d) Vertical offset [cm (inch)] 30 (0.8) 1.0 (38) 1.1 (...

PJD5153 User Guide English
Page 26
The projector is only capable of playing mixed mono audio, even if a stereo audio input is ceiling-mounted or wallmounted. 1. You need only connect to this procedure. • If not, you will need not connect to this device using a composite Video connection if ...
The projector is only capable of playing mixed mono audio, even if a stereo audio input is ceiling-mounted or wallmounted. 1. You need only connect to this procedure. • If not, you will need not connect to this device using a composite Video connection if ...
PJD5153 User Guide English
Page 53
... the filter is displayed. 3. Be sure to reset the filter timer. 46 Press Enter. Cleaning the dust filter 1. Be sure to your projector is ceiling-mounted or is not easily accessible, pay special attention to turn off the projector and unplug it from power source. 2. Re-install the dust filter. Press...
... the filter is displayed. 3. Be sure to reset the filter timer. 46 Press Enter. Cleaning the dust filter 1. Be sure to your projector is ceiling-mounted or is not easily accessible, pay special attention to turn off the projector and unplug it from power source. 2. Re-install the dust filter. Press...

PJD5153 User Guide English
Page 61
L = 8 mm) 63.62 60.87 27.13 13.00 1.45 198.10 Unit: mm 54 Dimensions 315.24 mm (W) x 97.7 mm (H) x 227.93 mm (D) (Excluding extrusions) 227.93 315.24 97.7 / Ceiling mount installation Ceiling mount screws: M4 x 8 (Max.
L = 8 mm) 63.62 60.87 27.13 13.00 1.45 198.10 Unit: mm 54 Dimensions 315.24 mm (W) x 97.7 mm (H) x 227.93 mm (D) (Excluding extrusions) 227.93 315.24 97.7 / Ceiling mount installation Ceiling mount screws: M4 x 8 (Max.

