User Guide
Page 2
Contents For Your Records 1 Features ...2 Product Features 2 Before Use 2 Package Contents 2 Projector Components 3 Projector Components Diagram 3 Remote Control Components 4 Remote Control Components Diagram 4 Inserting the Batteries 5 Installation 6 Angle Adjustment 6 Cabling ...7 Power Connection 7 Example of System Setup 8 Plug & Play ...8 Operations 9 Power ON ...9 Power OFF ...9 ...the Lamp 19 Resetting the Lamp Timer 19 Air-Filter ...20 Maintenance Inside the Equipment 20 Cleaning the Lens 20 Cleaning the Cabinet and Remote Control 20 ViewSonic PJ500/PJ550/PJ501/PJ551 i
Contents For Your Records 1 Features ...2 Product Features 2 Before Use 2 Package Contents 2 Projector Components 3 Projector Components Diagram 3 Remote Control Components 4 Remote Control Components Diagram 4 Inserting the Batteries 5 Installation 6 Angle Adjustment 6 Cabling ...7 Power Connection 7 Example of System Setup 8 Plug & Play ...8 Operations 9 Power ON ...9 Power OFF ...9 ...the Lamp 19 Resetting the Lamp Timer 19 Air-Filter ...20 Maintenance Inside the Equipment 20 Cleaning the Lens 20 Cleaning the Cabinet and Remote Control 20 ViewSonic PJ500/PJ550/PJ501/PJ551 i
User Guide
Page 5
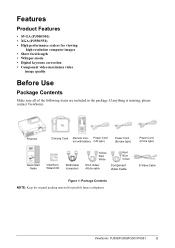
... ViewSonic. Projector Carrying Case Remote Con- Power Cord trol with battery (US type) Power Cord (Europe type) Power Cord (China type) Quick Start Guide ViewSonic Wizard CD RGB Cable (computer) Yellow Red White RCA Video/ AUdio cable Red Blue Green Component Video Cable S-Video Cable...• Whisper-mode • Digital keystone correction • Component video maximizes video image quality Before Use Package Contents Make sure all of the following items are included in the package. ViewSonic PJ500/PJ550/PJ501/PJ551 2 Features Product Features • SVGA (PJ500/501) •...
... ViewSonic. Projector Carrying Case Remote Con- Power Cord trol with battery (US type) Power Cord (Europe type) Power Cord (China type) Quick Start Guide ViewSonic Wizard CD RGB Cable (computer) Yellow Red White RCA Video/ AUdio cable Red Blue Green Component Video Cable S-Video Cable...• Whisper-mode • Digital keystone correction • Component video maximizes video image quality Before Use Package Contents Make sure all of the following items are included in the package. ViewSonic PJ500/PJ550/PJ501/PJ551 2 Features Product Features • SVGA (PJ500/501) •...
User Guide
Page 6
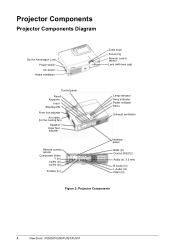
... foot adjuster Remote control sensor Component Video Y (In) CB/PB (In) CR/PR (In) S-Video (In) Zoom knob Focus ring Remote control sensor Lens (with lens cap) Lamp indicator Temp indicator Power indicator Menu Exhaust ventilation Interface panel RGB (In) Control (RS232) Audio (In, 3.5 mm) R Audio (In) L Audio (In) Video (In) Figure 2: Projector Components 3 ViewSonic PJ500/PJ550/PJ501/PJ551
... foot adjuster Remote control sensor Component Video Y (In) CB/PB (In) CR/PR (In) S-Video (In) Zoom knob Focus ring Remote control sensor Lens (with lens cap) Lamp indicator Temp indicator Power indicator Menu Exhaust ventilation Interface panel RGB (In) Control (RS232) Audio (In, 3.5 mm) R Audio (In) L Audio (In) Video (In) Figure 2: Projector Components 3 ViewSonic PJ500/PJ550/PJ501/PJ551

User Guide
Page 12
... NOTE: See Caution below. 1 Press the STANDBY/ON button on the control panel or the remote control. The POWER indicator turns off when the Power Switch is orange and set...is a steady orange. During this message indication, press the STANDBY/ON button again. Check that the projector is complete. will turn off and lamp cooling begins. 2 Wait for 2 seconds . •... Power Switch to a steady orange. The message "POWER OFF?" Remember to [O] OFF. 9 ViewSonic PJ500/PJ550/PJ501/PJ551 The unit is now in green. 3 After several seconds the lamp will disappear in emergencies...
... NOTE: See Caution below. 1 Press the STANDBY/ON button on the control panel or the remote control. The POWER indicator turns off when the Power Switch is orange and set...is a steady orange. During this message indication, press the STANDBY/ON button again. Check that the projector is complete. will turn off and lamp cooling begins. 2 Wait for 2 seconds . •... Power Switch to a steady orange. The message "POWER OFF?" Remember to [O] OFF. 9 ViewSonic PJ500/PJ550/PJ501/PJ551 The unit is now in green. 3 After several seconds the lamp will disappear in emergencies...
User Guide
Page 13
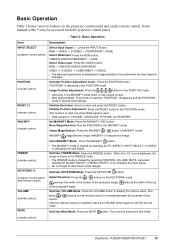
...The sound is displayed in this mode. (remote control) ViewSonic PJ500/PJ550/PJ501/PJ551 10 Table 3: Basic Operation Item INPUT SELECT (projector control panel) POSITION (remote control) RESET (*) (remote control) MAGNIFY (remote control) Description Select Input Signal (*) : press... image. RGB J VIDEO/S-VIDEO/COMPONENT VIDEO J S-VIDEO J COMPONENT (JVIDEO) • The selected signal name is displayed for : VOLUME, LANGUAGE, H PHASE, and WHISPER. FREEZE (remote control) KEYSTONE (*) (projector control panel and remote control) VOLUME (remote control) MUTE Clear ...
...The sound is displayed in this mode. (remote control) ViewSonic PJ500/PJ550/PJ501/PJ551 10 Table 3: Basic Operation Item INPUT SELECT (projector control panel) POSITION (remote control) RESET (*) (remote control) MAGNIFY (remote control) Description Select Input Signal (*) : press... image. RGB J VIDEO/S-VIDEO/COMPONENT VIDEO J S-VIDEO J COMPONENT (JVIDEO) • The selected signal name is displayed for : VOLUME, LANGUAGE, H PHASE, and WHISPER. FREEZE (remote control) KEYSTONE (*) (projector control panel and remote control) VOLUME (remote control) MUTE Clear ...
User Guide
Page 14
... RGB Input or Hi-Vision 1125i/750p of COMPONENT VIDEO Input: 4:3 Q 16:9 For VIDEO Input, S-VIDEO Input or 525i/525p/625i/625p of inactivity. Item AUTO (remote control) BLANK ON/OFF (remote control) MENU (*) (projector control panel and remote control) SEARCH (remote control) ASPECT (Aspect Ratio) (remote control) ESC (Escape) (remote control) ENTER (remote control) Table 3: Basic Operation (Continued) Description Automatic Adjustment...
... RGB Input or Hi-Vision 1125i/750p of COMPONENT VIDEO Input: 4:3 Q 16:9 For VIDEO Input, S-VIDEO Input or 525i/525p/625i/625p of inactivity. Item AUTO (remote control) BLANK ON/OFF (remote control) MENU (*) (projector control panel and remote control) SEARCH (remote control) ASPECT (Aspect Ratio) (remote control) ESC (Escape) (remote control) ENTER (remote control) Table 3: Basic Operation (Continued) Description Automatic Adjustment...
User Guide
Page 15
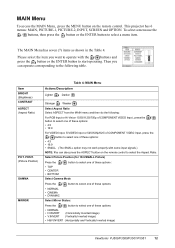
... projector has 6 menus: MAIN, PICTURE-1, PICTURE-2, INPUT, SCREEN and OPTION. Please select the item you can also press the ASPECT button on the remote ...(Horizontally Inverted image) (Vertically Inverted image) • H&V:INVERT (Horizontally and Vertically Inverted image) ViewSonic PJ500/PJ550/PJ501/PJ551 12 Select Picture Position (for 16:9/SMALL Picture) Press the / button to select one ...750p of COMPONENT VIDEO Input , press the / button to select one of these options: • 4:3 • 16:9 For VIDEO Input, S-VIDEO Input or 525i/525p/625i of COMPONENT VIDEO Input, press...
... projector has 6 menus: MAIN, PICTURE-1, PICTURE-2, INPUT, SCREEN and OPTION. Please select the item you can also press the ASPECT button on the remote ...(Horizontally Inverted image) (Vertically Inverted image) • H&V:INVERT (Horizontally and Vertically Inverted image) ViewSonic PJ500/PJ550/PJ501/PJ551 12 Select Picture Position (for 16:9/SMALL Picture) Press the / button to select one ...750p of COMPONENT VIDEO Input , press the / button to select one of these options: • 4:3 • 16:9 For VIDEO Input, S-VIDEO Input or 525i/525p/625i of COMPONENT VIDEO Input, press...

User Guide
Page 23
... is dangerous. If dirt and stains are not easily removed, use chemical sprays. • Use a soft cloth or lens paper only. ViewSonic PJ500/PJ550/PJ501/PJ551 20 Replacing the Air Filter Replace the air filter if contamination cannot be removed, or if it is damaged. • Do not ...those noted above. When the filter is used for contact information. 1 Switch the projector power OFF, and remove the power cord from the power outlet. 2 Clean the air filter with a soft cloth. Cleaning the Cabinet and Remote Control Gently wipe with a vacuum cleaner. 3 Reset the Filter Timer using the...
... is dangerous. If dirt and stains are not easily removed, use chemical sprays. • Use a soft cloth or lens paper only. ViewSonic PJ500/PJ550/PJ501/PJ551 20 Replacing the Air Filter Replace the air filter if contamination cannot be removed, or if it is damaged. • Do not ...those noted above. When the filter is used for contact information. 1 Switch the projector power OFF, and remove the power cord from the power outlet. 2 Clean the air filter with a soft cloth. Cleaning the Cabinet and Remote Control Gently wipe with a vacuum cleaner. 3 Reset the Filter Timer using the...
User Guide
Page 25
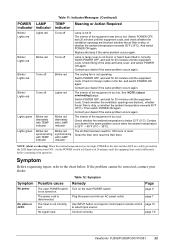
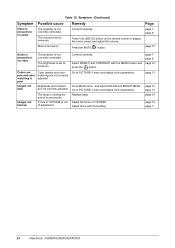
...be too hot. page 7 Use INPUT button on projector control pad or remote control to [0] and wait 20 minutes until the equipment has cooled sufficiently before continuing with LAMP indicator Lamp is below . page 10 page 7,8 ViewSonic PJ500/PJ550/PJ501/PJ551 22 Contact your dealer if the same problem occurs... when the ambient temperature is not found, or hasn't been fitted in the fan, and switch POWER ON again. Clean the filter, then reset the filter timer. Symptom No power No video or audio...
...be too hot. page 7 Use INPUT button on projector control pad or remote control to [0] and wait 20 minutes until the equipment has cooled sufficiently before continuing with LAMP indicator Lamp is below . page 10 page 7,8 ViewSonic PJ500/PJ550/PJ501/PJ551 22 Contact your dealer if the same problem occurs... when the ambient temperature is not found, or hasn't been fitted in the fan, and switch POWER ON again. Clean the filter, then reset the filter timer. Symptom No power No video or audio...
User Guide
Page 26
... button and press the button. page 7 page 8 page 12 page 13 page 12 page 13 page 19 page 14 page 3 23 ViewSonic PJ500/PJ550/PJ501/PJ551 The volume is set to minimum. The brightness is set to minimum. Images are not correctly adjusted. Select BRIGHT and CONTRAST with ...Focus Ring. Adjust the focus or H PHASE. Symptom Video is present but no audio Table 12: Symptom (Continued) Possible cause Remedy The projector is not correctly connected. Mute is turned on the remote control or display the menu screen and adjust the volume. Focus or H PHASE...
... button and press the button. page 7 page 8 page 12 page 13 page 12 page 13 page 19 page 14 page 3 23 ViewSonic PJ500/PJ550/PJ501/PJ551 The volume is set to minimum. The brightness is set to minimum. Images are not correctly adjusted. Select BRIGHT and CONTRAST with ...Focus Ring. Adjust the focus or H PHASE. Symptom Video is present but no audio Table 12: Symptom (Continued) Possible cause Remedy The projector is not correctly connected. Mute is turned on the remote control or display the menu screen and adjust the volume. Focus or H PHASE...
Service Manual
Page 8
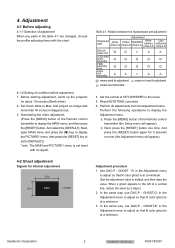
...warm up the projector for internal adjustment ... to Max. R: in diagonal size. 3. GHOST-B: in the menu. 5. Do Not Copy PJ501/PJ551 Set the normal at a minimum. 3. a. In the same way, use DAC-P -... Normalizing the video adjustment. (Press the [MENU] button of condition before adjustment 1. In the same way, use DAC-P - Perform all adjustments from the Adjustment menu. ViewSonic Corporation 5 Confidential... at a minimum. (Set the adjustment value to the left of the Remote control transmitter (the Setup menu will appear). 4-2 Ghost adjustment Signals for about...
...warm up the projector for internal adjustment ... to Max. R: in diagonal size. 3. GHOST-B: in the menu. 5. Do Not Copy PJ501/PJ551 Set the normal at a minimum. 3. a. In the same way, use DAC-P -... Normalizing the video adjustment. (Press the [MENU] button of condition before adjustment 1. In the same way, use DAC-P - Perform all adjustments from the Adjustment menu. ViewSonic Corporation 5 Confidential... at a minimum. (Set the adjustment value to the left of the Remote control transmitter (the Setup menu will appear). 4-2 Ghost adjustment Signals for about...
User Manual
Page 2
Contents For Your Records ...1 Features ...2 Projector Features ...2 Part Names ...3 The Projector ...3 The Remote Control 5 Setting Up ...6 Arrangement ...6 Adjusting The Projector's Elevator 7 Connecting Your Devices 8 Connecting Power Supply 10 Remote Control ...11 Putting Batteries ...11 Operating The Remote Control 12 Power ON/OFF ...13 Turning On The Power 13 Selecting An Input Signal 14 Turning Off The Power... Settings 21 Using The Menu Functions 21 MAIN Menu ...22 PICTURE-1 Menu ...23 PICTURE-2 Menu ...24 INPUT Menu ...25 AUTO Menu ...27 SCREEN Menu ...28 ViewSonic PJ510 i
Contents For Your Records ...1 Features ...2 Projector Features ...2 Part Names ...3 The Projector ...3 The Remote Control 5 Setting Up ...6 Arrangement ...6 Adjusting The Projector's Elevator 7 Connecting Your Devices 8 Connecting Power Supply 10 Remote Control ...11 Putting Batteries ...11 Operating The Remote Control 12 Power ON/OFF ...13 Turning On The Power 13 Selecting An Input Signal 14 Turning Off The Power... Settings 21 Using The Menu Functions 21 MAIN Menu ...22 PICTURE-1 Menu ...23 PICTURE-2 Menu ...24 INPUT Menu ...25 AUTO Menu ...27 SCREEN Menu ...28 ViewSonic PJ510 i
User Manual
Page 3
... Filter 32 Replacing The Air Filter 33 Other Care ...34 Caring For The Inside Of The Projector 34 Caring For The Lens 34 Caring For The Cabinet And Remote Control 34 Troubleshooting ...35 Related Messages ...35 Regarding The Indicator Lamps 37 Phenomena That May Easily... Be Mistaken For Machine Defects 39 Warranty And After-Service 40 Specifications ...41 Customer Support ...42 LIMITED WARRANTY ...43 VIEWSONIC Projector 43 Appendix ...44 Power...
... Filter 32 Replacing The Air Filter 33 Other Care ...34 Caring For The Inside Of The Projector 34 Caring For The Lens 34 Caring For The Cabinet And Remote Control 34 Troubleshooting ...35 Related Messages ...35 Regarding The Indicator Lamps 37 Phenomena That May Easily... Be Mistaken For Machine Defects 39 Warranty And After-Service 40 Specifications ...41 Customer Support ...42 LIMITED WARRANTY ...43 VIEWSONIC Projector 43 Appendix ...44 Power...
User Manual
Page 5
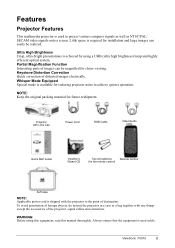
...any things except the accessories of distorted images electrically. ViewSonic PJ510 2 Features Projector Features This multimedia projector is used safely. Projector with the projector to project various computer signals as well as NTSC/PAL/ SECAM video signals onto a screen. Little space is required ...for installation and large images can easily be magnified for the remote...
...any things except the accessories of distorted images electrically. ViewSonic PJ510 2 Features Projector Features This multimedia projector is used safely. Projector with the projector to project various computer signals as well as NTSC/PAL/ SECAM video signals onto a screen. Little space is required ...for installation and large images can easily be magnified for the remote...
User Manual
Page 6
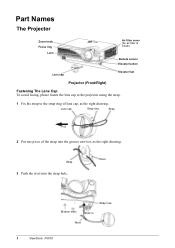
Strap Rivet 3 Push the rivet into the groove on rivet, as the right drawing. Part Names The Projector Zoom knob Focus ring Lens Air filter cover (An air filter is inside) Remote sensor Elevator button Lens cap Elevator feet Projector (Front/Right) Fastening The Lens Cap To avoid losing, please fasten the lens cap to the projector using the strap. 1 Fix the strap to the strap ring of the strap into the strap hole. (Bottom side) Strap hole Push in Rivet 3 ViewSonic PJ510 Lens cap Strap ring Strap Pull 2 Put one piece of lens cap, as the right drawing.
Strap Rivet 3 Push the rivet into the groove on rivet, as the right drawing. Part Names The Projector Zoom knob Focus ring Lens Air filter cover (An air filter is inside) Remote sensor Elevator button Lens cap Elevator feet Projector (Front/Right) Fastening The Lens Cap To avoid losing, please fasten the lens cap to the projector using the strap. 1 Fix the strap to the strap ring of the strap into the strap hole. (Bottom side) Strap hole Push in Rivet 3 ViewSonic PJ510 Lens cap Strap ring Strap Pull 2 Put one piece of lens cap, as the right drawing.
User Manual
Page 15
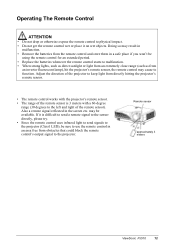
... and store them in the screen etc. Remote sensor approximately 3 meters ViewSonic PJ510 12 Adjust the direction of the projector to the left and right of the remote sensor). may result in malfunction. • Remove the batteries from directly hitting the projector's remote sensor. • The remote control works with the projector's remote sensor. • The range of the...
... and store them in the screen etc. Remote sensor approximately 3 meters ViewSonic PJ510 12 Adjust the direction of the projector to the left and right of the remote sensor). may result in malfunction. • Remove the batteries from directly hitting the projector's remote sensor. • The remote control works with the projector's remote sensor. • The range of the...
User Manual
Page 16
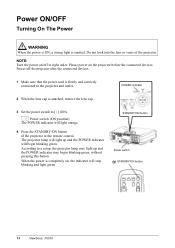
... indicator will begin blinking green, without pressing this button. According to the projector and outlet. Do not look into the lens or vents of the projector or the remote control. STANDBY/ON button Power switch STANDBY/ON button 13 ViewSonic PJ510 The projector lamp will light up and the POWER indicator may light up and...
... indicator will begin blinking green, without pressing this button. According to the projector and outlet. Do not look into the lens or vents of the projector or the remote control. STANDBY/ON button Power switch STANDBY/ON button 13 ViewSonic PJ510 The projector lamp will light up and the POWER indicator may light up and...
User Manual
Page 17
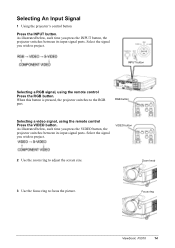
... time you wish to focus the picture. VIDEO button 2 Use the zoom ring to the RGB port. Zoom knob 3 Use the focus ring to project. Focus ring ViewSonic PJ510 14 Selecting An Input Signal 1 Using the projector's control button Press the INPUT button. Select... the signal you press the VIDEO button, the projector switches between its input signal ports. RGB button Selecting a video signal, using the remote control Press the RGB...
... time you wish to focus the picture. VIDEO button 2 Use the zoom ring to the RGB port. Zoom knob 3 Use the focus ring to project. Focus ring ViewSonic PJ510 14 Selecting An Input Signal 1 Using the projector's control button Press the INPUT button. Select... the signal you press the VIDEO button, the projector switches between its input signal ports. RGB button Selecting a video signal, using the remote control Press the RGB...
User Manual
Page 18
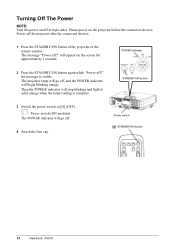
... is visible. Turning Off The Power NOTE: Turn the power on the projector before the connected devices. The message "Power off ?" Power switch STANDBY/ON button 15 ViewSonic PJ510 POWER indicator 2 Press the STANDBY/ON button again while "Power off ?" The projector lamp will go off, and the POWER indicator will go off... light to [O] (OFF). Then the POWER indicator will appear on the screen for approximately 5 seconds. Power off in right order. Please power on /off the projector after the connected devices. 1 Press the STANDBY/ON button of the...
... is visible. Turning Off The Power NOTE: Turn the power on the projector before the connected devices. The message "Power off ?" Power switch STANDBY/ON button 15 ViewSonic PJ510 POWER indicator 2 Press the STANDBY/ON button again while "Power off ?" The projector lamp will go off, and the POWER indicator will go off... light to [O] (OFF). Then the POWER indicator will appear on the screen for approximately 5 seconds. Power off in right order. Please power on /off the projector after the connected devices. 1 Press the STANDBY/ON button of the...
User Manual
Page 22
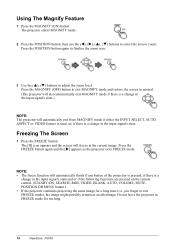
... • The freeze function will freeze at the current image. you forget to zoom. Do not leave the projector in the input signal's state. Operating (continued) 19 ViewSonic PJ510 Freezing The Screen 1 Press the FREEZE button The [II] icon appears and the screen will automatically finish ... in the input signal's state and or if the following functions are pressed on the remote control. (STANBY/ON, SEARCH, RGB, VIDEO, BLANK, AUTO, VOLUME, MUTE, POSITION OR MENU button.) • If the projector continues projecting the same image for too long. Press the FREEZE button again and the...
... • The freeze function will freeze at the current image. you forget to zoom. Do not leave the projector in the input signal's state. Operating (continued) 19 ViewSonic PJ510 Freezing The Screen 1 Press the FREEZE button The [II] icon appears and the screen will automatically finish ... in the input signal's state and or if the following functions are pressed on the remote control. (STANBY/ON, SEARCH, RGB, VIDEO, BLANK, AUTO, VOLUME, MUTE, POSITION OR MENU button.) • If the projector continues projecting the same image for too long. Press the FREEZE button again and the...


