User Guide
Page 8
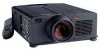
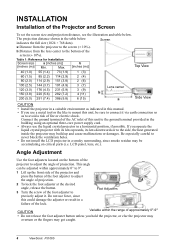
... may get caught. 6 ViewSonic PJ1065 LCD panel, lens, etc.). Be especially careful to mount this could damage the adjuster or result in the table below . The projection distance shown in a failure of the lock. INSTALLATION Installation of the Projector and Screen To set the... sure to connect it . If you use a metal tool or the like to never block the ventilation holes. • Do not install the LCD projector in a smoky surrounding, since this unit, be accumulating on the bottom of projection. Max. Table 1: Reference for Installation Screen size a [inches ...
... may get caught. 6 ViewSonic PJ1065 LCD panel, lens, etc.). Be especially careful to mount this could damage the adjuster or result in the table below . The projection distance shown in a failure of the lock. INSTALLATION Installation of the Projector and Screen To set the... sure to connect it . If you use a metal tool or the like to never block the ventilation holes. • Do not install the LCD projector in a smoky surrounding, since this unit, be accumulating on the bottom of projection. Max. Table 1: Reference for Installation Screen size a [inches ...
User Guide
Page 10
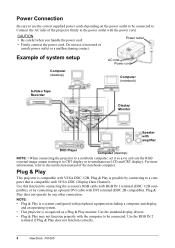
... with the power cord. Use the RGB IN 2 terminal if Plug & Play does not function correctly. 8 ViewSonic PJ1065 Power outlet Example of the projector firmly to simultaneous LCD and CRT display). Do not use the correct supplied power cords depending on the power outlet to the instruction manual... of the notebook computer. Plug & Play This projector is recognized as to activate the RGB external image ...
... with the power cord. Use the RGB IN 2 terminal if Plug & Play does not function correctly. 8 ViewSonic PJ1065 Power outlet Example of the projector firmly to simultaneous LCD and CRT display). Do not use the correct supplied power cords depending on the power outlet to the instruction manual... of the notebook computer. Plug & Play This projector is recognized as to activate the RGB external image ...
User Guide
Page 11
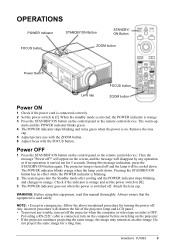
... and changes to [0]. 3 The POWER indicator goes out when the power is switched off and the lamp will shorten the life of the projector lamp and LCD panel. • To prevent any operation or if no effect while the POWER indicator is OFF. Check if the indicator is orange and...The warm-up starts and the POWER indicator blinks green. 4 The POWER indicator stops blinking and turns green when the power is used safely. ViewSonic PJ1065 9 During this manual thoroughly. Attach the lens cap. Always ensure that the equipment is on the control panel or the remote control device.
... and changes to [0]. 3 The POWER indicator goes out when the power is switched off and the lamp will shorten the life of the projector lamp and LCD panel. • To prevent any operation or if no effect while the POWER indicator is OFF. Check if the indicator is orange and...The warm-up starts and the POWER indicator blinks green. 4 The POWER indicator stops blinking and turns green when the power is used safely. ViewSonic PJ1065 9 During this manual thoroughly. Attach the lens cap. Always ensure that the equipment is on the control panel or the remote control device.


