User Guide
Page 2
Contents Product Registration...2 Important Product Safety Instructions 3 Antenna Installation Instructions 4 Cleaning the LCD ...4 Getting Started Package Contents ...5 Front View of the Product 6 Card Reader...7 Rear View of the Product 8 Remote Control ...9 Notes on the Remote Control...11 Teletext...11 Installation ...12 OSD Functions Source Input: TV/AV/S-video 15 Appendix Specifications ...25 Troubleshooting...27 Customer Support ...28 Limited Warranty ...29 Safety Guidelines ...30 ViewSonic N3200w 1
Contents Product Registration...2 Important Product Safety Instructions 3 Antenna Installation Instructions 4 Cleaning the LCD ...4 Getting Started Package Contents ...5 Front View of the Product 6 Card Reader...7 Rear View of the Product 8 Remote Control ...9 Notes on the Remote Control...11 Teletext...11 Installation ...12 OSD Functions Source Input: TV/AV/S-video 15 Appendix Specifications ...25 Troubleshooting...27 Customer Support ...28 Limited Warranty ...29 Safety Guidelines ...30 ViewSonic N3200w 1
User Guide
Page 6
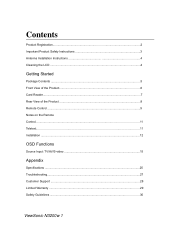
Getting Started Congratulations on your purchase of a ViewSonic LCD TV display. Package Contents Please confirm that the following accessories are present when you unpack the box: • LCD TV • Remote Control (batteries included) • Power Cord • Quick Start Guide • User Guide • Speakers x 2 • SCART Cable x 1 (For Europe) • SCART Adapters x 2 (For Asia Pacific) Save the original box and all packaging material for future shipping needs. Important!
Getting Started Congratulations on your purchase of a ViewSonic LCD TV display. Package Contents Please confirm that the following accessories are present when you unpack the box: • LCD TV • Remote Control (batteries included) • Power Cord • Quick Start Guide • User Guide • Speakers x 2 • SCART Cable x 1 (For Europe) • SCART Adapters x 2 (For Asia Pacific) Save the original box and all packaging material for future shipping needs. Important!
User Guide
Page 7
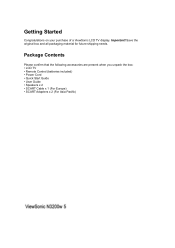
SOURCES Switch between display input sources. 5. CH ▼ /▲ Changes the channel. 8. A green light indicates that it is on and off . 1 ViewSonic N3200w 6 VOL +/- MENU Display menu screen. SD/MUMsCedSMforMcShanging the volume. 4 7. HEADPHONE MENU VOL CH POWER SOURCES CF 6. HEADPHONE Used for connecting headphones. 4. POWER 5 8 7 6 Turns the TV on and red that TV is off . Front View of the Product 1.SPEAKERS Audio output. 2.MEMORY CARD READER Slots to insert flash memory cards (CF, SD/MMC, MS, SMC). 3.
SOURCES Switch between display input sources. 5. CH ▼ /▲ Changes the channel. 8. A green light indicates that it is on and off . 1 ViewSonic N3200w 6 VOL +/- MENU Display menu screen. SD/MUMsCedSMforMcShanging the volume. 4 7. HEADPHONE MENU VOL CH POWER SOURCES CF 6. HEADPHONE Used for connecting headphones. 4. POWER 5 8 7 6 Turns the TV on and red that TV is off . Front View of the Product 1.SPEAKERS Audio output. 2.MEMORY CARD READER Slots to insert flash memory cards (CF, SD/MMC, MS, SMC). 3.
User Guide
Page 9
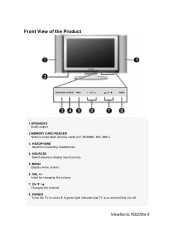
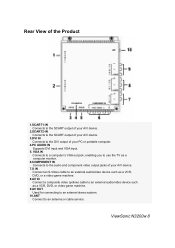
... or portable computer. 4.PC AUDIO IN Supports DVI input and VGA input. 5. VGA IN Connects to a computer's VGA out jack, enabling you to use the TV as a VCR, DVD, or video game machine. 9.AV OUT Used for connecting to an external stereo system. 10.ANT Connect to the audio and component... IN Connect a composite video (yellow) cable to an external audio/video device such as a computer monitor. 6.COMPONENT IN Connects to an antenna or cable service. 2 3 8 ViewSonic N3200w 8
... or portable computer. 4.PC AUDIO IN Supports DVI input and VGA input. 5. VGA IN Connects to a computer's VGA out jack, enabling you to use the TV as a VCR, DVD, or video game machine. 9.AV OUT Used for connecting to an external stereo system. 10.ANT Connect to the audio and component... IN Connect a composite video (yellow) cable to an external audio/video device such as a computer monitor. 6.COMPONENT IN Connects to an antenna or cable service. 2 3 8 ViewSonic N3200w 8
User Guide
Page 11
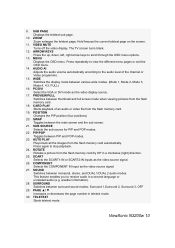
...the sub source for PIP and POP modes. 22. PIP/POP Toggles between various wide modes. (Mode 1, Mode 2, Mode 3, Mode 4, 4:3, FULL) 16. The TV screen turns blank. 12. SWAP Toggles between thumbnail and full screen mode when viewing pictures from the flash memory card by 90º in a clockwise.... TELETEXT Starts teletext mode. VIDEO MUTE Turns off the video display. AUDIO AI Adjusts the audio volume automatically according to stop playback. 24. ViewSonic N3200w 10 PC/DVI Select the VGA or DVI mode as the video display source. 17. Press again to the audio level of an audio or...
...the sub source for PIP and POP modes. 22. PIP/POP Toggles between various wide modes. (Mode 1, Mode 2, Mode 3, Mode 4, 4:3, FULL) 16. The TV screen turns blank. 12. SWAP Toggles between thumbnail and full screen mode when viewing pictures from the flash memory card by 90º in a clockwise.... TELETEXT Starts teletext mode. VIDEO MUTE Turns off the video display. AUDIO AI Adjusts the audio volume automatically according to stop playback. 24. ViewSonic N3200w 10 PC/DVI Select the VGA or DVI mode as the video display source. 17. Press again to the audio level of an audio or...
User Guide
Page 12
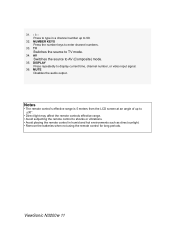
... source to AV (Composite) mode. 35. AV Switches the source to TV mode. 34. MUTE Disables the audio output. Notes • The remote control's effective range is 5 meters from the LCD screen at an angle of up to ±30°. • Direct light may affect the remote ... humid and hot environments such as direct sunlight. • Remove the batteries when not using the remote control for long periods. Press to 99. 32. ViewSonic N3200w 11 31. - /- DISPLAY Press repeatedly to enter channel numbers. 33. NUMBER KEYS Press the number keys to display current time, channel number,...
... source to AV (Composite) mode. 35. AV Switches the source to TV mode. 34. MUTE Disables the audio output. Notes • The remote control's effective range is 5 meters from the LCD screen at an angle of up to ±30°. • Direct light may affect the remote ... humid and hot environments such as direct sunlight. • Remove the batteries when not using the remote control for long periods. Press to 99. 32. ViewSonic N3200w 11 31. - /- DISPLAY Press repeatedly to enter channel numbers. 33. NUMBER KEYS Press the number keys to display current time, channel number,...
User Guide
Page 13
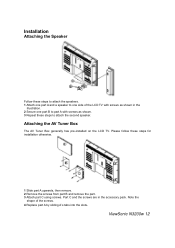
... the screws are in the illustration. 2 Secure one side of the screws. 4 Replace part A by sliding A's tabs into the slots. Note the shape of the LCD TV with screws as shown in the accessory pack. Please follow these steps to part A with screws as shown. 3 Repeat these steps for installation otherwise. 1 Slide... A and a speaker to one part B to attach the second speaker. Attaching the AV Tuner Box The AV Tuner Box generally has pre-installed on the LCD TV. ViewSonic N3200w 12
... the screws are in the illustration. 2 Secure one side of the screws. 4 Replace part A by sliding A's tabs into the slots. Note the shape of the LCD TV with screws as shown in the accessory pack. Please follow these steps to part A with screws as shown. 3 Repeat these steps for installation otherwise. 1 Slide... A and a speaker to one part B to attach the second speaker. Attaching the AV Tuner Box The AV Tuner Box generally has pre-installed on the LCD TV. ViewSonic N3200w 12
User Guide
Page 15
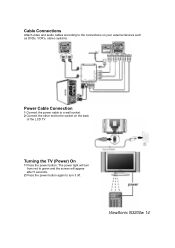
ViewSonic N3200w 14 Cable Connections Attach video and audio cables according to the connections on your external devices such as DVDs, VCR's, stereo systems. Power Cable Connection 1 Connect the power cable to a wall socket. 2 Connect the other end to turn it off. The power light will turn from red to green and the screen will appear after 5 seconds. 2 Press the power button again to the socket on the back of the LCD TV Turning the TV (Power) On 1 Press the power button.
ViewSonic N3200w 14 Cable Connections Attach video and audio cables according to the connections on your external devices such as DVDs, VCR's, stereo systems. Power Cable Connection 1 Connect the power cable to a wall socket. 2 Connect the other end to turn it off. The power light will turn from red to green and the screen will appear after 5 seconds. 2 Press the power button again to the socket on the back of the LCD TV Turning the TV (Power) On 1 Press the power button.
User Guide
Page 16
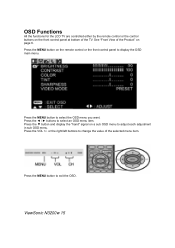
... the functions for the LCD TV are controlled either by the remote control or the control buttons on the front control panel at bottom of the Product" on page 6. ViewSonic N3200w 15 Press the MENU button on a sub OSD menu to display the OSD main menu. See "Front View of the TV. Press the MENU...
... the functions for the LCD TV are controlled either by the remote control or the control buttons on the front control panel at bottom of the Product" on page 6. ViewSonic N3200w 15 Press the MENU button on a sub OSD menu to display the OSD main menu. See "Front View of the TV. Press the MENU...
User Guide
Page 17
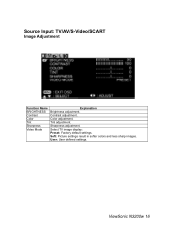
Soft: Picture settings result in softer colors and less sharp images. Tint adjustment. Select TV image display: Preset: Factory default settings. Sharpness adjustment. Source Input: TV/AV/S-Video/SCART Image Adjustment Function Name BRIGHTNESS Contrast Color Tint Sharpness Video Mode Explanation Brightness adjustment. ViewSonic N3200w 16 Color adjustment. Contrast adjustment. User: User defined settings.
Soft: Picture settings result in softer colors and less sharp images. Tint adjustment. Select TV image display: Preset: Factory default settings. Sharpness adjustment. Source Input: TV/AV/S-Video/SCART Image Adjustment Function Name BRIGHTNESS Contrast Color Tint Sharpness Video Mode Explanation Brightness adjustment. ViewSonic N3200w 16 Color adjustment. Contrast adjustment. User: User defined settings.
User Guide
Page 20
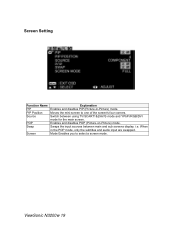
Moves the mini-screen to select a screen mode. Enables and disables POP (Picture-on-Picture) mode. ViewSonic N3200w 19 Switch between main and sub screens display. When in -Picture) mode. Mode Enables you to one of the screen's four corners. Screen Setting Function Name PIP PIP Position Source POP Swap Screen Explanation Enables and disables PIP (Picture-in the POP mode, only the subtitles and audio input are swapped. Swaps the input sources between using TV/SCART1&2/AV/S mode and YPbPr/RGB/DVI mode for the main screen. i.e.
Moves the mini-screen to select a screen mode. Enables and disables POP (Picture-on-Picture) mode. ViewSonic N3200w 19 Switch between main and sub screens display. When in -Picture) mode. Mode Enables you to one of the screen's four corners. Screen Setting Function Name PIP PIP Position Source POP Swap Screen Explanation Enables and disables PIP (Picture-in the POP mode, only the subtitles and audio input are swapped. Swaps the input sources between using TV/SCART1&2/AV/S mode and YPbPr/RGB/DVI mode for the main screen. i.e.
User Guide
Page 21
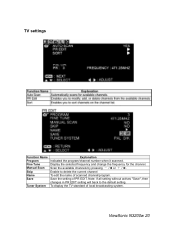
Tuner System To display the TV standard of PR EDIT. TV settings Function Name Explanation Program Indicated the program/channel number when it scanned. ViewSonic N3200w 20 Skip Enable to the default setting. Fine Tune Display the selected frequency and change the frequency for the channel. Save Save the setting of ...
Tuner System To display the TV standard of PR EDIT. TV settings Function Name Explanation Program Indicated the program/channel number when it scanned. ViewSonic N3200w 20 Skip Enable to the default setting. Fine Tune Display the selected frequency and change the frequency for the channel. Save Save the setting of ...
User Guide
Page 26
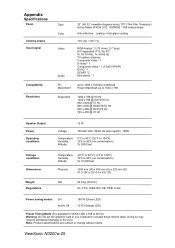
Appendix Specifications Panel Viewing angles Input signal Compatibility Resolution Type Color Video Audio 32" (full 32" viewable diagonal area), TFT (Thin Film Transistor), Active Matrix WXGA LCD, 1280RGB * 768 vertical stripe Anti-reflective coating + Anti-glare coating 170° (H) / 170° (V) RGB Analog *... 1 (75 ohms, 0.7 Vp-p) H/V separated (TTL) for PC fh: 30-70 KHz, fv: 50-85 Hz TV ...
Appendix Specifications Panel Viewing angles Input signal Compatibility Resolution Type Color Video Audio 32" (full 32" viewable diagonal area), TFT (Thin Film Transistor), Active Matrix WXGA LCD, 1280RGB * 768 vertical stripe Anti-reflective coating + Anti-glare coating 170° (H) / 170° (V) RGB Analog *... 1 (75 ohms, 0.7 Vp-p) H/V separated (TTL) for PC fh: 30-70 KHz, fv: 50-85 Hz TV ...
User Guide
Page 27
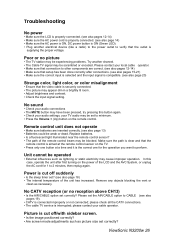
...the unit has increased. please check all the CATV connections. • The cable TV service is interrupted; please contact your local cable operator. • Make sure that the outlet is supplying the proper voltage. ViewSonic N3200w 26 Please set ? (see also page 18) • The internal temperature of...set to other components are inserted correctly. (see also page 13) • Batteries could be blocked. Troubleshooting No power • Make sure the LCD is properly connected. (see also pages 12-14) • Make sure the AC power cord is properly connected. (see also page 14) ...
...the unit has increased. please check all the CATV connections. • The cable TV service is interrupted; please contact your local cable operator. • Make sure that the outlet is supplying the proper voltage. ViewSonic N3200w 26 Please set ? (see also page 18) • The internal temperature of...set to other components are inserted correctly. (see also page 13) • Batteries could be blocked. Troubleshooting No power • Make sure the LCD is properly connected. (see also pages 12-14) • Make sure the AC power cord is properly connected. (see also page 14) ...
User Guide
Page 29
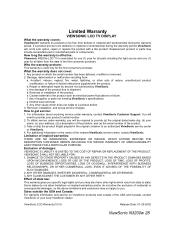
... NOT BE LIABLE FOR: 1. ANY CLAIM AGAINST THE CUSTOMER BY ANY OTHER PARTY. ViewSonic LCD Warranty (V3.0) Release Date: 01-29-2002 ViewSonic N3200w 28 Limited Warranty VIEWSONIC LCD TV DISPLAY What the warranty covers: ViewSonic® warrants its products to be free from defects in material or workmanship during the warranty period. Damage, deterioration or malfunction resulting...
... NOT BE LIABLE FOR: 1. ANY CLAIM AGAINST THE CUSTOMER BY ANY OTHER PARTY. ViewSonic LCD Warranty (V3.0) Release Date: 01-29-2002 ViewSonic N3200w 28 Limited Warranty VIEWSONIC LCD TV DISPLAY What the warranty covers: ViewSonic® warrants its products to be free from defects in material or workmanship during the warranty period. Damage, deterioration or malfunction resulting...


