User Guide
Page 2
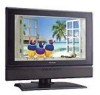
... Registration 3 Antenna Installation Instructions 4 Quick Installation 5 Using the Display (PC 6 PREPARTION 7 OPERATING INSTRUCTIONS Use of the remote control 9 To use the menus 19 Main menu 19 CONNECT PERIPHERAL EQUIPMENT Front Panel Control Knobs 26 Preparation 26 Video recorder 27 Camera, camcorder, Video Game set 28 DVD player 28 Digital Set TOP box 29 Headphone 30 Tips 30 PRODUCT SPECIFICATION Compatibility Modes 33 BEFORE CALLING SERVICE Customer support 35 Limited Warranty 36 SYMBOL SA 1965 SYMBOL DEFINITION DANGEROUS VOLTAGE: The lightning flash with the...
... Registration 3 Antenna Installation Instructions 4 Quick Installation 5 Using the Display (PC 6 PREPARTION 7 OPERATING INSTRUCTIONS Use of the remote control 9 To use the menus 19 Main menu 19 CONNECT PERIPHERAL EQUIPMENT Front Panel Control Knobs 26 Preparation 26 Video recorder 27 Camera, camcorder, Video Game set 28 DVD player 28 Digital Set TOP box 29 Headphone 30 Tips 30 PRODUCT SPECIFICATION Compatibility Modes 33 BEFORE CALLING SERVICE Customer support 35 Limited Warranty 36 SYMBOL SA 1965 SYMBOL DEFINITION DANGEROUS VOLTAGE: The lightning flash with the...

User Guide
Page 3
... or relocate the receiving antenna. •ɹ Increase the separation between the equipment and receiver. •ɹ Connect the equipment into an outlet on a circuit different from that interference will not occur in a residential installation. If this device. FCC Warning To assure continued FCC compliance, the user must use grounded power supply cord and the cables which the receiver is encouraged to...
... or relocate the receiving antenna. •ɹ Increase the separation between the equipment and receiver. •ɹ Connect the equipment into an outlet on a circuit different from that interference will not occur in a residential installation. If this device. FCC Warning To assure continued FCC compliance, the user must use grounded power supply cord and the cables which the receiver is encouraged to...

User Guide
Page 4
... the power-supply cord or plug is damaged, if liquid is easily accessible. 11. A polarized plug has two blades with the cart, stand, tripod, bracket, or table specified by the manufacturer. 12. Unplug this guide for long periods of the polarized or grounding-type plug. Keep these instructions completely before using the equipment. 2. Do not install near the equipment so that produce heat. 9. ViewSonic N2050w 2 Use only with...
... the power-supply cord or plug is damaged, if liquid is easily accessible. 11. A polarized plug has two blades with the cart, stand, tripod, bracket, or table specified by the manufacturer. 12. Unplug this guide for long periods of the polarized or grounding-type plug. Keep these instructions completely before using the equipment. 2. Do not install near the equipment so that produce heat. 9. ViewSonic N2050w 2 Use only with...
User Guide
Page 6
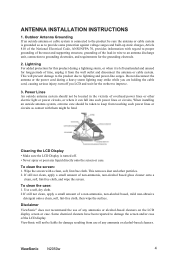
.... ANTENNA INSTALLATION INSTRUCTIONS 1. Outdoor Antenna Grounding If an outside antenna system, extreme care should not be fatal. turn off . • Never spray or pour any ammonia or alcohol-based cleaners on the LCD display screen or case. This removes dust and other electric light or power circuits, or where it can fall into such power lines or circuits, When installing an outside antenna or cable system is connected...
.... ANTENNA INSTALLATION INSTRUCTIONS 1. Outdoor Antenna Grounding If an outside antenna system, extreme care should not be fatal. turn off . • Never spray or pour any ammonia or alcohol-based cleaners on the LCD display screen or case. This removes dust and other electric light or power circuits, or where it can fall into such power lines or circuits, When installing an outside antenna or cable system is connected...
User Guide
Page 7
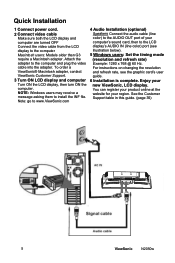
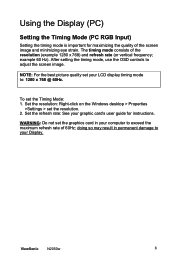
... LCD display, then turn ON the computer. For instructions on changing the resolution and refresh rate, see illustration below). 5 Windows users: Set the timing mode (resolution and refresh rate) Example: 1280 x 768 @ 60 Hz. Enjoy your region. Quick Installation 1 Connect power cord. 2 Connect video cable Make sure both the LCD display and computer are turned OFF Connect the video cable from the LCD display to install the INF file. See the Customer Support table in this guide. (page 35) 5 ViewSonic N2050w NOTE: Windows users...
... LCD display, then turn ON the computer. For instructions on changing the resolution and refresh rate, see illustration below). 5 Windows users: Set the timing mode (resolution and refresh rate) Example: 1280 x 768 @ 60 Hz. Enjoy your region. Quick Installation 1 Connect power cord. 2 Connect video cable Make sure both the LCD display and computer are turned OFF Connect the video cable from the LCD display to install the INF file. See the Customer Support table in this guide. (page 35) 5 ViewSonic N2050w NOTE: Windows users...
User Guide
Page 8
... setting the timing mode, use the OSD controls to : 1280 x 768 @ 60Hz. Set the refresh rate: See your Display. NOTE: For the best picture quality set the graphics card in permanent damage to exceed the maximum refresh rate of the resolution (example 1280 x 768) and refresh rate (or vertical frequency; To set the resolution. 2. ViewSonic N2050w 6 WARNING: Do not set your computer to your graphic card's user guide...
... setting the timing mode, use the OSD controls to : 1280 x 768 @ 60Hz. Set the refresh rate: See your Display. NOTE: For the best picture quality set the graphics card in permanent damage to exceed the maximum refresh rate of the resolution (example 1280 x 768) and refresh rate (or vertical frequency; To set the resolution. 2. ViewSonic N2050w 6 WARNING: Do not set your computer to your graphic card's user guide...
User Guide
Page 11
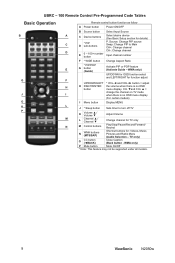
... be supported under all models. 9 ViewSonic N2050w WMA only) UP/DOWN for OSD function select and LEFT/RIGHT for function adjust UP/DOWN/LEFT * VOL-◄ and VOL+► button = adjust H RIGHT/ENTER the volume when there is no OSD button menu display. UBRC - 100 Remote Control Pre-Programmed Code Tables Basic Operation B A C D E G F H J I Menu button Display MENU J * Sleep button Sets timer to Main CH+: Change channel CH-: Change channel E 0 - 100+ number button Input channel number F * WIDE button Change Aspect Ratio * PIP/POP G button (Guide) Activate PIP or...
... be supported under all models. 9 ViewSonic N2050w WMA only) UP/DOWN for OSD function select and LEFT/RIGHT for function adjust UP/DOWN/LEFT * VOL-◄ and VOL+► button = adjust H RIGHT/ENTER the volume when there is no OSD button menu display. UBRC - 100 Remote Control Pre-Programmed Code Tables Basic Operation B A C D E G F H J I Menu button Display MENU J * Sleep button Sets timer to Main CH+: Change channel CH-: Change channel E 0 - 100+ number button Input channel number F * WIDE button Change Aspect Ratio * PIP/POP G button (Guide) Activate PIP or...
User Guide
Page 12
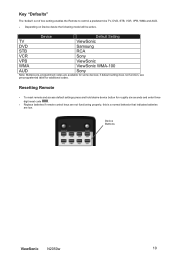
... Buttons ViewSonic N2050w 10 Key "Defaults" The 'default' out of box setting enables the Remote to control a predetermine TV, DVD, STB, VCR, VPB, WMA and AUD. • Depending on Device desire the following model will be active. if default setting does not function, see pre-programmed table for some devices; Resetting Remote • To reset remote and access default settings press and hold desire device button for roughly six seconds and enter three digit reset code 000...
... Buttons ViewSonic N2050w 10 Key "Defaults" The 'default' out of box setting enables the Remote to control a predetermine TV, DVD, STB, VCR, VPB, WMA and AUD. • Depending on Device desire the following model will be active. if default setting does not function, see pre-programmed table for some devices; Resetting Remote • To reset remote and access default settings press and hold desire device button for roughly six seconds and enter three digit reset code 000...

User Guide
Page 13
... digit is used to control a Sony DVD player with a 006 code under the AUX key a 2 must be added in the beginning of the pre-programmed code making it 3006. 11 ViewSonic N2050w LED will control. LED Device Buttons Pre-Programmed Code Notes Record the three digit codes for approximately six seconds. AUX Button TV = 1 DVD = 2 STB = 3 VCR = 4 VPB = 5 WMA = 6 AUD = 7 For example, to operate a second TV, DVD, STB, VCR, VPB, WMA, and AUD. Basic Setup 1 Power...
... digit is used to control a Sony DVD player with a 006 code under the AUX key a 2 must be added in the beginning of the pre-programmed code making it 3006. 11 ViewSonic N2050w LED will control. LED Device Buttons Pre-Programmed Code Notes Record the three digit codes for approximately six seconds. AUX Button TV = 1 DVD = 2 STB = 3 VCR = 4 VPB = 5 WMA = 6 AUD = 7 For example, to operate a second TV, DVD, STB, VCR, VPB, WMA, and AUD. Basic Setup 1 Power...

User Guide
Page 24
... all programs to block program viewing based on OSD then enter 4 digits of program and by the broadcaster. It is to allow all program viewing for a time period. OFF ADJUST A. The default setting is also possible to "U" U: Unblock B: Block ADJUST ViewSonic N2050w 22 If you enter an incorrect pin number "Incorrect" message will be defined. One is TV Guidelines another one is the parental control function (V-chip). V-CHIP SETUP Select...
... all programs to block program viewing based on OSD then enter 4 digits of program and by the broadcaster. It is to allow all program viewing for a time period. OFF ADJUST A. The default setting is also possible to "U" U: Unblock B: Block ADJUST ViewSonic N2050w 22 If you enter an incorrect pin number "Incorrect" message will be defined. One is TV Guidelines another one is the parental control function (V-chip). V-CHIP SETUP Select...
User Guide
Page 26
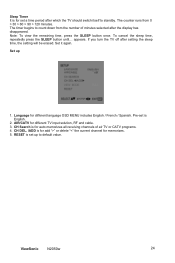
... different language OSD MENU includes English / French / Spanish. To cancel the sleep time, repeatedly press the SLEEP button until... Note: To view the remaining time, press the SLEEP button once. The timer begins to standby. The counter runs from the number of air TV or CATV programs. 4. If you turn the TV off after the display has disappeared. Set it again. AIR/CATV for different TV input solution, RF and cable. 3.
... different language OSD MENU includes English / French / Spanish. To cancel the sleep time, repeatedly press the SLEEP button until... Note: To view the remaining time, press the SLEEP button once. The timer begins to standby. The counter runs from the number of air TV or CATV programs. 4. If you turn the TV off after the display has disappeared. Set it again. AIR/CATV for different TV input solution, RF and cable. 3.
User Guide
Page 28
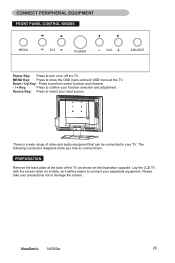
... TV as it will be connected to confirm your input source. Down / Up Key: Press to perform select function and channel. - / + Key: Press to your precautions not to connect them. PREPARATION Remove the back plate at the TV. MENU Key: Press to turn on the illustration opposite. CONNECT PERIPHERAL EQUIPMENT FRONT PANEL CONTROL KNOBS Power Key: Press to show you how to damage the screen. ViewSonic N2050w...
... TV as it will be connected to confirm your input source. Down / Up Key: Press to perform select function and channel. - / + Key: Press to your precautions not to connect them. PREPARATION Remove the back plate at the TV. MENU Key: Press to turn on the illustration opposite. CONNECT PERIPHERAL EQUIPMENT FRONT PANEL CONTROL KNOBS Power Key: Press to show you how to damage the screen. ViewSonic N2050w...

User Guide
Page 29
... the Antenna input of your VCR has an S-VHS video jack: For improved picture quality, connect a S-Video cable with the S-VIDEO input on the TV instead of connecting the VCR to the VIDEO port of your VCR can be connected to the RF IN port of AV2. Connect another RF cable from your VCR. 2. Insert videotape in the VCR and press the PLAY button. 27 ViewSonic N2050w If you also connect the Video, Audio...
... the Antenna input of your VCR has an S-VHS video jack: For improved picture quality, connect a S-Video cable with the S-VIDEO input on the TV instead of connecting the VCR to the VIDEO port of your VCR can be connected to the RF IN port of AV2. Connect another RF cable from your VCR. 2. Insert videotape in the VCR and press the PLAY button. 27 ViewSonic N2050w If you also connect the Video, Audio...
User Guide
Page 30
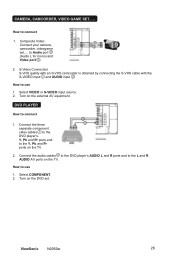
...ports on the external AV equipment. DVD PLAYER How to Audio port (Audio L for mono) and Video port . 2. How to the DVD player's. Turn on the TV. 2. Select VIDEO or S-VIDEO input source. 2. How to the L and R AUDIO AV ports on the DVD set ,... ViewSonic N2050w 28 S-Video Connection S-VHS quality with an S-VHS camcorder is obtained by connecting the S-VHS cable with the S-VIDEO input and AUDIO input . Turn on the TV. Connect the audio cables to the DVD player's AUDIO L and R ports and to use 1. Select COMPONENT. 2. Connect the three separate component video cables...
...ports on the external AV equipment. DVD PLAYER How to Audio port (Audio L for mono) and Video port . 2. How to the DVD player's. Turn on the TV. 2. Select VIDEO or S-VIDEO input source. 2. How to the L and R AUDIO AV ports on the DVD set ,... ViewSonic N2050w 28 S-Video Connection S-VHS quality with an S-VHS camcorder is obtained by connecting the S-VHS cable with the S-VIDEO input and AUDIO input . Turn on the TV. Connect the audio cables to the DVD player's AUDIO L and R ports and to use 1. Select COMPONENT. 2. Connect the three separate component video cables...
User Guide
Page 31
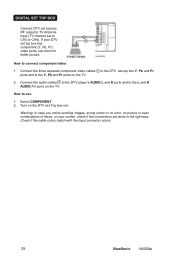
... the cable colors match with the Input connector colors. 29 ViewSonic N2050w DIGITAL SET TOP BOX Connect DTV set top box RF output to TV Antenna input (TV channel set to connect component video: 1. Connect the three separate component video cables to the DTV set-top box Y, Pb and Pr ports and to the Y, Pb and Pr ports on the DTV set-Top box set top box has component (Y, Pb, Pr) video ports, use 1. Turn on the TV. 2. Connect the audio cables to the DTV player's AUDIO L and R ports and to use them for better picture. Select COMPONENT. 2. Warning...
... the cable colors match with the Input connector colors. 29 ViewSonic N2050w DIGITAL SET TOP BOX Connect DTV set top box RF output to TV Antenna input (TV channel set to connect component video: 1. Connect the three separate component video cables to the DTV set-top box Y, Pb and Pr ports and to the Y, Pb and Pr ports on the DTV set-Top box set top box has component (Y, Pb, Pr) video ports, use 1. Turn on the TV. 2. Connect the audio cables to the DTV player's AUDIO L and R ports and to use them for better picture. Select COMPONENT. 2. Warning...

User Guide
Page 32
... To avoid disturbances in green focal areas. The MUTE key on the remote control works on both internal speaker and the earphone. 3. Do not use a clean, damp cloth. Use volume key to be recycled and reused. The earphone jack is located at the rear corner of a rating set via the Parental control menu, also the headphone is blocked because of the TV. 2. Please ensure you...
... To avoid disturbances in green focal areas. The MUTE key on the remote control works on both internal speaker and the earphone. 3. Do not use a clean, damp cloth. Use volume key to be recycled and reused. The earphone jack is located at the rear corner of a rating set via the Parental control menu, also the headphone is blocked because of the TV. 2. Please ensure you...
User Guide
Page 33
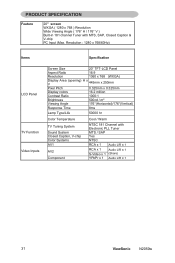
...1 Audio L/R x 1 S-Video x 1 (Share) YPbPr x 1 Audio L/R x 1 31 ViewSonic N2050w Resolution : 1280 x 768/60Hz) Items Specification LCD Panel TV Function Video Inputs Screen Size 20" TFT-LCD Panel Aspect Ratio 16:9 Resolution 1360 x 768 (WXGA) Display V Area (opening) H x 445mm x 250mm Pixel Pitch 0.325mm x 0.325mm Display colors 16.2 million Contrast Ratio 1000:1 Brightness 500cd / m² Viewing Angle 176°(Horizontal)/176°(Vertical) Response Time 8ms Lamp Type/Life 50000 hr Color Temperature Cool / Warm TV Tuning System Sound System Closed Caption...
...1 Audio L/R x 1 S-Video x 1 (Share) YPbPr x 1 Audio L/R x 1 31 ViewSonic N2050w Resolution : 1280 x 768/60Hz) Items Specification LCD Panel TV Function Video Inputs Screen Size 20" TFT-LCD Panel Aspect Ratio 16:9 Resolution 1360 x 768 (WXGA) Display V Area (opening) H x 445mm x 250mm Pixel Pitch 0.325mm x 0.325mm Display colors 16.2 million Contrast Ratio 1000:1 Brightness 500cd / m² Viewing Angle 176°(Horizontal)/176°(Vertical) Response Time 8ms Lamp Type/Life 50000 hr Color Temperature Cool / Warm TV Tuning System Sound System Closed Caption...

User Guide
Page 34
PC Input Audio Output Signal Input PnP compatibility Input frequency Recommended Input Audio Audio Output: L / R Analog: D-Sub 15 pin (detachable cable) DDC 2B Analog: FH: 31.5KHz to 61KHz FV: 56Hz to 75Hz Analog: 1280 x 768 (60Hz) Headphone Mini-jack for stereo (3.5ø) Speaker (built-in): Two 5 watt speakers Headphone Mini-jack for stereo (3.5ø) Line Output (RCA L/R) OSD language English / French / Spanish Table Stand Included Wall Mount Power Environment Panel Tilt VESA 100 x 50 x 50 mm Power Supply AC100V~240V, 50/60Hz Power Consumption
PC Input Audio Output Signal Input PnP compatibility Input frequency Recommended Input Audio Audio Output: L / R Analog: D-Sub 15 pin (detachable cable) DDC 2B Analog: FH: 31.5KHz to 61KHz FV: 56Hz to 75Hz Analog: 1280 x 768 (60Hz) Headphone Mini-jack for stereo (3.5ø) Speaker (built-in): Two 5 watt speakers Headphone Mini-jack for stereo (3.5ø) Line Output (RCA L/R) OSD language English / French / Spanish Table Stand Included Wall Mount Power Environment Panel Tilt VESA 100 x 50 x 50 mm Power Supply AC100V~240V, 50/60Hz Power Consumption
User Guide
Page 36
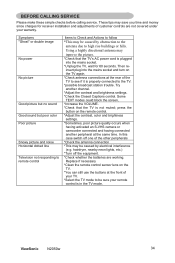
... controls are working. ViewSonic N2050w 34 Symptoms ″Ghost″ or double image No power No picture Good picture but no sound Good sound but poor color Poor picture Snowy picture and noise Horizontal dotted line Television not responding to remote control Items to Check and Actions to follow *This may inprove the picture. *Check that the TV is in the TV mode. press the button on the TV again. *Check antenna connections...
... controls are working. ViewSonic N2050w 34 Symptoms ″Ghost″ or double image No power No picture Good picture but no sound Good sound but poor color Poor picture Snowy picture and noise Horizontal dotted line Television not responding to remote control Items to Check and Actions to follow *This may inprove the picture. *Check that the TV is in the TV mode. press the button on the TV again. *Check antenna connections...
User Guide
Page 38
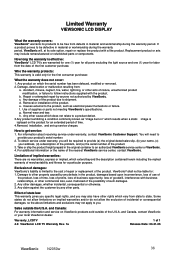
.... What the warranty does not cover: 1. Removal or installation of supplies or parts not meeting ViewSonic's specifications. Limitation of the first customer purchase. Limited Warranty VIEWSONIC LCD DISPLAY What the warranty covers: ViewSonic® warrants its sole option, repair or replace the product with the product. If a product proves to an authorized ViewSonic service center or ViewSonic. 4. Who the warranty protects: This warranty is effective: ViewSonic® LCD TV's are no warranties, express or...
.... What the warranty does not cover: 1. Removal or installation of supplies or parts not meeting ViewSonic's specifications. Limitation of the first customer purchase. Limited Warranty VIEWSONIC LCD DISPLAY What the warranty covers: ViewSonic® warrants its sole option, repair or replace the product with the product. If a product proves to an authorized ViewSonic service center or ViewSonic. 4. Who the warranty protects: This warranty is effective: ViewSonic® LCD TV's are no warranties, express or...


